Installing on Networked Systems
This section provides configuration requirements and guidance for deploying the YubiKey Minidriver (YKMD) in an enterprise environment. The steps provided allow the YubiKey Minidriver to be pushed out to all workstations from a central repository, without requiring administrative rights on the local workstation.
There are two ways to automate installing the YubiKey Minidriver:
Method 1 - Auto-Install via Startup Script
Auto-install using a Startup Script. This is recommended for most environments. Create a startup script that can be pushed out via Group Policy Object (GPO). This automatically installs the YubiKey Minidriver on ALL devices in the computer object OU that the GPO is linked to.
Method 2 - Standard Networked User Install
End user install using Device Manager. This is recommended when the YubiKey Minidriver needs to be available to a large number of users but only installed on an as-needed basis: Create a registry entry on all client workstations with a GPO setting allowing standard users to update the inbox drivers to the YubiKey Minidriver, without requiring an admin to physically touch or access the machine for the install. This way, the users can insert the YubiKey, launch the Device Manager, and automatically update the smart card driver to the latest version of the YubiKey Minidriver.
Note
The version number shown below (4.6.3.252) is only an example. The actual number changes as downloads are updated.
Prepare to Install
Complete the listed tasks before you install the YubiKey Minidriver on your networked machines. This includes:
- Installing via Group Policy Object
- Connecting the Endpoints to the GPO Domain
- Creating the Driver Store
Installing via Group Policy Object
For large deployments, the YubiKey Minidriver can be centrally installed via Group Policy Objects. By leveraging a PowerShell script for the necessary commands and a shared network drive accessible from every client station to distribute the the YubiKey Minidriver files, an Administrator can automate the installation. When creating an installation script, an Administrator needs to ensure they define registry entries for the PUK Policy, the Touch Policy and the Debug Log Policy, as well as installing the INF file directly.
Connecting the Endpoints to the GPO Domain
The process for deploying the the YubiKey Minidriver .cab file requires every endpoint to be connected to the enterprise GPO domain and to have access to a shared directory. For machines where this is not an option, such as those on isolated networks, the YubiKey Minidriver needs to be installed manually.
Creating the Driver Store
The first step to deploying the YubiKey Minidriver is creating a network shared directory for the the YubiKey Minidriver .cab file. If you already have a network share for driver software, we recommend using the existing location. If not, you need to create a shared network folder, which is accessible with read and execute permissions for all users.
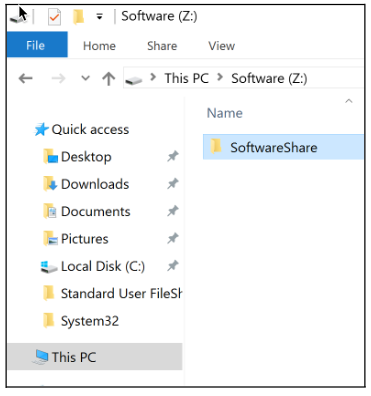
For this example, we create a new folder in the Z:\ drive.
Open File Explorer and browse to
Z:\.Create a new folder, such as: SoftwareShare.
For example:
Inside this folder, create another folder, for example named YKMD. You can build this file structure per your standard naming convention.
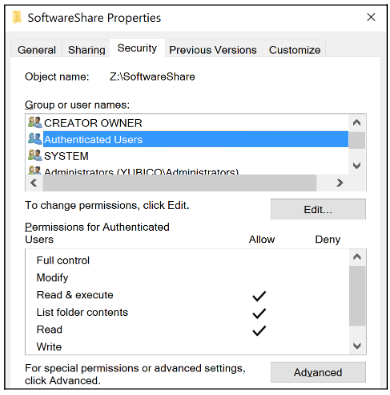
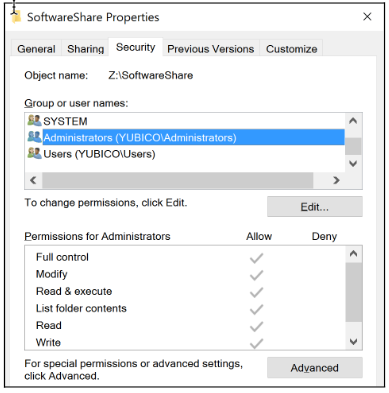
Ensure the read, write, execute permissions on the folder are set as follows:
- Read / Execute for Everyone or Authenticated Users
- Read / Write / Execute for Administrators
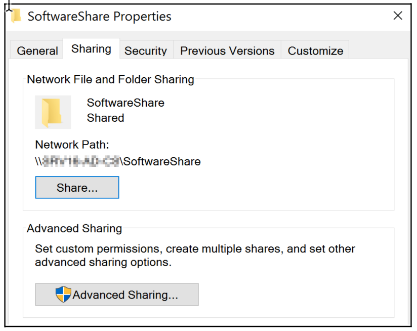
Share network path.
Authenticated users permissions settings.
Administrators permission settings.
Method 1 - Auto-Install via Startup Script
This process creates a PowerShell script for installing the YubiKey Minidriver. This script is run with elevated permissions via GPO. It deploys the YubiKey Minidriver upon startup, and continues to do so until the GPO object is disabled or removed.
Creating the Minidriver Zip File
The PowerShell script deploys the YubiKey Minidriver to the client machines as a zip file.
Download the latest version of the YubiKey Minidriver and prepare it for installation.
Go to Smart card drivers and tools.
Scroll down the page to YubiKey Smart Card Minidriver (Windows).
For automated update installations, use the file name
latestin your filepath.Extract the downloaded CAB file to your preferred location.
This can simply be done via the CLI using the
Expandcommand. For example, to extract the contents to theC:\ykmddirectory, use the command:expand.exe yubikey-minidriver-4.6.3.252.cab -F:* C:\ykmdThe version number,
4.6.3.252, is an example. The actual number changes as downloads are updated.Add the extracted
.cabfile to a zip file namedYKMD.zip.
Creating the PowerShell Script
The PowerShell script used for the install script connects an endpoint to the shared network folder created previously. See Creating the Driver Store.
Copy the the YubiKey Minidriver components to a local directory on the machine and install the YubiKey Minidriver.
Create a PowerShell script with all the following items.
Define the environmental variables at the start of the script.
Copy the
YKMD.zipto a shared folder which users have read permissions to replace the server with name of server that hosts theYKMD.zip.Run the script, using your values.
$server="Server"
$shared_folder = "shared"
$temp = "$env:windir\temp"
$YKMD = "YubiKey-Minidriver-4.6.3.252.cab.sha256"
$DriverPath = "$env:windir\System32\DriverStore\FileRepository"
$destination = "YKMD"
$fullpath = $temp+"\"+$destination
$logdir = "$temp\logs";
$logfile = "yubikey.log"
$logfullpath = $logdir+"\"+$logfile;
New-Item $logdir -ItemType Directory -force;
Start-Transcript -Path $logfullpath -force;
copy-item "\\$server\$shared_folder\YKMD.zip" -Destination $temp -force;
Expand-Archive -Path "$temp\YKMD.zip" -DestinationPath $fullpath -force;
cmd.exe /c expand $fullpath\$YKMD -F:* $fullpath | Out-Null
Get-ChildItem $fullpath -Recurse -Filter "*inf" | ForEach-Object { PNPUtil.exe /add-driver $_.FullName /install }
rundll32.exe setupapi.dll,InstallHinfSection Yubico64_61_Install 132 $fullpath\YKMD.inf

# Remove the comment ``#`` from next line to create the device node or leave the comment to let Windows handle creating the device node when the YubiKey is inserted.
#cmd.exe /c DrvInst.exe "5" "2" "$DriverPath\YKMD.inf_amd64_24989c5c4b9230ad\YKMD.inf" "0" "4e6904753" "0000000000000238" "WinSta0\Default"

Get-Service -Name "Scardsvr" | Set-Service -StartupType Automatic
Stop-Transcript
Where -
YKMD.zipis copied to a shared folder which users have read permissions to replace the server with name of server that hosts theYKMD.zip.folder_nameis replaced with name of shared folder on the network.tempsets the folder location.YKMDadds file_name. The version number,4.6.3.252, is an example. The actual number changes as downloads are updated.DriverPathadds driver path to the environment variable.folder_namereplaces the folder name of destination.Start-Transcriptstarts recording logs. This doesn’t work if the script is run remotely.copy-itemdownloads the YubiKey Minidriver from the shared folder and install.Get-ChildIteminstalls the.infdriver.rundll32.exeimports the registry keys.Get-Serviceenables the Smart Card Service.Stop-Transcriptstops logging.
Save this PowerShell script (
.ps1) on the Windows Server for deployment.
Configuring the GPO
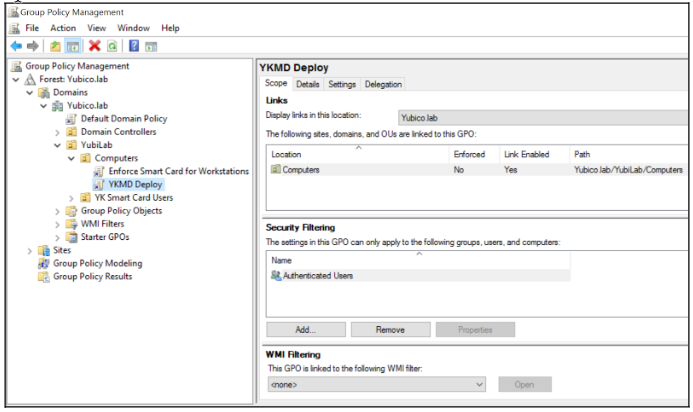
After the installation PowerShell script file is created, create the Group Policy Object to run the script. To do this, create a new GPO and link it to the location of the computer objects which require YubiKey Minidriver.
Click Start > Run > gpmc.msc.
Navigate to your domain and locate the OU for the computer objects.
Right-click and select Create a GPO in this domain and Link it here.
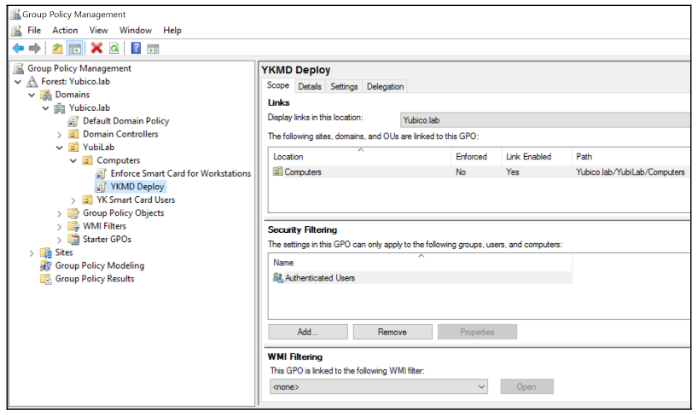
Create a descriptive name for this GPO, such as: YKMD Deploy.
Example:
Editing the the YubiKey Minidriver Deploy GPO
Right-click the new the YubiKey Minidriver Deploy GPO and select Edit.
Expand Computer Configuration > Policies > Windows Settings > Scripts (Startup/Shutdown).
Right-click Startup and select Properties.
Select Add then Browse.
Using another file explorer window, browse to your startup script (
.ps1), then copy and paste the file into the File name field.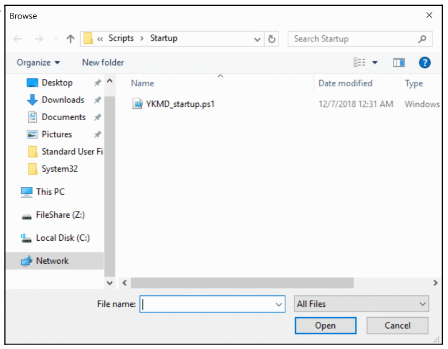
Select the file, then select Open.
With the script in the Script Name field, select OK.
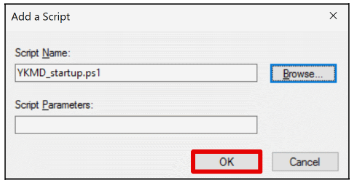
Select OK once more to complete the GPO configuration.
Method 2 - Standard Networked User Install
This process configures endpoints to make the YubiKey Minidriver available to install when the standard user is ready. This does not install the YubiKey Minidriver until the user requests it via the Device Manager.
Preparing the YubiKey Minidriver for Distribution
Download the YubiKey Minidriver from the Yubico Support site.
Scroll down the page to YubiKey Smart Card Minidriver (Windows).
For automated update installations, use the file name
latestin your filepath.Download the latest release of the YubiKey Minidriver.
Extract the downloaded contents:
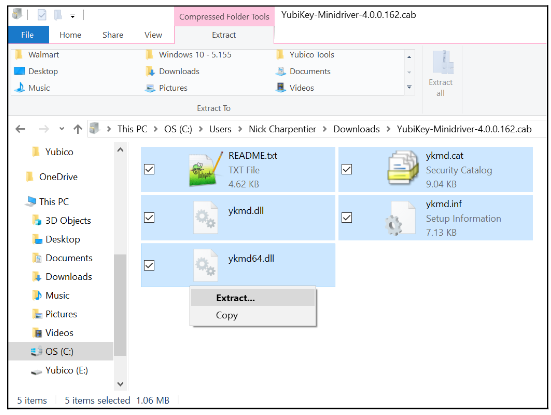
- Browse to your downloads directory.
- Double click the the YubiKey Minidriver
.cabfile to open and view the contents. - Select All.
- Right-click > Extract.
- Select either a local directory or extract directly to the fileshare created in previously. See Creating the Driver Store.
Configuring the GPO
Confirm that the file share is configured and accessible to all client workstations, and that the YubiKey Minidriver is extracted to that directory. Once this is accomplished, proceed to configure the GPO.
The Group Policy Object handles two things:
- Making the client workstations aware of the location of the YubiKey Minidriver. This is accomplished via an updated Registry setting.
- Allowing standard users to install the YubiKey Minidriver without requiring admin privileges. This is accomplished via whitelisting the GUID of the YubiKey Minidriver.
Creating a new GPO
In the location of the computer objects that require the YubiKey Minidriver, create a new GPO and link it.
Click Start > Run > gpmc.msc.
Navigate to your Domain and locate the OU for the computer objects.
Right-click and select Create a GPO in this domain and Link it here.
Create a descriptive name for this GPO, such as: YKMD Deploy.
For example:
Edit this GPO to complete the configuration. Complete the steps in the following sections.
Client Registry Setting
Update device path
Update the existing Device Path registry setting to reference the newly created driver store.
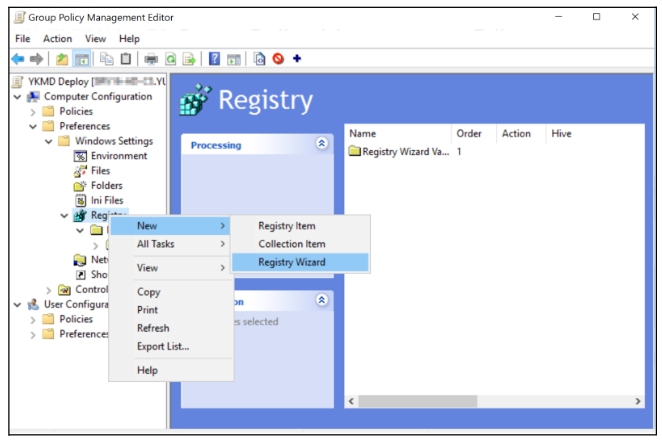
Right-click the new the YubiKey Minidriver Deploy GPO and select Edit.
Expand Computer Configuration > Preferences > Windows Settings > Registry.
Right-click Registry and select New > Registry Wizard.
Create new Registry
The Registry wizard walks you through creating the new Registry setting for your client machines.
When the registry browser comes up, browse to Another Computer or use the Local Computer since this registry setting should be the same on both. For this example, we are using Local Computer.
Select Local Computer, then click Next.
Browse to: HKLM > Software > Microsoft > Windows > CurrentVersion.
From the CurrentVersion panel, in the bottom window, scroll down and select DevicePath.
For example:
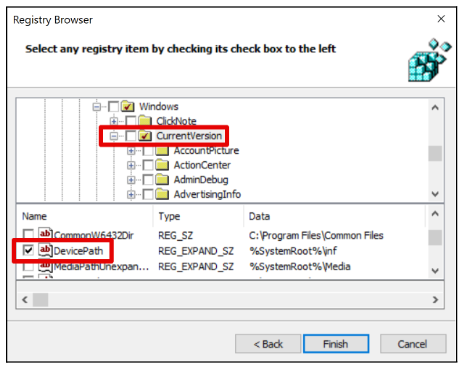
Click Finish.
Update New Registry
Update this new Registry value to append the newly created file share to its search locations. You can append any number of fileshare locations, just separate them with a semicolon.
Select the Registry Wizard Values created in Create new Registry and rename it to something more descriptive. For example, YKMD Deploy.
Fully expand the new registry value.
Double-click the Device Path so you can edit the contents.
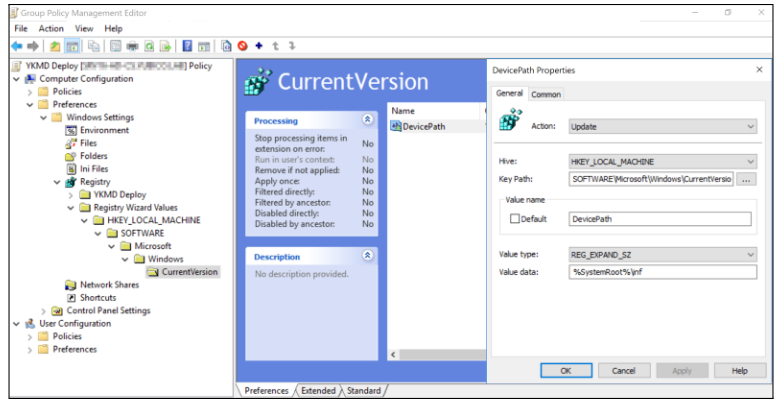
Update the last field, Value Data.
To update, add the following to the existing value:
;\\<servername>\<filepath>\<driverstore>Note the semicolon at the beginning of the string.
For example:
%SystemRoot%\inf;\\<servername>\SoftwareShare\YKMDThe final value should resemble the following:
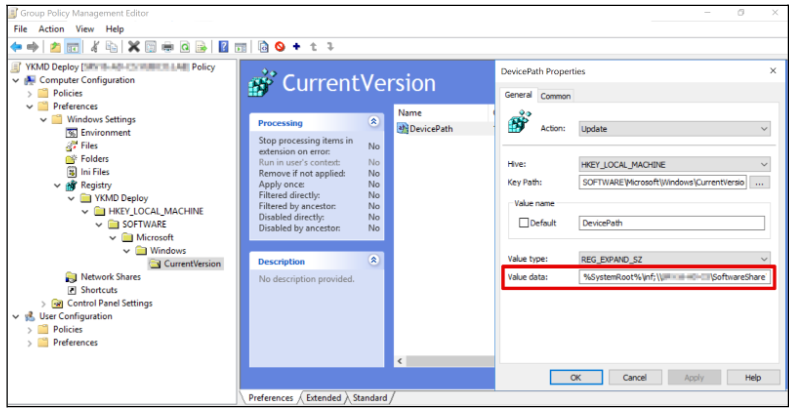
Click Apply. Then click OK to save your settings.
Whitelisting the the YubiKey Minidriver GUID
This step allows a silent install that does not require the user to elevate to an admin account.
Locate the GUID of the YubiKey Minidriver
Browse to the extracted contents of the the YubiKey Minidriver
.cabfile.Select the file
YKMD.inf, right-click and open with a text editor.Find the line
ClassGuid=.For example:
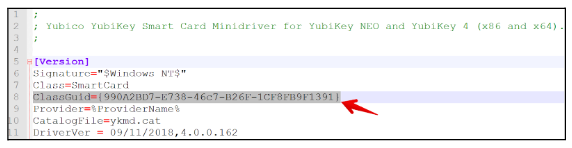
Copy and paste the full content of that line after the
=.For example:
ClassGuid={990A2BD7-E738-46c7-B26F-1CF8FB9F1391}The GUID:
{990A2BD7-E738-46c7-B26F-1CF8FB9F1391}brackets included, is what we are whitelisting.
Enable and Configure Group Policy
Enable and configure the Group Policy with the updated GUID value:
Select the Group Policy YKMD Deploy created earlier. See Configuring the GPO.
Browse to: HKLM > Policies > System > Driver Installation.
Select Allow non-administrators to install drivers for these device setup classes.
Right-click, and select Edit.
Select Enabled.
Under Options on the bottom left, select Show.
Add the GUID Value from Locate the GUID of the YubiKey Minidriver into the next open line. If you have not used this before, this is the first line.
For example:

Select OK > Apply > OK.
Complete Installation
Confirm the following installation steps are completed.
Created a network file share to host and distribute the YubiKey Minidriver. See Prepare to Install.
Downloaded and extract the YubiKey Minidriver. See Creating the Minidriver Zip File or Preparing the YubiKey Minidriver for Distribution.
Created and applied GPO to the computer objects which require YubiKey Minidriver. See Configuring the GPO or Configuring the GPO and Creating a new GPO.
GPO configured based on Method 1 or Method 2 below:
- Method 1 - Auto-Install via Startup Script
Push the PowerShell script file to auto-install the YubiKey Minidriver.
- Method 2 - Standard Networked User Install
- Client-side registry update.
- Whitelist the YubiKey Minidriver GUID for installation by non-admin users.
Important
If any of the above is not completed, review the instructions in this chapter, before proceeding.
Issue a Group Policy Update
This can be issued as soon as Method 1 or Method 2 tasks are completed. The version numbers shown are examples. The actual number changes as YubiKey Minidriver is updated.
Refresh the Group Policy for all clients and publish the new changes.
From the command line, issue the command:
gpupdate /forceFor example:

If the client computer does not have the YubiKey Minidriver installed:
- Method 1
The end-user must reboot their computer. The YubiKey Minidriver is installed during the next reboot.
- Method 2
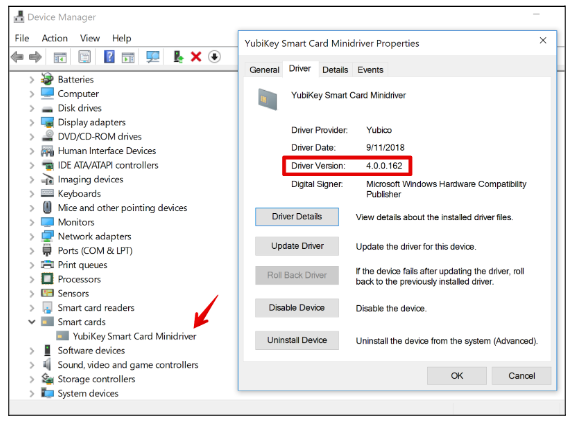
The end-user updates the YubiKey Minidriver through the Device Manager.
- Launch the Device Manager.
- Select the YubiKey Minidriver.
- Select Update > Search automatically for updated driver software.
Confirm the YubiKey Minidriver is successfully installed. Open Device Manager.