About YubiEnroll
YubiEnroll lets organization IT admins configure and register YubiKeys on behalf of users in the organization and is a complementary solution to Yubico FIDO Pre-reg and part of the Yubico Enrollment Suite.
With Yubico FIDO Pre-reg organizations use the YubiEnterprise API and the organizations’ identity provider to request pre-registered, factory-new YubiKeys. Yubico pre-registers the keys which are then shipped to end users or offices through YubiEnterprise Delivery services.
YubiEnroll works as an independent application in an organizations’ environment and only communicates with the identity provider. A user, for example the organizations’ IT admin, configures and enrolls the YubiKey on behalf of an end user in the organization with YubiEnroll, and delivers the key locally to that end user.
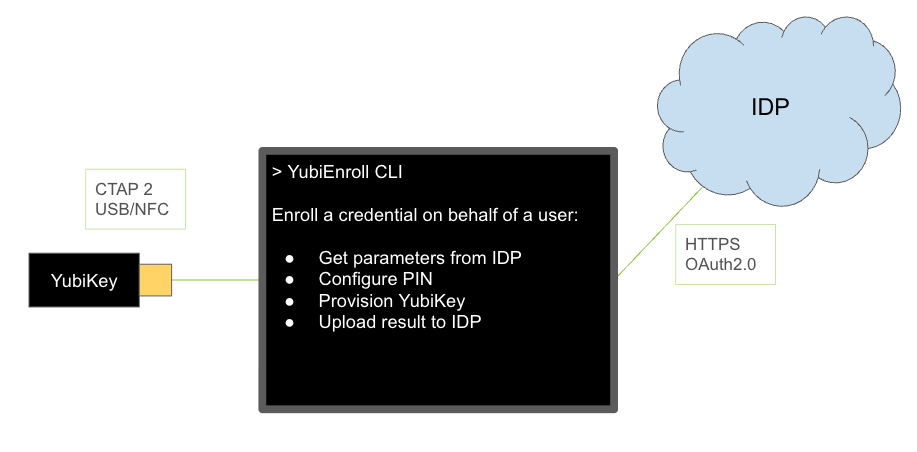
The following are typical enrollment steps performed by an IT admin using YubiEnroll:
- The IT admin runs the YubiEnroll CLI and authenticates to the identity provider.
- The IT admin uses YubiEnroll CLI to initiate the enrollment process for an end user’s account in the identity provider.
- YubiEnroll gets the credential creation options from the identity provider.
- YubiEnroll creates the credentials on a YubiKey which is locally connected or presented to the enrollment workstation.
- YubiEnroll sets a randomized PIN on the YubiKey.
- The YubiKey returns the attestation data for the end user’s credential to YubiEnroll.
- YubiEnroll registers the credential for the end user in the identity provider.
- The IT admin provides the YubiKey and PIN to the end user.
YubiEnroll CLI
The YubiEnroll Command Line Interface (CLI) tool provides an intuitive interface for interacting with the underlying YubiEnroll solution. You can for example:
- Factory reset the YubiKey
- Set and change the PIN
- Configure Forcing PIN change
- Increase the minimum PIN length
- Configure Always require user verification (AlwaysUV)
For more information, see Using YubiEnroll CLI.
Enrollment Profiles
Enrollment profiles is a YubiEnroll feature that lets users define a combination of preferred configuration option settings, for example Minimum PIN length and Force PIN change configurations.
Note
The configuration options Min PIN length, Require always UV, and Force PIN change before use require YubiKeys with firmware version 5.5 and higher.
PS C:\program files\yubico> yubienroll profiles add entra-reset
Min PIN length [4]: 6
Require always UV? [y/N]: n
Require Enterprise Attestation: [y/N]: n
Force PIN change before use: [y/N]: y
Factory reset the Security Key? [y/N]: n
Set a new random PIN? [Y/n]: y
Random PIN length [4]: 6
Assign this profile to the active provider (entra-demo)? [y/N] n
Added profile 'entra-reset'
See Profile Settings for descriptions of the enrollment profile settings.
The enrollment profile settings are stored with a specific profile name locally on the workstation running YubiEnroll, to be applied when enrolling credentials for end users. Only one enrollment profile can be linked to a provider.
Enrollment profiles can be used with different identity provider configurations, and can also be configured for a provider to be automatically used during enrollment. For more information, see Identity Provider Configuration.
Identity Provider Configuration
When configuring a supported identity provider for YubiEnroll, the following provider-specific configuration parameters are required:
- NAME - Name of identity provider.
- CLIENT_ID - Identity provider client identifier.
- REDIRECT_URI - Authentication resource location.
- DATA - Provider-specific data such as
tenant_idordomain_name.
For information on how to obtain these values for supported providers, see the following:
- Configuring YubiEnroll with Okta
- Configuring YubiEnroll with Microsoft Entra ID
- Configuring YubiEnroll with PingOne PingID
- Configuring YubiEnroll with PingOne AIC
All provider configurations used by YubiEnroll are stored in a single yubienroll.toml file that can be manually edited. The file is located at %APPDATA%\yubienroll\yubienroll.toml.
The .toml file accepts a value cacert which is the absolute path to the Certificate Authority (CA) bundle. This value lets users specify custom CA bundles if required. CA bundles are expected as a single Privacy-Enhanced Mail (PEM) file containing one or more Root CA certs.
The following example shows a typical provider configuration file. The enrollment profile with the name profiles.default is configured to be used by any of the included providers, (in this example, ENTRA and OKTA). The profiles.default settings are listed in the profiles.default section.
yubienroll.toml
active_provider = "entra"

[providers.entra]
provider = "ENTRA"
client_id = "78a1a…"
redirect_uri = "http://localhost/yubienroll-redirect"
tenant_id = "220b41…"
profile = "default"

[providers.okta]
provider = "OKTA"
client_id = "0oahi…"
redirect_uri = "http://localhost:8080/yubienroll-redirect"
domain = "domain.com"
profile = "default"

[profiles.default]
reset = true
min_pin_length = 4
override_always_uv = true
force_pin_change = true
random_pin = true
The active_provider setting shows the identity provider that is automatically be used when enrolling end users. In the previous example, the active provider is the one named entra. There can only be one active provider at the time.
If there are multiple providers configured for an environment, the user can change the active provider by using the command yubienroll providers activate name. Where name is the name of a configured identity provider.
In addition to activating providers, a user can also create, edit, and delete provider configurations. For more information, see YubiEnroll Commands.
Authentication and Authorization
The user (IT admin, enrollment administrator etc.) authenticates to the identity provider via the system default browser which is automatically launched by YubiEnroll during the login procedure. This includes entering the user account email, and presenting the YubiKey and PIN associated with the user’s identity provider account.
During the login procedure an access token is obtained for the identity provider API. The access token lets YubiEnroll interact with the identity provider API to manage end user credentials. The required configuration to connect to the provider, for example tenant name and URL, are either set manually in the configuration file, or added through YubiEnroll.
YubiEnroll users can log in to the identity provider through the configured system options. Refer to the specific identity provider documentation for details. When setting up and using YubiEnroll, there are a set of user categories typically involved. The permissions for these are defined in the identity provider: Microsoft Entra ID, Okta, PingOne PingID, or PingOne AIC.
The following are typical user categories and their tasks:
- System administrator: An employee of an organization responsible for obtaining, installing and configuring the YubiEnroll application.
- Enrollment administrator: An employee of an organization responsible for enrolling YubiKey credentials on behalf of their organization’s users. Can for example configure PIN settings as required by the organization.
- End user: An employee or contractor receiving an enrolled YubiKey to be used to authenticate with services. Might have been granted permission to reset, change the PIN and/or enroll additional keys for themselves as a self-service.
- Auditor: An employee of the organization or an external contractor responsible for inspection of logs for audit purposes. Only has read access to the logs.