Using YubiEnroll CLI
The following describes how to add identity providers to and enroll end-users with the YubiEnroll CLI.
The examples reference the default installation path. If you choose a different installation path, update the command to point to the path you used. For more information, see also YubiEnroll Commands.
Note
Due to Windows restrictions, many commands require administrator privileges. To avoid running the YubiEnroll CLI tool as administrator, the tool itself prompts for elevation when needed through the Windows user account control (UAC) prompt. Launching the YubiEnroll CLI tool as administrator is not recommended.
Launching on Windows
- Open a terminal, for example Windows PowerShell.
- Navigate to the installation path. Default is
C:\Program Files\Yubico\YubiEnroll\. - Run
yubienroll.exe --helpto see the YubiEnroll usage, options, and commands. - Run the YubiEnroll commands from the command prompt. See YubiEnroll Commands.
Adding Provider Configurations
The following describes how to add an identity provider configuration and an enrollment profile. The example prompt flows for each identity provider are included. The workflow starts with a first time YubiEnroll log in, where no providers or enrollment profiles exist. However, you can add providers and enrollment profiles at any time.
Note
When adding a provider configuration, you need to provide identity provider-specific values for Client ID, Redirect URI, and Tenant/Domain ID. For information on how to obtain these values, see Identity Provider Configuration.
The yubienroll providers add command adds a provider configuration of a supported type (Microsoft Entra ID, Okta, PingOne PingID, or PingOne AIC). If no provider configuration exists and you choose to add one, the provider is automatically activated and becomes the default provider for enrolling end users.
To add a provider configuration and an enrollment profile, complete the steps in the following sections for your provider.
Adding Microsoft Entra ID
In a terminal, run the command:
yubienroll providers add entra-demo
Where
entra-demois the provider name. Choose any name that is useful to you.Select the desired provider type.
Supported identity providers:
[1] ENTRA
[2] OKTA
[3] PING_ONE
[4] PING_ONE_AIC
Select provider: 1
Enter the Client ID and Redirect URI. For provider-specific input values, see Identity Provider Configuration.
Enter the Client ID: c64e5ed2. . .
Enter the Redirect URI: http://localhost:8080/yubienroll-redirect
Enter the provider values collected from the identity provider app configuration.
Enter the Microsoft Entra Tenant ID: 220b415
Enter the Microsoft Entra Tenant endpoint [https://login.microsoftonline.com]:
Enter the Microsoft Graph endpoint [https/graph.microsoft.com]:
Where Entra specific prompts include values you collected from Entra ID. You can use default values in most cases. If your organization is working with government tenants, you might need to change the endpoints. See Preparing to Add the Entra ID Provider.
Select if you want to create a new enrollment profile. See Creating Enrollment Profiles for descriptions of all the profile options. If you select
Y, complete the following prompts.Do you want to create and add an enrollment profile? [y/N]: y Profile name [default]: entra-main Min PIN length [4]: 6 Require always UV? [y/N]: n Require Enterprise Attestation: [y/N]: n Force PIN change before use: [y/N]: y Factory reset the Security Key? [y/N]: n Set a new random PIN? [Y/n]: y Random PIN length [4]: 6 Added profile 'entra-main'
Activate the provider.
The provider configuration is added together with the enrollment profile. If no provider existed previously, the provider is automatically activated. If this is an additional provider, you are prompted to confirm before activating.
Added provider 'entra-demo'.
Activated provider.
To check provider and authentication status and see available enrollment profiles you can run
yubienroll statusandyubienroll profiles list. This example is with Entra ID.PS C:\program files\yubico> yubienroll status Active provider set to 'entra-demo' using Microsoft Entra ID. Checking authentication status . . . You are currently authenticated. PD C:\progream files\yubico> yubienroll profiles list Name Minimum PIN length Require always UV Require each Force PIN change Factory reset Random PIN entra-main 6 False False True False True PS C:\program files\yubico>
For more information about the yubienroll providers command, see YubiEnroll Commands.
Adding Okta
In a terminal, run the command:
yubienroll providers add okta-demo
Where
okta-demois the provider name. Choose any name that is useful to you.Select the desired provider type.
Supported identity providers:
[1] ENTRA
[2] OKTA
[3] PING_ONE
[4] PING_ONE_AIC
Select provider: 2
Enter the Client ID and Redirect URI when prompted. For provider-specific input values, see Identity Provider Configuration.
Enter the Client ID: 0oalrpp312ZBUw1Xs1d7
Enter the Redirect URI: http://localhost:8080/yubienroll-redirect
Enter the provider values collected from the identity provider app configuration.
Enter the Okta domain (e.g. 'example.okta.com'): yubico-poc.oktapreview.com
Okta specific prompts are values you collected from Okta. In this example,
yubico-poc.oktapreview.comis the Okta domain. See Using Custom Domains.Specify if you want to create a new enrollment profile. See Creating Enrollment Profiles for descriptions of all the profile options. If you select
Y, complete the following prompts.Do you want to create and add an enrollment profile? [y/N]: y Profile name [default]: okta-main Min PIN length [4]: 6 Require always UV? [y/N]: n Require Enterprise Attestation: [y/N]: n Force PIN change before use: [y/N]: y Factory reset the Security Key? [y/N]: n Set a new random PIN? [Y/n]: y Random PIN length [4]: 6 Added profile 'okta-main'
Activate the provider.
The provider configuration is added together with the enrollment profile. If no provider existed previously, the provider is automatically activated. If this is an additional provider, you are prompted to confirm before activating.
Do you want to activate this provider? [y/N]: y
Added provider 'okta-demo'.
Activated provider.
To check provider and authentication status and see available enrollment profiles you can run
yubienroll statusandyubienroll profiles list. This example is with Entra ID.PS C:\program files\yubico> yubienroll status Active provider set to 'entra-demo' using Microsoft Entra ID. Checking authentication status . . . You are currently authenticated. PD C:\progream files\yubico> yubienroll profiles list Name Minimum PIN length Require always UV Require each Force PIN change Factory reset Random PIN entra-main 6 False False True False True PS C:\program files\yubico>
For more information about the yubienroll providers command, see YubiEnroll Commands.
Adding PingOne PingID
In a terminal, run the command:
yubienroll providers add ping-demo
Where
ping-demois the provider name. Choose any name that is useful to you.Select the desired provider type.
Supported identity providers:
[1] ENTRA
[2] OKTA
[3] PING_ONE
[4] PING_ONE_AIC
Select provider: 3
Enter the Client ID and Redirect URI when prompted. For provider-specific input values, see Identity Provider Configuration.
Enter the Client ID: 822b253b-4717-4169-9292-b1ef9d7894c2
Enter the Redirect URI: http://localhost/yubienroll-callback
Enter the provider specific values collected from the identity provider app configuration.
Enter the PingOne environment ID: c15efa10-4ebb-449b-9b27-97b3264de073
Do you want to configure a custom domain? [y/N]: N
Do you want to configure a non-default PingOne MFA policy? [y/N]: N
Where PingOne PingID specific prompts include values you collected from PingOne PingID. See Using Custom Domains and Enabling MFA and FIDO2 Policies.
Specify if you want to create a new enrollment profile. See Creating Enrollment Profiles for descriptions of all the profile options. If you select
Y, complete the following prompts.Do you want to create and add an enrollment profile? [y/N]: y Profile name [default]: ping-main Min PIN length [4]: 6 Require always UV? [y/N]: n Require Enterprise Attestation: [y/N]: n Force PIN change before use: [y/N]: y Factory reset the Security Key? [y/N]: n Set a new random PIN? [Y/n]: y Random PIN length [4]: 6 Added profile 'ping-main'
Activate the provider.
The provider configuration is added together with the enrollment profile. If no provider existed previously, the provider is automatically activated. If this is an additional provider, you are prompted to confirm before activating.
Do you want to activate this provider? [y/N]: y
Added provider 'ping-demo'.
Activated provider.
To check provider and authentication status and see available enrollment profiles you can run
yubienroll statusandyubienroll profiles list. This example is with Entra ID.PS C:\program files\yubico> yubienroll status Active provider set to 'entra-demo' using Microsoft Entra ID. Checking authentication status . . . You are currently authenticated. PD C:\progream files\yubico> yubienroll profiles list Name Minimum PIN length Require always UV Require each Force PIN change Factory reset Random PIN entra-main 6 False False True False True PS C:\program files\yubico>
For more information about the yubienroll providers command, see YubiEnroll Commands.
Adding PingOne AIC
In a terminal, run the command:
yubienroll providers add ping-aic-demo
Where
ping-aic-demois the provider name. Choose any name that is useful to you.Select the desired provider type.
Supported identity providers:
[1] ENTRA
[2] OKTA
[3] PING_ONE
[4] PING_ONE_AIC
Select provider: 4
Enter the Client ID and Redirect URI when prompted. For provider-specific input values, see Identity Provider Configuration.
Enter the Client ID: YubiEnrollApp
Enter the Redirect URI: http://localhost:8443/yubienroll-redirect
Enter the provider specific values collected from the identity provider app configuration.
Enter the PingOne Advanced Identity Cloud tenant name (e.g. 'example.forgeblocks.com'): openam-tntp-yubico.forgeblocks.com
Enter the PingOne Advanced Identity Cloud realm name: alpha
Enter the PingOne Advanced Identity Cloud WebAuthn registration journey name: YubiEnroll_Admin_Registration
Where PingOne AIC specific prompts include values you collected from PingOne AIC. For example:
openam-tntp-yubico.forgeblocks.comis the tenant namealphais the realm nameYubiEnroll_Admin_Registrationis the WebAuthn registration journey name
See Registering the YubiEnroll App and Creating a WebAuthn Registration Journey.
Specify if you want to create a new enrollment profile. See Creating Enrollment Profiles for descriptions of all the profile options. If you select
Y, complete the following prompts.Do you want to add an enrollment profile? [y/N]: y Profile name [default]: ping-aic-main Min PIN length [4]: 6 Require always UV? [y/N]: n Require Enterprise Attestation: [y/N]: n Force PIN change before use: [y/N]: y Factory reset the Security Key? [y/N]: n Set a new random PIN? [Y/n]: y Random PIN length [4]: 6 Added profile 'ping-aic-main'
Activate the provider.
The provider configuration is added together with the enrollment profile. If no provider existed previously, the provider is automatically activated. If this is an additional provider, you are prompted to confirm before activating.
Do you want to activate this provider? [y/N]: y
Added provider 'ping-aic-demo'.
Activated provider.
To check provider and authentication status and see available enrollment profiles you can run
yubienroll statusandyubienroll profiles list. This example is with Entra ID.PS C:\program files\yubico> yubienroll status Active provider set to 'entra-demo' using Microsoft Entra ID. Checking authentication status . . . You are currently authenticated. PD C:\progream files\yubico> yubienroll profiles list Name Minimum PIN length Require always UV Require each Force PIN change Factory reset Random PIN entra-main 6 False False True False True PS C:\program files\yubico>
For more information about the yubienroll providers command, see YubiEnroll Commands.
Creating Enrollment Profiles
The following describes how to create and add an enrollment profile. You can add an enrollment profile at the same time when you add an identity provider to YubiEnroll. You can also add an enrollment profile at a later occasion and assign this to the active provider. This example is with Entra ID.
To create an enrollment profile for a provider, do the following:
In the terminal, run
yubienroll profiles add entra-resetWhere
entra-resetis the profile name in this example. You can enter a name of your choosing.Enter the following when prompted. See Profile Settings for a description of each setting.
PS C:\program files\yubico> yubienroll profiles add entra-reset
Min PIN length [4]: 6
Require always UV? [y/N]: n
Require Enterprise Attestation: [y/N]: n
Force PIN change before use: [y/N]: y
Factory reset the Security Key? [y/N]: n
Set a new random PIN? [Y/n]: y
Random PIN length [4]: 6
Assign this profile to the active provider (entra)? [y/N]: n
Confirm to add the profile:
Assign this profile to the active provider (entra-demo)? [y/N]
Added profile 'entra-reset'
Whereentra-resetis the provider name assigned in YubiEnroll.
For more information about the yubienroll profiles command, see YubiEnroll Commands.
Profile Settings
Note
The configuration options Min PIN length, Require always UV, and Force PIN change before use require YubiKeys with firmware version 5.5 and higher.
| Profile Option | Description | Setting |
|---|---|---|
| Profile name [default] | The name to be used for the profile. Prompted
if Name is not included in the command.
|
If no name entered at prompt,
default is the name assigned. |
| Min PIN length [4] | The minimum number of characters required for
the PIN used with the YubiKey.
|
Enter value for PIN length, example
6.Minimum PIN length is
4.Default:
4 |
| Require always UV? [y/N] | Enforces user verification (UV) in all cases,
whether the relying party requests it or not.
|
Y requires user verification always.N user verification is overridden.Default:
No. |
Require Enterprise
Attestation? [y/N]
|
Should enterprise attestation be required.
|
Y requires enterprise attestation.N enterprise attestation not required.Default:
No. |
Force PIN change before
use? [y/N]
|
Force the end user to change the provided
PIN when using the YubiKey the first time.
|
Y requires user to reset PIN.N allows user to use factory PIN.Default:
No. |
Factory reset the
Security Key? [Y/n]
|
For keys that have previously been in use.
Clears existing configurations.
|
Y to enroll previously used key.N to enroll a new (blank) key.Default:
Y. |
Set a new random PIN
[Y/n]
|
YubiEnroll generates a random PIN
for the key.
|
Y YubiEnroll sets the key PIN.N you enter the key PIN.Default:
Y. |
| Random PIN length [6] | Define the length of the random PIN to be set.
Prompt if
Set a new random PIN is Y. |
Enter value for PIN length, example
6.Minimum PIN length is
4.Default:
6. |
Assign this profile to
the active provider
(entra)? [y/N]
|
If there is an existing profile. Select to
override the existing profile for the active
provider.
|
Y replaces current enrollment profile.N keeps the current enrollmentprofile. Default:
N |
Enrolling End Users
The following describes how to enroll a YubiKey adding credentials on behalf of a specific end user. Ensure you have the YubiKey you want to enroll available, as well as the ID or Username of the end user.
If you are using Microsoft Entra ID, the user_id can be provided either as Object ID (unique identifier), for example 123456-abc-123456-xyz, or as UPN (User Principal Name), for example username@yubico123.sample.com. For information on how to find an end user identifier, see the command yubienroll users.
Note
To enroll YubiKeys on behalf of end users, you need to be an administrator with IDP-specific permissions. For more information, see the Configuring Permissions section for the IDP you are using.
To enroll a YubiKey on behalf of an end user, do the following:
In the terminal, run
yubienroll loginto authenticate with the identity provider.Select the desired provider,
[1] ENTRAin this example.When prompted, confirm the Client ID, Redirect URI, and Tenant ID for the active provider to continue. For information on how to obtain these values for a provider, see Identity Provider Configuration.
Follow the steps to complete the authentication. When successfully authenticated, return to the terminal.

Insert or present the YubiKey you want to enroll.
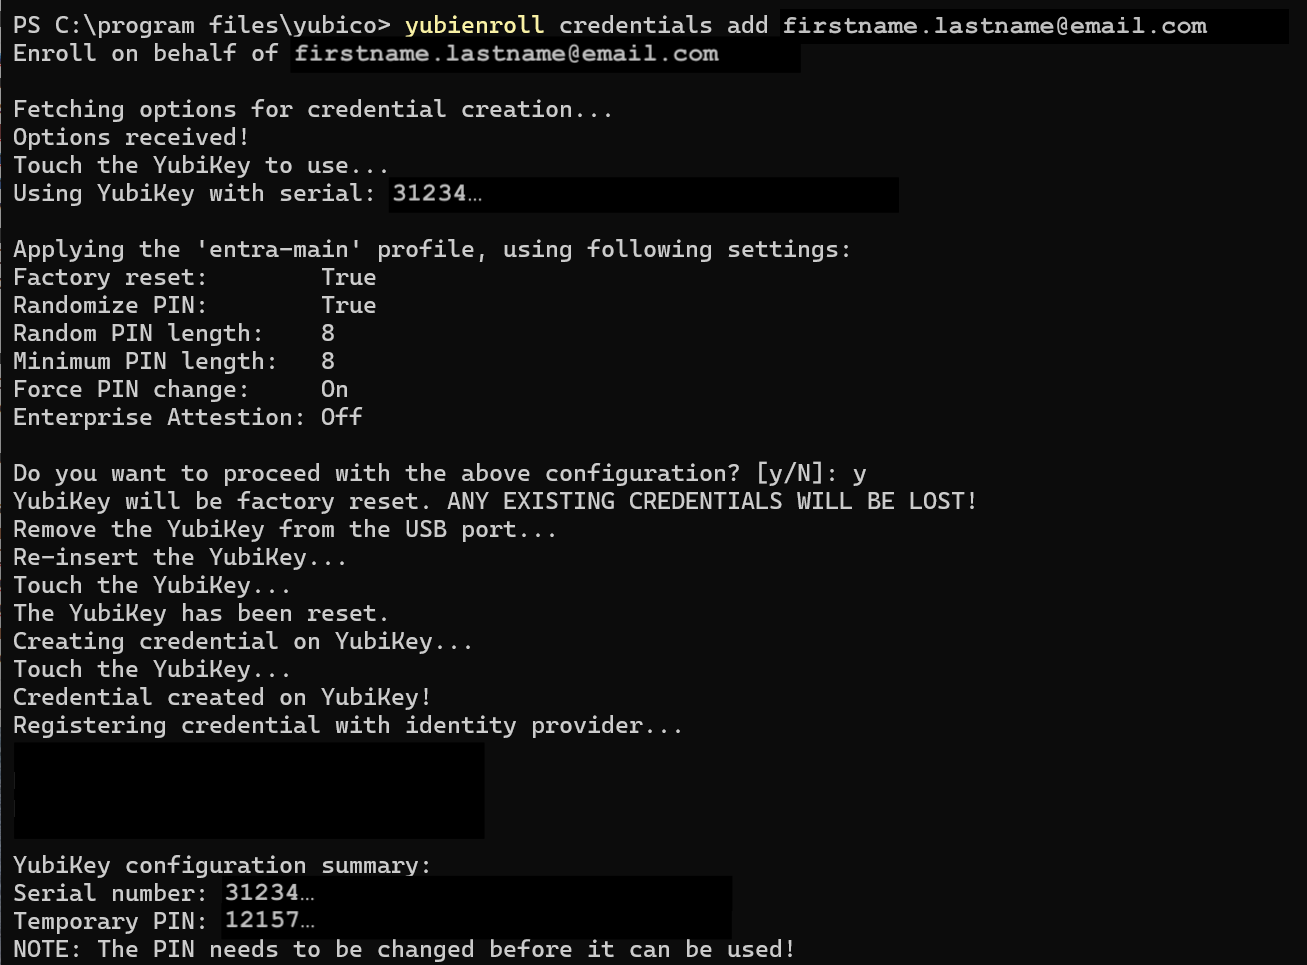
Run the command
yubienroll credentials add firstname.lastname@email.comwherefirstname.lastname\@email.comis the end users’ account identifier in this example.YubiEnroll fetches the provider-specific options for creating credentials, and the settings for the enrollment profile to be used are displayed. To use a different enrollment profile than the one assigned to the active provider, see the command yubienroll profiles. In this example, the key is reset before the credentials are added.
When prompted, touch the YubiKey you are enrolling.
When prompted, enter
yto proceed with the configuration.When the credentials have been successfully added, the serial number and temporary PIN to be used is displayed. See also yubienroll credentials.
- Provide the YubiKey and the temporary PIN to the end user.
Initial Authentication
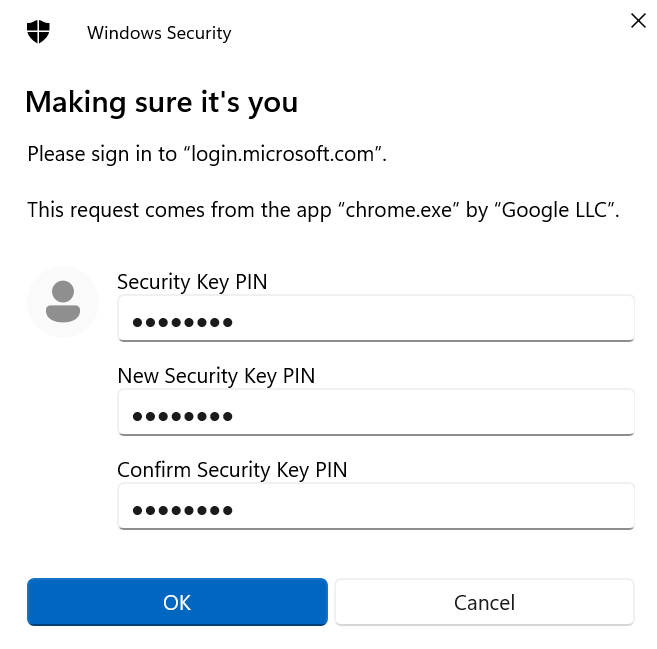
To authenticate with the identity provider, the end user presents their YubiKey and enters the provided PIN. If Force PIN change is set to True (and if supported by the platform), the end user is prompted to change the PIN when using the YubiKey for the first time, as in this example.
If Force PIN change was not set (is False), the end user is able to log in without changing the provided PIN, when using the YubiKey for the first time.
The previous step also applies when using a YubiKey Bio (FIDO and Multi-Protocol Editions) where the end user authenticates primarily using fingerprint(s) enrolled on the key (a PIN is required as fallback also when using fingerprint authentication).
Note
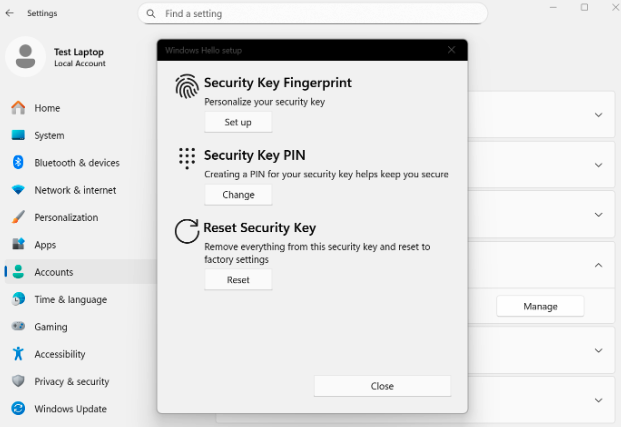
In most cases, the end user is not automatically prompted to enroll a fingerprint when using a pre-registered YubiKey Bio the first time. Enrolling a fingerprint must be done by the end user in a separate step as described in the following.
Here is an example of how to enroll fingerprints when using Windows 11: Navigate to Settings > Accounts > Sign-in options, select Security key, and click Manage. Enter the PIN for the YubiKey Bio, and follow the on-screen instructions, which prompts you to insert the security key and touch it to enroll a fingerprint. When done, you is prompted to provide the fingerprint (instead of the PIN) when logging in.
Different platforms (device/OS/browser) have different flows with regards to enrolling fingerprints on YubiKeys. Refer to the account security settings information for each platform for instructions on how to enroll fingerprints. For more examples of fingerprint enrollment, see YubiKey Bio Series Specifics.
Yubico Authenticator is a convenient tool that can also be used to enroll fingerprints on a YubiKey Bio. For instructions on how to install Yubico Authenticator and enroll fingerprints, see Install the App and Enroll a fingerprint.
Select the method that is applicable to your organization’s IT platform when providing recommendations for your end users on how to enroll fingerprints on their pre-registered YubiKey Bio.