Requesting Credentials and Shipments
The methods for initiating enrollment credentials and shipment requests for pre-pre-enrolled YubiKeys depend on how your FIDO Pre-reg solution is set up in your IT environment, and the API version implemented in your environment.
As an IT administrator, you can for example trigger a credential request and/or a shipment request through your front-end IT Helpdesk system. Or, you can have some other integration process in your environment trigger the requests.
You can initiate shipment-only requests, or requests that contain both enrollment credentials, and shipment of pre-enrolled keys. Enrollment credentials are used for on-site pre-programming of credentials onto a YubiKey, or a mobile device.
The credential and shipment requests are received by the FIDO Connector which manages the credential encryption, requests recipient information from associated systems, and creates a shipment request to the Yubico Delivery service. For more information, see Process Flow.
A credential request sent to the Yubico Enrollment service initiates the sending of a QR code to the IT admin (trusted agent), who authenticates and starts the credential programming. The credentials are either programmed onto a YubiKey provided to the end user, or the end user’s mobile device. Using these, the end user can then immediately authenticate to their IdP.
A shipment request for a physical YubiKey sent to the Yubico Delivery service contains all information needed to program and ship the key. When the request is fulfilled and the credential is activated, the randomly generated PIN associated with the YubiKey is emailed to the end user, who can then immediately authenticate to their IdP.
Note
Once the credential is programmed onto the YubiKey, the challenge and credential data, including PIN, is purged from Yubico systems.
Initial Authentication
To authenticate with the identity provider, the end user presents their YubiKey and enters the provided PIN. If “Force PIN change” is set (and if supported by the platform), the end user is prompted to change the PIN when using the YubiKey for the first time, as in this example.
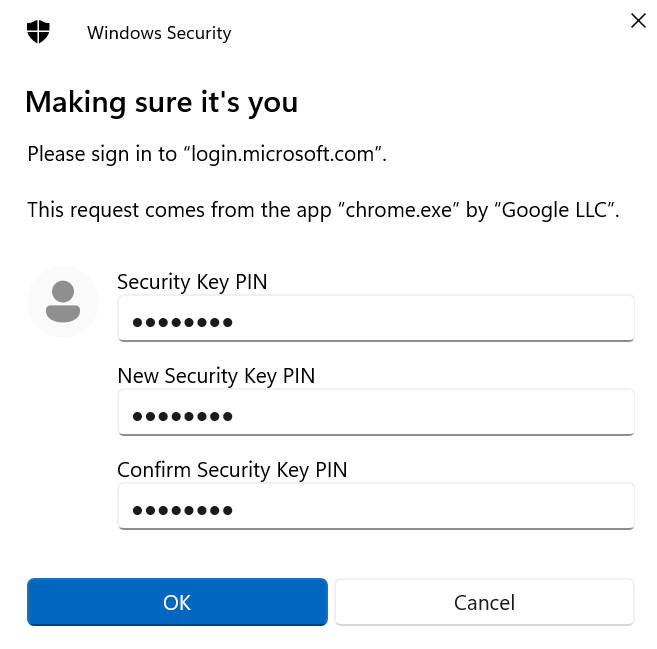
If “Force PIN change” was not set, the end user will be able to log in without changing the provided PIN, when using the YubiKey for the first time.
The previous step also applies when using a YubiKey Bio (FIDO and Multi-Protocol Editions) where the end user authenticates primarily using fingerprint(s) enrolled on the key (a PIN is required as fallback also when using fingerprint authentication).
Note
In most cases, the end user will not be automatically prompted to enroll a fingerprint when using a pre-enrolled YubiKey Bio the first time. Enrolling a fingerprint must be done by the end user in a separate step as described in the following.
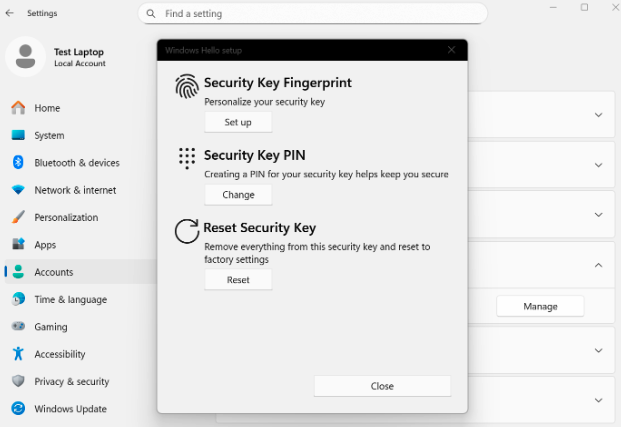
Here is an example of how to enroll fingerprints when using Windows 11: Navigate to Settings > Accounts > Sign-in options, select Security key, and click Manage. Enter the PIN for the YubiKey Bio, and follow the on-screen instructions, which will prompt you to insert the security key and touch it to enroll a fingerprint. When done, you will be prompted to provide the fingerprint (instead of the PIN) when logging in.
Different platforms (device/OS/browser) will have different flows with regards to enrolling fingerprints on YubiKeys. Refer to the account security settings information for each platform for instructions on how to enroll fingerprints. For more examples of fingerprint enrollment, see YubiKey Bio Series Specifics.
Yubico Authenticator is a convenient tool that can also be used to enroll fingerprints on a YubiKey Bio. For instructions on how to install Yubico Authenticator and enroll fingerprints, see Install the App and Enroll a fingerprint.
Select the method that is applicable to your organization’s IT platform when providing recommendations for your end users on how to enroll fingerprints on their pre-enrolled YubiKey Bio.