YubiHSM 2 Key Storage Provider (KSP)
The YubiHSM 2 Manager program, which is part of the YubiHSM 2 tool set, is used to perform the initial configuration of the primary YubiHSM 2 device. This program configures the device with the requirements needed for deploying YubiHSM 2 to safely store the ADCS root CA key. Specifically, during the setup process the YubiHSM is configured so that the necessary key material is generated on the device:
One wrap key – The wrap key is split among a determined number of key custodians, and each share is recorded by each custodian. See Key Splitting and Key Custodians.
One application authentication key (auth key) – The auth key for authenticating to the YubiHSM 2 through the KSP. This allows the KSP to perform operations in the YubiHSM 2.
Note
This initial configuration replaces the default auth key with a new one, which will only be operable in the same domain as the asymmetric key. The Domains that is used to compartmentalize the YubiHSM 2 determines this behavior.
Tip
If you are using the deprecated
yubihsm-setup: For test purposes, you can set theyubihsm-setup -dflag to keep the default auth key with the administrative privileges; this will allow you to delete keys on the YubiHSM 2 for test purposes only. For production purposes, however, the factory preset auth key must be is properly deleted from the YubiHSM 2 device, which is ensured by not using the-dflag.One audit key – The audit key is used for accessing the internal audit log of the device and resetting the audit log. The audit log retains information about the last 62 operations. It is also used to purge the log if needed. Depending on your local requirements, you may not need to create an audit key. If you are unsure of your requirements, we suggest you create an audit key.
The auth key and the audit key are exported under wrap to a file in the current working directory on the machine where the YubiHSM Manager program is installed.
Tip
The YubiHSM Manager tool has a help argument that you can call to learn more about its usage.
Note
To safeguard the integrity of the device, configuration must be performed in an air-gapped environment.
Install Key Storage Provider (KSP)
The Key Storage Provider (KSP) for Windows Cryptography API: Next Generation (CNG) has been thoroughly tested with Active Directory Certificate Services (AD CS) plus 2048-bit, 3072-bit, and 4096-bit keys. It also works with other types of keys, but those have not been tested to the same extent.
The following installs the KSP and the Connector Service, using them for ADCS with the default Authentication Key (1) and password (password).
When you run the Install-AdcsCertificationAuthority command, you should see the YubiHSM 2 light flash rapidly, because AD CS uses the KSP to generate a 2048-bit key in hardware. For AD CS to work properly, Restart-Computer may be needed.
PS1> msiexec /i "yubihsm-connector-windows-amd64.msi" /passive ACCEPT=yes
PS1> msiexec /i "yubihsm-cngprovider-windows-amd64.msi" /passive  ACCEPT=yes
PS1> Install-WindowsFeature AD-Certificate -Verbose
PS1> Install-AdcsCertificationAuthority -CAType EnterpriseRootCa    \
    -CryptoProviderName "RSA#YubiHSM Key Storage Provider"          \
    -KeyLength 2048 -HashAlgorithmName SHA256 -ValidityPeriod Years \
    -ValidityPeriodUnits 5
PS1> Install-AdcsOnlineResponder
If you are using a different Authentication Key, password, or Connector for the KSP, you can specify them as follows (defaults are shown):
PS1> Set-ItemProperty -path HKLM:\SOFTWARE\Yubico\YubiHSM \
    -name ConnectorURL -Type String -Value http://127.0.0.1:12345
PS1> Set-ItemProperty -path HKLM:\SOFTWARE\Yubico\YubiHSM \
    -name AuthKeysetPassword -Type String -Value password
PS1> Set-ItemProperty -path HKLM:\SOFTWARE\Yubico\YubiHSM \
    -name AuthKeysetID -Type DWord -Value 1
Warning
Design considerations for Key Storage Providers in Windows prevent the direct USB functionality of libyubihsm (Connector URL yhusb://), therefore it is not supported in this version of the YubiHSM KSP.
The default configuration for the connector is: ProgramData\YubiHSM\yubihsm-connector.yaml - Administrator rights are required to access the file.
Additional Documentation for YubiHSM Key Storage Provider
- For instructions on how to move a software-based key into the YubiHSM 2 for use with the KSP, see Move Software Keys to Key Storage Provider.
- For an example of how to create an HSM-backed code signing certificate for Windows through the KSP, see Example: Creating a Code-Signing Certificate using the Key Storage Provider.
- For more information about status codes, see KSP Status Codes for Windows.
- For details on how to configure the 32-bit and 64-bit KSP DLLs, please see Configuring YubiHSM 2 for Microsoft Windows Server.
Configure Key Storage Provider (KSP)
After you have inserted the primary device into the air-gapped system, the configuration steps are diagrammed in the following image, and listed below. They are described in detail in the next section, Configure YubiSHM 2 Device.
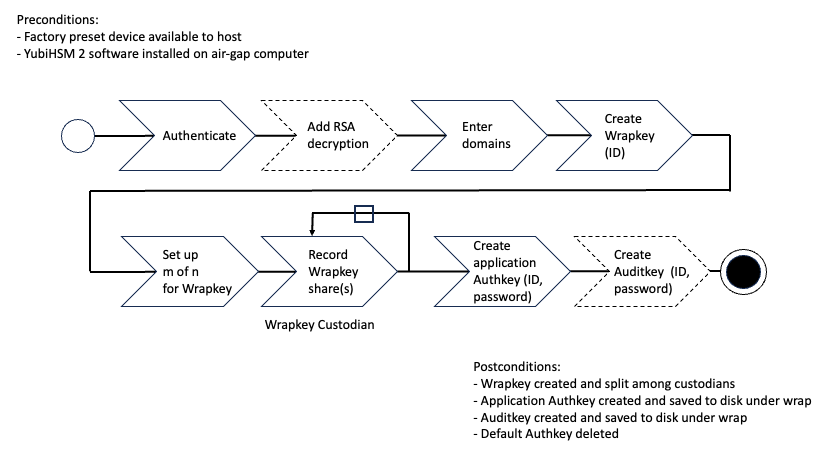
Figure: Create wrapkey using Custodians
- Authenticate:
- Set up communication between the YubiHSM 2 tools and the device.
- Start the configuration process. Run the YubiHSM 2 Manager with the argument
ksp(yubihsm-manager ksp), specifying the Connector URL if necessary. - Start the YubiHSM Manager process and authenticate to the YubiHSM device.
- Add RSA decryption capabilities if required. For example:
- Active Directory Certificate Services (ADCS), does not require RSA decryption.
- Microsoft SQL Server Always Encrypted, needs RSA decryption capabilities.
- Enter Object ID for the wrap key to be created, or allow the system to assign them automatically.
- Select the Domains in which you need the wrap key, auth key and audit key to be available.
- Setup
m of nfor Wrap key. Split the wrap key into shares and specify the privacy threshold. - Record Wrap key shares. Have the wrap key custodians record the number of shares required to rejoin the wrap key.
- Create the application authentication key (auth key). Includes creating the ID and password that are used to authenticate to the device by the KSP in Windows so the KSP can perform operations in YubiHSM 2.
- Create the audit application key (audit key) (optional), include ID and password.
- Select to delete the original default auth key
The setup process finishes.
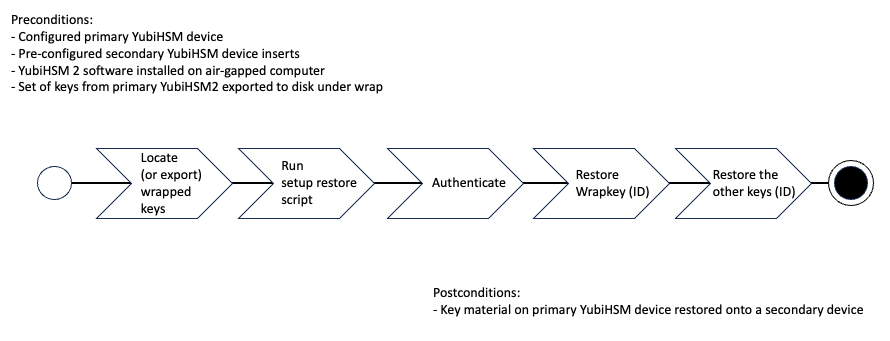
Figure: Export keys from Primary YubiHSM to Seconary YubiHSM on Windows
Configure YubiSHM 2 Device
Authenticate
Enable communication with the YubiHSM 2 device by ensuring that the YubiHSM Connector service (
yhconsrvin Windows) is running the YubiHSM Connector on the system where the device is inserted.If the YubiHSM Connector is running on a host machine to which the YubiHSM 2 is physically connected, the Connector should be started in networked mode. For example, if the host IP address is 192.168.100.252, the Connector should be started on the host machine with the following command:
yubihsm-connector -l 192.168.100.252:12345
You can validate that the connector is running properly by typing the following URI into your browser: http://192.168.100.252:12345/connector/status. The output in the web browser should be similar to:
status=OK
serial=*
version=1.0.0
pid=*
address=192.168.100.252
port=12345
Run YubiHSM Manager with the argument
ksp. To do this:- Launch your command line application.
- Navigate to the directory for which you have write access and that contains the YubiHSM Manager program.
- Run the YubiHSM Manager with the argument
ksp.
yubihsm-manager kspIf the application calling the Setup is installed on a machine other than the YubiHSM Connector, use the connector flag to specify the Connector URL, for example:
yubihsm-manager --connector http://192.168.100.252:12345 ksp
Tip
The manager tool also has a help argument that you can call to learn more about its usage.
Start the YubiHSM Manager. Type the default auth key password:
passwordand press Enter.A message confirms that the default auth key was used and that you have successfully authenticated to the device:
Using authentication key 0x0001.Object IDs are displayed in the YubiHSM Manager using hexadecimal numbers, in this case the default auth key has ID
1, or0x0001in hexadecimal.
You are prompted to add RSA decryption capabilities. Do one of the following:
If you plan to use your YubiHSM 2 exclusively with an application that only needs signing capabilities, RSA decryption is not required. Active Directory Certificate Services (ADCS), for example, does not require RSA decryption.
Select
No.If you are planning on using the same YubiHSM 2 device for something that does require the capability to decrypt RSA, then you do need RSA decryption. The Microsoft SQL Server Always Encrypted, for example, needs RSA decryption capabilities.
Select
Yes.
Tip
If you are unsure what selection to make, select
No.Generate a wrap key and enter its ID.
The wrap key is very important as it allows you to export and import objects from and to the device. For example, you would export and import objects for backup purposes, as described in Backup Examples. Do one of the following:
- To manually assign a wrap key ID, type the number and press Enter. As object ID
1is already in use by the default auth key, we recommend you assign id2to the wrap key. Type2and press Enter. - To allow the system to assign a wrap key ID automatically, type
0and press Enter.
- To manually assign a wrap key ID, type the number and press Enter. As object ID
At the prompt, enter the domain(s) you need the wrap key, auth key and audit key to be available in.
The auth and audit keys are generated after you create the wrap key. You will only need one domain for the purposes of completing this guide. Do the following:
Unless you have a requirement to assign more than one domain, select a single number between
1to16by pressing Space, then press Enter.In this guide, we assume that domain
1was entered. The selected Domain will be displayed after pressing EnterSpecify the number of shares to split the wrap key to distribute it equally among a number of key custodians. Also, specify the privacy threshold, which is the number of shares that must be present for the wrap key to be regenerated.
For this example, we assume that the wrap key is split into three shares, out of which at least two shares must be present in order to use the key. If there are not two key custodians present, the wrap key cannot be rejoined. At the prompt, do the following:
- Enter the number of shares. In this example, enter
3. - Enter the privacy threshold. In this example, enter
2.
When defined, the three wrap key custodians each take their turn in front of the screen to record their respective share. A warning notice appears advising you that the shares are not stored anywhere.
- Enter the number of shares. In this example, enter
Have each custodian record their key shares. Each custodian completes these steps.
- At the prompt, record their key share.
- Confirm their key share by selecting
Yes. - Turn it over to the next custodian. The screen buffer is cleared before each share is presented.
The following is an example of a share presented on the screen:
2-1-691042965113bfa1a793d739df112703aec2801f0f20aecdcb847f6d6522118bb717b24e3efc3964b033133b995eb4556d725221
Have you saved the key share?
A notice is displayed, warning if the shares are not stored anywhere.
Note
Be sure to record the shares and store them safely if you want to re-use the wrap key for this device in the future.
Important
Each custodian must record the whole string presented, including the prefix (in this case)
2-1-which indicates the number of shares determined to be required to rejoin (or the privacy threshold) and the number of the share itself out of the total number of shares being created.Tip
For non-production and test purposes, such as in a lab scenario, it is not necessary to specify that the wrap key should be shared between key custodians but instead just use one solitary key. To do this, when configuring the device using YubiHSM Manager, indicate the number of shares to be
1and the privacy threshold to also be1.When this step is completed, the wrap key generated is saved to the HSM 2 device.
Create an auth key.
The auth key is used to authenticate to the device by the Key Storage Provider (KSP) in Windows, allowing the KSP to perform operations in YubiHSM 2.
Since object ID
1and2are already in use by the default auth key and the wrap key respectively, the example in this guide assumes that the auth key to be created next gets ID3. Do one of the following:- To manually assign an auth key ID, type
3and press Enter. - To instead allow the system to assign a wrap key ID automatically, type
0and press Enter.
- To manually assign an auth key ID, type
Create and enter a password of at least eight (8) characters for the auth key.
Be sure to store the password of the auth key that you will use in a way so that it cannot be compromised. You need this password later to configure the YubiHSM KSP DLL for use later. See Set up KSP on Windows.
Enter the auth key password and press Enter.
Re-Enter the auth key password and press Enter. A confirmation message appears.
Successfully imported application authentication key with ID 0x0003
Decide whether to create an audit key. To log into the YubiHSM 2 with the audit key, both the key ID and the password will be needed.
The audit key is used to access the internal audit log of the device which holds information about the last 62 operations performed. It is also used to reset the log if needed. Depending on your local requirements, you may not need to create an audit key. If you are unsure of your requirements, we suggest you create an audit key.
At the prompt to create an audit key, select
Yes.Assign a key ID to the audit key.
Make a note of the ID you enter (for example, key ID
4).Enter the audit key password.
Store this password so that it cannot be compromised.
When prompted to select whether to export the auth key and the audit key, select
Yes. The wrapped auth key and audit key are exported to the current working directory to0x0003.yhwand0x0004.yhwrespectively.Leave the
\*.yhw-file with the wrapped auth key where it was saved for now. It will be used later to create a backup. Delete the auth key after you make the backup.Select to delete the default auth key.
The default auth key (object ID
1) has administrative privileges, and for security purposes, it is important to delete it from the device.Select
Yesto delete the default auth key.
The manager finishes by letting you know that the default, factory-installed auth key has been deleted.
Previous authentication key 0x0001 deleted
All done
The YubiHSM Manager application exits. The YubiHSM 2 device is now equipped with the symmetric keys for wrap, audit, and application authentication.
Verifying the Setup
You can verify the results of the YubiHSM Manager program by running the YubiHSM Manager program again and logging in using the auth key (we used object ID 3 in this guide). To verify the KSP setup:
In your command line application (where
$is the prompt), run YubiHSM Manager program. To do this, if you haven’t already, launch your command line application and navigate to the directory containing the YubiHSM Manager program. Then type the following command and press Enter.$ yubihsm-manager --authkey 3
Type in the password for the auth key. You will see the main menu displayed.
You now have an administrative connection to the YubiHSM 2 and can list the objects available. To list the objects, select
Listfrom the menu and press Enter. Your results should be similar to the following:+--------+-------------------+----------------------+--------------------------------+---------+------------------------------------------------+ | ID | Type | Label | Algorithm | Domains | Capabilities | +--------+-------------------+----------------------+--------------------------------+---------+------------------------------------------------+ | 0x0003 | AuthenticationKey | Application auth key | "AES128 Yubico Authentication" | 1 | generate-asymmetric-key,sign-pkcs,sign-pss,sig | | | | | | | n-ecdsa,sign-eddsa,derive-ecdh,export-wrapped, | | | | | | | import-wrapped,exportable-under-wrap,get-optio | | | | | | | n | +--------+-------------------+----------------------+--------------------------------+---------+------------------------------------------------+ | 0x0004 | AuthenticationKey | Audit auth key | "AES128 Yubico Authentication" | 1 | exportable-under-wrap,get-log-entries | +--------+-------------------+----------------------+--------------------------------+---------+------------------------------------------------+ | 0x0002 | WrapKey | KSP Wrap Key | "AES256 CCM wrap" | 1 | export-wrapped,import-wrapped | +--------+-------------------+----------------------+--------------------------------+---------+------------------------------------------------+
As you can see by looking at the table, these objects correspond to the wrap key, the auth key and the audit key that were just created.
To obtain more information about any one of the objects, for example, the auth key (object ID
3), including its capabilities, do the following:- Select Search Objects from the main menu and press Enter.
- Select By ID and press Enter:
- Type the object ID (for example,
3for the auth key) and press Enter.
The response you receive should look similar to the following:
+--------+-------------------+----------------------+--------------------------------+----------+----------+---------+--------------------------------+--------------------------------+
| ID     | Type              | Label                | Algorithm                      | Sequence | Origin   | Domains | Capabilities                   | Delegated Capabilities         |
+--------+-------------------+----------------------+--------------------------------+----------+----------+---------+--------------------------------+--------------------------------+
| 0x0003 | AuthenticationKey | Application auth key | "AES128 Yubico Authentication" | 0        | Imported | 1       | generate-asymmetric-key,sign-p | generate-asymmetric-key,sign-p |
|        |                   |                      |                                |          |          |         | kcs,sign-pss,sign-ecdsa,sign-e | kcs,sign-pss,sign-ecdsa,sign-e |
|        |                   |                      |                                |          |          |         | ddsa,derive-ecdh,export-wrappe | ddsa,derive-ecdh,exportable-un |
|        |                   |                      |                                |          |          |         | d,import-wrapped,exportable-un | der-wrap,get-option            |
|        |                   |                      |                                |          |          |         | der-wrap,get-option            |                                |
+--------+-------------------+----------------------+--------------------------------+----------+----------+---------+--------------------------------+--------------------------------+
This indicates that YubiHSM 2 as it has now been configured will later on allow the KSP to leverage the device to:
- Generate asymmetric objects
- Compute signatures using RSA-PKCS1v1.5
- Compute signatures using RSA-PSS
- Export other objects under wrap
- Import wrapped objects
- Mark an object as exportable under wrap
In addition, this object (the auth key, object ID
3) also has so-called delegated capabilities. Delegated capabilities define the set of capabilities that can be set or “bestowed” onto other objects that are created by it.To exit, select Exit YubiHSM Manager from the main menu and press Enter.
KSP Status Codes for Windows
The YubiHSM software components have a standard set of status codes to report the status of an HSM operation. To comply with the expectations of specific platforms, these status codes are converted to the appropriate API status code.
Currently, this translation is only performed for the Windows Key Storage Provider. The error codes, their meanings and translated values are as follows.
| Libyubihsm Error Code | Description | Windows CNG Translation |
|---|---|---|
| YHR_BUFFER_TOO_SMALL | Not enough space
to store data
|
NTE_BUFFER_TOO_SMALL |
| YHR_CONNECTION_ERROR | Transport Backend
error
|
NTE_DEVICE_NOT_READY |
| YHR_CONNECTOR_ERROR | Connector
operation Failed
|
NTE_DEVICE_NOT_READY |
| YHR_CONNECTOR_NOT_FOUND | Unable to find a
suitable connector
|
NTE_DEVICE_NOT_READY |
| YHR_CRYPTOGRAM_MISMATCH | Unable to verify
cryptogram
|
NTE_BAD_SIGNATURE |
YHR_DEVICE_AUTHENTICATION
_FAILED
|
Message encryption /
verification failed
|
NTE_INCORRECT_PASSWORD
|
YHR_DEVICE_COMMAND
_UNEXECUTED
|
The HSM attempted to
execute a command,
but it did not
complete in allotted
time. The command
has not terminated,
and the current
state of the session
is unavailable
|
NTE_SYS_ERR |
YHR_DEVICE_DEMO_MODE
|
Demo mode, power
cycle device
|
NTE_DEVICE_NOT_READY |
YHR_DEVICE_INSUFFICIENT
_PERMISSIONS
|
Wrong permissions
for operation
|
NTE_PERM |
YHR_DEVICE_INVALID
_COMMAND
|
Invalid command | NTE_NOT_SUPPORTED |
| YHR_DEVICE_INVALID_DATA | Malformed command /
invalid data
|
NTE_INVALID_PARAMETER |
| YHR_DEVICE_INVALID_ID | Illegal ID used
|
NTE_INVALID_PARAMETER[] |
| YHR_DEVICE_INVALID_OTP | Invalid OTP
|
NTE_INCORRECT_PASSWORD |
YHR_DEVICE_INVALID
_SESSION
|
Invalid session | NTE_DEVICE_NOT_READY |
YHR_DEVICE_LOG_FULL
|
Log buffer is full
and forced audit is
set
|
NTE_DEVICE_NOT_READY |
| YHR_DEVICE_OBJECT_EXISTS | An object with the
specified ID already
exists
|
NTE_EXISTS |
YHR_DEVICE_OBJECT
_NOT_FOUND
|
Object not found | NTE_NOT_FOUND |
| YHR_DEVICE_OK | No error | NTE_OP_OK |
| YHR_DEVICE_SESSION_FAILED | Session creation
failed
|
NTE_DEVICE_NOT_READY |
| YHR_DEVICE_SESSIONS_FULL | All sessions are
allocated
|
NTE_DEVICE_NOT_READY |
| YHR_DEVICE_STORAGE_FAILED | Storage failure | NTE_TOKEN_KEYSET
_STORAGE_FULL
|
| YHR_DEVICE_WRONG_LENGTH | Wrong length | NTE_BAD_LEN |
| YHR_GENERIC_ERROR | Generic error | NTE_FAIL |
| YHR_INIT_ERROR | Unable to initialize
libyubihsm
|
NTE_PROVIDER_DLL_FAIL |
| YHR_INVALID_PARAMETERS | Invalid argument to
a function
|
NTE_INVALID_PARAMETER |
YHR_MAC_MISMATCH
|
Unable to verify MAC
|
NTE_BAD_SIGNATURE
|
YHR_MEMORY_ERROR
|
The YubiHSM or
software library was
not able to allocate
memory to perform
the requested
operation
|
NTE_NO_MEMORY
|
YHR_SESSION
_AUTHENTICATION_FAILED
|
Unable to
authenticate session
|
NTE_INCORRECT_PASSWORD |
| YHR_SUCCESS | The operation
completed
Successfully
|
ERROR_SUCCESS |
| YHR_WRONG_LENGTH | This error may occur
if there is a
mismatch between the
YubiHSM firmware
version and
libyubihsm library
version
|
NTE_BAD_LEN |