Backup and Restore with YubiHSM Backup Keys
This document describes methods for creating a secondary YubiHSM key that is a backup of your primary YubiHSM. Topics in this document:
Backup using Shell, Manager, or KSP
The YubiHSM 2 supports encrypted export and import of objects using either a symmetric AES-CCM based scheme or an RSA keypair.
The examples below assume the default Authentication Key (0x0001). If you use some other Authentication Key make sure
that it has the Capability put-wrap-key (“Import wrap key objects”) and has the correct Delegated Capabilities,
otherwise you will get a wrong permissions for operation error. See Access Control and Role Definition for more
information on the role of Capabilities and Delegated Capabilities.
You can perform these operations using:
- YubiHSM Shell for backing up and restoring
- YubiHSM Manager for backing up and restoring
- YubiHSM Key Storage Provider for backing up and restoring certificate as well as private key.
Basic steps for all three cases:
- Create a Wrap Key, call it wrapkey.
- Import wrapkey into the primary YubiHSM2.
- Export other objects in the primary YubiHSM2 using wrapkey.
- Import wrapkey into the backup YubiHSM2.
- Import the objects exported in step 3 into the backup YubiHSM2.
Conditions required for a successful full backup: Any object that does not fulfill these conditions is not exported:
- wrapkey is accessible in all the Domains the other objects are available in.
- wrapkey has Delegated Capabilities that include all the Capabilities any other object has.
- wrapkey has the Capabilities
export-wrappedandimport-wrapped(“Export other Objects under wrap” and “Import wrapped Objects” respectively). - All other objects have the capability
exportable-under-wrap(“Exportable under wrap”).
Backup and Restore Using YubiHSM Shell
Backup
Start by generating an asymmetric key that we then make a backup of.
$ yubihsm-shell -a generate-asymmetric-key -A rsa2048 --capabilities exportable-under-wrap, sign-pkcs,decrypt-pkcs
...
Generated Asymmetric key 0x6e77
...
This generates an asymmetric key accessible in all domains.
Get a pseudo random number from the YubiHSM2 and store it in a file. This is the Wrap Key.
$ yubihsm-shell -a get-pseudo-random --count=32 --out=wrap.key
Important
The file
wrap.keyhere contains the Wrap Key loaded into your YubiHSM in clear text. It should therefore be considered sensitive.Import
wrap.keyinto the primary YubiHSM2.... yubihsm-shell -a put-wrap-key --capabilities export-wrapped,import-wrapped --delegated=sign-pkcs, decrypt-pkcs,exportable-under-wrap --in=wrap.key ... Stored Wrap key 0xd581
This imports a Wrap Key accessible in all domains.
Make an encrypted backup of the Asymmetric Key
0x6e77in the filekey_6e77.yhw.yubihsm-shell -a get-wrapped --wrap-id=0xd581 --object-id=0x6e77 -t asymmetric-key --out=key_6e77.yhw
Restore
This step assumes you have a fresh device where you want to restore the previously backed up key 0x6e77.
Import the Wrap Key into the backup YubiHSM2.
$ yubihsm-shell -a put-wrap-key -A aes256-ccm-wrap -c export-wrapped, import-wrapped --delegated=sign-pkcs,decrypt-pkcs,exportable-under-wrap --in=wrap.key -i 0xd581
...
Stored Wrap key 0xd581
Import the Asymmetric key
0x6e77into the backup YubiHEM2.yubihsm-shell -a put-wrapped --wrap-id=0xd581 --in=key_6e77.yhw ... Object imported as 0x6e77 of type asymmetric-key
Backup and Restore Using YubiHSM Manager
The YubiHSM 2 Manager can be used to backup and restore all exportable objects simultaneously.
Backup
The step here assumes that a Wrap Key fulfilling all the conditions mentioned above already exists in the primary YubiHSM2. For the following examples, assume that such a key has ObjectID 0xd581.
- From the main menu, select [Device operations]
- Select [Backup device] and follow the prompts.
Note
When creating a Wrap Key using yubihsm-manager and if the Wrap Key is an AES key, an option is presented to split the Wrap Key into shares to be held by different custodians. It would also be possible to set the minimum number of custodians required to reconstruct the Wrap Key.
Important
Split and reconstruction of the Wrap Key is done in the software (yubihsm-manager). The YubiHSM2 itself is not aware of such split or any shares.
Restore
Running the store command imports all \*.yhw files in the specified directory. If some of those files are not encrypted and wrapped with the selected Wrap Key, they are not imported.
- From the main menu, select [Device operations]
- Select [Restore device] and follow the prompts.
Backup and Restore Using YubiHSM KSP (Windows Only)
YubiHSM Key Storage Provider (KSP) enables backing up and restoring the keys managed using this tool.
Note
Microsoft Active Directory Certificate Services (ADCS) does not set the NCRYPT_ALLOW_EXPORT_FLAG when generating a key, either through the setup UI or the Install-ADCSCertificationAuthority PowerShell module.
When creating an ADCS root CA key using the YubiHSM 2, the exportable-under-wrap Capability is added by default. Backup and restore functionality is therefore available using the following manual processes.
- Identify Your Private Key Container Name
- Backup the Target Certificate
- Backup the Target Private Key
- Restore the Target Private Key
- Restore the Target Certificate
Identify Your Private Key Container Name
- To view the currently installed certificates in the Local Machine “My” store, open an elevated command prompt/shell by using the
certutilcommand.
PS1> certutil -store My
- Find the target certificate in the list and then find its
Key Containerproperty. The Provider property should be the same asYubiHSM Key Storage Provider. - To identify the certificate, record the
Cert Hashproperty.
Backup the Target Certificate
Using any available means (certmgr.msc, PowerShell, certutil), export the target certificate, but without the private key in DER format.
Note
The YubiHSM does not provide a mechanism for returning the raw private key to Windows, so generating a PKCS#12 container is not currently possible.
For example, to export the certificate in .crt ``format to a file named ``<Cert Hash>.crt, use the command.
PS1> certutil -split -store My <Cert Hash>.
Backup the Target Private Key
Export the target private key with the label property equal to the Key Container property.
- Use an Authentication Key with the
export-wrappedcapability set. - Use the instructions for exporting a private key under wrap via
yubihsm-shell(see Backup and Restore Using YubiHSM Shell).
Restore the Target Private Key
Import the target private key file to your backup YubiHSM.
- Use an Authentication Key with the
import-wrappedcapability set. - Use the instructions for importing a private key under wrap via
yubihsm-shell(see Backup and Restore Using YubiHSM Shell).
The imported key object should have the same Label property as the original object.
Restore the Target Certificate
Before the certificate is imported to the local machine, it does not have an associated private key.
Move the target certificate file generated as per Backup and Restore Using YubiHSM Shell to the target machine by importing the certificate to the LocalMachine “My” store. Use your preferred method.
Re-associate the certificate to the private key by using the
-repairstorefunctionality ofcertutil.Verify that the target private key is visible via the YubiHSM KSP: list all private keys (and their corresponding container names - which are equal to the
Labelproperty in the YubiHSM visible to the current Authentication Key).PS1> certutil -key -csp "YubiHSM Key Storage Provider"
Open an elevated prompt and execute the command:
PS1> certutil -repairstore MY <Cert Hash>
To verify that the certificate has been associated with the YubiHSM Key Storage Provider and has the correct
Key Containerproperty value, repeat the steps under Identify Your Private Key Container Name.
Backup Examples
We strongly recommend you make a backup copy of all production objects residing on your primary device, particularly once the CA root key has been generated on the device. If there is an unforeseen hardware failure of the primary device, having a backup ensures that you can resume operations quickly. In addition, this provides a means to backup all objects contained on a device to reside in secure hardware offline.
The backup process results in two identical YubiHSM 2 devices with the same number of objects, keys, labels, etc.
Note
Specific recommendations for governance of your critical key material is out of scope for this guide. Ensure that you design and document these security procedures to fit the requirements of your organization. In many cases, they are subject to audits.
Backup and Restore the YubiHSM 2 Overview
The backup, see Backup using Shell, Manager, or KSP, of the primary YubiHSM 2 is a duplicate of all of the objects stored on the primary device. The objects are exported under wrap onto the secondary device. The objects are available using the same application Authentication Key.
For instance, when following this example, the Wrap Key (created with ID 2 previously), the application
Authentication Key (ID 3), the audit key (ID 4) (if created previously), and the CA root key is duplicated onto
the secondary device. The factory-installed Authentication Key (ID 1) on the secondary device is destroyed. You
need assistance from the Wrap Key custodians to provide their respective key shares, if applicable.
In the example we used, 2 out of the 3 shares must be available. When you create a backup, you create a duplicate of the objects on your primary YubiHSM 2 onto a secondary device.
The backup and restore procedure consists of the steps listed below the following diagram. These steps are described in detail in the section, Restore Keys on the Secondary YubiHSM 2.
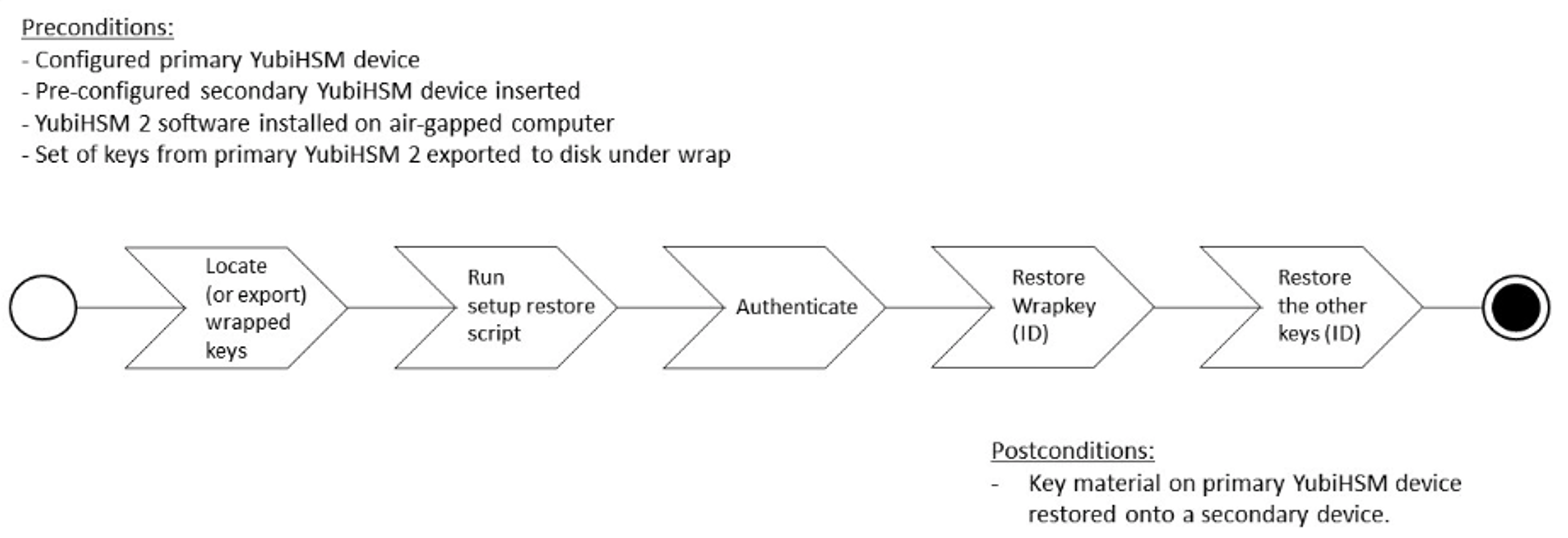
Figure: Backup and recovery on YubiHSM 2 Primary keys
- Locate the wrapped key material that was previously exported by the steps in YubiHSM 2 Key Storage Provider (KSP).
- Set up communication between the YubiHSM 2 tools and the secondary (backup) YubiHSM 2 device.
- Start the configuration process and authenticate to the secondary YubiHSM 2 device.
- Identify the CA root key ID.
- Export the CA root key.
- Verify the key material under wrap.
- Restore the key material onto a secondary (backup) YubiHSM 2 device.
- Verify the objects on the secondary device are correct.
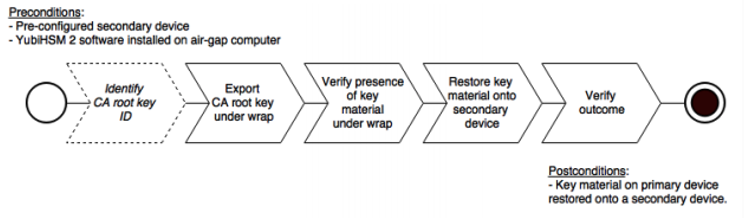
Figure: Recovery to YubiHSM 2 Secondary keys
Symmetric Backup of the Primary YubiHSM 2
The backup of the primary YubiHSM 2 is a duplicate of all of the objects stored on the primary device and are available using the application Authentication Key used.
The example described here is appropriate for testing and for smaller installations. This example is not appropriate for moving the YubiHSM 2 device from one server to another.
This example gives instructions for duplicating the following on the secondary device:
- Wrapkey (previously created with ID
2), - Application Authentication Key (ID
3), - Audit key (ID
4) (if created previously)
The listed objects are exported under wrap.
The factory-installed Authentication Key (ID 1) on the secondary YubiHSM 2 device will be destroyed, just as it was
on the primary YubiHSM 2 device.
If you use actual Wrap Key custodians (instead of just doing a proof of concept), you need the custodians to provide their respective key shares. In the example we used in this guide, 2 out of the 3 custodians/shares must be available.
To guarantee integrity, perform these operations in an air-gapped environment.
Restore Keys on the Secondary YubiHSM 2
Since the CA root key was created on the device when setting up the CA, it currently only exists on the device. To back it up using the YubiHSM Manager program, it must first be exported from the device using the Wrap Key that also sits on the device alongside the application Authentication Key and the audit key. To export the CA root key under wrap using the Wrap Key on the device:
In your command line application, run YubiHSM Manager program. To do this, if you haven’t already:
Launch your command line application and navigate to the directory containing the YubiHSM Manager program.
Then run the following command and press Enter.
$ yubihsm-manager --authkey 3
Type in the
passwordfor the application Authentication Key.If you already know the object ID of the root CA, you can skip this step. If you need to identify the root CA, you can list the objects available.
- To list the objects, select List from the main menu and press Enter.
- You see a list of the objects on the device that the application Authentication Key with ID
3has access to, which includes the CA root key. Identify its ID.
To export the CA root key under wrap from the primary device to the local file system, do:
- Using YubiHSM Manager: From the main menu, select [Wrap key operations] -> select [Export objects under wrap]. Follow the prompts to export the CA root key under wrap.
Using YubiHSM Shell: Run the following command:
yubihsm> get wrapped 0 2 seed=0 asymmetric-key {rootkeyID} rootkey.yhw
Where
seed=0does not export a privacy key seed. See EXPORT WRAPPED Command.
Verify that all the keys, that were previously exported from the primary YubiHSM 2 under wrap, reside in the same directory as the YubiHSM Manager program and that you have read access to that directory.
If the necessary keys are not yet all available on disk, export the keys under wrap. In YubiHSM Manager, from the main menu, select [Device operations] -> select [Backup device]. Follow the prompts to export the keys under wrap.
The YubiHSM Manager looks for files with the
.yhwfile extension in the specified working directory and attempts to read and import them into the YubiHSM 2 device. The Wrap Key itself is imported when the key shares are provided to the tool. For example, the following files may be present:0x0003-AuthenticationKey.yhw(Application Authentication Key under wrap)0x0004-AuthenticationKey.yhw(Audit key under wrap)rootkey.yhw(CA root key under wrap)x427a-Opaque.yhw(Certificate under wrap - not referenced by this guide in the configuration of the primary HSM 2)x427a-AsymmetricKey.yhw(Private asymmetric key under wrap - not referenced by this guide in the configuration of the primary HSM 2)
If the initial Authentication Key (by default available as ID
0x0001) has been deleted, the new authentication application key is identified with the flagyubihsm-manager --authkey. For example:$ yubihsm-manager --authkey 0x0003
To begin the process of restoring the data onto the secondary YubiHSM 2, if the primary YubiHSM 2 device is inserted into your computer, remove it and insert the secondary device.
Important
Restoring a device must be performed in an air-gapped environment in order to guarantee integrity.
In your command line application (where
$is the prompt), run YubiHSM Manager.Run
yubihsm-manager:$ yubihsm-manager
To start the YubiHSM Manager, type the default Authentication Key password:
passwordand press Enter.Import the Wrap Key onto the secondary YubiHSM 2 device. From the main menu, select [Wrap key operations] -> Import Wrap Key. Select to recreate Wrap Key from shares.
When prompted for share number
1: Have the Wrap Key custodian holding the first share input this information and press Enter. A message confirms that the share is received:Continue to have each Wrap Key custodian enter the share information for each of the key shares required to regenerate the Wrap Key. When the sufficient number of key shares have been entered by the Wrap Key custodians, a final message is displayed indicating that the Wrap Key from the primary YubiHSM 2 is now on the secondary YubiHSM 2 as well:
Stored wrap key with ID 0x0002 on the device
Note
The ID of the Wrap Key on the secondary device is the same as the ID of the Wrap Key on the primary device.
Review the output to verify Certificate Authority (CA) root key was also generated and exported along with a private asymmetric key, both under wrap.
After the Wrap Key has been stored on the secondary YubiHSM 2 device, use YubiHSM Manager restore objects from the files containing the application Authentication Key, the CA root key, and, if applicable, the audit key that were saved to file under wrap during the configuration of the primary device.
From the main menu, select [Device operations] -> [Restore device]. Follow the prompts to restore the keys under wrap.
The output below shows that in this case, the Certificate Authority (CA) root key was also generated and exported along with a private asymmetric key, both under wrap.
reading ./0x0004.yhw
Successfully imported object Authkey, with ID 0x0004
reading ./0x0003.yhw
Successfully imported object Authkey, with ID 0x0003
reading ./0x427a-AsymmetricKey.yhw
Successfully imported object Asymmetric, with ID 0x427a
reading ./0x427a-Opaque.yhw
Successfully imported object Opaque, with ID 0x427a
reading ./rootkey.yhw
Successfully imported object Asymmetric, with ID {rootkeyID}
Review the output to note if there are files containing wrapped objects with the
.yhwfile extension in the specified directory that were exported with a Wrap Key other than the one reconstituted by the shares here. The YubiHSM Manager attempts to read those too, but fails gracefully. The YubiHSM Manager only restores the files it can decrypt.After the restore process is finished, delete the default, factory-installed Authentication Key.
From the main menu, select [Authentication key management] -> Delete -> Select the default Authentication Key (ID
0x0001) and press Enter -> Confirm the deletion by selecting [Yes] and pressing Enter.Exit YubiHSM Manager by selecting Exit YubiHSM Manager from the menu
Verify the Duplicated YubiHSM 2
With the steps in the previous sections completed, you now have a secondary (duplicate) of the YubiHSM 2 device configured with the three key objects you created on the primary YubiHSM 2 device earlier.
Confirm that the key objects are identical on both the secondary (configured in previous section) and the primary device (configured earlier).
At your command prompt, run the YubiHSM Manager program. To do this, if you haven’t already:
Launch your command line application and navigate to the directory containing the YubiHSM Manager program.
Then run the following command and press Enter.
$ yubihsm-manager --authkey 3
Type the password for the application Authentication Key. The main menu is displayed
List the objects by selecting List from the main menu.
Review the output and verify that the secondary device now contains all of the key material that you intended to restore.
Depending on the order in which the keys under wrap were imported, the order of the enumerated keys on the secondary device may be different than on the primary device when using the list command. This has no practical implication and the object IDs are identical between the devices.
After you verify that the secondary device contains all of the key material that you intended to restore, remove the keys under wrap currently on file. The computer’s hard drive can be erased.