Set up KSP on Windows
To configure the YubiHSM for use with Windows, complete the initial preparation, then complete the steps in either the Windows or Windows Server topics.
- Preparing to use YubiHSM 2 on Windows
- Configuring YubiHSM 2 for Windows
- Configuring YubiHSM 2 for Microsoft Windows Server
Preparing to use YubiHSM 2 on Windows
Before using the YubiHSM 2 on Windows, there are two YubiHSM 2 software components to be configured:
- The YubiHSM 2 Key Storage Provider (KSP).
- The YubiHSM 2 Connector service.
The configuration steps are described in the sections below.
Important
Make a backup of your Windows Registry before you make any changes.
Configure the KSP Settings in the Windows Registry
To enable Microsoft Cryptographic API Next Generation (CNG) to access the YubiHSM 2 KSP, the following registry entries must be changed from their default values. The YubiHSM 64-bit KSP subkey and the YubiHSM 32-bit KSP subkey were created during the YubiHSM SDK installation:
HKEY_LOCAL_MACHINE\SOFTWARE\Yubico\YubiHSM
The edits to be made produce a result like the one illustrated below:
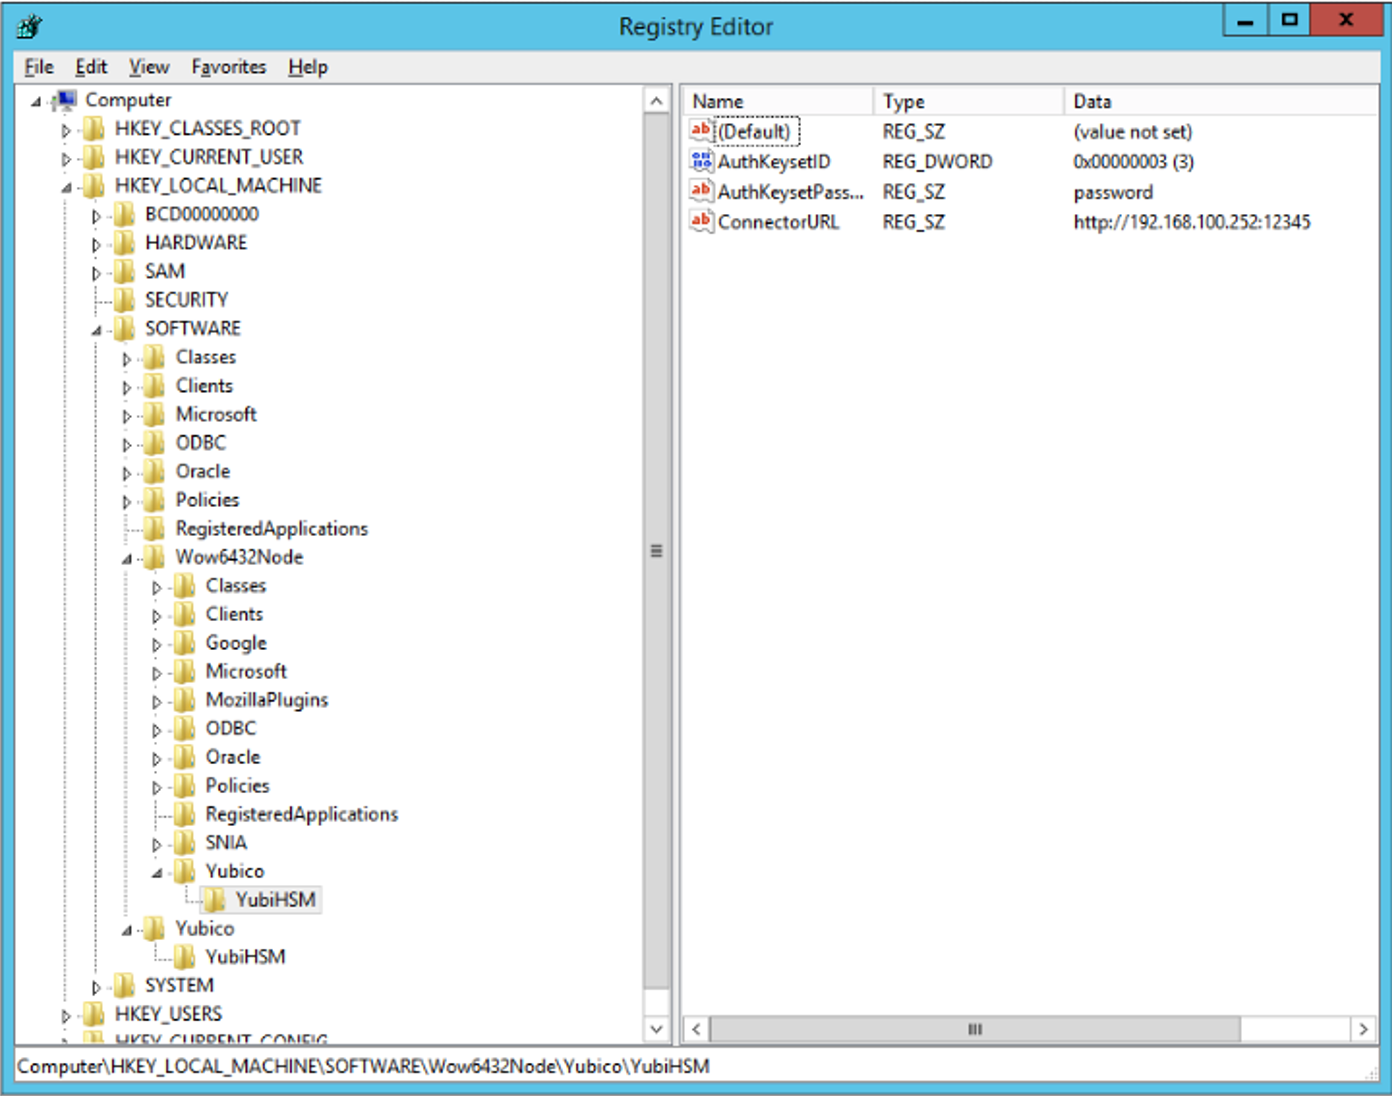
Figure: Registry settings for the YubiHSM 2 KSP
Click Start > Run, type
regeditin the Run dialog box, and click OK.Select the registry subkey for the YubiHSM 64-bit KSP.
HKEY_LOCAL_MACHINE\SOFTWARE\Yubico\YubiHSM.
Change the URI to the IP address and port on which the YubiHSM 2 Connector is listening by editing the following registry entry appropriately, for example:
“ConnectorURL”=http://127.0.0.1:12345If the Connector is listening on IP address and port
192.168.100.252:12345, for example, the ConnectorURL value should be changed to:“ConnectorURL”=http://192.168.100.252:12345Enter the ID of the application authentication key (object ID
3was used as an example in this guide; if you used another object ID be sure to enter that). For our example, because the hexadecimal value of0x00000003resolves to3in the Windows Registry, change the entry to:“AuthKeysetID”=3
The application authentication key password is stored in the registry for the KSP to use when authenticating to the device. Enter the new password that you created:
“AuthKeysetPassword”={password}
Select the registry subkey for the
YubiHSM 32-bit KSP.HKEY_LOCAL_MACHINE\SOFTWARE\Wow6432Node\Yubico\YubiHSM
Repeat steps 3-5 above.
To save your changes, exit the Windows Registry.
Configure the YubiHSM 2 Connector Service
The YubiHSM Connector service reads the configuration file yubihsm-connector-config.yaml. Depending on your local setup, for instance if you are running multiple instances of the software on the same host, you may need to edit this configuration file to ensure it is consistent with the Windows Registry, i.e., that the parameters and their values are the same in the configuration file and in the Windows Registry.
On Windows, the yubihsmconnector.config.yaml file is located at C:\programdata\yubiHSM\yubihsmconnector.yaml - you need administrator rights to modify the file.
Configuring YubiHSM 2 for Windows
If the target private key is managed by the Microsoft Software Key Storage Provider, another software provider, or any other KSP that allows export via PKCS#12 PFX, it is possible to move your key to the YubiHSM 2, but results may vary.
This process relies on using the -repairstore functionality of the certutil command, so the private key must only be present via the YubiHSM Key Storage Provider when performing this step. Please refer to the source storage provider documentation for how to cleanly and completely delete a private key.
Because KSP implementations differ, we recommend testing this procedure using your existing provider before affecting a live system.
Export your Existing Private Key and Certificate
Refer to your current KSP documentation on how to obtain a PKCS#12 PFX export of your certificate and private key.
Obtain your PFX file.
Split the certificate from the PFX file using
certutil.The following example creates a file named
<Cert Hash>.crt.PS1> certutil -split -dump <pfx file>
If you are moving the key to the YubiHSM 2 on the same machine, you must delete the original private key in your current provider.
PS1> certutil -key
Locate the key that corresponds with the CA. It may look something like this:
Microsoft Software Key Storage Provider:

EXAMPLE-CA abcdef1234fedcba4321abcdef123456_9cfc1053-1b5a-44d7-8a7e-3a8a1c0d0db0 RSA AT_KEYEXCHANGE
To delete this example private key.
PS1> certutil -delkey -csp "Microsoft Software Key Storage Provider" "abcdef1234fedcba4321abcdef123456_9cfc1053-1b5a-44d7-8a7e-3 a8a1c0d0db0"
Import the Target Private Key
Using the instructions for importing a PFX private key, see PUT ASYMMETRIC KEY Command via yubihsm-shell, import the target private key file to your YubiHSM 2.
Record the
Labelproperty of your imported key.Important
The
certutilutility does not provide an easy way to split a key exported from the Software KSP into an unencrypted PEM file. It may be necessary to use another tool like OpenSSL to convert the key file to an unencrypted format for import into the HSM.Export the private key.
PS1> openssl pkcs12 -in <pfx file> -nocerts -out ca.key -nodes
To remove the passphrase from the private key.
PS1> openssl rsa -in ca.key -out ca.key
Restore the Target Certificate
Move the target certificate file (
<Cert Hash>.crt) to the target machine.Import the certificate to the LocalMachine “My” store via your favorite method.
At this point, the certificate does not have an associated private key. We use the
-repairstorefunctionality ofcertutilto re-associate the certificate to the private key.Make sure that the target private key is visible via the YubiHSM KSP.
PS1> certutil -key -csp "YubiHSM Key Storage Provider"
This command lists all private keys visible to the current Authentication Key. It also lists the private keys corresponding container names - which are equal to the Label property in the YubiHSM 2.
Open an elevated prompt and execute the command.
PS1> certutil -repairstore MY <Cert Hash>
Verify that the certificate has been associated with the YubiHSM KSP and has the correct
Key Containerproperty value.PS1> certutil -store My
Inspect the Key Container and Provider properties.
Warning
If you are moving your CA key to the YubiHSM 2 on the same machine, Windows Certificate Services (CertSvc) on the local machine writes the name of the KSP to its configuration section in the registry. When signing requests, the certificate service will fail if the KSP name does not match the name in the registry.
Update the KSP name for the local certificate service.
Open an elevated prompt and execute the commands.
PS1> certutil -setreg CA\CSP\Provider "YubiHSM Key Storage Provider"
PS1> certutil -setreg CA\EncryptionCSP\Provider "YubiHSM Key Storage
     Provider"
Optionally, if you have multiple CAs on the same machine, or prefer to edit the registry directly. These settings are located at:
HKLM\System\CurrentControlSet\Services\CertSVC\Configuration\<CAName>\[CSP | EncryptionCSP]
Example: Creating a Code-Signing Certificate using the Key Storage Provider
This example will show you how to create a code-signing certificate request using a key generated and stored in the YubiHSM 2 via the Key Storage Provider (KSP). This type of code-signing certificate is appropriate for use with the Microsoft signtool utility for digitally signing Windows binaries.
In this example, we use the command line certreq utility. All procedures documented here are available in the Certificate Manager (certmgr.msc) MMC snap-in if you prefer to use a GUI.
Note
For operations that take input data (from command line or file), releases prior to and including the current yubihsm2-sdk release have a size limit - 4kb in interactive mode, or 8kb in non-interactive mode.
Configure the Key Storage Provider
By default, the KSP will use the factory authentication key in slot 1. If the factory authentication key no longer exists or a different authentication key is desired, the KSP must first be configured with the desired key ID and password.
Note
The configured authentication key must at a minimum have the capabilities generate-asymmetric-key, sign-pkcs, and delegated capability sign-pkcs. If you want the generated key to be exportable, then add the exportable-under-wrap delegated capability.
Authentication Key Example
Create a new Authentication Key capable of generating exportable asymmetric keys through KSP.
yubihsm> put authkey 0 0 "GenerateKey" 1 generate-asymmetric-key,
         sign-pkcs sign-pkcs,exportable-under-wrap password
         Stored Authentication key 0x0e32
Create the Certificate Request Configuration File
To specify your request, the certreq utility requires an .inf file as input. An example file is supplied here.
Sample sign.inf
[Version]
 Signature="$Windows NT$"

[NewRequest]
 Subject = "CN=My Publisher"  ; Entity name (dns name/upn for other cert types)
 HashAlgorithm = sha256       ; Request uses sha256 hash
 KeyAlgorithm = RSA           ; Key pair generated using RSA algorithm
 Exportable = FALSE           ; Private key is not exportable
 ExportableEncrypted = FALSE  ; Private key is not exportable encrypted
 KeyLength = 2048             ; YubiHSM KSP key sizes: 2048, 3072, 4096
 KeySpec = 2                  ; 1 = AT_KEYEXCHANGE, 2 = AT_SIGNATURE
 KeyUsage = 0x80
     ; 80 = Digital Signature, 20 = Key Encipherment (bitmask)
 MachineKeySet = FALSE
     ; True: cert belongs the local computer, False: current user
 KeyUsageProperty = NCRYPT_ALLOW_SIGNING_FLAG
     ; Private key only used for signing, not decryption
 UseExistingKeySet = FALSE    ; Do not use an existing key pair
 ProviderName = "YubiHSM Key Storage Provider"
 ProviderType = 1
 SMIME = FALSE                ; No secure email function
 UseExistingKeySet = FALSE    ; Do not use an existing key pair
 RequestType = PKCS10         ; Can be CMC, PKCS10, PKCS7 or Cert (self-signed)

[Strings]
 szOID_ENHANCED_KEY_USAGE = "2.5.29.37"
 szOID_CODE_SIGN = "1.3.6.1.5.5.7.3.3"
 szOID_BASIC_CONSTRAINTS = "2.5.29.19"

[Extensions]
 %szOID_ENHANCED_KEY_USAGE% = "{text}%szOID_CODE_SIGN%"
 %szOID_BASIC_CONSTRAINTS% = "{text}ca=0&pathlength=0"

; If you are using ADCS with certificate templates, you may add
; a specific template under [RequestAttributes]
; [RequestAttributes]
; CertificateTemplate= CodeSigning
Create the Certificate Request
Once you have created the certificate request configuration file, pass it to certreq as the input file argument. For example:
certreq -new sign.inf sign.req
Sign the Certificate Request
In the above example, the certificate request was written to sign.req.
- Take this file and submit its contents to your CA for signature.
- Open the resulting file (for example,
sign.crt) and install the certificate to your personal store.
Sign using Signtool
Open a prompt with
signtoolin the path.Sign your binary.
> signtool sign <binary name>
Identify your signing certificate by hash, if you have multiple certificates available for code signing.
signtoolshows you a list of valid certificates. Re-run sign tool with thesha1hash of the certificate:> signtool sign /sha1 <certificate hash> <binary name>
Associate the YubiHSM private key to the certificate.
When importing the certificate for the first time on a new computer, you need to manually bind the certificate to the private key. This is needed because 1) the key is not stored with the certificate and 2) Windows doesn’t automatically create an association between the private key and the certificate.
After you import the certificate to your personal store, use the
certutilutility provided by Windows.> certutil -repairstore my <certificate hash>
Troubleshooting
The error messages returned from signtool are often unhelpful in diagnosing why a signing operation failed. In these situations there are a few commands you can use to track down the root cause.
When using signtool, use the /v and /debug flags to get more detailed output.
The example below shows a response you might receive if the certificate is installed but the YubiHSM is not connected or is misconfigured.
 > signtool sign /v /debug <binary name>

After EKU filter, 1 certs were left.
After expiry filter, 1 certs were left.
After Hash filter, 1 certs were left.
After Private Key filter, 0 certs were left.
SignTool Error: No certificates were found that met all the given criteria.
Use
certutilto check the validity of the imported certificate.> certutil -verifystore my <certificate hash> ================ Certificate 0 ================ Serial Number: 029fe48291dd587c1e6f42bca341291 ... Certificate is valid
Use
certutilto check whether the KSP has been installed correctly. You should seeProvider Name: YubiHSM Key Storage Provideras one of the entries with no errors.> certutil -csplist ... Provider Name: YubiHSM Key Storage Provider ...
Use
certutilto check if the key is accessible through the storage provider. You can also add the-vflag to get additional details.> certutil -csp "YubiHSM Key Storage Provider" -key YubiHSM Key Storage Provider: tq-75c94c4b-5e40-4e44-bcd2-ee3330d4942f RSA AT_SIGNATURE
Use
certutilto dump certificate information.If the command shows
Cannot find the certificate and private key for decryption.when using a new computer, it might indicate thatcertutil -repairstorehasn’t yet been performed.> certutil -store my <certificate hash> ================ Certificate 0 ================ Serial Number: 029fe48291dd587c1e6f42bca341291 ... Private key is NOT exportable Signature test passed
For a detailed explanation of all options available in the request .inf file, see the documentation for the certreq utility.
To generate a similar request using the Certificate Manager:
- Open the Certificate Manager snap-in.
- Select the Personal/Certificates store.
- Right click and select All Tasks > Advanced Operations > Create Custom Request.
Configuring YubiHSM 2 for Microsoft Windows Server
This guide is intended to help systems administrators deploy YubiHSM 2 for use in a Windows server environment. The expected outcome is that the YubiHSM 2 is installed and configured with authentication keys, audit keys, and wrap keys. This guide also explains how to make backups and restore keys on a YubiHSM 2.
These guidelines for deployment cover basic topics, so the instructions should be modified as required for your specific environment. It is assumed that you are familiar with the concepts and processes for working with Microsoft Windows Server. It is also assumed that the installation is performed on a single Microsoft Windows Server, but the concept can be extended to more servers.
Important
Before deploying to production, we recommend that you use this guide for installing and testing the setup of the YubiHSM 2 with the Microsoft Windows Server installation in a test or lab environment.
About the YubiHSM Software
The following YubiHSM 2 software is used in this guide. These items are included as part of the archive file you download from the YubiHSM 2 SDK Downloads.
YubiHSM Connector - Enables communication between the YubiHSM 2 and applications that use it. We recommend that the YubiHSM Connector run on the host operating system if the calling application is deployed to a VM. The Connector must always be running.
YubiHSM Shell - The administrative command line tool used to interact with and configure the YubiHSM 2 device. If the YubiHSM Shell is installed on a VM, it will connect to the Connector over a networked connection.
YubiHSM Manager - Helps with setting up a device for specific use cases. Currently supports setting up for use with Microsoft Windows KSP.
YubiHSM Key Storage Provider (KSP) - Acts like a driver for the YubiHSM 2 device on Windows and enables it to work with applications that leverage Microsoft’s Cryptographic API Next Generation (CNG). Examples of calling applications are Microsoft Certificate Services or Microsoft SQL Server Always Encrypted.
Prerequisites and Preparations
The audience of this guide is an experienced systems administrator with a good understanding of Microsoft Windows Server management. In addition, it is helpful to be familiar with the terminology, software, and tools specific to YubiHSM 2. As a primer for these, refer to Glossary.
In order to follow the steps provided in this guide, the following prerequisites must be met:
- Access to Microsoft Windows Server 2012 SP2 or higher, installed in a secure computer network. The system administrator must have elevated system privileges.
- The YubiHSM 2 SDK downloaded from the Yubico YubiHSM 2 Release page and available on the system to be used. Installation instructions are given in the following.
- Two (2) YubiHSM 2 devices, one for deployment and one for backup in hardware.
- Key custodians, if your organization policies require them for the YubiHSM 2 deployment. For more information about key custodians and the associated
M of Nkey shares, see Key Splitting and Key Custodians.
Important
Although it is possible to configure the YubiHSM 2 on a networked machine, to safeguard its integrity, it is recommended that its configuration be performed on a fresh system in an air-gapped environment, i.e., the steps in this guide should be performed on a stand-alone computer with both Windows Server 2012 SP2 or higher and the YubiHSM 2 software installed. And we recommend that you do not store keys - even under wrap - on network-accessible or otherwise compromise-able storage media.
Key Splitting and Key Custodians
The preferred method for backing up the YubiHSM 2 keys on Windows calls for key splitting and restoring or regenerating, often referred to as setting up an M of n scheme (Shamir’s Secret Sharing (SSS)). This process ensures no individual can export key material from the YubiHSM 2 and provides a way to control the import of key material that has been exported under wrap from one device into other devices. For example, you would export and import objects for backup purposes, as described in Backup and Restore Using YubiHSM KSP (Windows Only).
The key that is split among a predetermined number (n) of key custodians (also known as key shareholders) is known as the wrap key. Each custodian receives their own unique share. To use the key, a minimum number of shares (m) must be present so that the key can be regenerated (sometimes called “rejoined”). This minimum number of custodians is called the privacy threshold. If this threshold is not attained, the wrap key cannot be regenerated. This minimum number, n, should be larger than one.
The exact number of key shares and the privacy threshold are determined by the requirements of your organization. If your organization has policies in place that define how this procedure should be performed, be sure you know these policies before proceeding. You should also have a predetermined practice in place specifying both:
- How the key shares must be recorded (written on paper, photographed, locally printed, or some other means) and
- How they must be stored between uses (for example, offsite archive, safety deposit box, sealed envelope).
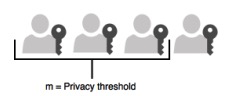
Figure: Privacy Threshold
The YubiHSM Manager enables you to perform the key splitting and assigning of shares to key custodians (use the subcommand ksp). To carry out the setup process, you need to know who the wrap key custodians will be. During setup, all key custodians must be physically present to record their shares. Exact instructions for key splitting and assigning of shares are given in YubiHSM 2 Key Storage Provider (KSP).