YubiKey 5 CSPN Series Specifics
CSPN Mode Configuration
As described in the YubiKey 5 CSPN security target [RD9], the YubiKey can be used in a CSPN approved mode of operation.
The specific configurations required to achieve a CSPN-approved mode are described in the sections below, organized by application.
For each section there is a summary of the YubiKey application, how to operate it in a CSPN-approved mode, and how the the application can be configured.
Listing the Applications on the YubiKey 5
To obtain a list of all applications on the YubiKey 5, use ykman to execute the ykman info command (ykman CLI and YubiKey Manager GUI Guide).
The output contains general information about the YubiKey 5, such as the current firmware version, but also all of the available applications, both enabled and disabled. An example of this command is shown in the screenshot below.

Figure 1 - Example of listing the applications on a YubiKey 5
Note
The Security Domain application is hidden from the user and therefore not listed by ykman.
Password Strength
Adherence to ANSSI’s guidelines on password strength is highly recommended whenever applicable, particularly with any of the YubiKey 5 applications.
Configuration Environment
Configuration of the YubiKey can be performed in two different areas:
- If the keys of an application are generated by the secured microcontroller, the YubiKey 5 is considered placed in a public area.
- If the keys of an application are loaded into the secured microcontroller, the YubiKey 5 is considered placed in a secure area with restricted access.
One-Time Password - OTP
The YubiKey 5 Series OTP application supports four protocols:
The configuration required to achieve CSPN-approved mode is described in the following sections.
Yubico OTP
Feature Summary
The Yubico OTP scheme is a proprietary algorithm based on symmetric AES encryption. To generate a Yubico OTP, set the following parameters:
- Public ID (1-16 bytes modhex)
- Private ID (6 bytes hexadecimal)
- Secret Key (16 bytes)
The Public ID generally represents the serial number of the YubiKey, but may be set to a different value. The Private ID is an optional secret field that may be included as an input parameter to the OTP generation algorithm. By default, when this parameter is not configured, its value is set to zero. The Secret Key is an AES-128 key that must be shared by the user between the YubiKey 5 and the verification server during configuration of the protocol’s credentials.
The touch sensor is always used when generating a Yubico OTP, and is considered part of the standard operating procedure.
For more information about Yubico OTP, see Yubico’s website, OPTs Explained.
CSPN Approved Mode
To operate the YubiKey 5 application Yubico OTP in a CSPN approved mode, the user must first be identified by a first factor authentication scheme. For example, username/password. The details for such an authentication scheme are beyond the scope of this document.
Once a Yubico OTP application is configured, set an access code to protect the key material and configuration. More details for such a configuration are described in the following section.
Technical Configuration
In order to protect the Yubico OTP credentials, use ykman <https://developers.yubico.com/yubikey-manager/Releases/>`_. Note that you need the most recent version of the CLI, not the GUI. For more information about this tool, see ykman CLI and YubiKey Manager GUI Guide.
To protect the credentials, use the command:
ykman otp --access-code <value> yubiotp <slot> --public-id <value> --generate-private-id --generate-key
Where --access-code parameter is set to a six byte long hex value.
See the figure below for an example command line interaction for creating protected Yubico OTP credentials with ykman.
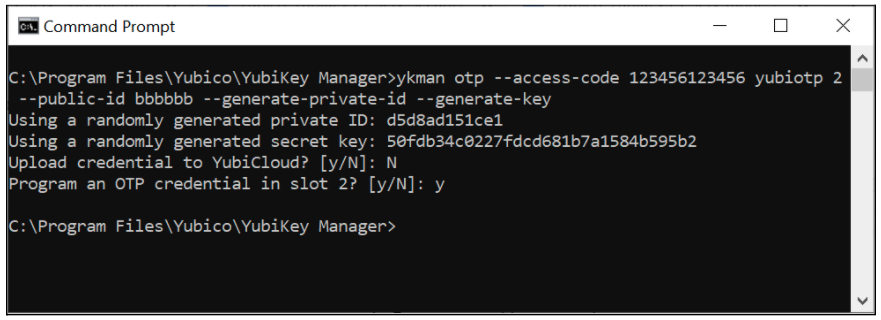
Figure 2 - Example of configuring protected Yubico OTP credentials
A code is now required for any operation that requires access to the Yubico OTP credentials.
To delete credentials, use the command:
ykman otp --access-code <value> delete [1|2]
To change the settings, use the command:
ykman otp --access-code <value> settings [OPTIONS] [1|2]
For instance, it is no longer possible to delete the Yubico OTP credentials without providing the correct access code. The screenshot below shows another example of how to use the ykman CLI for deleting protected Yubico OTP credentials. The first attempt fails because --access-code is not provided, but the second attempt succeeds when the flag --access-code is set.
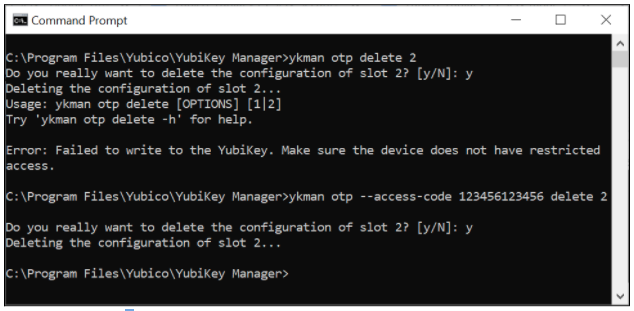
Figure 3 - Example of deleting protected Yubico OTP credentials
Challenge-Response
Feature Summary
The Challenge-Response protocol is based on the HMAC-SHA-1 algorithm. The relying party sends a challenge to the YubiKey 5, and the device responds with a hash of that challenge. The secret key used in the HMAC-SHA-1 is pre-loaded by the user onto the YubiKey 5 during configuration. It is also possible to configure whether touching the sensor of the YubiKey 5 is required for each Challenge-Response request. The Challenge-Response protocol is used as a second factor in the authentication process.
For more information on the challenge-response YubiKey application, see Yubico’s website, Challenge and Response.
CSPN Approved Mode
To operate the YubiKey 5 in a CSPN approved mode:
Identify the user by a first factor authentication scheme. For example, username/password. The details for such an authentication scheme are beyond the scope of this document.
Set usage of the YubiKey 5 touch sensor to required when configuring the Challenge-Response application.
When the Challenge-Response application is enabled on the YubiKey 5, set an access code to protect both the secret key and configuration. More details for such a configuration is described in the following section.
Technical Configuration
In order to protect the Challenge-Response credentials and enforce the touch sensor, use the command line ykman. Install the most recent version of the ykman CLI, because the YubiKey Manager GUI includes an older version of the ykman CLI.
Use the command:
ykman otp --access-code <value> chalresp --touch --generate <slot>
where -
--access-code for protecting the credentials. Set the --access-code parameter to a six byte long hex value.
--touch for requesting proof of user presence.
See the figure below for an example ykman CLI interaction for creating protected Challenge-Response credentials requiring touch.
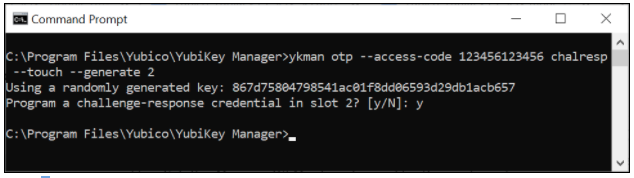
Figure 4 - Example of configuring protected Challenge-Response credentials with touch sensor
A code is now required for any operations that require access to the Challenge-Response credentials
To delete credentials, use the command
ykman otp --access-code <value> delete [1|2]
To Change the settings, use the command
ykman otp --access-code <value> settings [OPTIONS] [1|2]
For instance, now it is not possible to delete the Challenge-Response credentials without providing the access code.
The screenshot below shows an example of how to use the ykman command for deleting protected Challenge-Response credentials. The first attempt fails because --access-code is not provided, but the second attempt succeeds when the flag --access-code is set.
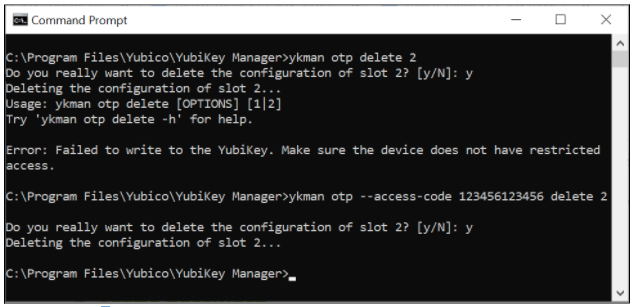
Figure 5 - Example of deleting protected Challenge-Response credentials
Static Password
Feature Summary
The static password application allows for storing a complete or partial static password. The password is replayed in the clear once the user touches the YubiKey 5 sensor. The static password is used as a second factor in the authentication process.
For more information on YubiKey application for static passwords, see Yubico’s website, Understanding Core Static Password Features.
CSPN Approved Mode
To operate the YubiKey 5 in a CSPN approved mode, store only one portion of the password within the YubiKey 5 and keep the remaining portion of the password in a different, but also secure location. Reconstruct the complete password by combining the portion from the YubiKey with the other portion stored elsewhere. Then authenticate in conjunction with the username. The overall details for such a password splitting scheme are beyond the scope of this document. Only the portion of the password to be stored within the YubiKey 5 is described.
The touch sensor is always used when displaying a portion of a static password, and is considered part of the standard operating procedure.
When the static password application is configured, set an access code to protect both the static password and configuration. More details for such a configuration are described in the following section.
Technical Configuration
To protect the static password, use the ykman. Install the most recent version of the ykman CLI, because the YubiKey Manager GUI includes an older version of the ykman CLI.
Use the command
ykman otp --access-code <value> static --generate --length <value> <slot>
where -
--access-code for protecting the static password. Set the --access-code parameter to a six byte long hex value.
See the figure below for an example command line interaction for creating a protected static password with ykman.
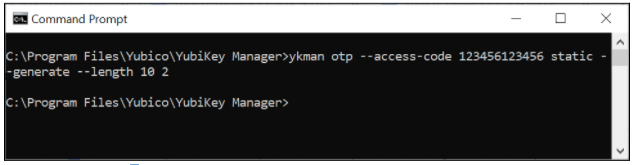
Figure 6 - Example of configuring a protected static password
A code is now required for any operations that require access to the static password.
To delete static password, use the command:
ykman otp --access-code <value> delete [1|2]
To change the settings, use the command:
ykman otp --access-code <value> settings [OPTIONS] [1|2]
For instance, it is not possible to now change the static password settings without providing the access code.
The screenshot below shows an example of how to use the ykman command line for changing the settings of a protected static password. The first attempt fails because no --access-code is provided, but the second attempt succeeds when the flag --access-code is set.

Figure 7 - Example of changing a protected static password
OATH-HOTP
Feature Summary
The OATH-HOTP protocol is implemented according to RFC 4226, “HOTP: An HMAC-Based One-Time Password Algorithm”, [RD5]. The algorithm underpinning this application on the YubiKey 5 is HMAC-SHA-1. Choose the length of the OTP (either 6 or 8 digits) and the initial counter value. The OATH-HOTP protocol is used as a second factor in the authentication process.
The touch sensor is always used when generating the OATH-HOTP, and is considered part of the standard operating procedure.
For more information on the YubiKey application OATH-HOTP see Yubico’s website, OATH.
CSPN Approved Mode
To operate the YubiKey 5 in a CSPN approved mode, identify the user by a first factor authentication scheme. For example, username/password. The details for such an authentication scheme are beyond the scope of this document.
When the OATH-HOTP application is enabled on the YubiKey 5, set an access code to protect the initial counter value and configuration. More details for such a configuration are described in the following section.
Technical Configuration
In order to protect the OATH-HOTP credentials, use the ykman. Install the most recent version of the ykman CLI, because the YubiKey Manager GUI includes an older version of the ykman CLI.
For protecting the OATH-HOTP credentials, use the command:
ykman otp --access-code <value> hotp <slot>
where --access-code is set to a six byte long hex value.
An example command line interaction for creating a protected OATH-HOTP with ykman is depicted in the following screenshot.
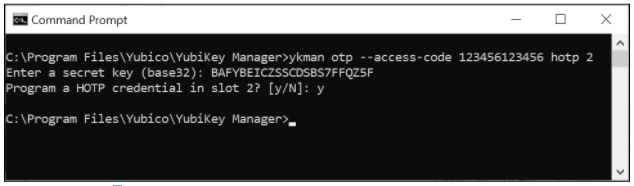
Figure 8 - Example of configuring protected OATH-HOTP credentials
A code is now required for any operations that require access to the OATH-HOTP credentials.
To Delete credentials, use the command
ykman otp --access-code <value> delete [1|2]
To Change the settings, use the command
ykman otp --access-code <value> settings [OPTIONS] [1|2]
For instance, you can no longer delete the OATH-HOTP credentials without providing the access code.
The screenshot below is an example of how to use the ykman CLI for deleting protected OATH-HOTP credentials. The first attempt fails because no --access-code is provided, but the second attempt succeeds when the flag –access-code is set.
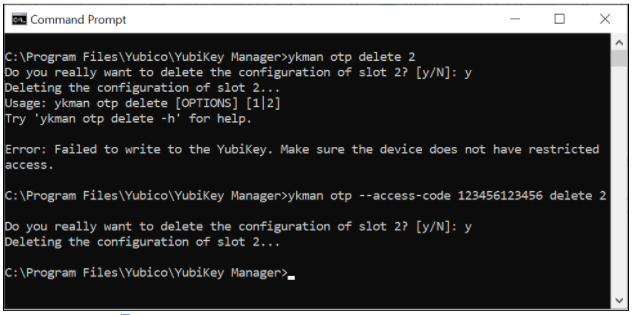
Figure 9 - Example of deleting protected OATH-HOTP credentials
OATH
Feature Summary
The OATH application allows for managing two types of OTP over the CCID interface:
- HMAC-Based One Time Password (HOTP)
- Time-Based One Time Password (TOTP)
A maximum of 32 credentials [1] can be stored within the YubiKey’s OATH application. Use the software tool Yubico Authenticator to configure and use this application.
A password may be set to protect the OATH credentials. If a password is configured, the password is required to unlock the application, which can then be used to generate any number of OTPs for the remainder of the session (until application is deselected).
When enrolling credentials, you can configure whether touching the sensor of the YubiKey 5 is required for each OTP generation.
CSPN Approved Mode
The OATH-HOTP/TOTP protocol is used as a second factor in the authentication process. To operate the YubiKey 5 in a CSPN approved mode, identify the user by a first factor authentication scheme. For example, username/password. The details for such a first factor authentication scheme are beyond the scope of this document.
When the OATH-HOTP/TOTP application is enabled on the YubiKey 5, you can set a password to protect the OATH credentials. More details for such a configuration are described in the following section.
Technical Configuration
To protect the OATH-HOTP/TOTP credentials with a password, install and use the Yubico Authenticator for the configuration.
To set the password, launch the Yubico Authenticator application, select File from the menu, then select the option Set Password. In the dialog box that appears, enter a new password and confirm it. This configuration protects all OATH-HOTP/TOTP credentials with the same nominated password.
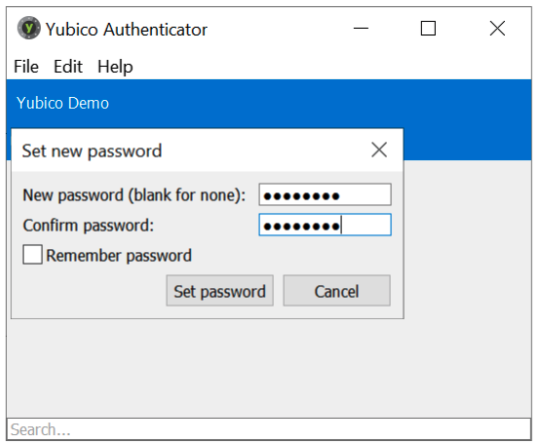
Figure 10 - Example of protecting the OATH-HOTP/TOTP credentials with a password
When Yubico Authenticator is used for generating an OATH one-time password, the password must be entered each time to unlock the credentials.
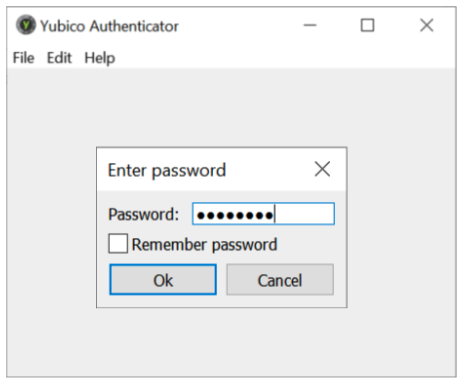
Figure 11 - Example of unlocking the OATH-HOTP/TOTP credentials
Footnotes
| [1] | A credential is a configuration of the OTP linked to a unique key. |
FIDO U2F
Feature Summary
The YubiKey 5 Series supports FIDO Universal 2nd Factor (U2F), which is defined in [RD7]. On a high level, the FIDO U2F protocol comprises both the registration and the authentication process but is only used as a second factor in the authentication process.
For more information on the YubiKey application FIDO U2F see Yubico’s website, U2F.
CSPN Approved Mode
To operate the YubiKey 5 in a CSPN approved mode, identify the user by a first factor authentication scheme (for example, username/password) according to the FIDO U2F standard [RD7]. The details for such a first factor authentication scheme are beyond the scope of this document.
As part of the registration process, the user touches the YubiKey 5 sensor when the browser or application prompts for it. The user also touches the YubiKey 5 when the browser or application requests for it during the authentication process.
Technical Configuration
No additional configuration is needed to achieve a CSPN approved mode, assuming the YubiKey 5 has been correctly enrolled against a U2F compatible relying party.
FIDO2
Feature Summary
The FIDO2 protocol is an amalgamation of two standards: W3C WebAuthn (for the communication between the client and the relying party) and CTAP2 (for accessing the authenticator from the client). On a high level, the FIDO2 protocol comprises both the registration and the authentication process.
FIDO2 is an update of FIDO U2F and is defined in [RD3]. It takes into account PIN management, in addition to the new standardized protocols, WebAuthn [RD8] and CTAP2.
CSPN Approved Mode
The FIDO2 protocol can be used in two different CSPN modes of operation:
- FIDO2 with a PIN code set on the YubiKey 5 (see FIDO2 With PIN Code), or
- FIDO2 without a PIN code set on the YubiKey 5 (see FIDO2 Without PIN Code)
FIDO2 With PIN Code
If WebAuthn User Verification is set to Required by the WebAuthn relying party, when registering the YubiKey 5 as a FIDO2 device, it prompts the your client to protect the FIDO2 credentials with a PIN code during the enrollment. Alternatively, you can also use the ykman or Yubico Authenticator to set a PIN code to protect the FIDO2 credentials. In both cases, the YubiKey 5 requires the PIN code for FIDO2 authentication.
As part of the registration process, touch the YubiKey 5 sensor when the browser or application prompts for it. Also touch the YubiKey 5 when the browser or application requests for it during the authentication process.
FIDO2 Without PIN Code
If WebAuthn User Verification is not enforced as recommended above, the YubiKey 5 must then be used as a second factor authentication device. To operate the YubiKey 5 in a CSPN approved mode under such a scenario, identify the user by a first factor authentication scheme. For example, username/password.The details for such a first factor authentication scheme are beyond the scope of this document.
The YubiKey 5, by default, requires the sensor to be touched for this configuration. As part of the registration process, you must touch the YubiKey 5 sensor when the browser or application prompts for it. You must also touch the YubiKey 5 when the browser or application requests for it during the authentication process.
Technical Configuration
FIDO2 With PIN Code
There are two ways to set the PIN code for the FIDO2 application on a YubiKey 5:
- You can set the PIN code by using the ykman or Yubico Authenticator.
- The relying party (server application) can request the user’s client to set the PIN code during the WebAuthn registration.
By default, the touch sensor is also required for FIDO2, in addition to setting the PIN on the YubiKey.
Set FIDO2 PIN Code
Use Yubico Authenticator or ykman to set a PIN code for the FIDO2 credentials on the YubiKey 5. When a PIN code is set, all FIDO2 credentials are protected by the same PIN code.
To set the PIN code with YubiKey Manager GUI:
- Select the Applications from the menu.
- Select the FIDO2 option.
- In the GUI that appears, select the button Set PIN.
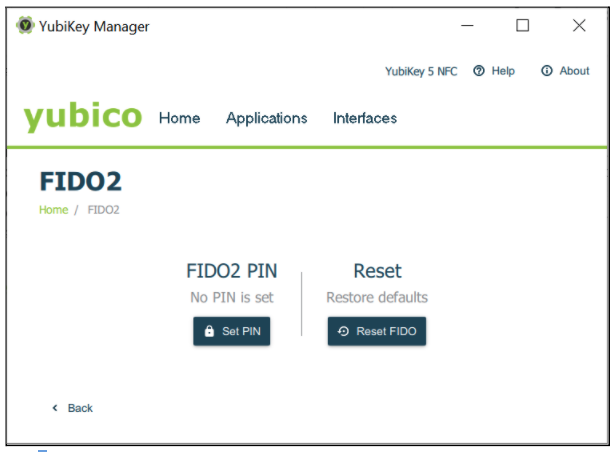
Figure 12 - Configuring the FIDO2 PIN with YubiKey Manager
- In the next popup prompt that appears, set the new PIN and confirm this PIN for the FIDO2 application.

Figure 13 - Configuring the FIDO2 PIN with YubiKey Manager
Set FIDO2 PIN Code From the Relying Party
The WebAuthn relying party (authentication server) can instruct a client to set the PIN code on an authenticator during the enrollment of the FIDO2 credentials.
A client, according to the WebAuthn/FIDO2 specifications, is any user device that supports WebAuthn/FIDO2. In practice, this is a hardware device (smartphone, tablet, laptop, etc), an operating system (Microsoft Windows, Apple MacOS, Apple iOS, Android, Linux, etc) or a web browser (Google Chrome, Apple Safari, Microsoft Edge, Mozilla Firefox, etc).
If the WebAuthn MakeCredentials parameter UserVerification is set to Required, this prompts the client to set the PIN code on the YubiKey 5.
The GUI for setting the FIDO2 PIN code may differ between clients. The image below is an example of using Google Chrome with Windows 10 for setting the FIDO2 PIN on a YubiKey 5.
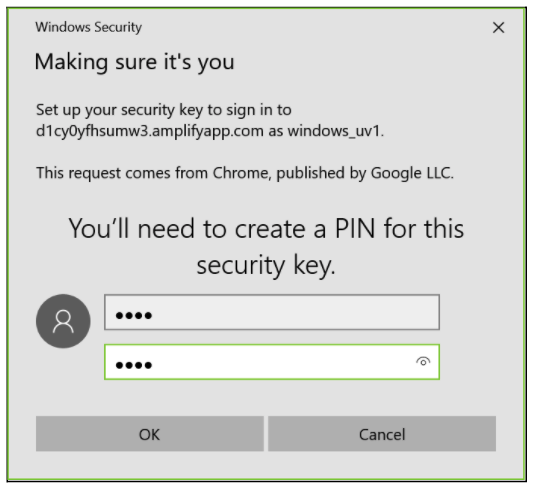
Figure 14 - Configuring the PIN code for FIDO2 with Windows 10
FIDO2 Without PIN Code
If the relying party has set the WebAuthn MakeCredentials parameter UserVerification to Discouraged, this does not trigger the client to set any FIDO2 PIN code on the YubiKey 5.
If a FIDO2 PIN is not set through YubiKey Manager GUI, ykman, or Yubico Authenticator and the client is not triggered to set a FIDO2 PIN, this means the FIDO credentials are not protected by a PIN.
However, by default, touch is still required for using the FIDO2 credentials during WebAuthn authentication.
When the PIN code is disabled for FIDO2 on the YubiKey 5, the CSPN approved mode is achieved by using a first factor authentication protocol in conjunction with the YubiKey 5 configured for FIDO2 and touch.
PIV
Feature Summary
The PIV application [RD4] can be used to authenticate, sign and decrypt. You can, for example, use the YubiKey 5 PIV application for Windows smart card logon.
The PIV application allows for generating or importing asymmetric key-pairs (both RSA or ECC) and storing multiple X.509 certificates. In total, 24 certificate slots are available:
- Slot 9a: PIV Authentication
- Slot 9c: Digital Signature
- Slot 9d: Key Management
- Slot 9e: Card Authentication
- Slots 82-95 (hexadecimal): Retired Key Management
- Slot f9: Attestation
User verification under PIV is achieved with a PIN and a management key (Triple-DES or AES key). This is used for various oversight functions. Set the PIN to a value between 6 and 8 bytes. Set the maximum number of retries between 1 to 255. The retries default value is 3.
To specify how often the PIN needs to be entered to access the credentials in a given slot, set a PIN policy for that slot. Set this policy when generating the key or when importing a key. The policy cannot be changed later.
You can configure the YubiKey 5 to require physical contact on the touch sensor, in addition to requiring the PIN. Similar to the PIN policy, set the touch policy when generating or importing a key.
CSPN Approved Mode
To operate the YubiKey’s PIV application in approved CSPN mode, set the PIN code, PUK code, and management key for the PIV application. It is imperative that you change the default values of these codes before using the PIV application.
More details for such a configuration are described in the following section.
Technical Configuration
PIN Configuration of PIV
Use the YubiKey Manager GUI, ykman, or Yubico Authenticator to set the PIN, PUK, and management key on the YubiKey. In this scenario, a YubiKey 5 with default settings is assumed.
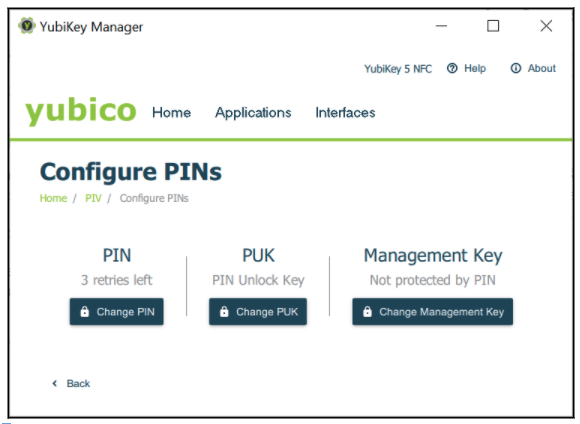
Figure 15 - Configuring the PIN, PUK, and management key for PIV
Changing the PIN Code
The PIN is used during normal operation to authorize an action such as creating a digital signature with any of the stored keys. Entering an incorrect PIN too many times and exceeding the retry counter, blocks the PIN and makes the PIV features unusable.
The PIN must be at least 6 characters and can contain any symbol, although for cross-platform portability it is recommended to only use decimal digits. There is a limit of 8 bytes for a PIN. This allows for up to 8 ASCII characters. By default the PIN code is set to 123456.
To change the PIN code, select the Change PIN button in the Configure PINs dialog box. The popup that appears in the YubiKey Manager GUI, is shown in the following figure.
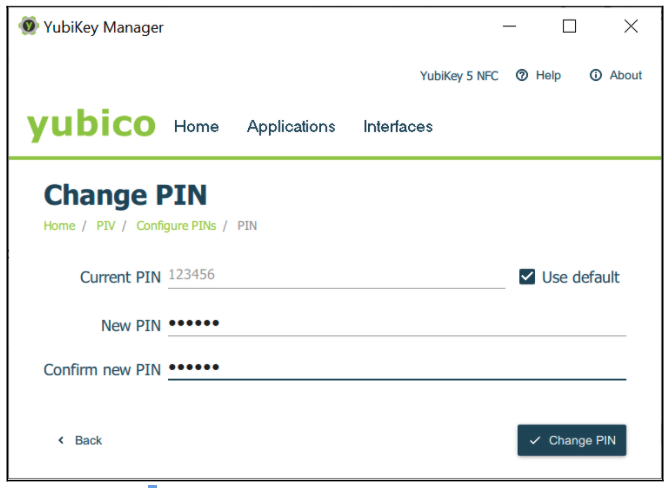
Figure 16 - Changing the PIN code for PIV
Change the current or default PIN to a new PIN with a length of 6-8 digits. To do this, enter the current PIN, enter a new PIN, confirm it, and then select the Change PIN button.
The default PIN code, 123456, is pre-configured for slots 9a, 9c and 9d. For slot 9e, set to enforce the PIN policy using the ykman when generating or importing the key-pair on the YubiKey 5. Use the command:
ykman piv generate-key --pin-policy always 9e -
Changing the PUK Code
The PUK can be used to reset the PIN if it is ever forgotten, lost, or becomes blocked after the maximum number of incorrect PIN entry attempts. By default the PUK is set to 12345678.
To change the PUK, select the Change PUK button in the Configure PINs dialog box. The popup that appears in the YubiKey Manager GUI, is shown in the following figure.
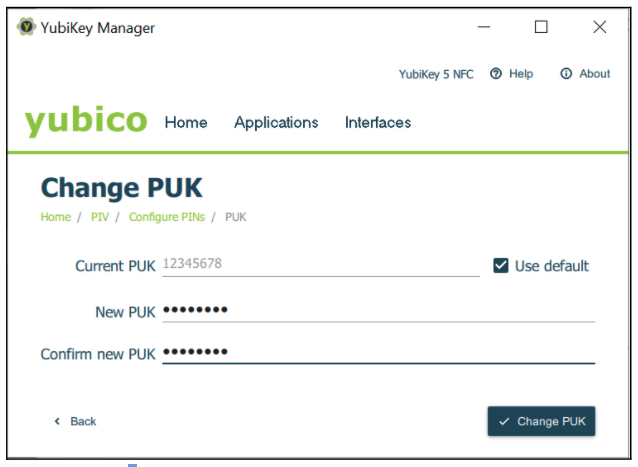
Figure 17 - Changing the PUK code for PIV
Change the default or current PUK to a new PUK with a length of 6-8 digits. To do this, enter the current PUK, the new PUK, confirm it, and then select the Change PUK button.
Changing the Management Key
All PIV management operations of the YubiKey require a 24 byte 3DES or AES key, known as the management key. By default the management key is set to 010203040506070801020304050607080102030405060708. Explicitly set a 24 byte key or use the YubiKey PIV Manager to generate one.
To change the management key press the Change Management Key button in the Configure PINs dialog box. The popup that appears in the YubiKey Manager GUI, is shown in the following figure.
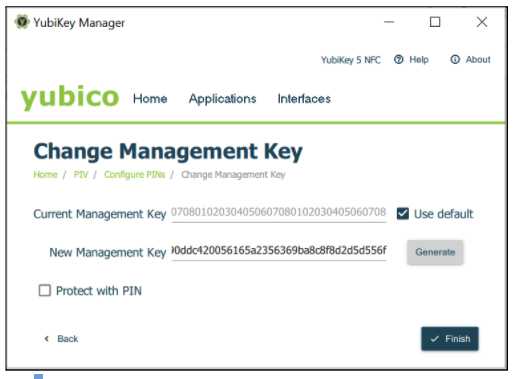
Figure 18 - Changing the management key for PIV
Change the current or default management key to a new management key with a length of 48 hexadecimal digits. To do this, in the Change Management Key dialog, enter the current management key, the new management key, and select the Finish button.
Click for Yubico Support.