Protocols and Applications
The YubiKey 5 Series provides applications for FIDO2, OATH, OpenPGP, OTP, Smart Card (PIV), and U2F. The applications are all separate from each other, with separate storage for keys and credentials.
This topic covers:
For information on managing all these applications, see Tools and Troubleshooting.
Note that the OTP and OATH categories overlap. Technically, there are three true OTPs:
- Yubico OTP (defined by Yubico)
- OATH-HOTP (standard RFC4226)
- OATH-TOTP (standard RFC6238)
- We support the Yubico OTP and OATH-HOTP directly on the touch-triggered OTP function on the YubiKey.
- We support OATH-HOTP and OATH-TOTP directly on the OATH function on the YubiKey (usually called OATH and used with Yubico Authenticator).
- We support a static password and Challenge-Response with Touch-triggered OTP. Challenge-Response can also be used with software (such as Yubico Authenticator) to act as a single OATH-TOTP credential.
All three of these OTPs are described in more detail below; see OATH and OTP.
FIDO2
For an overview of the FIDO2 features that became available with the 5.7.x firmware, see 5.7 - 5.6 Firmware Specifics.
The FIDO2 standard offers the same high level of security as FIDO U2F, since it is based on public key cryptography. In addition to providing phishing-resistant two-factor authentication, the FIDO2 application on the YubiKey allows for the storage of resident credentials, also called discoverable credentials. As these credentials can accommodate the username and other data, this enables truly passwordless authentication on sites and applications that support the WebAuthn protocol. YubiKeys in the 5 Series can hold up to 25 resident keys.
FIDO2 PINs and Fingerprint Templates
PINs and fingerprint templates, collectively referred to as “User Verification” or UV for short, are one of the enhancements from U2F included in FIDO2. FIDO2 UV enables single device Multi-Factor Authentication (MFA). It enables people to use a single device (the YubiKey) to provide two authentication factors: something they have - the YubiKey, and something they know (a PIN) or a unique physical attribute (a biometric fingerprint template on the YubiKey Bio).
FIDO2 credentials on a YubiKey cannot be accessed without either the PIN or on the YubiKey Bio, the fingerprint. There are no backdoors to bypass the UV protections. This is the main reason that Yubico recommends registering a minimum of two YubiKeys on each web site you use, to ensure you continue to have access to that site if you lose access to the first YubiKey. If the fingerprint sensor on the YubiKey Bio is damaged, the PIN is the only method available to use the credentials on the device.
Because the PIN or fingerprint is only used to authenticate with the YubiKey, and the protection against brute-force attacks (a maximum of eight incorrect PIN attempts before the YubiKey FIDO2 application locks), there is no security benefit to regularly changing the PIN unless there is reason to believe it has been compromised. Changing the FIDO2 PIN will not invalidate any credentials on the YubiKey. However, previous values for the PIN are not stored within the YubiKey, so if the current PIN is forgotten, an older PIN will not be recognized.
Locking FIDO2 Credentials
Note
By default, no PIN is set.
The resident credentials can be left unlocked and used for strong single-factor authentication, or they can be protected by a PIN for two-factor authentication. This is achieved by performing UV at the time of authentication.
The rule of thumb for PIN length is between 4 and 63 alphanumeric characters, but the actual minimum PIN length varies depending on the firmware version, whether or not the YubiKey is a FIPS key, and whether PIN Complexity is added or not.
| YubiKey prior to 5.7 | 4 |
| YubiKey FIPS prior to 5.7 | 6 |
| YubiKey 5.7 and later without PIN complexity | 4 |
| YubiKey 5.7 and later with PIN complexity | 6 |
On the YubiKey Bio Multi-protocol Edition, the PIN is shared between the PIV and FIDO2 applets. PIN length requirements depend on firmware version and YubiKey application status.
The special (developer-focused) requirements for the PIN are described in The FIDO2 PIN.
To change the minimum PIN length, see Increasing the minimum PIN length.
- To re-attempt to enter the PIN after you have entered an incorrect PIN three times in succession, power-cycle the FIDO2 application.
- Once a FIDO2 PIN is set, it can be changed but removal of a FIDO2 PIN requires a FIDO2 reset.
- If the PIN is entered incorrectly eight times in succession, the FIDO2 application locks and FIDO2 authentication is no longer possible. To unlock the FIDO2 application, a FIDO2 reset is required.
Note
Resetting the FIDO2 application also resets the U2F application. This means the YubiKey must be re-registered not only with all the FIDO2 sites, but also with all the U2F sites.
Note
The YubiKey 5 supports FIDO2 credential management. This enables selectively deleting resident keys. See our article YubiKey 5.2 enhancements to FIDO 2 Support for details.
Discoverable Credentials: Passkeys
Another new feature added in FIDO2 is discoverable credentials. Formerly referred to as resident keys, discoverable credentials are credentials which contain information about the site or service the credential belongs to, including the address and account username. These credentials can be more convenient for web sites that support them, because they allow secure login without requiring users to enter a username.
Not all web sites or service providers offer support for discoverable credentials, and there is no information stored on the YubiKey for any credential for a website or service provider that does not use a discoverable credential.
FIDO2 Connector Support
FIDO2 support is available to Apple devices via the USB-C or Lightning® connectors of the YubiKey 5Ci. FIDO2/WebAuthn can be achieved over USB-C using any of the following options:
ASWebAuthenticationSessionSFSafariViewController- Redirect to Safari browser
- YubiKey 5Ci
Like the USB interface, the YubiKey 5Ci’s Lightning® interface also uses a variety of channels for communication between the YubiKey and iOS.
The YubiKey 5Ci presents itself as an Apple iOS peripheral. It is able to interact with:
- Any iOS app using the Yubico YubiKey iOS SDK.
- Any app input data field through the touch-triggered OTP.
- Any WebAuthn-compliant application (starting in iOS 13). This includes the Safari browser.
When connecting the YubiKey 5Ci through Lightning®, the interfaces enabled setting is common to both USB-C and Lightning®. Enabling or disabling an interface applies to both connections.
Note
Developers: Enabling apps within iOS to use advanced protocols that send and receive information from the YubiKey 5Ci requires that you:
- Use the Yubico iOS SDK. See Yubico iOS SDK
- Register the app with Yubico. See Register HYour App.
The USB and iProduct strings that are displayed when connecting through Lightning® or USB are specific to the connection type. They are described in our Support article YubiKey USB ID Values.
- iPad and iPad Pro
For users of keys in the YubiKey 5 Series, because the iPad Pro does not have a Lightning port, support depends on what you want to do. All those aspects are covered by the second part of our Support article Getting Started with iOS.
From the developer perspective, support for the iPad Pro has some limitations. Consult Security Key Compatibility for detailed instructions on working around those limitations.
Note
To see which U2F/FIDO2 security keys currently work with iOS/iPadOS 13.3+ devices using the Safari browser in combination with apps using
SFSafariViewControllerorASWebAuthenticationSession, see Supporting FIDO2 Security Keys on iOS or iPadOS.
Default Values
PIN: None set.
AAGUID Values
An AAGUID (Authenticator Attestation GUID) is a 128-bit identifier indicating the type of the authenticator. The FIDO2 specification states that an AAGUID must be provided during attestation.
New AAGUIDs are issued for new YubiKey products that support FIDO2, or when existing YubiKey products have FIDO2 features added or removed.
For the complete list of AAGUIDs, see our the article on our Support site, YubiKey hardware FIDO2 AAGUIDs.
Supported Extensions
The YubiKey 5 Series supports the AppID extension (appid) as defined by the W3C Web Authentication API specification. This extension allows U2F credentials registered using the legacy FIDO JavaScript APIs to be used with WebAuthn. That means if you register a YubiKey in the 5 Series on a website that used U2F at that time and later upgrades to FIDO2, your U2F credentials continue to work on that website.
| Extension and feature | Firmware Versions | |||||||
|---|---|---|---|---|---|---|---|---|
| 5.7.x | 5.6.x | 5.5.x | 5.4.x | 5.3.x | 5.2.x | 5.1.x | 5.0.x | |
| ECC P256 Credentials | yes | yes | yes | yes | yes | yes | yes | yes |
| EdDSA/Ed25519 Credentials | yes | yes | yes | yes | yes | yes | ||
| ECC P384 Credentials | yes | yes | ||||||
Credential Protection
extension
|
yes | yes | yes | yes | yes | yes | ||
| HMAC-Secret extension | yes | yes | yes | yes | yes | yes | ||
| Credential Management | yes | yes | yes | yes | yes | yes | ||
| PIN Protocol v2 | yes | yes | yes | yes | ||||
| Credential Blob | yes | yes | yes | |||||
| Authenticator Large Blob | 4kB | 1kB | 1kB | |||||
| alwaysUV | yes | yes | yes | |||||
| Force PIN Change | yes | yes | yes | |||||
| Minimum PIN Length | yes | yes | yes | |||||
| Biometric Enrollment | yes | yes | yes | |||||
| Built-in UV (fingerprint) | yes | yes | yes | |||||
Make Credential UV
Not Required
|
yes | yes | yes | |||||
| Enterprise Attestation | yes | yes | ||||||
Enterprise Attestation
Enterprise Attestation (EA) enables pre-defined Relying Parties (RPs) to read the YubiKey serial number on custom-programmed keys during FIDO2 registration. This satisfies a variety of asset tracking requirements, and can aid in account recovery by allowing an end user to prove they have a specific FIDO2 device. In addition to support from the RP and/or Identity Provider (IdP), EA requires platform support in the form of CTAP 2.1 capabilities.
EA’s ability to identify individual authenticators as opposed to just the type of authenticator changes the privacy model of the FIDO protocol; however, the model is changed only by RPs defined by the customer at the time of order (utilizing EA vendor mode) or by supported platforms (utilizing EA platform mode).
- Typical Use-Cases
- Tracking of individual authenticators on registration ensures that only authenticators issued by the organization are used. This resolves a common compliance requirement that previously could only be met by using policies or custom AAGUIDs.
- If the organization knows what serial number a user was issued but does not see it registered or did not register it on the user’s behalf, the organization can take appropriate steps to help the end user register their authenticator. This will help organizations roll out phishing-resistant MFA.
- Tie the FIDO credential to a PIV certificate by matching serial numbers (or other device-specific information) between the FIDO EA and the PIV Attestation certificate.
- Identify individual authenticators in troubleshooting scenarios. When a key is lost or broken, a user can be guided by an IT admin who knows what authenticator holds what credential. The admin can advise which key is being used and which should be de-activated. The serial number of a back-up authenticator can be identified, too.
Developers seeking more information can refer to Enterprise Attestation on developers.yubico.com.
- Current Platform/RP Support
At present, few RPs support this feature; however, there is platform support for it in Chrome and some Chromium-based browsers. Windows 11 is required on Windows platforms.
CMS vendor support for EA is currently a little sparse; however, that is rapidly changing.
Minimum PIN Length
The Minimum PIN Length Extension (minPINLengthExtension) enables RPs to enforce PIN length requirements, for example in regulated environments. The RPs pre-defined by the organization or end user are able to query the minPINLength of the authenticator. Once set, the PIN length cannot be shortened until the authenticator is reset. The minimum PIN length is configurable only by platforms, or by communicating with the YubiKey directly, and can only be read by IdPs or RPs via an allowed list configured on the YubiKey.
This extension resolves compliance requirements for organizations that require certain PIN lengths. Before 5.7, this was only possible through FIPS (YubiKey 5 FIPS Series with firmware version 5.4.3 has a minimum PIN length of 6), or custom configuration in which there were no checks the RP could perform unless the authenticator had a custom AAGUID.
- Current Platform/RP Support
- No current RP supports this feature, however there is platform support for it in Chrome and some Chromium-based browsers. Windows 11 is required on Windows platforms.
Force PIN Change
Force PIN Change enables vendors or IT admins to prompt end-users to change their FIDO2 PIN upon next use. This is valuable in a pre-registration/enroll-on-behalf of scenario where the organization does not want their end users’ PINs to be known. End-users are prompted to set their own PINs (can be combined with minPINLength).
This feature also minimizes the number of help-desk calls due to forgotten PINs because end-users can set PINs that are meaningful to them.
Note
A PIN is not a password; it is local to the authenticator.
- Current Platform Support
Force PIN changeonly requires support on the platform, and can only be set by communicating with the YubiKey directly. Chrome and some Chromium-based browsers support it on macOS and Linux while other browsers support it on Windows. Windows 11 is required on Windows platforms.There is no need for explicit RP support, the
force PIN changeflag is set on the client/platform side, which is where it will trigger the flow.
Always UV (alwaysUV)
Always UV was introduced to prompt users for user verification (UV) with each use (authentication and registration), which provides consistency in behavior between different platforms and RPs. End-users are often confused because the setting uv=preferred/discouraged behaves differently depending on whether the user is on a macOS or a Windows machine.
This feature is enabled by default in the YubiKey Bio, which always asks for biometrics and never “plain touch” in a second factor flow when UV is not necessarily required. If this feature is not enabled, an end user might touch the fingerprint sensor with an unenrolled finger and authenticate, therefore mistakenly believing they bypassed the biometrics or that the biometric sensor was faulty, in that it apparently allowed an unenrolled finger to authenticate.
Another reason for enabling alwaysUV is to oblige users to enter their PINs, thus ensuring they are less likely to forget them.
- Current Platform/RP Support
- This setting is internal to the authenticator and requires no specific platform or RP support.
Blob Storage
There are two blob storage options available on the YubiKey 5.7 and later. Both Credential Blobs and Large Blobs require support on the platform as well as from the RP.
- Cred blob (credBlob)
Credential Blobs are 32 bytes of unencrypted storage per credential that can be set during registration and retrieved during authentication for discoverable credentials. This feature allows for a small amount of data to be associated with a discoverable credential during
makeCredential. The blob is opaque to the authenticator. This enables IdPs to include a small amount of information such as a certificate thumbprint to aid in authentication scenarios. PII can be stored in this field if it is used withcredProtect.There are many use cases, as the
credBlobenables storage of arbitrary data; however, it can:- Be used as HPKP-like public key hash to identify for example kerberos certificates to trust when using a given credential (“on prem AD”).
- Provide information about the issuance of the specific credential.
- Large blob (authenticatorLargeBlob)
Large blob storage is 4096 bytes on firmware 5.7.0 and later, (1024 bytes on firmware 5.5.x and 5.6.x) of compressed, shared storage on the authenticator. It is managed by the platform, and is always encrypted with the Large Blob Key - a per-credential symmetric encryption key that is used by the platform to read the contents of the large blob. Large blobs can be used for storing authentication certificates or other artifacts linked to the private FIDO2 key stored on an authenticator.
The large blob feature allows for a “large” amount of data to be added to a discoverable credential upon creation. The typical use case is a public SSH key.
Creating an SSH key using a discoverable FIDO2 credential would allow the authenticator (a) to perform SSH authentications using a key stored in the FIDO2 applet and (b) be hardware-bound. With the addition of large blob the user can take the authenticator to a new machine and would not need to copy the public part to the new client machine.
Any other data can be associated with the key, such as linkage to a PIV certificate or details on the creation of the credential.
The largeBlobKey is required to decrypt the data in the Large Blob.
Calculating the RPID hash
The FIDO2 protocol uses the RPID (Relying Party ID) as an identifier for the RP (Relying Party) that an authenticator authenticates against. To calculate the PRID hash of an URL, apply the SHA-256 algorithms over the RPID. For example, the RPID yubico.com has the RPID hash of 378209b72defcba91dcbf854edb4daa648828a2cbd180afc77a74434655a1c7d. This can be calculated by running echo -n "yubico.com" | openssl dgst -sha256, which returns the result SHA2-256(stdin)= 378209b72defcba91dcbf854edb4daa648828a2cbd180afc77a74434655a1c7d.
Developers seeking more information can refer to The W3C’s WebAuthn specification.
Tools for Managing the FIDO2 Application
Each operating system has different software available to manage the YubiKey, with different capabilities. Note that the same YubiKey can be configured using any or all of the tools listed.
Yubico Authenticator for Windows, MacOS and Linux
| Platforms: | Windows, MacOS, Linux |
|---|---|
| Capabilities: | Set or change the PIN, manage fingerprint templates, manage discoverable credentials, reset the YubiKey |
| Works with: | All YubiKeys that support FIDO2 |
Yubico Authenticator enables users to manage all aspects of the FIDO2 application, and can do all the things that are outlined in this document for managing the YubiKey, including adding fingerprint templates to the YubiKey Bio. Yubico Authenticator requires administrative privileges for several operations on Windows, so for non-administrative users on Windows, the built-in Windows Security Key tools may be a better option.
See Managing Discoverable Credentials with Yubico Authenticator. Download Yubico Authenticator for Windows, MacOS or Linux.
ykman CLI for Windows, MacOS and Linux
Install the most recent version of the ykman, because the YubiKey Manager GUI includes an older version of the ykman CLI.
| Platforms: | Windows, MacOS, Linux |
|---|---|
| Capabilities: | Set or change the PIN, reset the YubiKey, manage discoverable credentials (ykman CLI only) |
| Works with: | All YubiKeys that support FIDO2. |
For Windows, MacOS, Linux, download the Yubico Authenticator with its intuitive and easy-to-use graphical interface, the ykman, a lightweight software package installable on many OS, or the YubiKey Manager GUI, though it is not as robust as the other tools.
These are general purpose utilities that is able to configure many of the applications on the YubiKey in addition to FIDO2. They require administrative privileges to configure FIDO2, or detect FIDO2-only devices like the Security Key series or the YubiKey Bio on Windows, so for non-administrative users, the built in Windows Security Key tools may be a better option.
Chrome on MacOS, Linux and ChromeOS
| Platforms: | MacOS, Linux, ChromeOS |
|---|---|
| Capabilities: | Set or change the FIDO2 PIN, manage fingerprint templates, manage discoverable credentials, reset the YubiKey |
| Works with: | All YubiKeys that support FIDO2. |
Chrome has built-in support for managing FIDO2 devices, and will allow for managing security keys on the non-mobile based platforms where it is available. These capabilities are not available on Windows installations of Chrome.
Built-in Security Key Management on Windows
| Platforms: | Supported versions of Windows 10 or 11, and Windows Server |
|---|---|
| Capabilities: | Set or change the PIN, Manage fingerprint templates, Reset the YubiKey |
| Works with: | All YubiKeys that support FIDO2. |
Windows has supported security keys for many versions, and all the most recent releases of all supported Windows Desktop and Server support FIDO2, and make that support available to web browsers running on the platform. Windows includes built-in tools for setting and changing the PIN on FIDO2 devices like the YubiKey, as well as resetting the YubiKey. Search for “Set up Security Key” in the Start menu to find Windows’ built-in FIDO2 management tools. This method of interacting with the security key does not require administrative rights.
Managing Discoverable Credentials
Any YubiKey with firmware 5.2.1 and higher supports viewing and deleting individual discoverable credentials (also known as Passkeys) that are stored on the YubiKey. A PIN must be configured, and entered each time you want to view discoverable credentials. Deleting a discoverable credential is a permanent action, and can not be undone. It is recommended to ensure that you have access to an account by other means (such as a different YubiKey) before deleting a discoverable credential for a specific account.
Managing Discoverable Credentials with Yubico Authenticator
Download and install Yubico Authenticator for Windows, MacOS or Linux. The iOS and Android versions of Yubico Authenticator do not support resetting the FIDO2 application of the YubiKey.
Insert your YubiKey or Security Key in a USB port on your computer.
Open Yubico Authenticator.
Click the menu icon (three vertical bars) in the upper left hand corner and select WebAuthn.
Windows 10 or 11 users, if prompted, enter administrator consent.
Due to underlying OS mechanics, when using Windows 10 or 11, applications that manage FIDO2 devices need to be run as administrator in order to access FIDO2 options and/or to detect the Security Key Series keys.
Enter a PIN at the prompt, if a PIN is set on the device.
Any discoverable credentials on the device are listed. Most discoverable credentials provide a way to identify the account. The URL that the credential is used for is always visible.
Locate the credential you want to delete, and click on the elipses (…) icon to the right of the credential.
The Username and URL of the credential is listed again.
Click the Delete Passkey button under the credential. To cancel the deletion, click the X Close button.
Confirm deletion by clicking the delete button. This permanently deletes the credential.
Managing Discoverable Credentials with Google Chrome on MacOS or Linux
Note
Chrome for Windows does not support managing individual FIDO2 credentials due to Windows operating system restrictions.
To list and delete credentials:
Open the Chrome Settings menu. Click the 3 vertical dots.
Alternatively, navigate to chrome://settings/securityKeys and skip to step 5.
Select Privacy & Security from the settings navigation on the left hand side.
Scroll down and select Security.
Scroll down and select Manage security keys.
Select Sign-in data.
Enter your YubiKey’s PIN and click Continue.
Located the credential you want to delete and click the trash can icon next to it.
Confirm deletion by clicking the delete button. This permanently deletes the credential.
Resetting the FIDO2 Application
If the FIDO2 PIN has been forgotten, and the fingerprint sensor on the YubiKey Bio is not working, the key will need to be reset. Resetting the key will remove the PIN, but it will also destroy all the U2F and FIDO2 credentials on the YubiKey, whether they are discoverable or not. Entering the PIN incorrectly 8 times will also cause the FIDO2 application to lock.
Note
Device Support: This article applies to Yubico devices that support the FIDO2 protocol, like the YubiKey 5 Series, YubiKey 5 FIPS Series, and Security Key Series, but not to the FIDO U2F Security Key, which cannot be reset. Also note that FIDO2 reset performed over a Lightning connection is only supported for devices with firmware 5.7.4 and higher.
Before Resetting the FIDO2 Application
Once the FIDO2 application on the YubiKey has been reset, there is no way to recover the previously stored credentials or PIN. Resetting the FIDO2 application will effectively unregister your key from any accounts it was registered with using FIDO U2F or FIDO2. We therefore recommend following the steps below, prior to resetting.
Determine which accounts will be affected by a reset (see below). Log in to each of those accounts, unregister the key to be reset, and then double-check that you are still able to log in and modify the account’s 2FA settings (without the key that is to be reset). This process is easier if you have more than one key registered with your accounts, which we recommend.
- Determining which accounts may be affected
To determine which of your accounts may be affected by a FIDO reset:
Search for each service your YubiKey is registered with in the Works With YubiKey Catalog.
Under each service’s listing, check the security protocol support section for FIDO2/WebAuthn, Universal 2nd Factor (U2F), or similar. Services that indicate support for these may be affected by a FIDO2 reset.
For instance, Google’s listing in the WWYKC has both of these listed, indicating it would be affected by a reset.
Services that only list Yubico OTP, OATH-TOTP, etc., and do not include any of the aforementioned protocols should not be affected.
The YubiKey will return to its initial state without a FIDO2 PIN. We recommend using the Yubico Authenticator app or built-in OS support on a desktop OS to set the PIN prior to using the YubiKey again.
Resetting the FIDO2 Application
Download and install YubiKey Manager GUI.
Alternatively, use either the Yubico Authenticator with its intuitive and easy-to-use graphical interface or the ykman, a lightweight software package installable on many OS.
Insert your YubiKey or Security Key into an available USB port on your computer.
Open YubiKey Manager.
Note
When using Windows 10 or 11, applications that manage FIDO2 devices need to be run as administrator in order to access FIDO2 options and/or to detect the Security Key Series keys.
Navigate to Applications > FIDO2.
Click “Reset FIDO” > “YES”.
Follow the prompts to remove, re-insert, and touch your key.
Resetting the FIDO2 Application Using Yubico Authenticator
If a PIN has been set, Yubico Authenticator requires that PIN in order to reset the FIDO2 application.
Note
When using Windows 10 or 11, applications that manage FIDO2 devices need to be run as administrator in order to access FIDO2 options and/or to detect the Security Key Series keys. If you are using Windows and do not have administrative access, consider using the built-in security key management features of Windows.
- Download and install Yubico Authenticator for Windows, MacOS or Linux. The iOS and Android versions of Yubico Authenticator do not support resetting the FIDO2 application of the YubiKey.
- Insert your YubiKey or Security Key into an available USB port on your computer.
- Open Yubico Authenticator.
- In the upper left hand corner, click on the menu icon (three vertical bars) and then select “WebAuthn”.
- You will be prompted for a PIN if a PIN is set on the device; however, if a PIN has not been set, entering the PIN is not required for a reset.
- In the upper right hand corner of the Authenticator, click on the icon for the device you are using, and select “Reset FIDO”.
- Follow the on-screen instructions.
Resetting the FIDO2 Application Using Windows Built-in Security Key Management
Windows 10 and 11 provide built-in tools to manage FIDO2 devices.
Open the Start menu and select “Set up security key”.
Alternatively, open Windows Settings and navigate to “Accounts” > “Sign-in options” > “Security Key”.
Click the “Manage” button.
When prompted, touch your security key.
Click “Reset security key”, and follow the on-screen prompts.
Resetting the FIDO2 Application Using Google Chrome on MacOS or Linux
Chrome for Windows does not support resetting the FIDO2 application because of Windows OS restrictions.
Open the Chrome Settings menu by clicking on the 3 vertical dots on the upper right of the browser, next to the URL field.
Alternatively, navigate to chrome://settings/securityKeys and skip to step 5.
Select “Privacy & Security” from the settings navigation on the left hand side.
Scroll down and select “Security”.
Scroll down and select “Manage security keys”.
Click “Reset your security key”, and follow the on-screen prompts.
Setting or Changing the FIDO2 PIN
For a general description of the FIDO2 PIN, see FIDO2 PINs and Fingerprint Templates.
Note that the FIDO2 PIN is independent from the PIV PIN, and may be set to a different value, or not set at all. Changing the FIDO2 PIN will not change the PIV PIN, and vice-versa.
Setting or Changing the FIDO2 PIN
When using Windows 10 or 11, applications that manage FIDO2 devices need to be run as administrator in order to access FIDO2 options and/or to detect the Security Key Series keys If you are using Windows and do not have administrative access, consider using the built-in security key management features of Windows.
Download and install YubiKey Manager GUI.
Alternatively, use either the Yubico Authenticator with its intuitive and easy-to-use graphical interface or the ykman, a lightweight software package installable on many OS.
Insert your YubiKey or Security Key into an available USB port on your computer.
Open YubiKey Manager.
Navigate to Applications > FIDO2.
Click “Set PIN” or “Change PIN”.
Follow the prompts to set or change the PIN.
Setting or Changing the FIDO2 PIN Using Yubico Authenticator
When using Windows 10 or 11, applications that manage FIDO2 devices need to be run as administrator in order to access FIDO2 options and/or to detect the Security Key Series keys. If you are using Windows and do not have administrative access, consider using the built-in security key management features of Windows.
The iOS and Android versions of Yubico Authenticator do not support setting the FIDO2 PIN.
- Download and install Yubico Authenticator for Windows, MacOS or Linux.
- Insert your YubiKey or Security Key into an available USB port on your computer.
- Open Yubico Authenticator.
- In the upper left hand corner, click on the menu icon (three vertical bars) and select “WebAuthn”.
- You will be prompted for a PIN if a PIN is set on the device. In the upper right hand corner, click on the icon representing your device, and select “Set PIN” or “Change PIN”, depending on whether your device already has a PIN configured.
Setting or Changing the FIDO2 PIN Using Windows Built-in Security Key Management
Windows 10 and 11 provide built in tools to manage FIDO2 devices without needing administrative access.
Open the start menu and search for “Set up security key”.
Alternatively, open Windows Settings and navigate to “Accounts” -> “Sign-in options” -> “Security Key”
Click on the “Manage” button.
Touch your security key as prompted
Under “Security key PIN”, Click on “Add” or “Change”, and follow the on-screen prompts.
Setting or Changing the FIDO2 PIN Using Google Chrome on MacOS or Linux
Chrome for Windows does not support setting or changing the FIDO2 PIN because of Windows OS restrictions.
Open the Chrome Settings menu by clicking on the 3 vertical dots.
Alternatively, navigate to chrome://settings/securityKeys and skip to step 5.
Select “Privacy & Security” from the settings navigation on the left hand side.
Scroll down and select “Security”.
Scroll down and select “Manage security keys”.
Click on “Create a PIN”, and follow the on-screen prompts to set or change the FIDO2 PIN.
Enrolling Fingerprints on the YubiKey Bio
Videos demonstrating how to enroll fingerprints in the YubiKey Bio can be found at Set up your YubiKey. Click the enroll your fingerprint link.
FIDO U2F
FIDO U2F is an open standard that provides strong, phishing-resistant two-factor authentication for web services using public key cryptography. U2F does not require any special drivers or configuration to use, just a compatible web browser. The U2F application on the YubiKey can be associated with an unlimited number of U2F sites.
Smart Card (PIV Compatible)
For an overview of the PIV features that became available with the 5.7.x firmware, see PIV Enhancements.
The YubiKey 5 Series provides a PIV-compatible smart card application. PIV, or FIPS 201, is a US government standard. It enables RSA or ECC sign/encrypt operations using a private key stored on a smart card through common interfaces like PKCS#11.
On Windows, the smart card functionality can be extended with the YubiKey Minidriver. See YubiKey Minidriver User Guide.
Note
The YubiKey Minidriver is not available for Android, Linux, macOS or iOS.
The YubiKey 5 Series supports extended APDUs, extended Answer To Reset (ATR), and Answer To Select (ATS). Using the PIV APDUs on iOS requires the Yubico iOS SDK.
Default Values
- PIN:
123456 - PUK:
12345678 - Management Key:
- Firmware 5.0.x-5.6.x:
010203040506070801020304050607080102030405060708(3DES) - Firmware 5.7.x:
010203040506070801020304050607080102030405060708(AES-192)
- Firmware 5.0.x-5.6.x:
Note
The Management Key changed to AES-192 in firmware 5.7, however the default value itself did not change.
Supported Algorithms
The YubiKey 5 Series supports the following algorithms on the PIV smart card application.
| Firmware Versions | ||
|---|---|---|
| Algorithm (Identifier) | 5.0.x - 5.6.x | 5.7.x |
| RSA-1024 (0x06) | Yes | Yes |
| RSA-2048 (0x07) | Yes | Yes |
| RSA-3072 (0x05) | Yes | |
| RSA-4096 (0x16) | Yes | |
| ECC P-256 (0x11) | Yes | Yes |
| ECC P-384 (0x14) | Yes | Yes |
| Ed25519/x25519 (0xe0) | Yes |
Note
The algorithms RSA-1024 and X25519 are not allowed on FIPS 140-3 capable devices.
Policies
PIN Policy
To specify how often the PIN needs to be entered for access to the credential in a given slot, set a PIN policy for that slot. This policy must be set upon key generation or import. It cannot be changed later.
Touch Policy
In addition to requiring the PIN, the YubiKey can require a physical touch on the metal contact. Similar to the PIN policy, the touch policy must be set upon key generation or import.
Slot Information
The keys and certificates for the smart card application are stored in slots, which are described below. The PIN policies described below are the defaults, before they are overridden with a custom PIN policy. These slots are separate from the programmable slots in the OTP application.
Slot 9a: PIV Authentication
This certificate and its associated private key is used to authenticate the card and the cardholder. This slot is used for system login, etc. To perform any private key operations, the end user PIN is required. Once the correct PIN has been provided, multiple private key operations may be performed without additional cardholder consent.
Slot 9c: Digital Signature
This certificate and its associated private key is used for digital signatures for the purpose of document, email, file, and executable signing. To perform any private key operations, the end user PIN is required. The PIN must be submitted immediately before each sign operation to ensure cardholder participation for every digital signature generated.
Slot 9d: Key Management
This certificate and its associated private key is used for encryption to assure confidentiality. This slot is used for encrypting emails or files. The end user PIN is required to perform any private key operations. Once the correct PIN has been provided, multiple private key operations may be performed without additional cardholder consent.
Slot 9e: Card Authentication
This certificate and its associated private key is used to support additional physical access applications, such as providing physical access to buildings through PIV-enabled door locks. The end user PIN is NOT required to perform private key operations for this slot.
Slots 82-95: Retired Key Management
These slots are meant for previously used Key Management keys to be able to decrypt earlier encrypted documents or emails.
Slot f9: Attestation
This slot is only used for attestation of other keys generated on the device with instruction f9. This slot is not cleared on reset, but can be overwritten.
Advanced Key Management Functions
With the 5.7.x firmware, the PIV application supports advanced key management functions such as moving and deleting keys:
- The ability to move keys enables retaining retired encryption keys on the device to decrypt older messages.
- The ability to delete keys enables destroying key material without overwriting with bogus data or resetting the PIV application.
Import a Key
For more information, see Import asymmetric key pair.
Move a Key
Keys can be moved from any slot except F9 (attestation) to any other slot except F9 using the instruction 0xF6.
| CLA | 00 |
| INS | F6 |
| P1 | Destination slot |
| 9A, 9C, 9D, 9E, | |
| 82, 93, 84, 85, 86, 87, 88, 89, 8A, 8B, 8C, 8D, 8E, 8F, | |
| 90, 91, 92, 93, 94, 95 | |
| P2 | Source slot |
| 9A, 9C, 9D, 9E, | |
| 82, 93, 84, 85, 86, 87, 88, 89, 8A, 8B, 8C, 8D, 8E, 8F, | |
| 90, 91, 92, 93, 94, 95 | |
| P2 |
Delete a Key
Any key can be deleted from any slot, including F9 (Attestation) using the instruction 0xF6 with a value of 0xFF for P1.
| CLA | 00 |
| INS | F6 |
| P1 | FF |
| P2 | Source slot |
| 9A, 9C, 9D, 9E, | |
| 82, 93, 84, 85, 86, 87, 88, 89, 8A, 8B, 8C, 8D, 8E, 8F, | |
| 90, 91, 92, 93, 94, 95 | |
| F9 |
Attestation
Attestation enables you to verify that a key on the smart card application was generated on the YubiKey and was not imported. An X.509 certificate for the key to be attested is created if the key has been generated on the YubiKey. Included in the certificate are the following extensions that provide information about the YubiKey.
1.3.6.1.4.1.41482.3.3: Firmware version, encoded as three bytes. For example, 050100 indicates firmware version 5.1.0.1.3.6.1.4.1.41482.3.7: Serial number of the YubiKey, encoded as an integer.1.3.6.1.4.1.41482.3.8: Two bytes, the first encoding the PIN policy and the second encoding the touch policy.
- PIN policy:
- 01 - never require PIN
- 02 - require PIN once per session
- 03 - always require PIN.
- Touch policy:
- 01 - never require touch
- 02 - always require touch
- 03 - cache touch for 15 seconds.
1.3.6.1.4.1.41482.3.9: YubiKey’s form factor, encoded as a one-byte octet-string.
- USB-A Keychain: 0x01
- USB-A Nano: 0x02
- USB-C Keychain: 0x03
- USB-C Nano: 0x04
- USB-C and Lightning®: 0x05
- Undefined: 0x00
PIV Metadata
Background: How PIV Attestation Works
A technical description of YubiKey PIV attestation is available at the Yubico developer website.
Attestation is performed on a public key that has been generated on the YubiKey. For example, consider an asymmetric key-pair that is generated on the YubiKey with the following ykman command:
ykman piv generate-key 9c -
This command generates an asymmetric key-pair, and stores the private key in the specified slot (9c in this example). The public key that has been generated is returned as output.
The ykman attestation command can be executed for the key-pair at the slot (9c):
ykman piv attest 9c C:\Test\attestation-cert-9c.cer
The generated certificate is generated in real time at the YubiKey. The attestation certificate and private key, which are stored in slot f9, are used for signing the generated certificate for the slot (9c). The attestation certificate is used as template when creating the generated certificate for the slot (9c). In addition to the template attestation certificate, the extensions and subject details are appended to the generated certificate.
However, the generated certificate is not the same as the X.509 certificate that may be issued by an external CA or self-signed on the YubiKey. For example, the X.509 certificate could be issued by the Microsoft ADCS and written to the YubiKey. The Yubico Authenticator on Windows can be used to generate a key-pair and self-sign the public key at the YubiKey.
The public key at slot 9a can be attested (signed in real time by the CA attestation certificate) with the same ykman command as above:
ykman piv attest 9a C:\Test\attestation-cert-9a.cer
And the X.509 self-signed certificate can be exported from the YubiKey with the following ykman command:
ykman piv export-certificate 9a C:\Test\self-signed-9a.cer
Notes on PIV Attestation
PIV attestation only works for asymmetric keys that have been generated on the YubiKey. It does not work for asymmetric keys that have been imported into the YubiKey as the attestation attests that a private key only exists on that particular YubiKey.
For example, the following ykman command imports a PKCS #12 file into the YubiKey at slot 9e:
ykman piv import-key 9e C:\\Test\\TestUser1.p12 -P 123456
ykman piv import-certificate 9e C:\\Test\\TestUser1.p12 -P 123456
These ykman commands unpack the PKCS #12 file, store the private key in the private key slot (9e), and store the X.509 certificate in the corresponding certificate slot.
Now, if one tries to attest the public key at slot 9e with the ykman attestation command, the operation fails:
ykman piv attest 9e C:\\Test\\attestation-9e.cer
Error: Attestation failed.
One more drawback with PIV attestation is performance, since generation of multiple PIV attestation certificates can be time-consuming.
When To Use PIV Metadata
PIV metadata should be used for the following cases:
- If PIV attestation cannot be used (for imported keys),
- If an attestation certificate is not required, PIV metadata can be used for achieving higher performance.
Yubico PIV Library and Metadata API
PIV metadata is supported by YubiKey v5.3.0 firmware and above. YubiKey PIV metadata can be accessed by using the libykpiv library.
The Yubico PIV Tool contains the library
libykpiv.so(for Linux),libykpiv.dylib(for MacOS),libykpiv.dll(for Windows).
The source code of the libykpiv library is published at the Yubico GitHub repo.
libykpiv
The libykpiv library exposes a C API in the header file ykpiv.h, which includes the functions ykpiv_get_metadata() and ykpiv_util_parse_metadata(). The source code of these functions is available in the file ykpiv.c.
In particular, the function ykpiv_get_metadata() calls the underlying function _ykpiv_transfer_data(), which transfers APDUs to the YubiKey PIV applet over the CCID interface.
The function _ykpiv_transfer_data() takes the input parameter templ, which is populated with the APDUs (CLA, INS, P1, P2) that are specified at the Yubico developer website for PIV extensions under the section GET METADATA. The YubiKey returns the tag length values (TLVs) (Algorithm, Policy, Origin, etc.) that are specified in the same PIV extensions section, and the TLV-encoded output is returned in the ykpiv_get_metadata() parameter data.
| Key | TLV | Description |
|---|---|---|
| Algorithm | 0x01 | Algorithm/type of the key |
| Policy | 0x02 | PIN and Touch policy of the key (keys only) |
| Origin | 0x03 | Origin of the key: imported or generated |
| Public key | 0x04 | Public key associated with the private key |
| Default value | 0x05 | Whether the PIN/key has a default value
(PIN and PUK and Mgmt key only)
|
| Retries | 0x06 | Number of retries left (PIN and PUK only) |
It is even possible to invoke the function ykpiv_transfer_data() directly for low-level APDU communication with the YubiKey’s PIV applet.
The function ykpiv_util_parse_metadata() can be used for parsing the returned TLV-encoded object.
Therefore, the developer can integrate the libykpiv library for low level programming with YubiKey PIV metadata.
Using PIV Metadata with YKCS11
The YKCS11 library is part of the Yubico PIV Tool. YKCS11 is a PKCS#11 module that allows external applications to communicate with the PIV application running on a YubiKey.
When the PKCS #11 function C_OpenSession() is called for a YubiKey PKCS #11 slot (which is a YubiKey PIV application in a PC/SC reader), then the YKCS11 library parses out the public keys for all PIV key slots. If PIV attestation is supported, the PIV attestation certificate is used for parsing out the public key.
If PIV attestation is not supported, that is, if the key-pair has been imported into a YubiKey, then the YKCS11 library calls the functions ykpiv_get_metadata() and ykpiv_util_parse_metadata() to parse out the requested public key.
If both attestation and PIV metadata fail, in that order, YKCS11 falls back to parse the public key from the X.509 certificate.
Note
The X.509 certificate’s public key may not match the private key in the YubiKey PIV slot.
Changes
Answer to Reset (ATR) and Answer to Select (ATS)
The ATR has been changed from Yubikey 4 to YubiKey and adds support for ATS.
PIV Attestation Root CA
YubiKeys 5 Series have a PIV attestation root certificate authority different than previous YubiKeys. Download the certificate of the new root certificate authority on the PIV attestation page.
Easier Identification
The YubiKey 5 Series devices can report their form factor through the PIV application whether or not they have an NFC interface. This enables easier, programmatic identification of the physical attributes of the YubiKey. For more information about how to query this information, see the YubiKey 5 Series Configuration Reference Guide.
PIV AES Management Key
Historically, the YubiKey PIV management key is a 3DES key. With the release of the YubiKey firmware version 5.4.2, the YubiKey PIV Management Key can also be an AES key. For more details, see the article on our Developer site, YubiKey and PIV.
Technically speaking, this feature expands the management key type held in PIV slot 9b to include AES keys (128, 192 and 256) as defined in the PIV specification (SP800-78-4, section 5). PIV management key in AES format renders the YubiKey compatible with current or future FIPS-compliant CMS services.
With the release of YubiKey firmware version 5.7 the YubiKey PIV Management Key is AES-192 by default.
OATH
For an overview of the OATH features that became available with the 5.7.x firmware, see 5.7 - 5.6 Firmware Specifics.
The OATH application can store up to 64 OATH credentials on firmware 5.7.0 and later (32 on older firmware), either OATH-TOTP (time-based One-Time Password) or OATH-HOTP (counter-based One-Time Password). These credentials are separate from those stored in the OTP application, and can only be accessed through the CCID channel. In order to manage these credentials and read the OTPs generated by the YubiKey, requires the Yubico Authenticator.
To restrict access to the OTPs, set an access code for the OATH application.
Note
Developers: Using the OATH application functions on iOS requires the Yubico iOS SDK.
HOTP and TOTP
Both OATH-TOTP and OATH-HOTP credentials are described in detail in the OATH Overview.
OpenPGP
For an overview of the OpenPGP features that became available with the 5.7.x firmware, see 5.7 - 5.6 Firmware Specifics.
The OpenPGP application provides an OpenPGP-compatible smart card in compliance with version 3.4 of the specification if the YubiKey firmware is 5.2.3 or later. If the firmware is an earlier version, the OpenPGP-compatible smart card is in compliance with version 2.0 of the specification.
OpenPGP-compatible smart card can be used with compatible PGP software such as GnuPG (GPG) and can store one PGP key each for authentication, signing, and encryption. Similar to the PIV / Smart Card touch policy, the OpenPGP application can also be set to require the YubiKey’s metal contact be touched to authorize an operation.
Note
Developers: Using the OpenPGP functions on iOS requires the Yubico iOS SDK.
YubiKey firmware 5.2.3 and later in combination with OpenPGP 3.4:
- Extends existing RSA support for OpenPGP operations to ECC algorithms
- Provides the Yubico Attestation feature for verifying keys generated on a YubiKey device
- Utilizes separate x.509 cardholder certificates alongside the existing OpenPGP certificates for authentication, signature and encryption/decipher
- Bring attestation functionality to OpenPGP keys and certificates generated on a YubiKey
- Improves security by supporting Key Derivation Function (KDF) PINs. With KDF enabled, the PIN is stored as a hash on the YubiKey. The OpenPGP client will only pass the hashed value, never the PIN directly.
Elliptic Curve Cryptographic (ECC) Algorithms
The YubiKey 5.2.3 firmware added support for ECC algorithms. These can be used for Signature, Authentication and Decipher keys. The full list of curves supported by OpenPGP 3.4 can be found in section 4.4.3.10 of the OpenPGP Smart Card 3.4 spec (page 35).
In addition to the algorithms listed below in RSA Algorithms, YubiKeys support the following ECC algorithms:
- secp256r1
- secp256k1
- secp384r1
- secp521r1
- brainpoolP256r1
- brainpoolP384r1
- brainpoolP512r1
- curve25519
- x25519 (decipher only)
- ed25519 (sign / auth only)
For further details on the new features, including key attestation, expanded encryption algorithms and additional cardholder certificates, refer to YubiKey 5.2 enhancements to OpenPGP 3.4 support.
RSA Algorithms
- RSA-1024 (removed in firmware 5.3.2 and later)
- RSA-2048
- RSA-3072 (requires GnuPG version 2.0 or higher)
- RSA-4096 (requires GnuPG version 2.0 or higher)
OTP
For an overview of the OTP features that became available with the 5.7.x firmware, see 5.7 - 5.6 Firmware Specifics.
The OTP application provides two programmable slots, each of which can hold one of the types of credentials listed below. A Yubico OTP credential is programmed to slot 1 during manufacturing. Output is sent as a series of keystrokes from a virtual keyboard.
- Trigger the YubiKey to produce the credential in the first slot by briefly touching the metal contact of the YubiKey.
- If a credential has been programmed to the second slot, trigger the YubiKey to produce it by touching the contact for 3 seconds.
Yubico OTP
Yubico OTP is a strong authentication mechanism that is supported by the YubiKey 5 Series. Yubico OTP can be used as the second factor in a two-factor authentication (2FA) scheme or on its own, providing single-factor authentication.
The OTP generated by the YubiKey has two parts, with the first 12 characters being the public identity which a validation server can link to a user, while the remaining 32 characters are the unique passcode that is changed each time an OTP is generated.
The character representation of the Yubico OTP is designed to handle a variety of keyboard layouts. It is crucial that the same code is generated if a YubiKey is inserted into a German computer with a QWERTZ layout, a French one with an AZERTY layout, or a US one with a QWERTY layout. The “Modhex”, or Modified Hexadecimal coding, was invented by Yubico to use only specific characters to ensure that the YubiKey works with the maximum number of keyboard layouts. (USB keyboards send their keystrokes by means of “scan codes” rather than the actual character. The translation to keystrokes is done by the device to which the YubiKey is connected).
Static Password
A static password can be programmed to the YubiKey so that it will type the password for you when you touch the metal contact.
For managing multiple passwords, see the password managers that the YubiKey can secure with two-factor authentication (2FA).
HMAC-SHA1 Challenge-Response
This type of credential is most often used for offline authentication, as it does not require contacting a server for validation.
An HMAC-SHA1 Challenge-Response credential enables software to send a challenge to the YubiKey and verify that an expected, predetermined response is returned. This credential can also be set to require a touch on the metal contact before the response is sent to the requesting software. This type of credential must be activated by the software sending the challenge; it cannot be activated by touching the metal contact on the YubiKey.
Note
Developers: Because the Challenge-Response function requires two-way communication with the YubiKey, using this feature on iOS requires the Yubico iOS SDK.
YubiHSM Auth
Introduction
YubiHSM Auth is a YubiKey CCID application that stores the long-lived credentials used to establish secure sessions to a YubiHSM 2. The secure session protocol is based on Secure Channel Protocol 3 (SCP03), see Yubico Secure Channel Technical Description. YubiHSM Auth is supported by YubiKey firmware version 5.4.3 and above.
YubiHSM Auth uses hardware to protect the long-lived credentials for accessing a YubiHSM 2. This increases the security of the authentication credentials, as compared to the authentication solution for the YubiHSM 2 based on software credentials derived from the Password-Based Key Derivation Function 2 (PBKDF2) algorithm with a password as input.
Credentials and PIN Codes
Each YubiHSM Auth credential is comprised of two AES-128 keys which are used to derive the three session-specific AES-128 keys. The YubiHSM Auth application can store up to 32 YubiHSM Auth credentials in the YubiKey.
Each YubiHSM Auth credential is protected by a 16-byte user access code provided to the YubiKey for each YubiHSM Auth operation. The access code is used to access the YubiHSM Auth Credential to derive the session-specific AES-128 keys.
Storing or deleting YubiHSM Auth credentials requires a separate 16-byte admin access code.
Each access code has a limit of eight retries and optionally, verification of user presence (touch).
YubiHSM 2 Secure Channel
Use the YubiKey YubiHSM Auth application to establish an encrypted and authenticated session to a YubiHSM 2. Although the YubiHSM 2 secure channel is based on the protocol Global Platform Secure Channel Protocol ‘03’ (SCP03), there are two important differences:
- The YubiHSM 2 secure channel protocol does not use APDUs, so the commands and possible options are not those of the complete SCP03 specification.
- SCP03 uses key sets with three long-lived AES keys, while the YubiHSM 2 secure channel uses key sets with two long-lived AES keys.
The YubiHSM 2 authentication protocol uses a set of static credentials called a long-lived key set. This consists of two AES-128 keys:
- ENC: Used for deriving keys for command and response encryption, as specified in SCP03.
- MAC: Used for deriving keys for command and response authentication, as specified in SCP03.
The identical long-lived keyset is protected in the YubiHSM 2 and in the YubiKey YubiHSM Auth application.
Those long-lived key sets are used by the YubiHSM Auth application to derive a set of three session-specific AES-128 keys using the challenge-response protocol as defined in SCP03:
- Session Secure Channel Encryption Key (S-ENC): Used for data confidentiality.
- Secure Channel Message Authentication Code Key for Command (S-MAC): Used for data and protocol integrity.
- Secure Channel Message Authentication Code Key for Response (S-RMAC): Used for data and protocol integrity.
The YubiHSM Auth session-specific keys are output from the YubiKey to the calling library, which uses the session keys to encrypt and authenticate commands and responses during a single session. The session keys are discarded afterwards.
Architecture Overview
The figure below shows how the YubiHSM Auth application fits in to the YubiHSM 2 architecture.
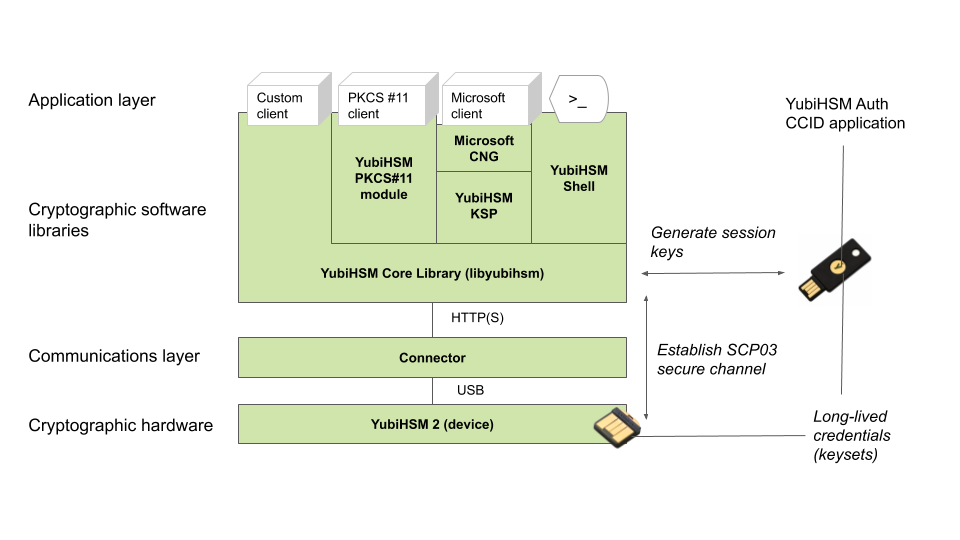
The identical long-lived credentials (key sets) are protected in both the YubiKey YubiHSM Auth application and in the YubiHSM 2. The YubiHSM-Shell software tool can be used for generating the key sets in the YubiHSM 2, and the YubiHSM-Auth software tool can be used for importing the same key sets to the YubiKey YubiHSM Auth application.
At the client, the YubiHSM authentication protocol is implemented in the libykhsmauth library, which derives the three session AES-keys by calling the YubiKey YubiHSM Auth CCID application. The session objects that are created can be used by the libyubihsm in the communication with YubiHSM.
The YubiHSM session keys are therefore generated on the basis of the long-lived credentials that are protected in the YubiHSM 2 and YubiKey YubiHSM Auth in conjunction with the SCP03 derivation scheme.
YubiHSM Auth Flowchart
The flowchart below illustrates the authentication protocol communication with YubiHSM using the static keys on YubiHSM Auth. It is assumed that the YubiHSM and YubiHSM Auth application share the same static keyset. The steps are explained below.
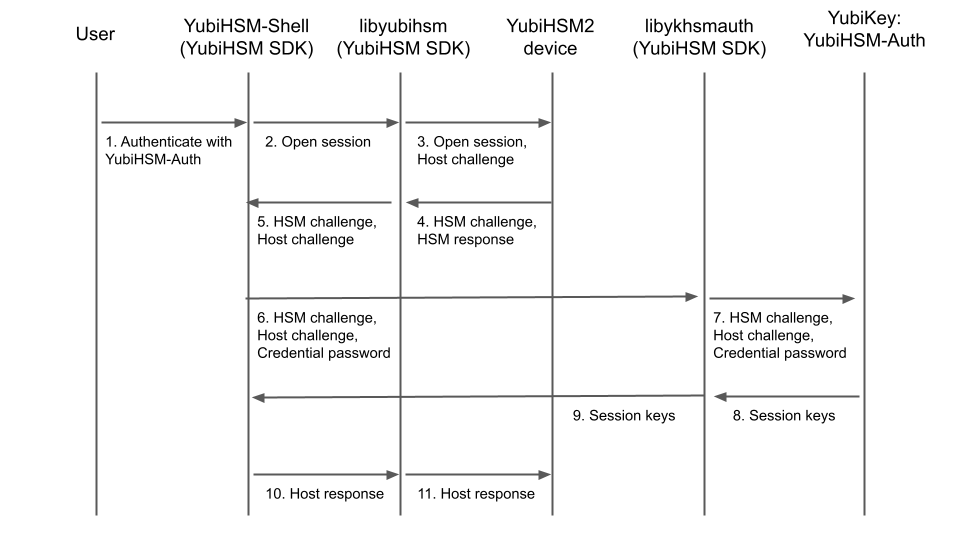
- The user launches YubiHSM-Shell and enters the commands
connectandsession open, with the flagykopenthat indicates that the YubiKey with YubiHSM Auth shall be used. - The YubiHSM-Shell invokes the
libyubihsmlibrary, with a request to open a session to the YubiHSM 2. - The
libyubihsmlibrary generates a host challenge, and opens a session to the YubiHSM 2 device. - The YubiHSM 2 device generates an HSM challenge, and generates the session keys based on the HSM challenge, the host challenge, and the static key set in the YubiHSM 2 device. The YubiHSM 2 returns the HSM challenge in an HSM response to the
libyubihsmlibrary. - The
libyubihsmlibrary propagates the host challenge and HSM challenge to the YubiHSM Shell. - The user enters the Credential password for unlocking the static keyset in the YubiHSM Auth application in the YubiKey. The YubiHSM Shell invokes the
libykhsmauthlibrary, with a request to generate session keys. - The
libykhsmauthlibrary invokes the YubiHSM Auth application in the YubiKey with the Credential password, the HSM challenge and host challenge are used as input parameters. - The Credential password unlocks the static keyset in the YubiHSM Auth application, and the YubiHSM Auth application generates the session keys based on the static keys, HSM challenge, and host challenge.
- The
libykhsmauthlibrary returns the session keys to YubiHSM Shell. - The YubiHSM Shell acknowledges the protocol handshake to
libyubihsm. - The
libyubihsmsends the host response to the YubiHSM 2 device. The session keys can now be used for secure channel communication betweenYubiHSM-Shell/libyubihsmin the host and the YubiHSM device.
Software and Tools
YubiHSM-Auth Software Tool
The YubiHSM-Auth software tool is part of the YubiHSM Shell, which is installed with the YubiHSM SDK. YubiHSM-Auth tool can be used for:
- Storing the YubiHSM Auth credentials on a YubiKey
- Deleting the YubiHSM Auth credentials on a YubiKey
- Listing the YubiHSM Auth credentials on a YubiKey
- Changing the YubiHSM Auth management key on a YubiKey
- Checking the number of retries of the YubiHSM Auth credential password
- Checking the version of the YubiHSM Auth application
- Calculating session keys, mainly for debugging and test purposes
- Resetting the YubiHSM Auth application on a YubiKey
First, the YubiHSM 2 device needs to be configured with an authentication key. The default authentication key password on KeyID=1 is set to password, and this should be changed or replaced with other authentication keys. For the examples in this section, however, it is assumed that the default authentication key is still present on the YubiHSM 2.
To generate and store the equivalent YubiHSM Auth credentials on the YubiKey, use the yubihsm-auth command line tool. To invoke YubiHSM-Auth, simply run yubihsm-auth with the required commands and parameters.
To get a list of available commands, parameters and their syntax, run: yubihsm-auth --help.
An example of how to use yubihsm-auth for storing YubiHSM Auth credentials on a YubiKey is shown below:
$ yubihsm-auth -a put --label="default key" --derivation-password="password" --credpwd="MyPassword" --touch=on --mgmkey="00000000000000000000000000000000" --verbose=5
Credential successfully stored
Where:
-a putis the action to insert a YubiHSM Auth credential on the YubiKey--labelis the label of the YubiHSM Auth credential on the YubiKey--derivation-passwordis used as input to the PBKDF2 algorithm, which is used for generating the two AES-128 keys that constitute the YubiHSM Auth credentials to be stored on the YubiKey--credpwdis the password protecting the YubiHSM Auth credentials on the YubiKey--touchis set toon. This requires the user touch the YubiKey when accessing the YubiHSM Auth credential--mgmkeyis the management key that is needed for writing the YubiHSM Auth credentials on the YubiKey--verboseis used to print more information as output
Note
We recommend using an offline air-gapped computer when storing the YubiHSM Auth credentials on the YubiKey.
Now, the YubiKey YubiHSM Auth application can be used with YubiHSM Shell for authentication to the YubiHSM 2.
Using YubiHSM-Auth with YubiHSM Shell
It is possible to authenticate to the YubiHSM 2 device with static credentials that are protected in the YubiKey application called YubiHSM Auth. For more information on this YubiKey feature and how to configure it, see the YubiHSM User Guide, section YubiHSM 2 Auth.
The YubiHSM Shell tool supports authentication with YubiHSM Auth credentials in both interactive mode and command-line mode.
To use yubihsm-shell with the YubiHSM Auth-enabled YubiKey in interactive mode, open a session by executing the following yubihsm-shell command:
yubihsm> session ykopen <authkey> <label> <password>
where, in the context of using YubiHSM-Shell with the YubiHSM Auth application, the following parameters are used:
authkeyis the identifier of the authentication key in the YubiHSM 2labelis the label of the YubiHSM-Auth credentials stored in the YubiKeypasswordis the password that protects the YubiHSM-Auth credentials stored in the YubiKey.
Below is an example of an interactive command with YubiHSM Shell:
yubihsm> session ykopen 1 "default key" "MyPassword"
trying to connect to reader 'Yubico YubiKey OTP+FIDO+CCID 0'
Created session 0
To use yubihsm-shell with YubiHSM Auth in command-line mode, add the parameter --ykhsmauth-label that implicitly invokes the YubiHSM Auth application at the YubiKey. Below is an example of how to use YubiHSM Shell in command-line mode:
$ yubihsm-shell --ykhsmauth-label "default key" -p "MyPassword" -a generate-asymmetric -A rsa2048 -i 11 -c sign-pss -l Signature_Key
If the YubiKey is configured to require touch when accessing the YubiHSM-Auth credentials, the user needs to touch the YubiKey sensor in addition to entering the credential password.
Once the user is authenticated with YubiHSM Auth, all YubiHSM-Shell commands can be used.