YubiHSM 2 SDK Tools And Libraries
YubiHSM 2 SDK Downloads
YubiHSM 2 SDK can be downloaded from https://developers.yubico.com/YubiHSM2/Releases/ and contains the following tools and libraries to interface with YubiHSM 2.
| Resource | Description |
|---|---|
| bin/libcrypto-3.dll or lib/libcrypto-3.dylib | Pre-built OpenSSL (Windows and MacOS only) |
| bin/yubihsm-setup | Deployment tool for YubiHSM 2 |
| bin/yubihsm-wrap | A tool to create wrapped importable
objects offline
|
| bin/yubihsm-connector | The Connector, a tool for providing a
common interface to the device
|
| bin/yubihsm-shell | The shell, a REPL-style tool for
interacting with YubiHSM 2 (and the
Connector) See Note (1)
|
| include/pkcs11/pkcs11.h | Common and standard PKCS#11 functions and
constants definitions
|
| include/pkcs11/pkcs11y.h | Yubico-specific PKCS#11 functions and
constants definitions
|
| include/yubihsm.h | Library functions and constants definitions |
lib/libyubihsm.{dylib,so}
or bin/libyubihsm.dll
|
Library binary to interact with YubiHSM 2 |
lib/yubihsm_pkcs11.{dylib,so}
or bin/yubihsm_pkcs11.dll
|
PKCS#11 module to interact with YubiHSM 2 |
| python-noarch (1) | Python implementation of the library |
yubihsm-cngprovider-windows-
amd64.msi
|
Installer for CNG/KSP for Windows ADCS
(Windows only)
|
yubihsm-connector-windows-
amd64.msi
|
Installer for the Connector (Windows only) |
(1) python-noarch is a separate download. See python-yubihsm.
For YubiHSM 2 SDK Library components see:
Details on these tools and libraries can be found in the later sections of this document.
YubiHSM 2 Communication
Users and applications communicate with the YubiHSM 2 through either HTTP and USB using the yubihsm-connector. See YubiHSM 2 Connector.
HTTP Access to YubiHSM
This kind of connection talks to yubihsm-connector over http(s), allowing remote access to a YubiHSM2, see YubiHSM 2 Connector.
In order to select this type of backend the connector URL should use the http or https scheme; for example, to use a local HTTP Connector use http://127.0.0.1:12345.
Note
HTTP is default configuration.
USB Access to YubiHSM
This kind of connection is a direct-access USB backend that talks directly with a YubiHSM device. The USB Connector is built into libyubihsm. This renders it unnecessary to run an additional component (i.e., the external Connector) at the cost of requiring exclusive access to a YubiHSM device.
To select this type of backend the connector URL should use the yhusb scheme. For example, to use a local device with serial number 123456 use yhusb://serial=123456.
YubiHSM 2 Setup Tool
The SDK ships with a tool called yubihsm-setup that helps with setting up a device for specific use cases. The tool assumes familiarity with the key concepts of YubiHSM such as Domains, Capabilities and Object ID. It currently supports the following:
- setup for KSP/ADCS and EJBCA;
- restoring a previous configuration
- resetting the device to factory defaults
- exporting all existing objects
The tool is based around the concept of secret-sharing. When setting up Objects, those are exported with a freshly created Wrap Key. The key is never stored on disk, but rather it is printed on the screen as shares. The key concepts here are:
- The number of shares, which is the number of parts the key should be divided into.
- The security threshold, which is the minimum number of shares required to reconstruct the Wrap Key.
Besides splitting the Wrap Key into shares, the tool (by default) also exports under wrap all the newly created objects and saves them in the current directory. This can be used at a later time to “clone” or recover a device. This operation can be performed either with yubihsm-setup or manually if the Wrap Key is known.
By default, the Authentication Key used to establish a Session with the device is also normally deleted at the end of the process.
Default behavior can be altered with command line options. For more information, consult the tool’s help.
Setup for EJBCA
When setting up the device for use by EJBCA, the setup tool also generates an asymmetric key pair and an X509 certificate suitable for use as a CA key. The setup tool can be re-run as many times as the number of asymmetric keys to be generated since each run will produce only one key pair and one corresponding X509 certificate.
Note
Using the --no-new-authkey flag prevents generation of a new Wrap Key and a new Authentication Key.
How It Works
For the JAVA implementation, a key pair can be used to perform PKCS#11 operations only if the key and its corresponding X509 certificate are stored under the same ID on the device (the value of their CKA_ID attributes is the same). To store them under the same ID, run the YubiHSM 2 Setup tool with the ejbca subcommand:
- Generate an Asymmetric Key on the YubiHSM 2.
- Generate an attestation certificate for the asymmetric key and import it into the YubiHSM 2 under the same ID as the Asymmetric Key.
The attestation certificate stored on the YubiHSM 2 is, in fact, only a placeholder certificate for the public key. It is never used by EJBCA because EJBCA stores the CAs’ certificates in a dedicated database.
YubiHSM 2 Shell
The yubihsm-shell tool is the administrative and testing tool you can use to interact with and configure the YubiHSM 2 device. All the commands supported by YubiHSM 2 YubiHSM Command Reference can be issued to YubiHSM 2 using YubiHSM 2 Shell.
The Shell can be invoked in two different ways: interactively, or as a command line tool useful for scripting.
Additional information on the various commands can be obtained with the help command in interactive mode or by referring to the --help argument for the command line mode.
Examples of commands can also be found in the YubiHSM Command Reference reference.
YubiHSM Shell Command Syntax
Commands and subcommands require specific arguments to work. The Shell will return an error message if the command syntax is incorrect, pointing at the first invalid argument.
Arguments have different types. In interactive mode pre-defined values for command types can be tab-completed (Tab Completion does not work on Windows). Command arguments are explained in the table below.
| Arg | Type | Description |
|---|---|---|
| A | Algorithm | An algorithm in string form (ex: ecp256) |
| B | Byte | A generic (hex or dec) 8-bit unsigned number |
| C | Capabilities | A list of Capabilities in either form:
hex (ex: 0xffffffffffffffff) or
string (ex: sign-pkcs,sign-pss, get-log-entries)
|
| D | Domains | A list of Domains, either in hex (ex: 0xffff) or
string form (ex: 3,5,14)
|
| I | Format | A format specifier in string form (ex: base64) |
| I | Input data | Input data, generally defaults to standard input |
| U | Number | A generic (hex or dec) unsigned number |
| O | Option | A device-global option in string form
(ex: force-audit)
|
| F | Output filename | Output file name, generally defaults to standard
output
|
| E | Session | The ID of an already-established Session |
| S | String | A generic string (use quotes for strings
including white spaces)
|
| T | Type | An Object Type in string form (ex: Asymmetric) |
| W | Word | A generic (hex or dec) 16-bit unsigned number |
Different commands have different default formats. These can be listed by invoking help on a specific command. For example, the help sign will display the following message:
pss           Sign data using RSASSA-PSS (default input format: binary)
              e:session,w:key_id,a:algorithm,i:data=-,F:out=-
As can be seen, the input format is binary. Additionally, arguments to a command that have =- after their type and name (like i:data and F:out in the example above), use the standard input or standard output by default for reading data.
Different levels of debug output can be enabled by using the -v flag in command line mode, or by issuing the debug LEVEL command in interactive mode, where LEVEL is one of all, crypto, error, info, intermediate, none, or raw.
See YubiHSM Command Reference for yubihsm-shell commands interactive and command line mode examples.
YubiHSM 2 Connector
The yubihsm-connector performs the communication between the YubiHSM 2 and the applications that use it.
The Connector must have permissions to access the USB device, and different operating systems behave differently in this regard. The easiest way to get started is to run the Connector with Administrator privileges (e.g. with sudo), but the safest way to run the Connector is to use your operating system’s configuration to give it only the privileges necessary to access the YubiHSM 2 USB device.
The Connector is not a trusted component. Sessions are established cryptographically between the application and the YubiHSM 2 using a symmetric mutual authentication scheme that is both encrypted and authenticated.
The Connector is not required to run on the same host as the applications which access it. In that case, configure the Connector to listen on a different address rather than the default localhost:12345. Make sure that the client has access. The port number does not need to change, only the address. Also, make sure that OS firewalls are configured properly to allow access to the host machine on the specified port.
To get information regarding the Connector issue a GET request on the /connector/status URI.
Communicating with the YubiHSM Connector
As mentioned earlier, the YubiHSM Connector is not meant to be a trusted component. For this reason it defaults to HTTP connections. It is possible to use HTTPS, however this requires providing a key and a certificate to the Connector.
Another option is to use a reverse proxy such as nginx before the Connector and have that handle TLS.
Sample Configuration
Sample configuration for the Connector: yubihsm-connector-config.yaml
# Certificate (X.509)
cert: ""

# Certificate key
key: ""

# Listening address. Defaults to "localhost:12345".
listen: localhost:12345

# Device serial in case of multiple devices
serial: ""

# Log to syslog/eventlog. Defaults to "false".
syslog: false

# Use to enable host header filtering. Default to "false".
# Use this if there is an absolute need to use a web browser on the
# host where the YubiHSM 2 is installed to connect to untrusted web
# sites on the Internet.
enable-host-whitelist: false

# Default list for the host header filter
host-whitelist: localhost,localhost.,127.0.0.1,[::1]
Sample udev rule to be placed into /etc/udev/rules.d/
#This udev file should be used with udev 188 and newer
ACTION!="add|change", GOTO="yubihsm2_connector_end"

# Yubico YubiHSM 2
# The OWNER attribute here has to match the uid of the process
# running the Connector
SUBSYSTEM=="usb", ATTRS{idVendor}=="1050", ATTRS{idProduct}=="0030",
  OWNER="yubihsm-connector"

LABEL="yubihsm2_connector_end"
YubiHSM 2 Auth
YubiHSM Auth is a YubiKey module that serves as a key storage for authenticating against a YubiHSM 2 with a YubiKey instead of having to manually entering credential to authenticate a session. To leverage this functionality, use the latest release of YubiHSM 2 SDK.
YubiHSM Auth is a YubiKey CCID application that stores the long-lived credentials used to establish secure sessions to a YubiHSM 2. The secure session protocol is based on Secure Channel Protocol 3 (SCP03). YubiHSM Auth is supported by YubiKey v5.4.0 and higher.
YubiHSM Auth uses hardware to protect the long-lived credentials for accessing a YubiHSM 2. This increases the security of the authentication credentials, as compared to the authentication solution for the YubiHSM 2 based on software credentials derived from the Password-Based Key Derivation Function 2 (PBKDF2) algorithm with a password as input.
Note
SCP03 is always used, with yubihsm-auth or not. This means that authentication is always based on a pair of 128 bit AES keys. These keys can be derived from a password on the client side, using authentication in the Yubico command line tools.
Credentials and PIN Codes
Each YubiHSM Auth credential consists of two AES-128 keys which are used to derive the three session-specific AES-128 keys. The YubiHSM Auth application can store up to 32 YubiHSM Auth credentials in the YubiKey.
Each YubiHSM Auth credential is protected by a 16-byte user access code provided to the YubiKey for each YubiHSM Auth operation. The access code is used to access the YubiHSM Auth Credential to derive the session-specific AES-128 keys.
Storing or deleting YubiHSM Auth credentials requires a separate 16-byte admin access code.
Each access code has a limit of eight retries and optionally, verification of user presence (touch).
YubiHSM 2 Secure Channel
YubiKey YubiHSM Auth application can be used to establish an encrypted and authenticated session to a YubiHSM 2. Although the YubiHSM 2 secure channel is based on the protocol Global Platform Secure Channel Protocol 03 (SCP03), there are two important differences:
- The YubiHSM 2 secure channel protocol does not use APDUs, so the commands and possible options are not those of the complete SCP03 specification.
- SCP03 uses key sets with three long-lived AES keys. Two of these long-lived keys are used for authentication and the third is used to encrypt new long-lived keys when they’re transferred to the device. Since YubiHSM handles authentication keys like any other keys, the third SCP03 long-lived key is not required therefore YubiHSM 2 secure channel uses key sets with two long-lived AES keys which are required for authentication.
The YubiHSM 2 authentication protocol uses a set of static credentials called a long-lived key set. This consists of two AES-128 keys:
- ENC: Used for deriving keys for command and response encryption, as specified in SCP03.
- MAC: Used for deriving keys for command and response authentication, as specified in SCP03.
The identical long-lived keyset is protected in the YubiHSM 2 and in the YubiKey YubiHSM Auth application.
Those long-lived key sets are used by the YubiHSM Auth application to derive a set of three session-specific AES-128 keys using the challenge-response protocol as defined in SCP03:
- Session Secure Channel Encryption Key (S-ENC): Used for data confidentiality.
- Secure Channel Message Authentication Code Key for Command (S-MAC): Used for data and protocol integrity.
- Secure Channel Message Authentication Code Key for Response (S-RMAC): Used for data and protocol integrity.
The YubiHSM Auth session-specific keys are output from the YubiKey to the calling library, which uses the session keys to encrypt and authenticate commands and responses during a single session. After the session is over the session keys are discarded. Session keys are only used for a single session and are not sensitive after the session is over.
Architecture Overview
The figure below shows how the YubiHSM Auth application fits in to the YubiHSM 2 architecture.
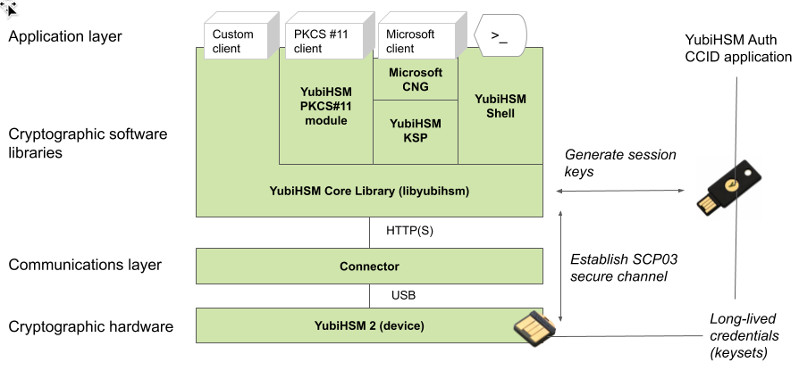
Figure: Architecture Overview
The identical long-lived credentials (key sets) are protected in both the YubiKey YubiHSM Auth application and in the YubiHSM 2. The YubiHSM-Shell software tool can be used for generating the key sets in the YubiHSM 2, and the YubiHSM-Auth software tool can be used for importing the same key sets to the YubiKey YubiHSM Auth application.
At the client, the YubiHSM authentication protocol is implemented in the libykhsmauth library, which derives the three session AES-keys by calling the YubiKey YubiHSM Auth CCID application. The session objects that are created can be used by the libyubihsm in the communication with YubiHSM.
The YubiHSM session keys are therefore generated on the basis of the long-lived credentials that are protected in the YubiHSM 2 and YubiKey YubiHSM Auth in conjunction with the SCP03 derivation scheme.
YubiHSM Auth Flowchart
The flowchart below illustrates the authentication protocol communication with YubiHSM using the static keys on YubiHSM Auth. It is assumed that the YubiHSM and YubiHSM Auth application share the same static keyset. The steps are explained below.
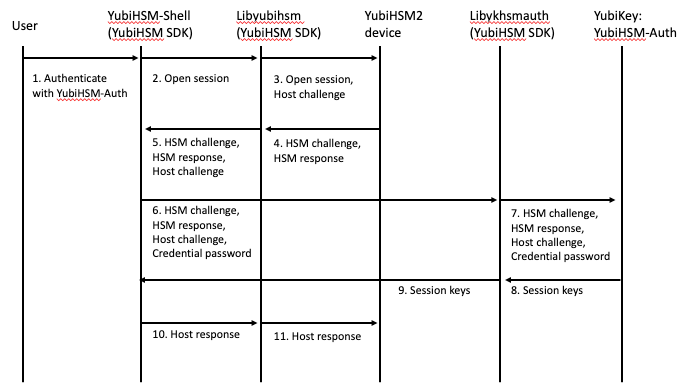
Figure: YubiHSM Auth Flowchart
The following is a description of the steps in the flowchart.
- The user launches YubiHSM-Shell and enters the commands
connectandsession open, with the flagykopenthat indicates that the YubiKey with YubiHSM Auth shall be used. - The YubiHSM-Shell invokes the
libyubihsmlibrary, with a request to open a session to the YubiHSM 2. - The
libyubihsmlibrary generates a host challenge and opens a session to the YubiHSM 2 device. - The YubiHSM 2 device generates an HSM challenge and generates the session keys based on the HSM challenge, the host challenge, and the static key set in the YubiHSM 2 device. The YubiHSM 2 returns the HSM challenge in an HSM response to the
libyubihsmlibrary. - The
libyubihsmlibrary propagates the host challenge and HSM challenge to the YubiHSM Shell. - The user enters the Credential password for unlocking the static keyset in the YubiHSM Auth application in the YubiKey. The YubiHSM Shell invokes the
libykhsmauthlibrary, with a request to generate session keys. - The
libykhsmauthlibrary invokes the YubiHSM Auth application in the YubiKey with the Credential password, the HSM challenge and host challenge are used as input parameters. - The Credential password unlocks the static keyset in the YubiHSM Auth application, and the YubiHSM Auth application generates the session keys based on the static keys, HSM challenge, and host challenge.
- The
libykhsmauthlibrary returns the session keys to YubiHSM Shell. - The YubiHSM Shell acknowledges the protocol handshake to
libyubihsm. - The
libyubihsmsends the host response to the YubiHSM 2 device. The session keys can now be used for secure channel communication betweenYubiHSM-Shell/libyubihsmin the host and the YubiHSM device.
YubiHSM-Auth Software Tool
The YubiHSM-Auth software tool is part of the YubiHSM Shell, which is installed with the YubiHSM SDK. YubiHSM-Auth tool can be used for:
- Storing the YubiHSM Auth credentials on a YubiKey
- Deleting the YubiHSM Auth credentials on a YubiKey
- Listing the YubiHSM Auth credentials on a YubiKey
- Changing the YubiHSM Auth management key on a YubiKey
- Checking the number of retries of the YubiHSM Auth credential password
- Checking the version of the YubiHSM Auth application
- Calculating session keys, mainly for debugging and test purposes
- Resetting the YubiHSM Auth application on a YubiKey
First, the YubiHSM 2 device needs to be configured with an authentication key. The default authentication key password on KeyID=1 is set to password, and this should be changed or replaced with other authentication keys. For the examples in this section, however, it is assumed that the default authentication key is still present on the YubiHSM 2.
In order to generate and store the equivalent YubiHSM Auth credentials on the YubiKey, the yubihsm-auth command line tool can be used. To invoke YubiHSM-Auth simply run yubihsm-auth with the required commands and parameters.
To get a list of available commands, parameters and their syntax, run:
yubihsm-auth --help
An example of how to use yubihsm-auth for storing YubiHSM Auth credentials on a YubiKey is shown below:
$ yubihsm-auth -a put --label="default key" --derivation-password="password" --credpwd="MyPassword" --touch=on --mgmkey="00000000000000000000000000000000" --verbose=5
Credential successfully stored
where –
-a put is the action to insert a YubiHSM Auth credential on the YubiKey
--label is the label of the YubiHSM Auth credential on the YubiKey
--derivation-password is used as input to the PBKDF2 algorithm, which is used for generating the two AES-128 keys that constitute the YubiHSM Auth credentials to be stored on the YubiKey
--credpwd is the password protecting the YubiHSM Auth credentials on the YubiKey
--touch is set to ‘on’, which requires the user to touch the YubiKey when accessing the YubiHSM Auth credential
--mgmkey is the management key that is needed for writing the YubiHSM Auth credentials on the YubiKey
--verbose is used to print more information as output
Note
We recommend using an offline air-gapped computer when storing the YubiHSM Auth credentials on the YubiKey. Now the YubiKey YubiHSM Auth application can be used with YubiHSM Shell for authentication to the YubiHSM 2.
Using YubiHSM-Auth with YubiHSM Shell
It is now possible to authenticate to the YubiHSM 2 device with static credentials that are protected in the YubiKey application called YubiHSM Auth. For more information on this YubiKey feature and how to configure it, see Using YubiHSM Auth.
The YubiHSM Shell tool supports authentication with YubiHSM Auth credentials in both interactive mode and command line mode.
In order to use yubihsm-shell with the YubiHSM Auth-enabled YubiKey in interactive mode, open a session by executing the following yubihsm-shell command:
yubihsm> session ykopen <authkey> <label> <password>
Where, in the context of using YubiHSM-Shell with the YubiHSM Auth application, the following parameters are used:
authkey is the identifier of the authentication key in the YubiHSM 2
label is the label of the YubiHSM-Auth credetnials stored in the YubiKey
password is the password that protects the YubiHSM-Auth credentials stored in the YubiKey.
Below is an example of an interactive command with YubiHSM Shell:
yubihsm> session ykopen 1 "default key" "MyPassword"
trying to connect to reader 'Yubico YubiKey OTP+FIDO+CCID 0'
Created session 0
To use yubihsm-shell with YubiHSM Auth in command line mode, add the parameter --ykhsmauth-label that implicitly invokes the YubiHSM Auth application at the YubiKey. Below is an example of how to use YubiHSM Shell in command line mode:
$ yubihsm-shell --ykhsmauth-label "default key" -p "MyPassword"
   -a generate-asymmetric -A rsa2048 -i 11 -c sign-pss -l Signature_Key``
If the YubiKey is configured to require touch when accessing the YubiHSM-Auth credentials, the user needs to touch the YubiKey sensor in addition to entering the credential password.
Once the user is authenticated with YubiHSM Auth, all YubiHSM-Shell commands can be used.
YubiHSM 2 Wrap
Yubihsm Wrap is a tool that allows the creation of importable objects offline. This is useful when bootstrapping secrets, for example on an air-gapped computer.
The tool requires an unencrypted Wrap Key in binary format and uses that to wrap objects with given Type, Objects, Algorithms, Object ID, Capabilities and, where applicable, Delegated Capabilities.
For the resulting Object to be successfully imported on a YubiHSM 2, the Wrap Key used by yubihsm-wrap must already be present on the device.
Currently not all Object Types are supported. Refer to Known Issues and Limitations for more information.
The yubihsm-wrap software tool is part of the YubiHSM Shell, which is installed with the YubiHSM SDK.
YubiHSM 2 Key Storage Provider (KSP)
The YubiHSM Setup program, which is part of the YubiHSM 2 tool set, is used to perform the initial configuration of the primary YubiHSM 2 device. This program configures the device with the requirements needed for deploying YubiHSM 2 to safely store the ADCS root CA key. Specifically, during the setup process the YubiHSM is configured so that the necessary key material is generated on the device:
One wrap key – The wrap key is split among a determined number of key custodians, and each share is recorded by each custodian. See Key Splitting and Key Custodians.
One application authentication key (auth key) – The auth key for authenticating to the YubiHSM 2 through the KSP. This allows the KSP to perform operations in the YubiHSM 2.
Note
This initial configuration replaces the default auth key with a new one, which will only be operable in the same domain as the asymmetric key. The Domains that is used to compartmentalize the YubiHSM 2 determines this behavior.
Tip
For test purposes you can set the
yubihsm-setup -dflag to keep the default auth key with the administrative privileges; this will allow you to delete keys on the YubiHSM 2 for test purposes only. For production purposes, however, theyubihsm-setupcommand must be executed without the-dflag to ensure that the factory preset auth key is properly deleted from the YubiHSM 2 device.One audit key – The audit key is used for accessing the internal audit log of the device and resetting the audit log. The audit log retains information about the last 62 operations. It is also used to purge the log if needed. Depending on your local requirements, you may not need to create an audit key. If you are unsure of your requirements, we suggest you create an audit key.
The auth key and the audit key are exported under wrap to a file in the current working directory on the machine where the YubiHSM Setup program is installed.
Tip
The YubiHSM Setup tool has a help argument that you can call to learn more about its usage.
Note
To safeguard the integrity of the device, configuration must be performed in an air-gapped environment.
Install Key Storage Provider (KSP)
The Key Storage Provider (KSP) for Windows Cryptography API: Next Generation (CNG) has been thoroughly tested with Active Directory Certificate Services (AD CS) plus 2048-bit, 3072-bit, and 4096-bit keys. It also works with other types of keys, but those have not been tested to the same extent.
The following installs the KSP and the Connector Service, using them for ADCS with the default Authentication Key (1) and password (password).
When you run the Install-AdcsCertificationAuthority command, you should see the YubiHSM 2 light flash rapidly, because AD CS uses the KSP to generate a 2048-bit key in hardware. For AD CS to work properly, Restart-Computer may be needed.
PS1> msiexec /i "yubihsm-connector-windows-amd64.msi" /passive ACCEPT=yes
PS1> msiexec /i "yubihsm-cngprovider-windows-amd64.msi" /passive  ACCEPT=yes
PS1> Install-WindowsFeature AD-Certificate -Verbose
PS1> Install-AdcsCertificationAuthority -CAType EnterpriseRootCa    \
    -CryptoProviderName "RSA#YubiHSM Key Storage Provider"          \
    -KeyLength 2048 -HashAlgorithmName SHA256 -ValidityPeriod Years \
    -ValidityPeriodUnits 5
PS1> Install-AdcsOnlineResponder
If you are using a different Authentication Key, password, or Connector for the KSP, you can specify them as follows (defaults are shown):
PS1> Set-ItemProperty -path HKLM:\SOFTWARE\Yubico\YubiHSM \
    -name ConnectorURL -Type String -Value http://127.0.0.1:12345
PS1> Set-ItemProperty -path HKLM:\SOFTWARE\Yubico\YubiHSM \
    -name AuthKeysetPassword -Type String -Value password
PS1> Set-ItemProperty -path HKLM:\SOFTWARE\Yubico\YubiHSM \
    -name AuthKeysetID -Type DWord -Value 1
Warning
Design considerations for Key Storage Providers in Windows prevent the direct USB functionality of libyubihsm (Connector URL yhusb://), therefore it is not supported in this version of the YubiHSM KSP.
The default configuration for the connector is: ProgramData\YubiHSM\yubihsm-connector.yaml - Administrator rights are required to access the file.
Additional Documentation for YubiHSM Key Storage Provider
- For instructions on how to move a software-based key into the YubiHSM 2 for use with the KSP, see Move Software Keys to Key Storage Provider.
- For an example of how to create an HSM-backed code signing certificate for Windows through the KSP, see Example: Creating a Code-Signing Certificate using the Key Storage Provider.
- For more information about status codes, see KSP Status Codes for Windows.
- For details on how to configure the 32-bit and 64-bit KSP DLLs, please see Configuring YubiHSM 2 for Microsoft Windows Server.
Configure Key Storage Provider (KSP)
After you have inserted the primary device into the air-gapped system, the configuration steps are diagrammed in the following image, and listed below. They are described in detail in the next section, Configure YubiSHM 2 Device.
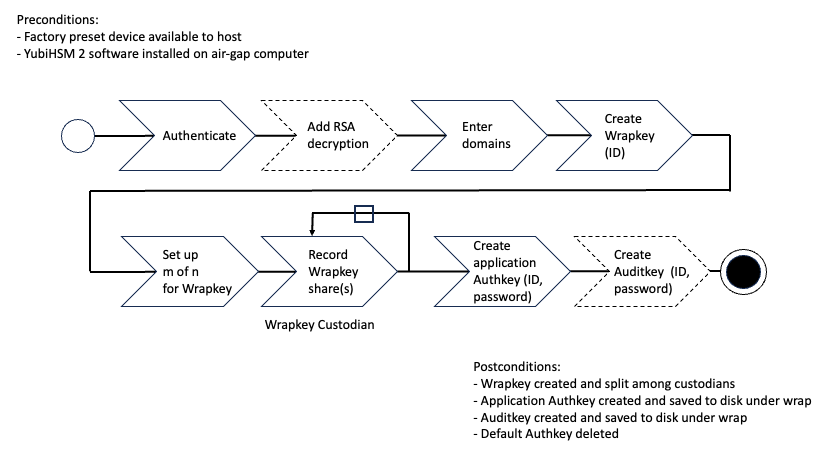
Figure: Create wrapkey using Custodians
- Authenticate:
- Set up communication between the YubiHSM 2 tools and the device.
- Start the configuration process. Run the YubiHSM Setup with the argument
ksp, specifying the Connector URL if necessary. - Start the YubiHSM Setup process and authenticate to the YubiHSM device.
- Add RSA decryption and capabilities if required. For example:
- Active Directory Certificate Services (ADCS), does not require RSA decryption.
- Microsoft SQL Server Always Encrypted, needs RSA decryption capabilities.
- Enter Domains. Enter the names of the domains in which you need the auth key and audit key to be available.
- Create the wrap key and its ID.
- Setup
m of nfor Wrap key. Split the wrap key into shares and specify the privacy threshold. - Record Wrap key shares. Have the wrap key custodians record the number of shares required to rejoin the wrap key.
- Create the application authentication key (auth key). Includes creating the ID and password that are used to authenticate to the device by the KSP in Windows so the KSP can perform operations in YubiHSM 2.
- Create the audit application key (audit key) (optional), include ID and password.
The original default auth key is deleted and setup process finishes.
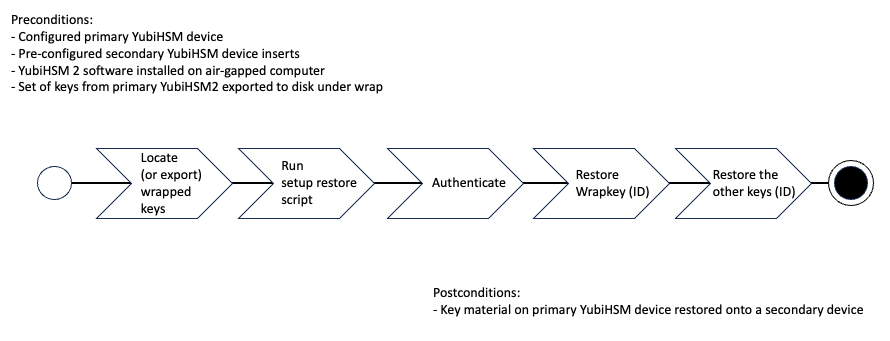
Figure: Export keys from Primary YubiHSM to Seconary YubiHSM on Windows
Configure YubiSHM 2 Device
Authenticate
Enable communication with the YubiHSM 2 device by ensuring that the YubiHSM Connector service (
yhconsrvin Windows) is running the YubiHSM Connector on the system where the device is inserted.If the YubiHSM Connector is running on a host machine to which the YubiHSM 2 is physically connected, the Connector should be started in networked mode. For example, if the host IP address is 192.168.100.252, the Connector should be started on the host machine with the following command:
yubihsm-connector -l 192.168.100.252:12345
You can validate that the connector is running properly by typing the following URI into your browser: http://192.168.100.252:12345/connector/status. The output in the web browser should be similar to:
status=OK
serial=*
version=1.0.0
pid=*
address=192.168.100.252
port=12345
Run YubiHSM Setup with the argument
ksp. To do this:- Launch your command line application.
- Navigate to the directory for which you have write access and that contains the YubiHSM Setup program.
- Run the YubiHSM Setup with the argument
ksp.
yubihsm-setup kspIf the application calling the Setup is installed on a machine other than the YubiHSM Connector, use the connector flag to specify the Connector URL, for example:
yubihsm-setup --connector http://192.168.100.252:12345 ksp
Tip
The setup tool also has a help argument that you can call to learn more about its usage.
Start the YubiHSM Setup process. Type the default auth key password:
passwordand press Enter.A message confirms that the default auth key was used and that you have successfully authenticated to the device:
Using authentication key 0x0001.Object IDs are displayed in the YubiHSM Setup Tool using hexadecimal numbers, in this case the default auth key has ID
1, or0x0001in hexadecimal.
You are prompted to add RSA decryption capabilities. Do one of the following:
If you plan to use your YubiHSM 2 exclusively with an application that only needs signing capabilities, RSA decryption is not required. Active Directory Certificate Services (ADCS), for example, does not require RSA decryption.
Type
n.If you are planning on using the same YubiHSM 2 device for something that does require the capability to decrypt RSA, then you do need RSA decryption. The Microsoft SQL Server Always Encrypted, for example, needs RSA decryption capabilities.
Type
y.
Tip
If you are unsure what selection to make, type
n.At the prompt, enter the domain(s) you need the auth key and audit key to be available in.
The auth and audit keys are generated after you create the wrap key. You will only need one domain for the purposes of completing this guide. Do the following:
Unless you have a requirement to assign more than one domain, type a single number between
1to16and press Enter.In this guide, we assume that domain
1was entered. Confirmation will look like the following:got domains [ One ]
or
Using domains:
One
Enter wrap keyID (0 to choose automatically):
Generate a wrap key and enter its ID.
The wrap key is very important as it allows you to export and import objects from and to the device. For example, you would export and import objects for backup purposes, as described in Backup Examples. Do one of the following:
- To manually assign a wrap key ID, type the number and press Enter. As object ID
1is already in use by the default auth key, we recommend you assign id2to the wrap key. Type2and press Enter. - To allow the system to assign a wrap key ID automatically, type
0and press Enter.
In both cases, a confirmation message similar to the following is displayed:
Stored wrap key with ID 0x0002 on the device
- To manually assign a wrap key ID, type the number and press Enter. As object ID
Specify the number of shares to split the wrap key to distribute it equally among a number of key custodians. Also, specify the privacy threshold, which is the number of shares that must be present for the wrap key to be regenerated.
For this example, we assume that the wrap key is split into three shares, out of which at least two shares must be present in order to use the key. If there are not two key custodians present, the wrap key cannot be rejoined. At the prompt, do the following:
- Enter the number of shares. In this example, enter
3. - Enter the privacy threshold. In this example, enter
2.
When defined, the three wrap key custodians each take their turn in front of the screen to record their respective share. A warning notice appears advising you that the shares are not stored anywhere.
- Enter the number of shares. In this example, enter
Have each custodian record their key shares. Each custodian completes these steps.
- At the prompt, record their key share.
- Confirm their key share by typing
yand press Enter. - Turn it over to the next custodian. The screen buffer is cleared before each share is presented.
The following is an example of a share presented on the screen:
2-1-WWmTQj5PHGJQ4H9Y2ouURm8m75QkDOeYzFzOX1VyMpAOeF3YKYZyAVdM0WY4GErclVuAC
Have you recorded the key share? (y/n)
A notice is displayed, warning if the shares are not stored anywhere.
Note
Be sure to record the shares and store them safely if you want to re-use the wrap key for this device in the future.
Important
Each custodian must record the whole string presented, including the prefix (in this case)
2-1-which indicates the number of shares determined to be required to rejoin (or the privacy threshold) and the number of the share itself out of the total number of shares being created.Tip
For non-production and test purposes, such as in a lab scenario, it is not necessary to specify that the wrap key should be shared between key custodians but instead just use one solitary key. To do this, when configuring the device using YubiHSM Setup, indicate the number of shares to be
1and the privacy threshold to also be1.When this step is completed, the wrap key generated is saved to the HSM 2 device.
Create an auth key.
The auth key is used to authenticate to the device by the Key Storage Provider (KSP) in Windows, allowing the KSP to perform operations in YubiHSM 2.
Since object ID
1and2are already in use by the default auth key and the wrap key respectively, the example in this guide assumes that the auth key to be created next gets ID3. Do one of the following:- To manually assign an auth key ID, type
3and press Enter. - To instead allow the system to assign a wrap key ID automatically, type
0and press Enter.
- To manually assign an auth key ID, type
Create and enter a password of at least eight (8) characters for the auth key.
Be sure to store the password of the auth key that you will use in a way so that it cannot be compromised. You need this password later to configure the YubiHSM KSP DLL for use later. See Set up KSP on Windows.
Enter the auth key password and press Enter. A confirmation message appears.
Stored auth key with ID 0x0003 on the device
Saved wrapped auth key to {path} 0x0003.yhw
The wrapped auth key (
0x0003.yhw) has been saved to the same path as the location of the YubiHSM Setup program. Although encrypted using the wrap key, we recommend that you do not store keys - even under wrap - on a network-accessible or otherwise potentially comparable storage media.Leave the
\*.yhw-file with the wrapped auth key where it was saved for now. It will be used later to create a backup. Delete the auth key after you make the backup.
Decide whether to create an audit key. To log into the YubiHSM 2 with the audit key, both the key ID and the password will be needed.
The audit key is used to access the internal audit log of the device which holds information about the last 62 operations performed. It is also used to reset the log if needed. Depending on your local requirements, you may not need to create an audit key. If you are unsure of your requirements, we suggest you create an audit key.
At the prompt to create an audit key, type
y.Assign a key ID to the audit key.
Make a note of the ID you enter (for example, key ID
4).Enter the audit key password.
Store this password so that it cannot be compromised.
The audit key is exported under wrap to the current working directory. Using our example of key ID
4, the file is named0x0004.yhw.
The setup tool finishes by letting you know that the default, factory-installed auth key has been deleted.
Previous authentication key 0x0001 deleted
All done
The YubiHSM Setup application exits. The YubiHSM 2 device is now equipped with the symmetric keys for wrap, audit, and application authentication.
Verifying the Setup
You can verify the results of the YubiHSM Setup program by using the YubiHSM Shell program, and logging in using the auth key (we used object ID 3 in this guide). To verify the YubiHSM Setup:
In your command line application (where
$is the prompt), run YubiHSM Shell program. To do this, if you haven’t already, launch your command line application and navigate to the directory containing the YubiHSM Shell program. Then type the following command and press Enter.$ yubihsm-shellTo connect to the YubiHSM, at the yubihsm prompt, type
connectand press Enter. A message verifying that you have a successful connection is displayed.To open a session with the YubiHSM 2, type
session open 3and press Enter.Type in the password for the auth key. You will receive a confirmation message that the session has been set up successfully.
You now have an administrative connection to the YubiHSM 2 and can list the objects available. To list the objects, type
list objects 0and press Enter. Your results should be similar to the following:Found 3 object(s) id: 0x0002, type: wrapkey, sequence: 0 id: 0x0003, type: authkey, sequence: 0 id: 0x0004, type: authkey, sequence: 0
As you can see by looking at their IDs, these objects correspond to the wrap key, the auth key and the audit key that were just created.
To obtain more information about any one of the objects, for example, the auth key (object ID
3), including its capabilities, type the following command and press Enter:yubihsm> get objectinfo 0 3 authentication-key
The response you receive should look similar to the following:
id: 0x0003, type: authkey, algorithm: yubico-aes-auth,
label: "Application auth key", length: 40, domains: 1,
sequence: 0, origin: imported, capabilities:
asymmetric_gen:asymmetric_sign_pkcs:asymmetric_sign_pss:
export_wrapped: import_wrapped:export_under_wrap,
delegated_capabilities:
asymmetric_gen:asymmetric_sign_pkcs:asymmetric_sign_pss:
export_under_wrap
This indicates that YubiHSM 2 as it has now been configured will later on allow the KSP to leverage the device to:
- Generate asymmetric objects
- Compute signatures using RSA-PKCS1v1.5
- Compute signatures using RSA-PSS
- Export other objects under wrap
- Import wrapped objects
- Mark an object as exportable under wrap
In addition, this object (the auth key, object ID
3) also has so-called delegated capabilities. Delegated capabilities define the set of capabilities that can be set or “bestowed” onto other objects that are created by it.To exit, type
quit.
KSP Status Codes for Windows
The YubiHSM software components have a standard set of status codes to report the status of an HSM operation. To comply with the expectations of specific platforms, these status codes are converted to the appropriate API status code.
Currently, this translation is only performed for the Windows Key Storage Provider. The error codes, their meanings and translated values are as follows.
| Libyubihsm Error Code | Description | Windows CNG Translation |
|---|---|---|
| YHR_BUFFER_TOO_SMALL | Not enough space
to store data
|
NTE_BUFFER_TOO_SMALL |
| YHR_CONNECTION_ERROR | Transport Backend
error
|
NTE_DEVICE_NOT_READY |
| YHR_CONNECTOR_ERROR | Connector
operation Failed
|
NTE_DEVICE_NOT_READY |
| YHR_CONNECTOR_NOT_FOUND | Unable to find a
suitable connector
|
NTE_DEVICE_NOT_READY |
| YHR_CRYPTOGRAM_MISMATCH | Unable to verify
cryptogram
|
NTE_BAD_SIGNATURE |
YHR_DEVICE_AUTHENTICATION
_FAILED
|
Message encryption /
verification failed
|
NTE_INCORRECT_PASSWORD
|
YHR_DEVICE_COMMAND
_UNEXECUTED
|
The HSM attempted to
execute a command,
but it did not
complete in allotted
time. The command
has not terminated,
and the current
state of the session
is unavailable
|
NTE_SYS_ERR |
YHR_DEVICE_DEMO_MODE
|
Demo mode, power
cycle device
|
NTE_DEVICE_NOT_READY |
YHR_DEVICE_INSUFFICIENT
_PERMISSIONS
|
Wrong permissions
for operation
|
NTE_PERM |
YHR_DEVICE_INVALID
_COMMAND
|
Invalid command | NTE_NOT_SUPPORTED |
| YHR_DEVICE_INVALID_DATA | Malformed command /
invalid data
|
NTE_INVALID_PARAMETER |
| YHR_DEVICE_INVALID_ID | Illegal ID used
|
NTE_INVALID_PARAMETER[] |
| YHR_DEVICE_INVALID_OTP | Invalid OTP
|
NTE_INCORRECT_PASSWORD |
YHR_DEVICE_INVALID
_SESSION
|
Invalid session | NTE_DEVICE_NOT_READY |
YHR_DEVICE_LOG_FULL
|
Log buffer is full
and forced audit is
set
|
NTE_DEVICE_NOT_READY |
| YHR_DEVICE_OBJECT_EXISTS | An object with the
specified ID already
exists
|
NTE_EXISTS |
YHR_DEVICE_OBJECT
_NOT_FOUND
|
Object not found | NTE_NOT_FOUND |
| YHR_DEVICE_OK | No error | NTE_OP_OK |
| YHR_DEVICE_SESSION_FAILED | Session creation
failed
|
NTE_DEVICE_NOT_READY |
| YHR_DEVICE_SESSIONS_FULL | All sessions are
allocated
|
NTE_DEVICE_NOT_READY |
| YHR_DEVICE_STORAGE_FAILED | Storage failure | NTE_TOKEN_KEYSET
_STORAGE_FULL
|
| YHR_DEVICE_WRONG_LENGTH | Wrong length | NTE_BAD_LEN |
| YHR_GENERIC_ERROR | Generic error | NTE_FAIL |
| YHR_INIT_ERROR | Unable to initialize
libyubihsm
|
NTE_PROVIDER_DLL_FAIL |
| YHR_INVALID_PARAMETERS | Invalid argument to
a function
|
NTE_INVALID_PARAMETER |
YHR_MAC_MISMATCH
|
Unable to verify MAC
|
NTE_BAD_SIGNATURE
|
YHR_MEMORY_ERROR
|
The YubiHSM or
software library was
not able to allocate
memory to perform
the requested
operation
|
NTE_NO_MEMORY
|
YHR_SESSION
_AUTHENTICATION_FAILED
|
Unable to
authenticate session
|
NTE_INCORRECT_PASSWORD |
| YHR_SUCCESS | The operation
completed
Successfully
|
ERROR_SUCCESS |
| YHR_WRONG_LENGTH | This error may occur
if there is a
mismatch between the
YubiHSM firmware
version and
libyubihsm library
version
|
NTE_BAD_LEN |
PKCS#11
Configuration
The PKCS#11 module requires a configuration file, default location for this file is current directory and default name is yubihsm_pkcs11.conf using the environment variable YUBIHSM_PKCS11_CONF one can point to a custom location and name.
Configuration options can also be passed as a string in the pReserved field of C_Initialize, using the OpenSSL PKCS#11 engine this can be set in the INIT_ARGS configuration value. This is technically a violation of the PKCS#11 specification (which mandates pReserved to be set to NULL) and is not supported by all applications.
Accepted configuration options:
- connector: URL pointing at the connector to contact, mandatory
- debug: Turn on PKCS#11 debugging, default
off - dinout: Turn on call tracing, default
off - ibdebug: Turn on debug of libyubihsm, default
off - debug-file: File to write debug information to, default
stderr - cacert: File with cacert to verify connector https cert with (not available on Windows)
- proxy: Proxy server for reaching the connector (not available on Windows)
- timeout: Timeout to use for initial connection to the connector (in seconds), default
5
A Configuration File Sample can be found below.
Logging In
All interesting operations through the PKCS#11 interface require a logged-in session, and one peculiarity of the PKCS#11 interface is that the user PIN MUST be prefixed by the ID (16 bits, in hexadecimal, zero padded if required) of the corresponding Authentication Key.
Assuming the default Authentication Key with ID 1 and password password, the user PIN would then be 0001password. To be compliant with PKCS#11 standards, the Authentication Key password MUST be at least 8 characters long.
This is not part of the PKCS#11 requirement, but instead provided through the C_GetTokenInfo function, which means the module decides. Currently the total PIN length must be 12 to to 68 bytes (including the encoded auth key id, so 8 to 64 bytes for the actual PIN). This limit is flexible since the PIN is only used to derive keys.
Note
The concept of a Security Officer (SO) is not supported by the device, and the PIN management functions are not implemented, neither for user nor for SO.
It is recommended that PIN (Authentication Key) management be performed via the yubihsm-shell utility or the libyubihsm functions.
PKCS#11 on Windows
After installing yubihsm-shell using the windows installer, in addition to setting YUBIHSM_PKCS11_CONF environment variable, the YubiHSM Shell\bin directory needs to be added to the system path in order for other applications to be able to load it. This is because the yubihsm-pkcs11.dll is dynamically linked to the libyubihsm\*.dll and libcrypto-1_1.dll libraries and they need to be accessible for the PKCS#11 module to be useful.
On Windows 10, setting the system path is done by following these steps:
- Go to Control Panel > System and Security > System > Advanced system setting.
- Click Environment Variables….
- Under System Variables, highlight Path and click Edit….
- Click New and add the absolute path to
YubiHSM Shell/bin. - Under System Variables, click New and add the environment variable
YUBIHSM_PKCS11_CONFand set it to the path to the YubiHSM2 PKCS11 configuration file.
If setting the system path is not desirable, the libyubihsm\*.dll and libcrypto-1_1.dll can be copied into the same directory as the application that needs to access the PKCS#11 module.
Note for Developers
If LoadLibrary is called with an absolute path, it will not look for dependencies of the specified DLL in that directory, but rather in the startup directory of the application that calls LoadLibrary. The solution is to either:
- Call
LoadLibraryExwith the flagLOAD_WITH_ALTERED_SEARCH_PATHfor absolute paths - Add the directory where the PKCS#11 module is located to the system
PATH - Or copy the dependencies into the application directory.
Note
Calling LoadLibraryEx with that flag for a non-absolute path is undefined behavior according to MS docs. For example, the way Pkcs11Interop does it is to set a variable to LOAD_WITH_ALTERED_SEARCH_PATH if the path looks absolute, and 0 otherwise; and then always calling LoadLibraryEx. If the flags is 0 then LoadLibraryEx behaves exactly like LoadLibrary.
PKCS#11 with JAVA
Due to design and implementation choices, there are some peculiarities when generating or importing keys into the YubiHSM 2 using SunPKCS#11 provider and YubiHSM 2 PKCS#11 module. JAVA SunPKCS#11 provider requires the ability to change a key’s properties after creation in order for it to be able to use the keys later on. However, YubiHSM 2 does not allow such operation (All key properties have to be set at the time of creation and cannot be changed after the fact). The key information here is that the asymmetric key and its corresponding X509Certificate need to be accessed via the same ID on the device. Later versions of YubiHSM 2 PKCS#11 module provide a way to achieve this via the use of Meta Objects, but it could be worth it to make sure that this requirement is met manually, especially if the number of objects created on the YubiHSM 2 needs to be limited.
Version 2.4.0 or later
In version 2.4.0, the use of Meta Objects is introduced. Meta Objects are opaque objects with algorithm opaque-data that store the values of CKA_ID and CKA_LABEL attributes of another object on the YubiHSM 2, thus working around the hard limit on the length of those values and the inability to change those attributes after the fact. The label of a Meta Object is always Meta object for followed by a HEX value representing the ID, type and sequence of the actual object it is tied to (referred to as an Original Object).
Meta Objects are created as needed when the function to create an object is called with CKA_ID and/or CKA_LABEL values that are longer than 2 and 40 bytes respectively, or when the function to change one of those values is called. Meta Objects store these values as unencrypted raw data. When an Original Object is deleted, its corresponding Meta Object is also deleted automatically.
Meta Objects are only used within PKCS#11 context and their existence and use are invisible to PKCS#11 clients or users. They are, however, visible to yubihsm-shell users.
Version 2.3.2 or earlier
When using SunPKCS11 provider, it’s important to know that generating asymmetric keys using C_GenerateKeyPair does not work. In order for SunPKCS11 to be able to use asymmetric keys on the YubiHSM2 device, both the asymmetric key and its X509Certificate must be stored under the same ObjectID. Once an asymmetric key and its X509Certificate are stored in the YubiHSM 2 under the same ObjectID, there is no problem whatsoever to use and manage the key using PKCS#11, including deleting it.
To generate asymmetric keys on the YubiHSM 2 so that they are accessible by SunPKCS11 provider, either yubihsm-setup or yubihsm-shell can be used.
yubihsm-setup
Use the subcommand ejbca to generate an asymmetric key on the YubiHSM2 and store it and its X509Certificate under the same ObjectID
yubihsm-setup -d ejbca
yubihsm-shell
Using yubihsm-shell, the attestation functionality can be leveraged to produce a self-signed X509Certificate that can then be imported using the same ObjectID as the generated asymmetric key.
# Generate asymmetric key and note its ObjectID
yubihsm-shell -a generate-asymmetric-key -i <KEY_OBJECT_ID> -l <OBJECT_LABEL> -d <OBJECT_DOMAINS> -c <KEY_CAPABILITIES> -A <KEY_ALGORITHM>

# Sign an attestation certificate for the generated key using the YubiHSM attestation key (with ObjectID=0)
yubihsm-shell -a sign-attestation-certificate -i <KEY_OBJECT_ID> --attestation-id 0 --out cert.pem

# Import the attestation certificate to use it as a template when signing the self-signed certificate. Use the same ObjectID as the generated key
yubihsm-shell -a put-opaque -i <KEY_OBJECT_ID> -l <OBJECT_LABEL> -A opaque-x509-certificate --informat=PEM --in cert.pem

# Sign an attestation certificate for the generated key using the generated key itself
yubihsm-shell -a sign-attestation-certificate -i <KEY_OBJECT_ID> --attestation-id=<KEY_OBJECT_ID> --out selfsigned_cert.pem

# Delete the template certificate to make room for the self-signed certificate to be imported
yubihsm-shell -a delete-object -i <KEY_OBJECT_ID> -t opaque

# Import the self-signed certificate using the same ObjectID as the generated key
yubihsm-shell -a put-opaque -i <KEY_OBJECT_ID> -l <OBJECT_LABEL> -A opaque-x509-certificate --informat=PEM --in selfsigned_cert.pem
Note that if a YubiHSM 2 device does not come with an attestation key with ObjectID 0, any other asymmetric key can be used instead. Since the whole purpose of signing the first attestation certificate is to produce an X509Certificate to use as a template, any X509Certificate with the desired attributes present can be used as a template instead.
Also note that when using a key for signing an attestation certificate, the signing key’s capabilities must include sign-attestation-certificate.
Software Operations
C_Encrypt and C_Verify for Asymmetric Keys are performed in software, as well as all of the C_Digest operations.
PKCS#11 Attributes
There are a number of attributes defined in PKCS#11 that do not translate to Capabilities of the YubiHSM 2 device and are therefore treated as always having a fixed value.
| PKCS#11 | YubiHSM 2 | Rationale |
|---|---|---|
| CKA_PRIVATE | CK_TRUE | Login is always required |
| CKA_DESTROYABLE | CK_TRUE | Objects can always be deleted from
the device
|
| CKA_MODIFIABLE | CK_FALSE | Objects are immutable on the
device
|
| CKA_COPYABLE | CK_FALSE | Objects are immutable on the device
|
| CKA_SENSITIVE | CK_TRUE | All objects are sensitive
|
| CKA_ALWAYS_SENSITIVE | CK_TRUE | Objects are immutable on the device
|
Capabilities and Domains
Objects created via the PKCS#11 module inherit the Domains of the Authentication Key used to establish the session. The Domains cannot be changed or modified via the module.
Object Capabilities are set on creation, depending on their Type, e.g. an RSA signing key (CKK_RSA) created via C_CreateObject with the attribute CKA_SIGN sets the following Capabilities set sign-pkcs,sign-pss.
Similarly for EC (CKK_EC), the key has sign-ecdsa set.
See the following tables for mappings:
| PKCS#11 | RSA
(CKK_RSA)
|
EC
(CKK_EC)
|
Wrap (CKK
_YUBICO_AES*
_CCM _WRAP)
|
HMAC
(CKK_SHA*
_HMAC)
|
|---|---|---|---|---|
CKA
_ENCRYPT
|
N/A | N/A | wrap-data | N/A |
CKA_EXT
RACTABLE
|
export-
under-wrap
|
export-
under-wrap
|
export-
under-wrap
|
export-
under-wrap
|
CKA
_DECRYPT
|
decrypt-pkcs,
decrypt-oaep
|
N/A | unwrap-data | N/A |
CKA
_DERIVE
|
N/A | derive-ecdh | N/A | N/A |
CKA
_SIGN
|
sign-pkcs,
sign-pss
|
sign-ecdsa | N/A | sign-hmac |
CKA
_VERIFY
|
N/A | N/A | N/A | verify-hmac |
CKA
_WRAP
|
N/A | N/A | export-
wrapped
|
N/A |
CKA
_UNWRAP
|
N/A | N/A | import-
wrapped
|
N/A |
PKCS#11 Objects
Not all PKCS#11 Object types are implemented, this is a list of what is implemented and what it maps to.
| PKCS#11 | Supported CKK | Comment |
|---|---|---|
| CKO_CERTIFICATE | Opaque object with algorithm
YH_ALGO_OPAQUE_X509
_CERTIFICATE
|
|
| CKO_DATA | Opaque object with algorithm
YH_ALGO_OPAQUE_DATA
|
|
| CKO_PRIVATE_KEY | CKK_RSA, CKK_EC | RSA 2048, 3072 & 4096 with
e=0x10001, EC with secp224r1,
secp256r1, secp384r1, secp521r1,
secp256k1, brainpool256r1,
brainpool384r1, brainpool512r1
|
| CKO_PUBLIC_KEY | does not exist in device, only
as a property of a private key
|
|
| CKO_SECRET_KEY | CKK_SHA_1_HMAC,
CKK_SHA256_HMAC,
CKK_SHA384_HMAC,
CKK_SHA512_HMAC,
CKK_YUBICO_AES128
_CCM_WRAP,
CKK_YUBICO_AES192
_CCM_WRAP,
CKK_YUBICO_AES256
_CCM_WRAP
|
PKCS#11 Functions
Not all functions in PKCS#11 are implemented in the module, this is a list of what is implemented.
| PKCS#11 | Comment |
|---|---|
| C_CloseSession | |
| C_CloseAllSessions | |
| C_CreateObject | Use with CKO_PRIVATE_KEY, CKO_SECRET_KEY,
CKO_CERTIFICATE or CKO_DATA
|
| C_Decrypt | |
| C_DecryptFinal | |
| C_DecryptInit | Decrypt with Wrap Key or RSA key |
| C_DecryptUpdate | |
| C_DeriveKey | Derive key using ECDH as a PKCS#11 session object |
| C_DestroyObject | |
| C_Digest | |
| C_DigestFinal | |
| C_DigestInit | Do software digest with CKM_SHA_1, CKM_SHA256,
CKM_SHA384 or CKM_SHA512
|
| C_DigestUpdate | |
| C_Encrypt | |
| C_EncryptFinal | |
| C_EncryptInit | Encrypt with Wrap Key or do software encryption
for RSA key
|
| C_EncryptUpdate | |
| C_Finalize | |
| C_FindObjects | |
| C_FindObjectsFinal | |
| C_FindObjectsInit | |
| C_GenerateKey | Generate HMAC Key or Wrap Key |
| C_GenerateKeyPair | Generate Asymmetric Key |
| C_GenerateRandom | Generate up to 2021 bytes of random |
| C_GetAttributeValue | |
| C_GetFunctionList | |
| C_GetInfo | |
| C_GetMechanismList | |
| C_GetMechanismInfo | |
| C_GetObjectSize | |
| C_GetSessionInfo | |
| C_GetSlotInfo | |
| C_GetSlotList | |
| C_GetTokenInfo | |
| C_Initialize | |
| C_Login | |
| C_Logout | |
| C_OpenSession | |
| C_Sign | |
| C_SignFinal | |
| C_SignInit | Sign with HMAC Key or Asymmetric Key |
| C_SignUpdate | |
| C_Verify | |
| C_VerifyFinal | |
| C_VerifyInit | Verify HMAC or software verify asymmetric |
| C_VerifyUpdate | C_UnwrapKey Unwrap an object with Wrap Key |
| C_WrapKey | Wrap an object with Wrap Key |
PKCS#11 Vendor Definitions
Working with the device Wrap Keys requires using vendor-specific definitions, these are listed in the table below. The Wrap Keys can be used with C_WrapKey, C_Unwrapkey, C_Encrypt, and C_Decrypt.
| Wrap Type | Wrap Key |
|---|---|
| CKM_YUBICO_AES_CCM_WRAP | 0xd9554204 |
| CKK_YUBICO_AES128_CCM_WRAP | 0xd955421d |
| CKK_YUBICO_AES192_CCM_WRAP | 0xd9554229 |
| CKK_YUBICO_AES256_CCM_WRAP | 0xd955422a |
Configuration File Sample
Below is a sample of a yubihsm_pkcs11.conf configuration file.
# This is a sample configuration file for the YubiHSM PKCS#11 module
# Uncomment the various options as needed

# URL of the connector to use. This can be a comma-separated list
connector = http://127.0.0.1:12345

# Enables general debug output in the module
#
# debug

# Enables function tracing (ingress/egress) debug output in the module
#
# dinout

# Enables libyubihsm debug output in the module
#
# libdebug

# Redirects the debug output to a specific file. The file is created
# if it does not exist. The content is appended
#
# debug-file = /tmp/yubihsm_pkcs11_debug

# CA certificate to use for HTTPS validation. Point this variable to
# a file containing one or more certificates to use when verifying
# a peer. Currently not supported on Windows
#
# cacert = /tmp/cacert.pem

# Proxy server to use for the connector
# Currently not supported on Windows
#
# proxy = http://proxyserver.local.com:8080

# Timeout in seconds to use for the initial connection to the connector
# timeout = 5
INIT_ARGS Sample
Below is a sample of using the INIT_ARGS configuration with an openssl.cnf file.
openssl_conf = openssl_init

[openssl_init]
engines = engine_section

[engine_section]
pkcs11 = pkcs11_section

[pkcs11_section]
engine_id = pkcs11
dynamic_path = /path/to/engine_pkcs11.so
MODULE_PATH = /path/to/yubihsm_pkcs11.so
INIT_ARGS = connector=http://127.0.0.1:12345 debug
init = 0
Note
OpenSSL 1.1 will auto-load modules present in the system engine directory (like /usr/lib/x86_64-linux-gnu/engines-1.1) so the dynamic_path line has to be dropped there. The error shown will mention “conflicting engine id”.
PKCS#11 Tool Compatibility, Interoperability and Known Restrictions
This topic contains information about the different tools that are either known to work or known not to work with the current version of the YubiHSM 2.
pkcs11-tool
This is the tool produced by OpenSC.
Run with HEAD on master (currently dfd18389346296f8e4617832e0d5f4171835620d).
pkcs11-tool --module yubihsm_pkcs11.so -l -p 0001password -t
All relevant tests are passing with the following notable exceptions:
RSA-PKCS-OAEP decryption: the test appears to be broken. It calls into OpenSSL’sEVP_PKEY_encrypt/EVP_PKEY_encrypt_oldwhich usesPKCS1v1.5paddingmechtype-0xD9554204 decryption: this a Yubico custom mechanism (AES-CCM wrapping) and can’t be handled by the tool
pkcs11test
This is a PKCS#11 tester tool by Google. It is built as a test target in the source code. We maintain an internal version to accommodate some differences at https://github.com/YubicoLabs/pkcs11test.
The command used
pkcs11test -myubihsm_pkcs11.so -l. -u0001password --gtest_filter= -${SKIPPED_TESTS_STR}
where SKIPPED_TESTS_STR is the list below.
All relevant tests pass. The following tests have been explicitly skipped:
Slot.NoInit
PKCS11Test.EnumerateMechanisms
ReadOnlySessionTest.GenerateRandom
ReadOnlySessionTest.GenerateRandomNone
ReadOnlySessionTest.UserLoginWrongPIN
ReadOnlySessionTest.SOLoginFail
ReadOnlySessionTest.CreateKeyPairObjects
ReadOnlySessionTest.CreateSecretKeyAttributes
ReadOnlySessionTest.SecretKeyTestVectors
ReadOnlySessionTest.SignVerifyRecover
ReadOnlySessionTest.GenerateKeyInvalid
ReadOnlySessionTest.GenerateKeyPairInvalid
ReadOnlySessionTest.WrapUnwrap
ReadOnlySessionTest.WrapInvalid
ReadOnlySessionTest.UnwrapInvalid
ReadWriteSessionTest.CreateCopyDestroyObject
ReadWriteSessionTest.SetLatchingAttribute
ReadWriteSessionTest.FindObjectSubset
ReadWriteSessionTest.ReadOnlySessionSOLoginFail
ReadWriteSessionTest.SOLogin
ReadWriteSessionTest.TookanAttackA1
ReadWriteSessionTest.TookanAttackA3
ReadWriteSessionTest.TookanAttackA4
ReadWriteSessionTest.TookanAttackA5a
ReadWriteSessionTest.TookanAttackA5b
ReadWriteSessionTest.PublicExponent4Bytes
ReadWriteSessionTest.ExtractKeys
ReadWriteSessionTest.AsymmetricTokenKeyPair
RWUserSessionTest.SOLoginFail
DataObjectTest.CopyDestroyObjectInvalid
DataObjectTest.GetMultipleAttributes
DataObjectTest.GetSetAttributeInvalid
RWSOSessionTest.SOSessionFail
RWSOSessionTest.UserLoginFail
RWEitherSessionTest.TookanAttackA2
KeyPairTest.EncryptDecrypt
Ciphers/SecretKeyTest.EncryptDecrypt/0
Ciphers/SecretKeyTest.EncryptDecrypt/1
Ciphers/SecretKeyTest.EncryptDecrypt/2
Ciphers/SecretKeyTest.EncryptDecrypt/3
Ciphers/SecretKeyTest.EncryptDecrypt/4
Ciphers/SecretKeyTest.EncryptDecrypt/5
Ciphers/SecretKeyTest.EncryptFailDecrypt/0
Ciphers/SecretKeyTest.EncryptFailDecrypt/1
Ciphers/SecretKeyTest.EncryptFailDecrypt/2
Ciphers/SecretKeyTest.EncryptFailDecrypt/3
Ciphers/SecretKeyTest.EncryptFailDecrypt/4
Ciphers/SecretKeyTest.EncryptFailDecrypt/5
Ciphers/SecretKeyTest.EncryptDecryptGetSpace/0
Ciphers/SecretKeyTest.EncryptDecryptGetSpace/1
Ciphers/SecretKeyTest.EncryptDecryptGetSpace/2
Ciphers/SecretKeyTest.EncryptDecryptGetSpace/3
Ciphers/SecretKeyTest.EncryptDecryptGetSpace/4
Ciphers/SecretKeyTest.EncryptDecryptGetSpace/5
Ciphers/SecretKeyTest.EncryptDecryptParts/0
Ciphers/SecretKeyTest.EncryptDecryptParts/1
Ciphers/SecretKeyTest.EncryptDecryptParts/2
Ciphers/SecretKeyTest.EncryptDecryptParts/3
Ciphers/SecretKeyTest.EncryptDecryptParts/4
Ciphers/SecretKeyTest.EncryptDecryptParts/5
Ciphers/SecretKeyTest.EncryptDecryptInitInvalid/0
Ciphers/SecretKeyTest.EncryptDecryptInitInvalid/1
Ciphers/SecretKeyTest.EncryptDecryptInitInvalid/2
Ciphers/SecretKeyTest.EncryptDecryptInitInvalid/3
Ciphers/SecretKeyTest.EncryptDecryptInitInvalid/4
Ciphers/SecretKeyTest.EncryptDecryptInitInvalid/5
Ciphers/SecretKeyTest.EncryptErrors/0
Ciphers/SecretKeyTest.EncryptErrors/1
Ciphers/SecretKeyTest.EncryptErrors/2
Ciphers/SecretKeyTest.EncryptErrors/3
Ciphers/SecretKeyTest.EncryptErrors/4
Ciphers/SecretKeyTest.EncryptErrors/5
Ciphers/SecretKeyTest.DecryptErrors/0
Ciphers/SecretKeyTest.DecryptErrors/1
Ciphers/SecretKeyTest.DecryptErrors/2
Ciphers/SecretKeyTest.DecryptErrors/3
Ciphers/SecretKeyTest.DecryptErrors/4
Ciphers/SecretKeyTest.DecryptErrors/5
Ciphers/SecretKeyTest.EncryptUpdateErrors/0
Ciphers/SecretKeyTest.EncryptUpdateErrors/1
Ciphers/SecretKeyTest.EncryptUpdateErrors/2
Ciphers/SecretKeyTest.EncryptUpdateErrors/3
Ciphers/SecretKeyTest.EncryptUpdateErrors/4
Ciphers/SecretKeyTest.EncryptUpdateErrors/5
Ciphers/SecretKeyTest.EncryptModePolicing1/0
Ciphers/SecretKeyTest.EncryptModePolicing1/1
Ciphers/SecretKeyTest.EncryptModePolicing1/2
Ciphers/SecretKeyTest.EncryptModePolicing1/3
Ciphers/SecretKeyTest.EncryptModePolicing1/4
Ciphers/SecretKeyTest.EncryptModePolicing1/5
Ciphers/SecretKeyTest.EncryptModePolicing2/0
Ciphers/SecretKeyTest.EncryptModePolicing2/1
Ciphers/SecretKeyTest.EncryptModePolicing2/2
Ciphers/SecretKeyTest.EncryptModePolicing2/3
Ciphers/SecretKeyTest.EncryptModePolicing2/4
Ciphers/SecretKeyTest.EncryptModePolicing2/5
Ciphers/SecretKeyTest.EncryptInvalidIV/0
Ciphers/SecretKeyTest.EncryptInvalidIV/1
Ciphers/SecretKeyTest.EncryptInvalidIV/2
Ciphers/SecretKeyTest.EncryptInvalidIV/3
Ciphers/SecretKeyTest.EncryptInvalidIV/4
Ciphers/SecretKeyTest.EncryptInvalidIV/5
Ciphers/SecretKeyTest.DecryptInvalidIV/0
Ciphers/SecretKeyTest.DecryptInvalidIV/1
Ciphers/SecretKeyTest.DecryptInvalidIV/2
Ciphers/SecretKeyTest.DecryptInvalidIV/3
Ciphers/SecretKeyTest.DecryptInvalidIV/4
Ciphers/SecretKeyTest.DecryptInvalidIV/3
Ciphers/SecretKeyTest.DecryptInvalidIV/4
Ciphers/SecretKeyTest.DecryptInvalidIV/5
Ciphers/SecretKeyTest.DecryptUpdateErrors/0
Ciphers/SecretKeyTest.DecryptUpdateErrors/1
Ciphers/SecretKeyTest.DecryptUpdateErrors/2
Ciphers/SecretKeyTest.DecryptUpdateErrors/3
Ciphers/SecretKeyTest.DecryptUpdateErrors/4
Ciphers/SecretKeyTest.DecryptUpdateErrors/5
Ciphers/SecretKeyTest.EncryptFinalImmediate/0
Ciphers/SecretKeyTest.EncryptFinalImmediate/1
Ciphers/SecretKeyTest.EncryptFinalImmediate/2
Ciphers/SecretKeyTest.EncryptFinalImmediate/3
Ciphers/SecretKeyTest.EncryptFinalImmediate/4
Ciphers/SecretKeyTest.EncryptFinalImmediate/5
Ciphers/SecretKeyTest.EncryptFinalErrors1/0
Ciphers/SecretKeyTest.EncryptFinalErrors1/1
Ciphers/SecretKeyTest.EncryptFinalErrors1/2
Ciphers/SecretKeyTest.EncryptFinalErrors1/3
Ciphers/SecretKeyTest.EncryptFinalErrors1/4
Ciphers/SecretKeyTest.EncryptFinalErrors1/5
Ciphers/SecretKeyTest.EncryptFinalErrors2/0
Ciphers/SecretKeyTest.EncryptFinalErrors2/1
Ciphers/SecretKeyTest.EncryptFinalErrors2/2
Ciphers/SecretKeyTest.EncryptFinalErrors2/3
Ciphers/SecretKeyTest.EncryptFinalErrors2/4
Ciphers/SecretKeyTest.EncryptFinalErrors2/5
Ciphers/SecretKeyTest.DecryptFinalErrors1/0
Ciphers/SecretKeyTest.DecryptFinalErrors1/1
Ciphers/SecretKeyTest.DecryptFinalErrors1/2
Ciphers/SecretKeyTest.DecryptFinalErrors1/3
Ciphers/SecretKeyTest.DecryptFinalErrors1/4
Ciphers/SecretKeyTest.DecryptFinalErrors1/5
Ciphers/SecretKeyTest.DecryptFinalErrors2/0
Ciphers/SecretKeyTest.DecryptFinalErrors2/1
Ciphers/SecretKeyTest.DecryptFinalErrors2/2
Ciphers/SecretKeyTest.DecryptFinalErrors2/3
Ciphers/SecretKeyTest.DecryptFinalErrors2/4
Ciphers/SecretKeyTest.DecryptFinalErrors2/5
Digests/DigestTest.DigestKey/0
Digests/DigestTest.DigestKey/1
Digests/DigestTest.DigestKey/2
Digests/DigestTest.DigestKey/3
Digests/DigestTest.DigestKey/4
Digests/DigestTest.DigestKeyInvalid/0
Digests/DigestTest.DigestKeyInvalid/1
Digests/DigestTest.DigestKeyInvalid/2
Digests/DigestTest.DigestKeyInvalid/3
Digests/DigestTest.DigestKeyInvalid/4
Signatures/SignTest.SignVerify/0
Signatures/SignTest.SignFailVerifyWrong/0
Signatures/SignTest.SignFailVerifyShort/0
Duals/DualSecretKeyTest.DigestEncrypt/0
Duals/DualSecretKeyTest.DigestEncrypt/1
Duals/DualSecretKeyTest.DigestEncrypt/2
Duals/DualSecretKeyTest.DigestEncrypt/3
Duals/DualSecretKeyTest.DigestEncrypt/4
Duals/DualSecretKeyTest.DigestEncrypt/5
p11tool
This is a tool shipped with GnuTLS. From version 3.5.2 it can work with the YubiHSM 2. Keys can be generated.
p11tool --provider=yubihsm_pkcs11.so "pkcs11:pin-value=0001password" --login --generate-rsa --label="rsa test key" --bits=2048
Signatures tested and verified.
p11tool --provider=yubihsm_pkcs11.so "pkcs11:pin-value=0001password;object=rsakey" --login --test-sign
OpenDNSSEC
OpenDNSSEC contains a libhsm and two tools, ods-hsmutil and ods-hsmspeed, both of these work with the YubiHSM 2 with a small configuration file.
<?xml version="1.0" encoding="UTF-8"?>

 <Configuration>
      <RepositoryList>
              <Repository name="default">
                      <Module>yubihsm_pkcs11.so</Module>
                      <TokenLabel>YubiHSM</TokenLabel>
                      <PIN>0001password</PIN>
              </Repository>
      </RepositoryList>
 </Configuration>
Using this, it is possible to run through tests.
ods-hsmutil -c conf-yubihsm.xml test default
This passes all tests using algorithms supported by the YubiHSM 2 (rsa2048, rsa4096, ecp256, ecp384 & randomness).
Libyubihsm
Libyubihsm is the C library used to communicate natively with a YubiHSM 2. It implements and exposes convenience functions for all the commands supported by the device. It also allows the sending of unformatted “raw” messages over an established session or in plain text.
The library is used by:
- yubihsm-shell, see YubiHSM 2 Shell
- PKCS#11 module, see PKCS#11
- KSP, see YubiHSM 2 Key Storage Provider (KSP)
Documentation of the library API can be found as comments within the header file (yubihsm.h) in the SDK, or as a pre-built Doxygen bundle.
Libyubihsm includes a connector component to talk to a YubiHSM device. This connector is different from the yubihsm-connector discussed earlier. This component can be one of the following two types.
Python Library
The Python library allows you to interface with a YubiHSM 2 through both the Connector service and direct USB connection using the Python programming language. It supports Python 3.8 or later.
The recommended way to install the library is by using pip inside a virtualenv. To create and activate a virtualenv, run:
$ virtualenv yubihsm
Running virtualenv with interpreter /usr/bin/python3
New python executable in /home/user/yubihsm/bin/python3
Also creating executable in /home/user/yubihsm/bin/python
Installing setuptools, pkg_resources, pip, wheel...done.

$ source yubihsm/bin/activate
(yubihsm) $ pip install yubihsm[http,usb]
Collecting yubihsm-2.0.0
...
Successfully installed asn1crypto-0.22.0 cffi-1.10.0 cryptography-1.8.1
   enum34-1.1.6 idna-2.5 ipaddress-1.0.18 pycparser-2.17 pyusb-1.0.2
   requests-2.13.0 yubihsm-2.0.0
(yubihsm) $
Note
The cryptography dependency uses C extensions, and therefore has some build dependencies. For detailed instructions, see: https://cryptography.io/en/latest/installation/
from yubihsm import YubiHsm
from yubihsm.objects import AsymmetricKey
from yubihsm.defs import ALGORITHM, CAPABILITY

# Connect to the Connector and establish a session using the default
# auth key:
hsm = YubiHsm.connect("http://localhost:12345")
session = hsm.create_session_derived(1, "password")

# Create a new EC key for signing:
key = AsymmetricKey.generate(session, 0, "EC Key", 1, CAPABILITY.SIGN_ECDSA, ALGORITHM.EC_P256)

# Sign a message
data = b'Hello world!'
signature = key.sign_ecdsa(data)

# Delete the key from the YubiHSM 2
key.delete()

# Close session and connection:
session.close()
hsm.close()