Deploy for Active Directory Certificate Services CA
This document is intended to enable systems administrators to deploy YubiHSM 2 with YubiHSM Key Storage Provider (KSP) so that the Active Directory Certificate Services Certificate Authority (ADCS CA) root key is created securely on the YubiHSM 2 and so that a hardware-based backup copy of key materials has been produced.
As a guide for deployment, it covers basic topics. Instructions should be modified as required for your specific environment. It is assumed that installation is performed on a single server destined to become a production or lab Certificate Authority root. It is also assumed that you are familiar with the concepts and processes of working with Microsoft ADCS.
Plan a public key infrastructure (PKI) that is appropriate for your organization. For guidance on setting up a PKI, see Microsoft’s TechNet article on Public Key Infrastructure Design Guidance
We recommend that you install and test the installation and setup of the YubiHSM 2 in a test or lab environment before deploying to production.
Scenario: In a Windows PKI environment, protect the CA root key in hardware.
Benefits: YubiHSM 2 guards the CA root key and protects all signing and verification services using the root key.
Note
Although the screenshots in this guide are specific to Windows Server 2016, Server 2019 is also supported.
Prerequisites and Preparations
The audience of this document is expected to be an experienced systems administrator with a good understanding of Windows Server management. In addition, it helps to be familiar with the terminology, software and tools specific to YubiHSM 2. As a primer for these, refer to the : Glossary in this guide.
In order to follow the steps provided in this guide, be sure you meet the following prerequisites, having:
- Access to Microsoft Windows Server 2012, R2/2016, 2019 with Active Directory in an offline, air-gapped environment, such as a secure computer network that is physically isolated from unsecured networks such as the internet. You must also have elevated system privileges.
- YubiHSM 2 software and tools for Windows downloaded from the YubiHSM 2 Release page and available on the system to be used.
- Two (2) factory-reset YubiHSM 2 devices, one for deployment and one for backup in hardware.
- Key custodians identified as per local requirements and available to participate. For more information about key custodians and the associated
M of Nkey shares, see Key Splitting and Key Custodians.
Deploying YubiHSM2 with ADCS Overview
With a YubiHSM 2 device now configured for use with YubiHSM Key Storage Provider and Microsoft Active Directory Certificate Services, the next set of steps covers the deployment in the ADCS environment. Note that YubiHSM Key Storage Provider software must be installed on the system before proceeding.
Deploying YubiHSM consists of three steps as follows. These steps are described in detail in the following procedure.
- Configuring the Windows Registry for the YubiHSM Key Storage Provider for the primary YubiHSM 2 device that was configured earlier
- Configuring ADCS (if not already present)
- Configuring a new ADCS CA with a root CA key being generated on the device
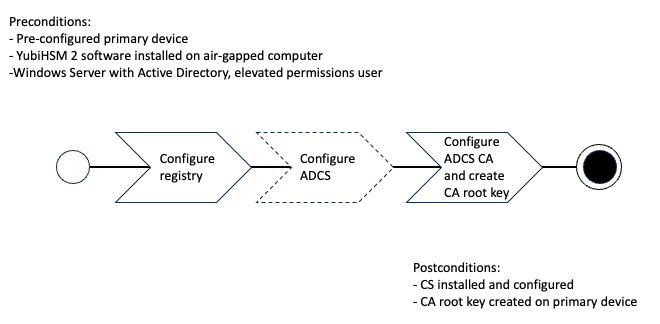
Figure: Create CA root key on Primary YubiHSM with ADCS
The host that these steps are performed on is assumed to be a member server in the Active Directory domain (domain-joined, not a Domain Controller).
These instructions include steps for a basic configuration and should be performed by an experienced system administrator.
Configuring the Windows Registry
For ADCS to use the YubiHSM 2, the following registry entries need to be changed from their default values. The HKEY_LOCAL_MACHINE\SOFTWARE\Yubico\YubiHSM subkey was created during installation. Be sure to make a backup of your Registry before you make any changes. To configure the Windows Registry:
Click Start > Run, type
regeditin the Run dialog box, and click OK.Locate and then click the registry subkey for YubiHSM (
HKEY_LOCAL_MACHINE\SOFTWARE\Yubico\YubiHSM).To change the URI where the connector is listening, change the following entry:
“ConnectorURL”=http://127.0.0.1:12345To change the ID of the application authentication key (object ID
3was used as an example in this guide; if you used another object ID be sure to enter the correct information). For our example, because the hexadecimal value of0x00000003resolves to3in the Windows Registry, change the entry as follows:“AuthKeysetID”=3To change the password for the application authentication key that is stored in the registry change the entry for:
“AuthKeysetPassword”={password}. The password is stored here for the Key Storage Provider to use when authenticating to the device.To save your changes, exit the Windows Registry.
The YubiHSM Connector service reads the configuration file,
yubihsm-connector-config.yaml.Depending on your local setup, for instance if you are running multiple instances of the software on the same host, you may need to edit this configuration file to make sure that parameters are consistent between the configuration file and the Windows Registry. On Windows, the
yubihsmconnector.config.yamlfile is available atC:\programdata\yubiHSM\yubihsmconnector.yaml- you will need administrator rights to modify the file.
Setting Up Your Enterprise Certificate Authority
Configure ADCS
If you already have Certification Services installed, you can skip these steps.
- On a Windows Server host, joined to an existing Active Directory domain, log on into the server as a domain administrator.
- Click Start > Administrative Tools, then click Server Manager.
- Under Roles Summary, click Add roles and features.
- Use the Add Roles and Features Wizard to add the Active Directory Certificate Services role, and click Next.
- In the Select role services wizard page, select the option for Certification Authority, then click Next.
- Complete the wizard and reboot the host if prompted.
Configure the ADCS CA and Create the Root Key
After you have completed the feature installation, you need to create the Enterprise CA instance.
- If you haven’t already, do the following:
- On a Windows Server host, joined to an existing Active Directory domain, log into the server as a
domain administrator. - Click Start > Administrative Tools, then click Server Manager.
- On a Windows Server host, joined to an existing Active Directory domain, log into the server as a
- In Server Manager, start the Add Roles and Features Wizard and select Role-based or feature based installation. Click Next.
- In the Credentials page, confirm that you are logged in as a
domain administrator. If you are not, you will not be able to create an Enterprise CA in the subsequent steps. Click Next. - In the Role Services page, select the option for Certification Authority, and then click Next.
- In the Setup Type page, select the option for Enterprise CA, and then click Next.
- In the CA Type page, select the option for Root CA, and then click Next.
- In the Private Key page, select the option for Create a new private key, and then click Next.
- In the Cryptography for CA page, do the following:
- Click Select a cryptographic provider and select RSA#YubiHSM Key Storage Provider from the list displayed. This indicates that the root key should be generated on the device.
- Click Key Length and select the key size you want from the list displayed. Options for key size
2048-bitor4096-bit. The default setting is2048. - For Select the hash algorithm for signing certificates issued by this CA, select a desired hash algorithm, such as
SHA256. The default setting isSHA256. - Select the option to Allow administrator interaction when the private key is accessed by the CA. This allows the private key to be exported for backup purposes (so it can be restored to another server). Click Next.
- In the CA Name page, accept the defaults. Click Next.
- In the Validity Period page, accept the default or set another validity period appropriate for your purposes. Click Next.
- In the CA Database page, accept the default location for logs. Click Next.
- In the Confirmation page, the important detail is that the
YubiHSM Key Storage Provideris being used to store the CA private key. Click Configure.
The Progress page appears, briefly, as the local CA database is created, and changes are written to Active Directory.
- Finally, confirm the presence of the
Configuration succeededmessage in the Results page. Click Close.
Alternative ADCS Configuration with YubiHSM 2
This guide covers only basic setup and use of the YubiHSM 2 with Active Directory Certificate Services (ADCS). Some alternative scenarios include migrating an existing CA root key to YubiHSM 2 or leveraging the YubiHSM 2 and YubiHSM Key Storage Provider in larger PKI installations using multiple hosts to serve the CA including Subordinate CAs. Since conditions can vary a great deal between organizations on these topics, the following contains some references that might be useful when deploying YubiHSM 2 under such circumstances.
Migrating an Existing CA Root Key to YubiHSM 2
One potential circumstance when deploying YubiHSM 2 to secure ADCS is the fact that a CA root key already exists, either in software or secured by hardware such as another Hardware Security Module. It is normally possible to migrate the CA root key over to the YubiHSM 2, however depending on the pre-existing setup, the steps to take may vary. For more information, see Configuring YubiHSM 2 for Windows.
Subordinate CAs
To improve security and scalability of your Certification Authority, consider installing the Root CA on a standalone (offline) server, and use a Subordinate CA for all certificate signing. For additional information about implementing advanced configurations, see the relevant Microsoft documentation, such as AD CS Step by Step Guide: Two Tier PKI Hierarchy Deployment.
You will need assistance from the wrap key custodians to provide their respective wrap key shares, if applicable. In the example we used in this guide, 2 out of the 3 shares must be available. When you create a backup, you create a duplicate of the objects on your primary YubiHSM 2 onto a secondary device. The actual backup procedure consists of steps as follows. These steps are described in detail in the following procedure.
- Set up communication between the YubiHSM 2 tools and the device.
- Start the configuration process and authenticate to the YubiHSM 2 device.
- Identify the CA root key ID.
- Export the CA root key.
- Verify the key material under wrap.
- Restore the key material onto a secondary (backup) device.
- Verify the objects on the secondary device are correct.
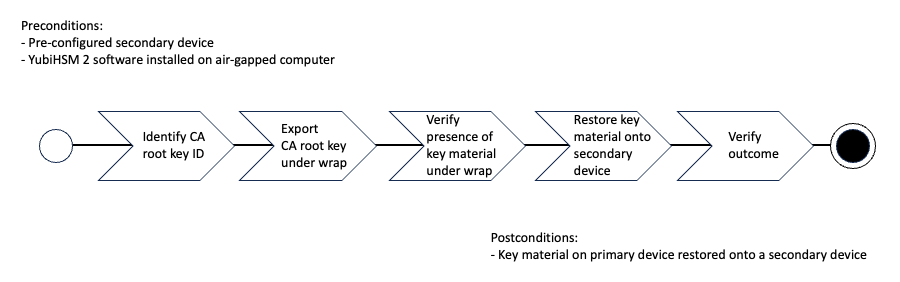
Figure: Restore Key Material on Secondary Device with ADCS
Since the CA root key was created on the device when setting up the CA, it currently only exists on the device. To back it up using the YubiHSM Setup program, it must first be exported from the device using the wrap key that also sits on the device alongside the application authentication key and the audit key. To export the CA root key under wrap using the wrap key on the device:
In your command line application, run YubiHSM Shell program. To start the YubiHSM Shell program:
Launch your command line application and navigate to the directory containing the YubiHSM Shell program.
Type the following command and press Enter.
$ yubihsm-shell
To connect to the YubiHSM, at the
yubihsmprompt, typeconnectand press Enter. A message verifying that you have a successful connection is displayed.To open a session with the YubiHSM 2, type
session open 3and press Enter.Type in the password for the application authentication key.
You will receive a confirmation message that the session has been set up successfully.
If you already know the object ID of the root CA, you can skip this step. If you need to identify the root CA, you can list the objects available.
- To list the objects, type
list objects 0(where0is the session number) and press Enter. - You will receive a list of the objects on the device that application authentication key with ID
3has access to, which will include the CA root key. Identify its ID.
- To list the objects, type
To export the CA root key under wrap from the primary device to the local file system, in the YubiHSM Shell program, run:
$ yubihsm> get wrapped 0 2 asymmetric-key {rootkeyID} rootkey.yhw
Verify that all the keys that were exported under wrap to file reside in the same directory as the YubiHSM Setup program. The tool looks for files with the
.yhwfile extension in the current working directory and attempts to read and import them into the device. The wrap key will be imported when you provide the wrap key shares to the tool. Given the example object IDs in this guide, the following files should be present:0x0003.yhw(Application authentication key under wrap)0x0004.yhw(Audit key under wrap)rootkey.yhw(CA root key under wrap)
To begin the process of restoring the data onto the secondary YubiHSM 2, if the primary YubiHSM 2 device is inserted into your computer, remove it and insert the secondary device. Restoring a device must be performed in an air-gapped environment to guarantee integrity.
In your command line application (where
$is the prompt), run YubiHSM Manager.Launch your command line application, navigate to the directory containing the YubiHSM Manager program,
Type the following command, and press Enter.
$ yubihsm-manager --authkey <Authentication Key ID>
Type the default authentication key password:
passwordand press Enter.Import the Wrap Key onto the secondary YubiHSM 2 device. From the main menu, select [Wrap key operations] -> Import Wrap Key. Select to recreate Wrap Key from shares.
When prompted, type the number of shares required by the privacy threshold and press Enter.
In this guide, we have specified that 2 shares are required to be rejoined. These must be present to proceed.
- When prompted, for share number
1, the wrap key custodian holding the first share inputs this information and presses Enter. A message is displayed that the share is received: - Continue to have each wrap key custodian enter the share information for each of the wrap key shares required to rejoin the key share. After a sufficient number of wrap key shares have been inserted by the wrap key custodians, a final message is displayed:
Stored wrap key with ID 0x0002 on the deviceNote
The ID of the wrap key on the secondary device is the same as that for the primary device.
After the Wrap Key has been stored on the secondary YubiHSM 2 device, use YubiHSM Manager restore objects from the files containing the application Authentication Key, the CA root key, and, if applicable, the audit key that were saved to file under wrap during the configuration of the primary device.
From the main menu, select [Device operations] -> [Restore device]. Follow the prompts to restore the keys under wrap.
reading ./0x0004.yhw
Successfully imported object Authkey, with ID 0x0004
reading ./0x0003.yhw
Successfully imported object Authkey, with ID 0x0003
reading ./rootkey.yhw
Successfully imported object Asymmetric, with ID {rootkeyID}
If there are files containing wrapped objects with the
.yhwfile extension in the specified directory that were exported with a different wrap key than the one reconstituted by the shares here, the YubiHSM Manager attempts to also read those but will fail gracefully and only restores the files it can decrypt.
- After the restore process is finished, delete the default, factory-installed Authentication Key.
From the main menu, select [Authentication key management] -> Delete -> Select the default Authentication Key (ID0x0001) and press Enter -> Confirm the deletion by selecting [Yes] and pressing Enter.
Confirming the Duplicated YubiHSM 2
You now have a duplicate of the device configured with the three key objects you created on the primary device earlier. These are identical to the primary device that was configured earlier.
To confirm the duplicated YubiHSM 2:
In your command line application, run YubiHSM Shell program.
Launch your command line application and navigate to the directory containing the YubiHSM Shell program.
Enter the following command and press Enter.
$ yubihsm-shell
To connect to the YubiHSM, at the
yubihsmprompt, typeconnectand press Enter. A message verifying that you have a successful connection is displayed.To open a session with the YubiHSM 2, type
session open 3(where3is the ID for your application authentication key) and press Enter.Type in the password for the application authentication key. You will receive a confirmation message that the session has been set up successfully.
To list the objects, type
list objects 0(or instead of0some other session number that was given to you in step 4) and press Enter. Verify that the secondary device now contains all of the key material that you intended to restore.Depending on the order in which the keys under wrap were imported, the order of the enumerated keys on the secondary device may be different than on the primary device when using the list command. This has no practical implementation and the object IDs are identical between the devices.
If you have verified that the secondary device now contains all of the key material that you intended to restore, you should now remove the keys under wrap currently on file in the current working directory for the YubiHSM Setup program.