Deploy for Microsoft SQL Server
YubiHSM 2 for Microsoft SQL Server Guide
In a Microsoft SQL Server environment, the Column Master Key (CMK) must be protected in hardware. The YubiHSM 2 protects the CMK in hardware and guards the Microsoft SQL Server database encryption services.
This guide is intended to help systems administrators deploy YubiHSM 2 for use with Microsoft SQL Server in a Windows server environment. The expected outcome is that the Column Master Key (CMK) is created securely on a YubiHSM 2 and that a hardware-based backup copy of key materials has been produced.
These guidelines for deployment cover basic topics, so the instructions should be modified as required for your specific environment. It is assumed that you are familiar with the concepts and processes for working with Microsoft SQL Server. It is also assumed that the installation is performed on a single Microsoft SQL Server database, but the concept can be extended to more servers and databases.
Important
Before deploying to production, we recommend that you install and test the Microsoft SQL Server installation and setup of the YubiHSM 2 in a test or lab environment.
For guidance on enabling the Microsoft SQL Server feature Always Encrypted in a production environment, see the Microsoft SQL Docs for Always Encrypted.
Introduction to Always Encrypted
Introduced in 2016, Microsoft SQL Server’s Always Encrypted feature enables the encryption of selected columns in a database.
Note
The YubiHSM 2 requires Microsoft SQL Server 2017 and Microsoft SQL Server Management Studio (SSMS) 2018.
The Always Encrypted encryption mechanisms rely upon two cryptographic keys, described in detail in the Microsoft SQL Docs, Overview of Key Management for Always Encrypted. In brief:
- The Column Encryption Key (CEK) is a symmetric key used for encrypting the contents of a selected database column.
- The Column Master Key (CMK) is an asymmetric key that is used for protecting the encryption key. The CMK for Always Encrypted can be protected in a local key store, which is in the scope of this document, or in a centralized key store, which is not in scope.
A CMK can be stored in a local key store that supports Microsoft’s Cryptography Next Generation (CNG) API. To protect the CMK in hardware, a hardware security module (HSM) should be used. In this scenario, Always Encrypted accesses the HSM through the CNG API by using a key storage provider (KSP).
To protect the CMK in hardware, the YubiHSM 2 can be deployed as the local key store. Microsoft’s Always Encrypted accesses the YubiHSM 2 through the KSP that is provided with the YubiHSM software tools. With this setup, the Microsoft SQL Server Management Studio (SSMS) can be used to manage the CMK in the YubiHSM 2 device. This deployment guide describes two ways to generate the CMK and CEK in YubiHSM 2:
- By using the SSMS wizard, as described in Use SSMS to Generate the CMK and CEK.
- By running a PowerShell script, as described in Use PowerShell Script to Generate the CMK and CEK.
Prerequisites and Preparations
The audience of this document is an experienced system administrator with a good understanding of Microsoft SQL Server management. In addition, it is helpful to be familiar with the terminology, software, and tools specific to YubiHSM 2. As a primer for these terms, see the Glossary.
To follow the steps provided in this guide, the complete the following prerequisites:
Microsoft Windows Server 2022 or higher, with Microsoft .NET Framework 4.8 or higher. The operating system should be installed in a secure computer network. The system administrator must also have elevated system privileges.
Access to Microsoft SQL Server 2019 with SQL Server Management Studio (SSMS) 2018 or higher.
YubiHSM 2 software and tools for Windows downloaded from the Yubico YubiHSM 2 Release page and available on the system to be used.
Note
The 32-bit version of the YubiHSM KSP DLL is needed for use with SSMS.
Two (2) YubiHSM 2 devices, one for deployment and one for backup in hardware.
Your organization policies may require key custodians to be available for the YubiHSM 2 deployment. For more information about key custodians and the associated
M of Nkey shares, see Key Splitting and Key Custodians.
Configuration for this Integration
For the integration described in this guide, the following hardware and software configuration was used:
- Microsoft Windows Server 2022.
- Microsoft .NET Framework 4.8.
- Microsoft SQL Server 2019.
- Microsoft SQL Server Management Studio (SSMS) 2018.
- Yubico YubiHSM v 2.1.2.
- Yubico YubiHSM software tools v 2021.12c. In particular, the 32-bit YubiHSM KSP DLL is needed for use with SSMS (which is a 32-bit application).
Basic Setup of YubiHSM 2 and SQL Server
Installing and Configuring YubiHSM 2
Install and configure the YubiHSM 2 device and software using the instructions in the following sections in the YubiHSM 2 with Key Storage Provider for Windows Server—Configure YubiHSM 2 Key Storage Provider for Microsoft Windows Server, see Key Splitting and Key Custodians.
When these instructions have been completed, the YubiHSM 2 should be configured with — for example — one domain with a wrap key (id 0x0002), an application auth key (id 0x0003), and an audit key (id 0x0004). The configuration of the YubiHSM 2 can be inspected by using the YubiHSM-Shell in a command prompt as shown in the screenshot below.
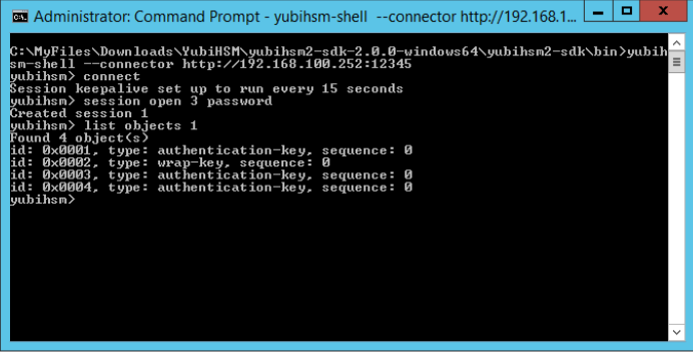
Figure: Example of the YubiHSM 2 basic configuration
Creating a Test Database
Create a test database that will be used for the Always Encrypted deployment with YubiHSM 2. A test database can be downloaded from Microsoft’s official repository at Wide World Importers sample database v1.0 If you already have a Microsoft SQL Server database installed, you can skip ahead to Configure SSMS for Database Encryption.
Note
At least one row with values needs to be inserted into the database table before the columns are encrypted (see the example of a test database below).
Create a test database.
Launch Microsoft SQL Server Management Studio (SSMS) 2018.
Right-click on the Databases icon.
Select New Database….
Enter an appropriate name for the database.
In this guide, a test database named “Sales3” is used for the tests with Always Encrypted in conjunction with YubiHSM 2.
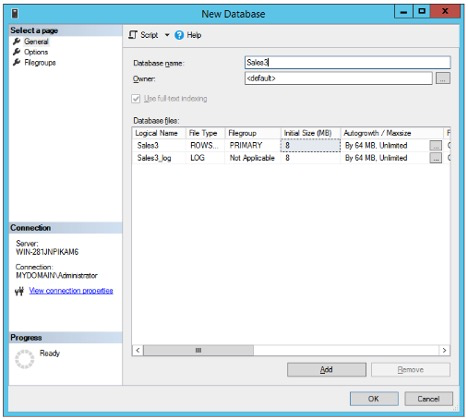
Figure: Example of test database
Create table:
- Expand Databases > Sales3 > Tables.
- Right-click on Tables and select Create new table.
- Add some columns, for example “Name”, “Address”, “ZipCode”, “City”, “Country”.
- Save the table and give it a name - “Table_Customers” for example.
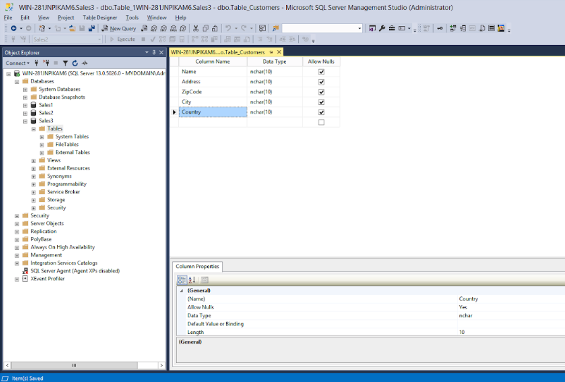
Figure: Example of test table
Add one or more rows to the table:
- Expand Databases > Sales3.
- Right-click on Table and selecting New > Query….
- Use the SQL Query window to insert rows into the database table, for example, with the SQL query shown below.
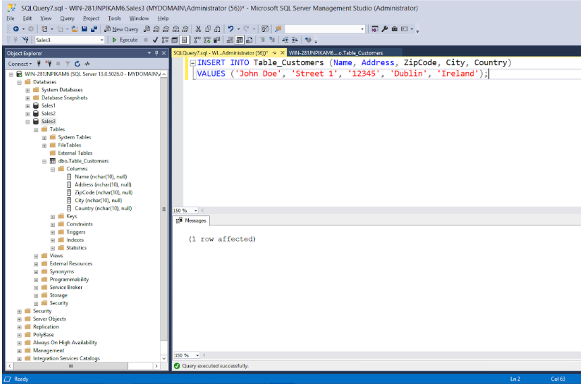
Figure: Example of SQL query to insert values into the table
Use SSMS to Generate the CMK and CEK
The Microsoft SQL Server Management Studio (SSMS) provides tools for manual creation of the CMK and CEK. However, using a PowerShell script (see Use PowerShell Script to Generate the CMK and CEK) results in a uniform configuration and ensure no options are missed. Note that all the examples and screenshots in this document are based on different key names being used for the SSMS wizard and the PowerShell script.
Generate the CMK
To generate the CMK for a database, create and save the following PowerShell script to generate Always Encrypted Key. Save this script as
AlwaysEncryptedKey-PS.ps1.$cngProviderName = "YubiHSM Key Storage Provider" $cngAlgorithmName = "RSA" $cngKeySize = 2048 # Recommended key size for column master keys $cngKeyName = "AlwaysEncryptedKey-PS" # Name identifying your key in the KSP $cngProvider = New-Object System.Security.Cryptography.CngProvider($cngProviderName) $cngKeyParams = New-Object System.Security.Cryptography.CngKeyCreationParameters $cngKeyParams.provider = $cngProvider $cngKeyParams.KeyCreationOptions = [System.Security.Cryptography.CngKeyCreationOptions]::OverwriteExistingKey $keySizeProperty = New-Object System.Security.Cryptography.CngProperty("Length",[System.BitConverter]::GetBytes($cngKeySize),[System.Security.Cryptography.CngPropertyOptions]::None); $cngKeyParams.Parameters.Add($keySizeProperty) $cngAlgorithm = New-Object System.Security.Cryptography.CngAlgorithm ($cngAlgorithmName) $cngKey = [System.Security.Cryptography.CngKey]::Create($cngAlgorithm,$cngKeyName, $cngKeyParams)
Run the
AlwaysEncryptedKey-PS.psscript from a PowerShell Window with elevated/administrator permissions.Once completed, verify the Network Location is set to Private or Domain. To do so:
View the current Profile assigned to the Network Connection by using the command.
Get-NetConnectionProfile.
If the Profile is set to
Publicchange it toPrivateorDomainso that SQL can communicate properly with the YubiHSM.To change it, use the command.
Set-NetConnectionProfile -InterfaceAlias Ethernet1 -NetworkCategory "Private"
Validate Generation of the CMK
The presence of the asymmetric CMK in the YubiHSM 2 can also be validated by running the following sequence of YubiHSM-Shell commands in a command prompt.
$yubihsm> connect
$yubihsm> session open <slot-ID> <password>
$yubihsm> list objects <session-ID>
$yubihsm> get objectinfo <session-ID> <key-ID> asymmetric-key
Example output from the YubiHSM-Shell commands is shown in the screenshot below.
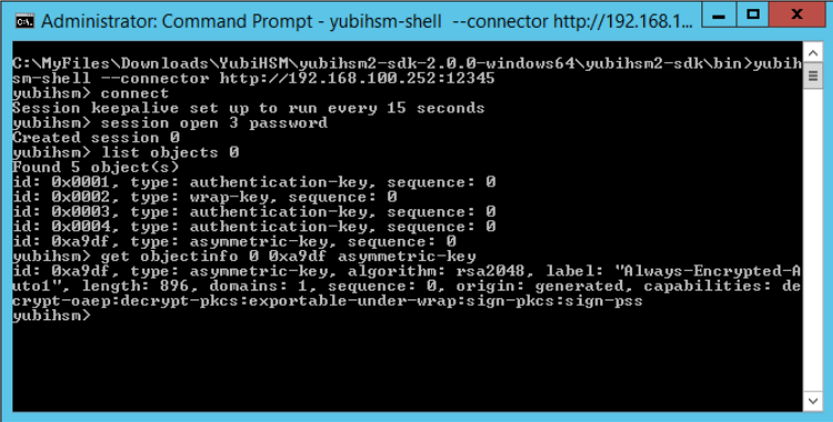
Figure: New Column Master Key listed in YubiHSM
Assign the CMK to a Database
To assign the CMK for a database.
- Launch SSMS.
- Expand Databases > Database-Name > Security > Always Encrypted Keys > Column Master Key.
We use the example shown below, expanding the tree Databases > Sales3 > Security > Always Encrypted Keys > Column Master Key.

Figure: Assigning the CMK
Right-click on Column Master Keys, and select New Column Master Key… in the New Column Master Key window, enter the following values:
- In the Name text field, enter an appropriate name for the CMK, for example, “CMK-YubiHSM-SSMS”.
- In the Key Store drop-down list, select Key Storage Provider (CNG).
- In the Select a provider drop-down list, select YubiHSM Key Storage Provider.
- In the bottom field, select AlwaysEncryptedKey-PS.
Generate the CEK
The next task is to generate the CEK for a database.
Generate the CEK.
- Launch SSMS.
- Expand Databases > Database-Name > Security > Always Encrypted Keys > Column Encryption Key.
In our example, expand the tree Databases > Sales3 > Security >Always Encrypted Keys > Column Encryption Key, which is illustrated in the screenshot below.
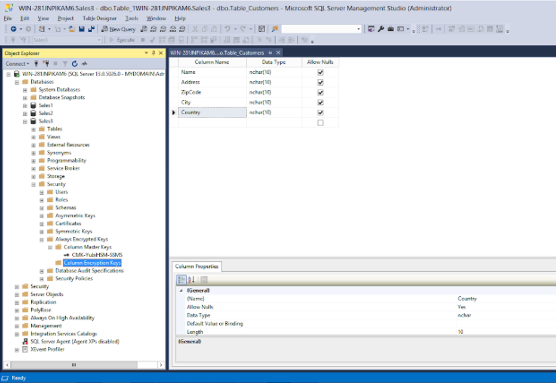
Figure: Column Encryption Keys in SSMS
Right-click Column Encryption Keys and select New Column Encryption Key….
In the New Encryption Master Key window, enter the following values:
- In the Name text field, enter an appropriate name for the CEK, for example
CEK-YubiHSM-SSMS. - In the Column master key drop-down list, select the CMK that was generated on the YubiHSM, for example
CMK-YubiHSM-SSMS.
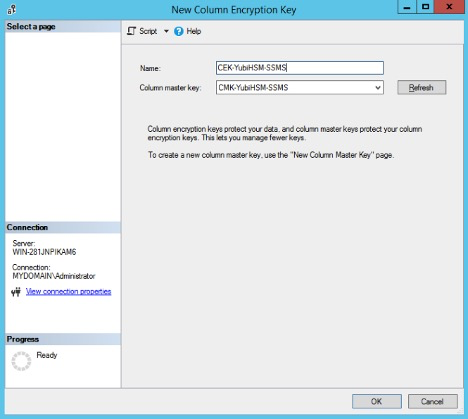
Figure: Create new Column Encryption Key with SSMS
- In the Name text field, enter an appropriate name for the CEK, for example
Generate and verify the CEK.
- Press OK. To verify the success of the operation.
- Check to see whether the CEK is listed under Always Encrypted Keys in SSMS.
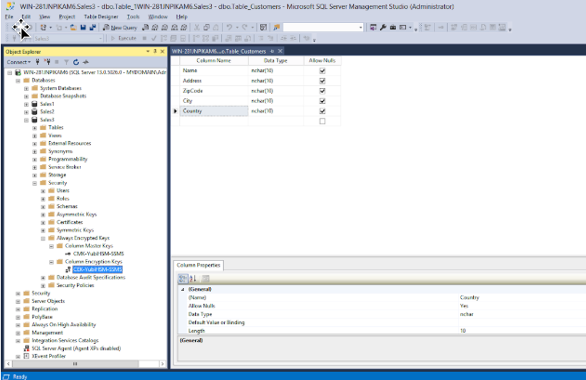
Figure: Column Master Key and Column Encryption Key in SSMS
Use PowerShell Script to Generate the CMK and CEK
Instead of using SSMS to generate the CMK and CEK (as described in the foregoing section, Use SSMS to Generate the CMK and CEK), another option is to use PowerShell to generate the CMK and CEK. Microsoft has published a PowerShell script that can be used to generate the CMK in an HSM. The following instructions list the activities in the script, then describe how to modify that PowerShell script to generate the CMK in the YubiHSM 2 by calling its KSP.
Create a CMK in the YubiHSM 2 with CNG Provider (KSP)
$cngProviderName = "YubiHSM Key Storage Provider"
$cngAlgorithmName = "RSA"
$cngKeySize = 2048 # Recommended key size for column master keys
$cngKeyName = "AlwaysEncryptedKey-PS" # Name identifying your key in the KSP
$cngProvider = New-Object System.Security.Cryptography.CngProvider($cngProviderName)
$cngKeyParams = New-Object System.Security.Cryptography.CngKeyCreationParameters
$cngKeyParams.provider = $cngProvider
$cngKeyParams.KeyCreationOptions = System.Security.Cryptography.CngKeyCreationOptions]:: OverwriteExistingKey
$keySizeProperty = New-Object System.Security.Cryptography.CngProperty("Length",[System.BitConverter]::GetBytes($cngKeySize),[System.Security.Cryptography.CngPropertyOptions]::None);
$cngKeyParams.Parameters.Add($keySizeProperty)
$cngAlgorithm = New-Object System.Security.Cryptography.CngAlgorithm($cngAlgorithmName)
$cngKey = [System.Security.Cryptography.CngKey]::Create($cngAlgorithm,$cngKeyName, $cngKeyParams)
Import SQL Server Module
Import-Module "SqlServer"
Connect to your Database
$serverName = "<server name>"
$databaseName = "<database name>"
$connStr = "Server = " + $serverName + "; Database = " + $databaseName + ";Integrated Security = True"
$connection = New-Object Microsoft.SqlServer.Management.Common.ServerConnection
$connection.ConnectionString = $connStr
$connection.Connect()
$server = New-Object Microsoft.SqlServer.Management.Smo.Server($connection)
$database = $server.Databases[$databaseName]
Create SQL CMK Settings Object for your CMK
$cmkSettings = New-SqlCngColumnMasterKeySettings -CngProviderName
$cngProviderName -KeyName $cngKeyName
Create CMK Metadata in Database
$cmkName = "CMK-YubiHSM-PS"
New-SqlColumnMasterKey -Name $cmkName -InputObject $database -ColumnMasterKeySettings $cmkSettings -Verbose
Generate CEK, Encrypt with CMK, and Create CEK Metadata in Database
$cekName = "CEK-YubiHSM-PS"
New-SqlColumnEncryptionKey -Name $cekName -InputObject $database -ColumnMasterKeyName $cmkName -Verbose
Customize the Script
To customize this script, change the placeholders
server nameanddatabase nameto the actual values of the Microsoft SQL Server name and the database used.For the test database used in this example, the
database nameis set toSales3, while theserver nameshould be set to the name of your Windows server.Save the PowerShell script file in a folder with an appropriate name, for example
CreateColumnMasterAndEncryptionKeys-YubiHSM.ps1.Execute the script.
- Launch a command prompt with administrator privileges
- Enter the PowerShell mode by typing
PowerShell. - Navigate to the directory where the PowerShell script is located.
- Execute the script:
PS> .\CreateColumnMasterAndEncryptionKeys-YubiHSM.ps1
The PowerShell script generates the CMK and the CEK and displays the output from these operations. Output from the script given in Create a CMK in the YubiHSM 2 with CNG Provider (KSP) is shown in the screenshot below.
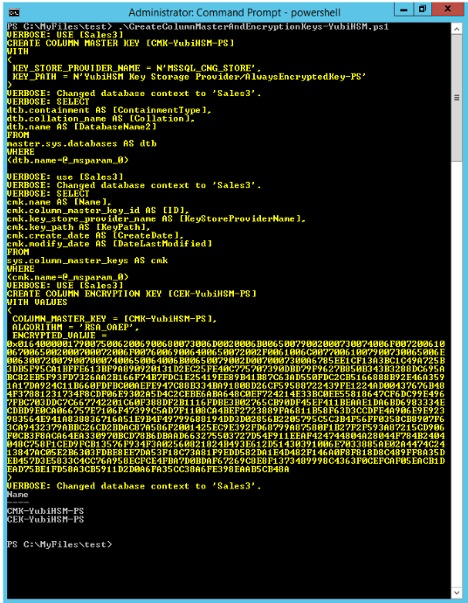
Figure: PowerShell script to create Column Master Key and Column Encryption Key
Validate Generation of the CMK and the CEK
After executing the PowerShell script.
- Switch back to SSMS.
- Expand the objects Databases > Database-Name > Security > Column Master Key and Databases > Database-Name > Security > Column Encryption Key.
- Right-click each object and select the Refresh option.
The CMK and CEK that were generated by the PowerShell script appear in SSMS as
CMK-YubiHSM-PSandCEK-YubiHSM-PSrespectively.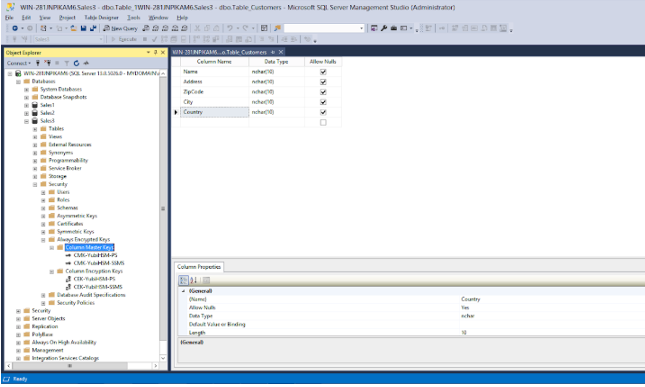
Figure: Refreshed Column Master Keys and Column Encryption Keys in SSMS
Verify the presence of the asymmetric CMK in the YubiHSM 2 by running the following sequence of YubiHSM-Shell commands in a command prompt.
$yubihsm> connect
$yubihsm> session open <slot-ID> <password>
$yubihsm> list objects <session-ID>
$yubihsm> get objectinfo <session-ID> <key-ID> asymmetric-key
Example output for the YubiHSM-Shell commands is shown in the screenshot below.
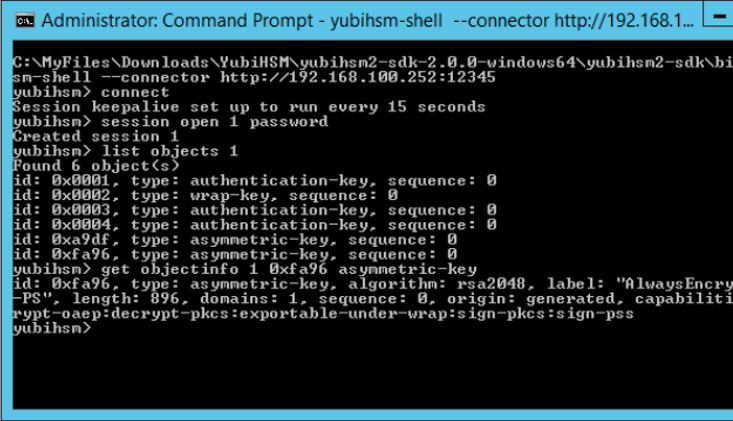
Figure: Column Master Keys in YubiHSM 2
Encrypt Database Columns
Database columns can be encrypted with PowerShell- or SSMS-generated keys.
Encrypt Database Column with PowerShell-Generated Keys
To encrypt a database column, expand the database’s columns: Databases > Database-Name > Tables > Table-Name > Columns.
Our example expands the tree Databases > Sales3 > Tables > dbo.Table_Customers > Columns, as shown in the screenshot below.
Figure: Expanded columns to be encrypted
Right-click the column to be encrypted and select Encrypt Column….
In our example, right-click the table Name and select Encrypt Column…. The Introduction window in the SSMS Always Encrypted wizard appears:
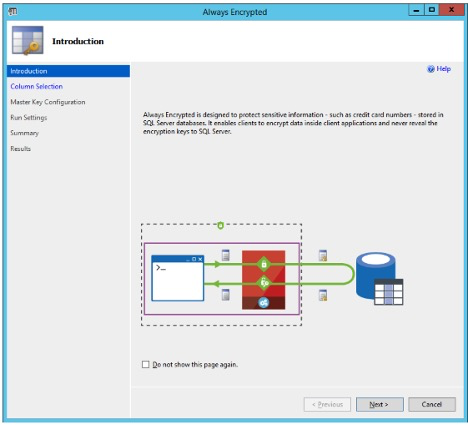
Figure: Always Encrypted wizard: Introduction
Click Next. The Column Selection window of the Always Encrypted wizard appears:
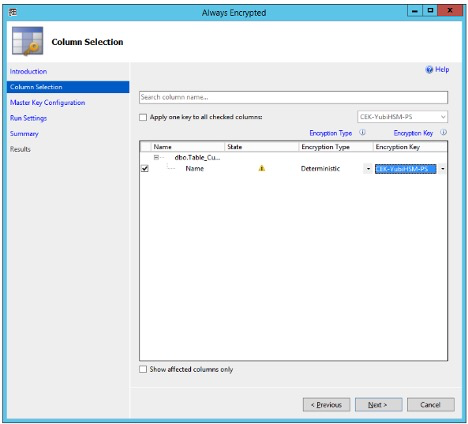
Figure: Always Encrypted wizard: Column Selection
In this example, the CEK that was generated with the PowerShell script is used for encrypting the database column.
In the Column Selection window, select the Encryption Key named CEK-YubiHSM-PS.
The Encryption Type can be set to either Deterministic or Randomized. In this example Deterministic is selected.
Click Next, and the Master Key Configuration window in the Always Encrypted wizard appears.

Figure: Always Encrypted wizard: Master Key Configuration
In the Master Key Configuration window, click Next, since the master column key in the YubiHSM 2 will be used. The Run Settings window in the Always Encrypted wizard appears.
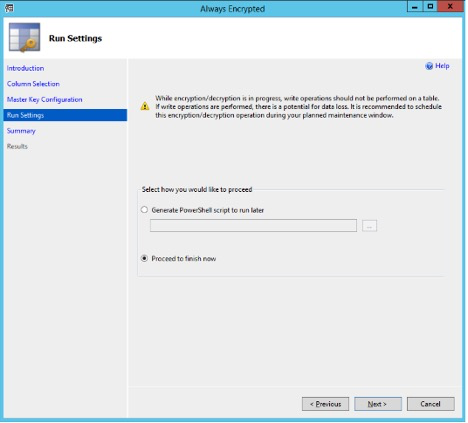
Figure: Always Encrypted wizard: Run Settings
In the Run Settings window, select Proceed to finish now (unless you want to generate a PowerShell script to run later) and click Next. The Summary window in the Always Encrypted wizard appears.
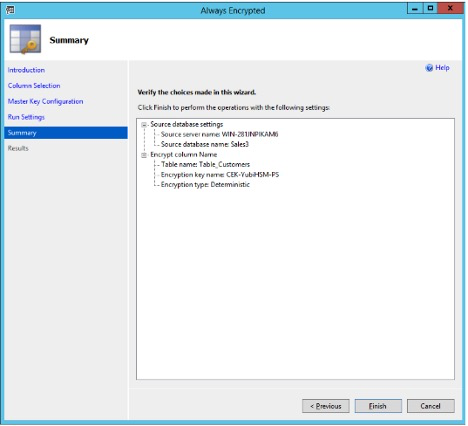
Figure: Always encrypted wizard: Summary
Review the settings in the Summary window and click Finish. The Results window appears:
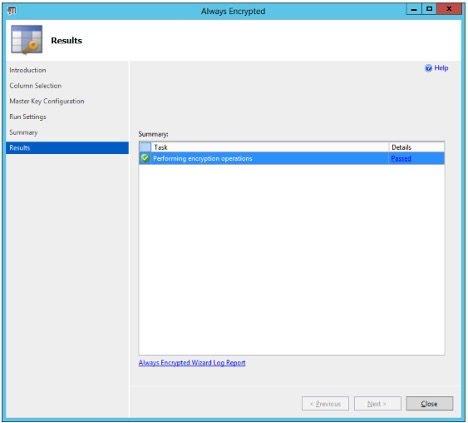
Figure: Always encrypted wizard: Results
When the column encryption operation succeeds, the word “Passed” is displayed in the Details column of the relevant row in the Results window.
Encrypt Database Column with SSMS-generated Keys
To use the CMK and CEK that were generated in Use SSMS to Generate the CMK and CEK follow the instructions above for encrypting a database column with PowerShell-generated keys (Encrypt Database Column with PowerShell-generated Keys), but select a different column (for example, Address) and use the column encryption key CEK-YubiHSM-SSMS and the related column master key MK-YubiHSM-SSMS.
Verify Encrypted Database Column
To check that the columns have been encrypted.
Expand the object Database > Database-Name. In our example the database name is
Sales3.Select New Query in the top menu.
Type the SQL query in the example below and click Execute.
SELECT * FROM Table_Customers;
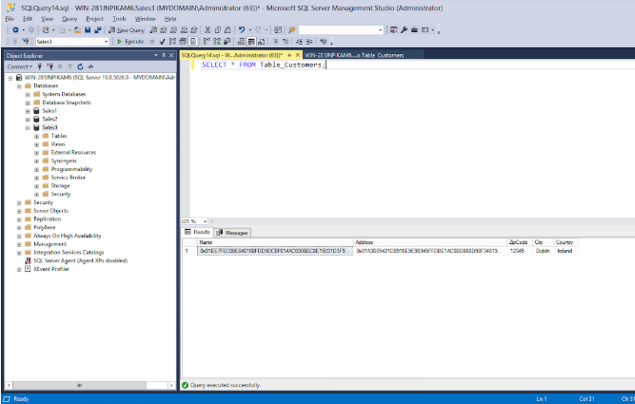
Figure: Checking the encrypted columns
Configure SSMS for Database Encryption
To configure Microsoft SQL Server and SSMS with the basic database settings needed for testing Always Encrypted in conjunction with YubiHSM 2, set SSMS to display the encrypted columns in clear text.
Select Connect Object Explorer settings.
- Click the Connect Object Explorer icon. The Connect to Server window appears.
- Click Options.
- Select the Always Encrypted tab and select Enable Always Encrypted (column encryption).
- To make the changes take effect, click the Disconnect icon and then the Connect icon.
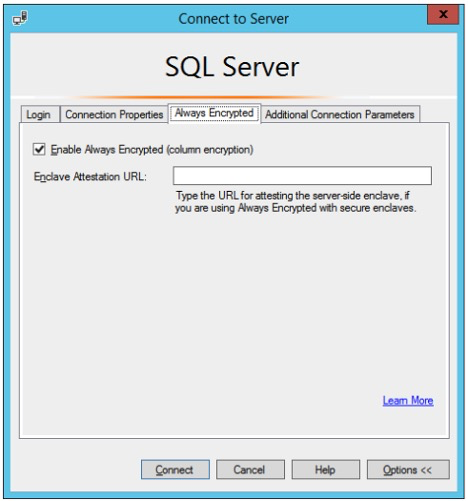
Figure: Enable Always Encrypted in SSMS
Select Enable Parameterization.
In the main menu, click Query and from the drop-down list, select Query options….
The Query Options window appears.
Select Execution > Advanced.
Select the checkbox for Enable Parameterization for Always Encrypted.
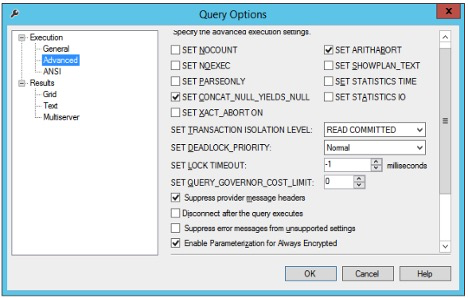
Figure: Enable Parameterization for Always Encrypted queries in SSMS
These are the basic database settings in Microsoft SQL Server and SSMS for testing Always Encrypted in conjunction with YubiHSM.
To verify the settings.
Expand the object Database > Database-Name. In our example the database name is
Sales3.Select New Query in the top menu again.
Re-enter the SQL query in the example below and click Execute.
SELECT * FROM Table_Customers;
When the SSMS settings take effect, the encrypted database columns are decrypted, and the values displayed in clear text as shown in the screenshot below.
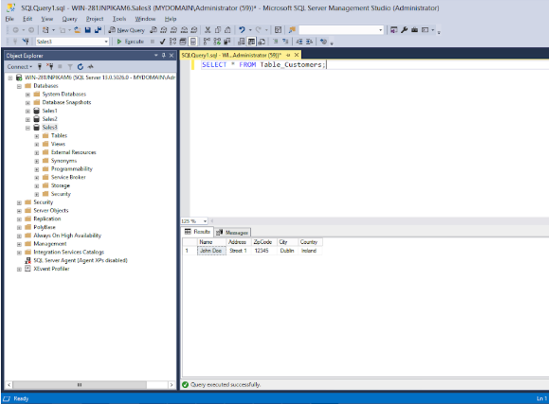
Figure: Decrypted values in the database columns