Deploy for Microsoft Host Guardian Service (HGS)
In a Microsoft Host Guardian Service (HGS) environment, the signing key and the encryption key must be protected in hardware. The YubiHSM 2 protects these keys in hardware and thereby guards the HGS.
This guide is intended to help systems administrators deploy YubiHSM 2 for use with HGS in a Windows server environment. The expected outcome is that the signing key and the encryption key are generated and stored securely on a YubiHSM 2 and that a hardware-based backup copy of key materials has been produced.
These guidelines for deployment cover basic topics, so the instructions should be modified as required for your particular environment. It is assumed that you are familiar with the concepts and processes for working with HSG. It is also assumed that the installation is performed on a single HSG, but the concept can be extended to multiple servers.
Important
We recommend that you install and test the HGS installation and setup of the YubiHSM 2 in a test or lab environment before deploying to production.
For guidance on enabling the HGS in a production environment, see Microsoft’s documentation on how to deploy a guarded fabric and shielded virtual machines (VMs).
The Host Guardian Service – Guarded Fabric Concept
In order to raise the security level for virtualization, Microsoft Windows Server 2016 introduced the concept of Guarded Fabric to increase the security of Hyper-V Virtual Machines (VMs). A guarded fabric is used to protect hosts from a VM running malicious software and to protect VMs from a compromised host.
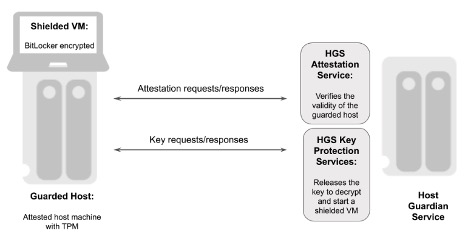
Figure: Overview of a Guarded Fabric and Main Components
A guarded fabric is comprised of the following main components:
- Host Guardian Service (HGS) This is a Windows Server role that is typically installed on a cluster of physical servers. The HGS in turn is composed of the Attestation Service and the Key Protection Service. The Attestation Service verifies the Trusted Computing Group (TCG) logs of a guarded host and issues a health certificate if the Guarded Host is attested by HGS. The HGS Key Protection Service is described in “HGS Key Protection Service” below.
- Guarded Host This is an attested host machine, equipped with a Trusted Platform Module (TPM) that can run shielded Hyper-V VMs. The guarded Hyper-V host must be attested by the HGS Attestation Service in order to power on or migrate shielded VMs.
- Shielded VM This is a Hyper-V VM equipped with a virtual TPM, that is encrypted using BitLocker and can run only on attested guarded hosts in a guarded fabric.
The guarded fabric components are described in Microsoft’s overview of guarded fabric and shielded VMs.
HGS Key Protection Service
The HGS Key Protection Service (KPS) is configured with at least two certificates (and corresponding private keys), which are used for signing and encrypting the keys used to start up shielded VMs. The two mandatory certificates are:
- Encryption certificate: This certificate is used to encrypt and decrypt the key protector, which itself contains the symmetric key that encrypts the virtual TPM of a shielded VM at rest. When a shielded VM is booting up on an attested guarded host, the HGS KPS decrypts and releases its symmetric key, which is used by the guarded host to decrypt the virtual TPM and the hard drive of a shielded VM.
- Signing certificate: This certificate is used to digitally sign the key protector to ensure its authenticity.
In addition to these mandatory certificates, the HGS KPS can also be configured with four optional certificates:
- Communications certificate
- Attestation signer certificate
- HTTPS (SSL/TLS) certificate
- Dump encryption certificate.
If those certificates are not configured, the Encryption certificate and Signing certificate will provide the necessary operations.
The Encryption certificate and Signing certificate can either be self-signed or issued by a Certification Authority (CA).
The private keys corresponding to the certificates can be stored in an HSM or in software in PKCS #12 format. The recommended option is to protect the keys in hardware in an HSM.
For more information on these topics, see Frequently Asked Questions About HGS Certificates in the Microsoft Tech Community (requires community login).
Scope of this Guide
The scope of this guide is to describe how to use the HGS KPS to generate the Encryption and Signing certificates/keys using the YubiHSM. In this document, the Encryption and Signing certificates will be self-signed and created with PowerShell scripts.
How to use CA to issue the certificates is out of scope for this guide.
How to deploy and configure the HGS Attestation Service, guarded hosts, shielded VMs, and additional features of a guarded fabric are also out of scope for this guide.
For information on how to install and configure a complete guarded fabric, see Microsoft’s documentation on guarded fabric deployment.
Prerequisites and Preparations
The audience of this document is an experienced systems administrator with a good understanding of Microsoft Hyper-V virtualization management. In addition, it is helpful to be familiar with the terminology, software, and tools specific to YubiHSM 2. As a primer for these terms, see the Glossary.
To complete the steps provided in this guide, complete the following prerequisites:
- Microsoft Windows Server 2016 or higher. The operating system should be installed in a secure computer network. The system administrator must also have elevated system privileges.
- YubiHSM 2 software and tools for Windows downloaded from the Yubico YubiHSM 2 Release page and available on the system to be used.
- Two (2) YubiHSM 2 devices, one for deployment and one for backup in hardware.
- Your organization’s policies may require key custodians to be available for the YubiHSM 2 deployment. For more information about key custodians and the associated
M of Nkey shares, see Key Splitting and Key Custodians in the YubiHSM 2 Windows Deployment Guide.
Configuration for this Integration For the integration described in this guide, the following hardware and software configuration was used:
- Microsoft Windows Server 2016.
- Yubico YubiHSM v 2.1.2.
- Yubico YubiHSM v 2.1.2 software tools.
Basic Setup of YubiHSM 2 and Host Guardian Service
Install and Configuring YubiHSM 2
Install and configure the YubiHSM 2 and software using the instructions in the following sections in the Configuring YubiHSM 2 for Microsoft Windows Server.
Once these instructions have been followed, the YubiHSM 2 should be configured with the example we are using, one domain with a wrap key (id 0x0002), an application authentication key (id 0x0003), and an audit key (id 0x0004). The configuration of the YubiHSM 2 can be inspected by using the YubiHSM-Shell in a command prompt as shown in the screenshot below.
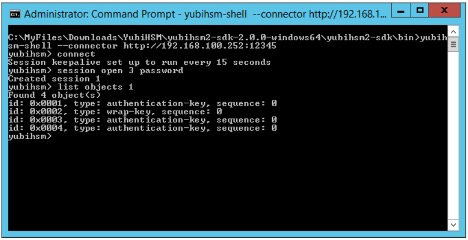
Figure: Example of the YubiHSM 2 Basic Configuration
Basic Deployment of HGS
To test the encryption and signing certificate/key generation for HGS Key Protection Services, configure a basic HGS environment on a single server. For more information on how to install and configure a complete guarded fabric, see Microsoft’s documentation on guarded fabric deployment.
To use shielded VMs, begin by adding the HGS role and configuring the HGS domain. In the following, we are showing the PowerShell prompt as PS C:\users\your-username\.
Add HGS Role.
To add the HGS role to a Windows Server, open a PowerShell console and enter the following command:
PS C:\users\your-username\ Install-WindowsFeature -Name HostGuardianServiceRole -IncludeManagementTools -Restart
For more information on this PowerShell command, see Microsoft’s documentation on how to Install HGS.
Install Host Guardian Server on Bastion Host.
To configure the Active Directory (AD) forest for HGS, configure the HGS service, and lock down the Windows Server to a bastion host, open a PowerShell console and enter the following command:
PS C:\users\your-username\ $adminPassword = ConvertTo-SecureString -AsPlainText '<password>' -Force

PS C:\users\your-username\ Install-HgsServer -HgsDomainName 'bastion.local' -SafeModeAdministratorPassword $adminPassword -Restart
For more information on this PowerShell command, see Microsoft’s documentation on how to Install HGS.
Create Signing and Encryption Keys for HGS
Generate Signing and Encryption Keys and Certificates
Generate the signing and encryption keys and certificates for HGS by using the PowerShell cmdlet New-SelfSignedCertificate. In this guide, self-signed certificates will be used for HGS.
The HGS signing and encryption certificates must adhere to the following specifications:
- Crypto provider: YubiHSM Key Storage Provider.
- Key algorithm: RSA
- Minimum key size: 2048 bits
- Signature algorithm: SHA256
- Key usage: Digital signature and data encipherment
- Enhanced key usage: Server authentication
- Subject name: Recommended: your company’s name or web address
Do the following to create the self-signed HGS certificates:
Create the Self-signed HGS Signing Certificate and Key.
Start a command prompt with administrator rights and type the command
PowerShell. In the PowerShell command prompt, run the following cmdlet:PS New-SelfSignedCertificate -Provider "YubiHSM Key Storage Provider" -Subject "CN=HGS Signing Certificate" -KeyExportPolicy NonExportable -KeyUsage DigitalSignature,DataEncipherment -TextExtension @("2.5.29.37={text}1.3.6.1.5.5.7.3.1") -KeyAlgorithm RSA -KeyLength 2048 -CertStoreLocation "Cert:\LocalMachine\My" -Verbose
Create the Self-signed HGS Encryption Certificate and Key.
In the PowerShell command prompt, run the following cmdlet:
PS C:\users\your-username\ New-SelfSignedCertificate -Provider "YubiHSM Key Storage Provider" -Subject "CN=HGS Encryption Certificate" -KeyExportPolicy NonExportable -KeyUsage DigitalSignature,DataEncipherment -TextExtension @("2.5.29.37={text}1.3.6.1.5.5.7.3.1") -KeyAlgorithm RSA -KeyLength 2048 "Cert:\LocalMachine\My" -Verbose
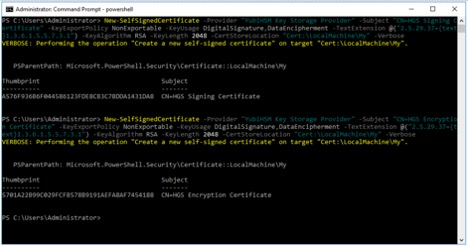
Figure: Example of PowerShell cmdlet to Create Self-Signed Certificates
Make a note of the thumbprints of the self-signed certificates. In this example, the signing certificate thumbprint is
A576F936B6F044586123FDE8CB3C7BDDA1431DA8and the encryption certificate thumbprint is5701A22B99C029FCFB578B9191AEFA8AF7454188.Verify Generation and Storage of HGS Key-pairs in YubiHSM 2.
Verify that the HGS key-pairs have been properly generated and stored in YubiHSM 2 by starting a command prompt and using
YubiHSM-Shellto list the objects, as shown in the figure below.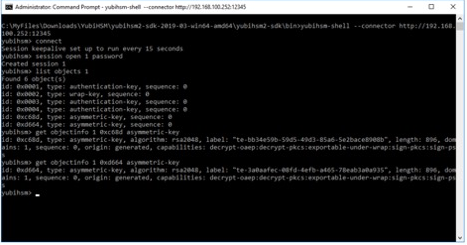
Figure: Example of HGS Keys in YubiHSM-Shell
Verify Storage of HGS Certificates in Microsoft Certificate Store.
Verify that corresponding HGS certificates have been stored in Microsoft certificate store. Launch the Microsoft Management Console (MMC) by going to the command line and typing
MMC.exe.- In MMC, select File > Add/remove Snap-in.
- In the Add or Remove Snap-ins window, select the option Certificates > Computer Account > Local Computer.
- In the Certificates (Local Computer) console, expand the folders Personal > Certificates, and verify that the self-signed HGS signing and encryption certificates appear.
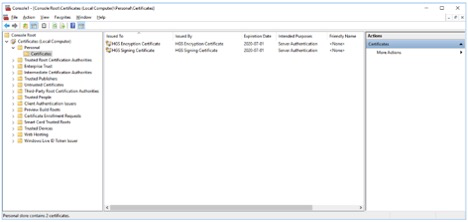
Figure: Example of HGS Certificates in Microsoft Certificate Store
For more information on how to generate HGS signing and encryption keys and certificates, see Microsoft’s documentation on HGS certificate management.
Initialize HGS with Signing and Encryption Keys and Certificates
Once the HGS signing and encryption keys and certificates have been generated, use them to initialize HGS.
Create the self-signed HGS certificates by starting a command prompt with administrator rights and typing the command PowerShell. In the PowerShell command prompt, run the following cmdlet to initialize HGS with the signing and encryption certificates.
Note
The parameters SigningCertificateThumbprint and EncryptionCertificateThumbprint should be set to the output values from the PowerShell cmdlet New-SelfSignedCertificate as described in the previous section.
PS C:\users\your-username\ Initialize-HgsServer -HgsServiceName 'MyHgsService' -SigningCertificateThumbprint '<SigningCertificateThumbprint>' -EncryptionCertificateThumbprint '<EncryptionCertificateThumbprint>'
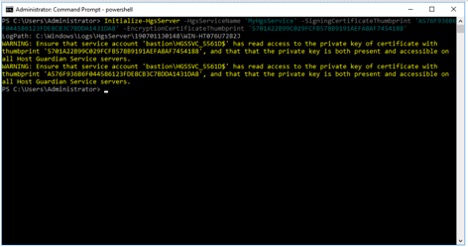
Figure: Example of PowerShell cmdlet to Initialize HGS with the Certificates
For more information on how to initialize HGS with the signing and encryption certificates, see Microsoft’s documentation on HGS initialization.