Shipping to Multiple Addresses
You can create a request to ship a set of products to multiple addresses using the batch shipment method. With this method you download an address template CSV file from the Customer Portal and fill it with recipient names and addresses.
You then upload the file, select the products that all recipients will get, and submit the batch shipment request for the products to be shipped to multiple addresses. If different recipients require different product sets, create a separate CSV file for each product set.
Note
Batch shipment is not available to “limited access mode” users. These are users with the Console Owner role that have not yet registered a security key, as part of the onboarding process. See Onboarding.
Creating the Address File
Important
Ensure that you are using the latest version of the address template CSV file. The template changes occasionally, and any request that does not use the latest template will fail.
To create the address file, do the following:
In the Customer Portal, click Delivery > Shipments in the left menu. Then click Create shipment in the top menu and select Batch shipment.
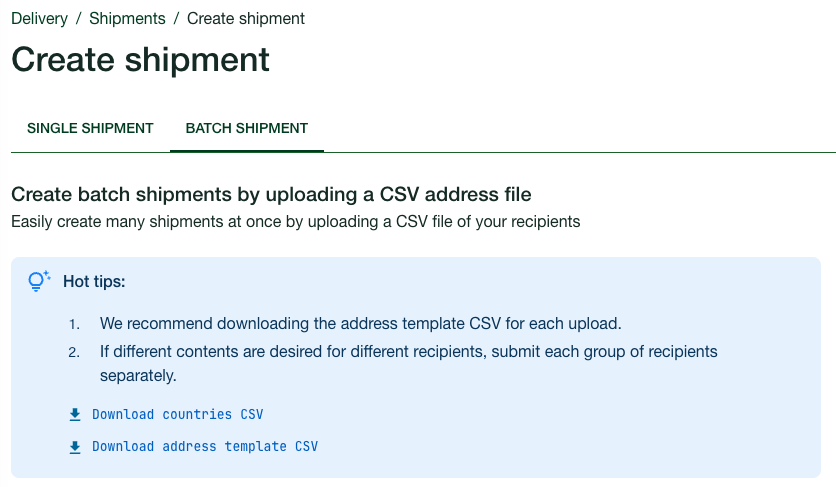
Click Download countries CSV to download the country list. This file contains the list of countries that your organization is allowed to ship to and the correct country code for each country.
Click Download address template CSV to download the template for recipient information.
Fill out the address template. For details about the fields in the CSV file, see Recipient Information Fields.
Save the address file, it will be used when creating the shipment request.
Recipient Information Fields
When filling in the template, ensure you follow these guidelines for a successful validation later on in the process:
- The table header row from the template is included in your CSV file.
- The columns in your CSV file correspond exactly to those in the template.
- Either company name or first name and last name are required.
- If the destination country is either United States or Canada, state or region is required, see USPS Region/State Codes.
- Only latin characters are permitted, including accented characters (à, á, ä etc.), see Supported Characters.
- When shipping to countries without postal codes, enter “00000” in that cell.
- Some table cells have limits on the number of alpha-numeric characters (including spaces). Ensure that content in a cell does not exceed the limits listed in the table below.
- If you are using a specific tool to manage CSV files, ensure that leading zeros in postal codes, for example “07030”, does not get removed by that tool. The “Postcode” column in the CSV file should be formatted as plain text. When previewing the CSV file, ensure to use a different program than the spreadsheet tool, to ensure the leading zeros are not removed again.
Note
The size of the uploaded CSV file must not exceed 25 MB. If it does, split the file and create multiple shipment requests.
In the table below, fields not marked as Required are optional. The Limit column displays the maximum number of alphanumeric characters permitted per field/table cell.
Important
To avoid delivery issues to addresses with long street names, the following recommendations apply for Address line fields 1 and 2:
- While some carriers might allow up to 60 characters per field, other carriers impose a strict limit of 40 characters per field. Given the unpredictability of the limits, the recommendation is to apply the most restrictive known constraint, and trim each address line to 40 characters whenever possible.
- For all shipments to India the maximum combined character limit is 120 characters between Address line 1 and 2. For shipments to other destinations the combined address line character limit is 105. For more information, see Address Field Limitations.
| Column Heading | Description | Limit |
|---|---|---|
Company
|
Required if name of recipient is not provided.
Maps to the second line of the shipping label if the
address is not residential. Do not provide a company
name if shipping to a residential address.
|
20 |
First name
|
Name of recipient. Required if company name is not
provided. Maps to the first line on the shipping label.
|
15 |
Last name
|
Recipient’s family name. Required if first name is
provided. Maps to the first line on the shipping label.
|
20 |
Address 1
|
Required. First line of address. | 40 |
Address 2
|
Required if address is undeliverable without, for
example suite #.
|
40 |
| City | Required. City, town, or township. | 60 |
Region/State
|
USPS codes are required for the US and Canada, see
USPS Region/State Codes. Region/state is required
for other countries if the address is undeliverable
without it.
|
50 |
Postcode
|
Required. Zip code or postal code. | 50 |
Country Code 2
|
Required. Country code from
available_countries.csvfile, see Country Codes.
|
2 |
Recipient Email
|
Recipient’s email address. | 80 |
Recipient Telephone
|
Required. Telephone number of shipment recipient. Any
format is acceptable with or without spaces. Limit is
40 of the alphanumeric characters “0-9+-( )” unless
the country code is IN, in which case the limit is 255.
|
40 |
Country Codes
The downloadable available_countries.csv file contains a list of destination countries and their country codes that your organization is allowed to ship to. Use the two-letter country codes to populate the Country Code 2 field in the address template.
Note
Although the system can deliver to Post Office (PO) Boxes within the United States, delivery to the equivalent elsewhere in the world is unlikely to succeed. If possible, use a different address.
Region/State Codes for US and Canada
If the destination country is either United States or Canada, or a US international military base, state or region is required and must confirm to the two-letter codes for states (US) or territories (CA). To populate the Region/State field in the address template, use the codes provided in USPS Region/State Codes.
Creating the Batch Shipment
Note
The steps described in the following require that you have created a CSV file with recipient information to be used when submitting the shipment request.
To create the batch shipment request, do the following:
In the Customer Portal in the Shipments page, click Create shipment request and select Batch shipment.
Drag and drop your address CSV file into the upload area, or click Select a file to add a file from a location of your choice. The file size must not exceed 10 MB, if it does, split the shipment request.
The file is validated line by line to ensure there are no errors. If errors were found, you will see a notification indicating the type of errors and the lines in the file where they were found.
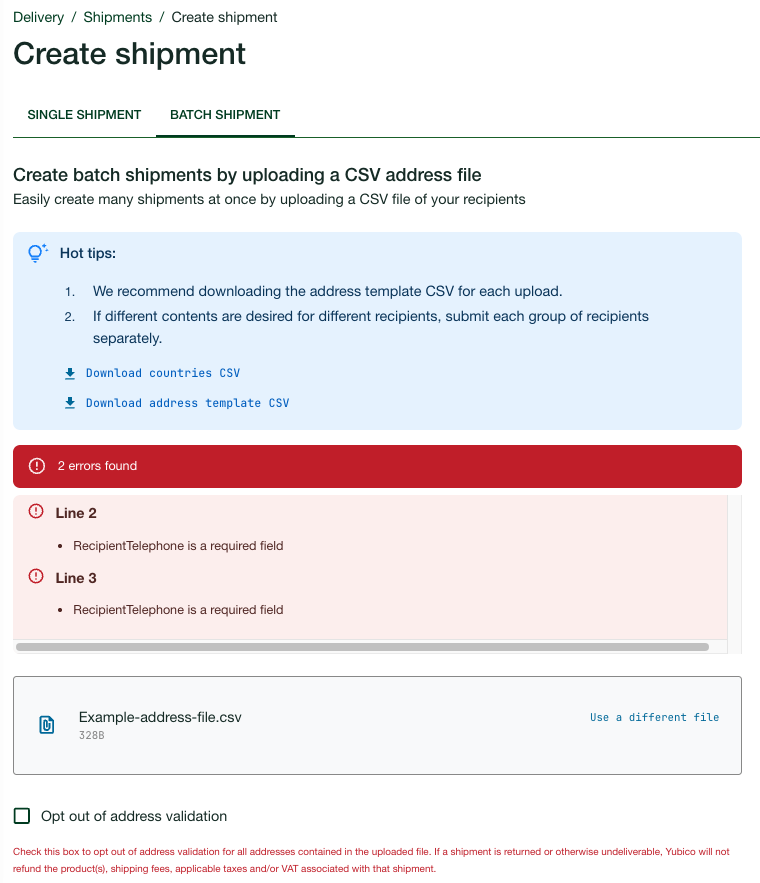
Correct the errors in the file according to the instructions and save it.
Click Use a different file in the upload area, add a corrected version for a new validation, and click Upload.
When the file is accepted without errors you will see a success notification. The rest of the shipment request form is displayed and you can continue to enter information.
If applicable, select Opt out of address validation to override the Yubico shipment processing address validation, see Overriding Address Validation.
Important
If you chose to override the Yubico validation service and a shipment is returned or otherwise undeliverable, Yubico will not refund the product, shipping fees, applicable taxes and/or VAT associated with that shipment.
If applicable, select a Reseller from the dropdown list. Your selection determines the inventories from which you can draw products from.
Note
If you have purchased directly from Yubico as well as from resellers, you will have multiple inventories to draw products from. To request shipments from multiple inventories you need to make a shipment request for each inventory separately by selecting the desired reseller in the Reseller dropdown when creating the shipment request.
Enter a Customer reference note (optional, max 50 characters) for internal reference. This information is collected and applied to all shipments created via the uploaded CSV file. See Customer Reference Field.
Select the Delivery Type, Normal or Expedited. Your selection determines the shipping fee, which is calculated after you complete the shipping request.
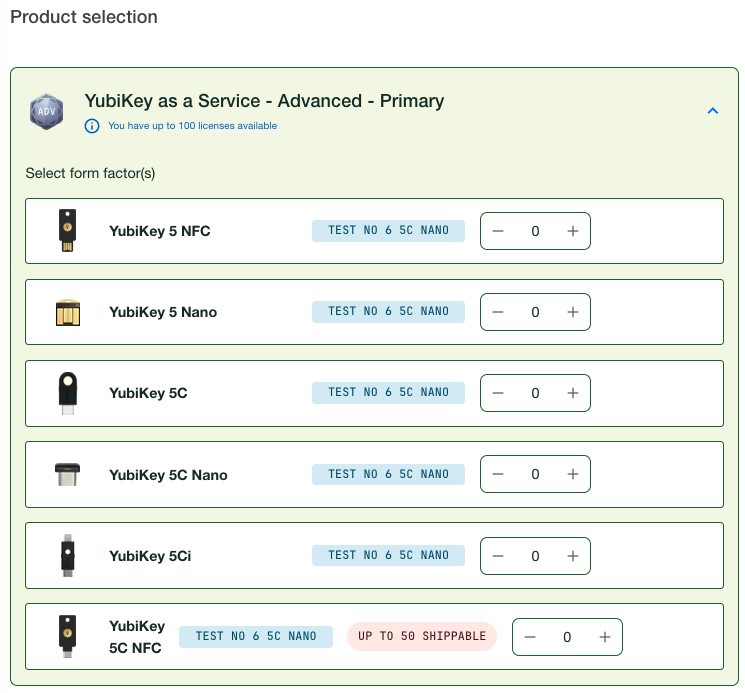
In the Product selection section, select one or more inventories to draw products from, and select the desired products and quantity from each inventory. For some countries you can only request one (1) key per address due to customs duty regulations. To see which countries this limitation applies to, see Delivery Policies.
If inventory allocations apply for a product, this is indicated in pink. Customized products can also be selected if available for your organization (FIDO Pre-reg type of customizations are excluded since these shipment requests are not created in the Customer Portal). Inventories containing customized products are indicated by the associated Customization label in blue.
Note
Accessories include for example lanyards, keyports and key covers that can be shipped together with YubiKeys. Accessories are currently not supported with subscription tiers, only with perpetual purchases. If available, accessories are listed in the Perpetual inventory section.
- When done with the product selection, click Next: Confirm.
- Verify the address file and product selection to be used for the shipment request, and click Create shipment(s).
- If you choose to override the address validation, click Confirm and submit in the displayed address validation override dialog.
The shipment requests will appear with one shipment per recipient in the address file in the list of shipments in the Shipments page.
Editing and Deleting Shipments
You can update an address or delete a shipment request until it is locked for processing and fulfillment. Editable shipment requests are shown with an Edit shipment icon in the Actions column in the list on the Shipments page. For more information, see Editing and Deleting Shipments.