Shipping Pre-registered Keys

This section describes how to install, configure, and use Yubico’s FIDO pre-registration service (Yubico FIDO Pre-reg) to distribute pre-registered YubiKeys to end users. Yubico FIDO Pre-reg reduces the IT administrative burden and improves end user experience by standardizing and streamlining YubiKey onboarding and account recovery.

About Yubico FIDO Pre-reg

With Yubico FIDO Pre-reg the IT administrator (IT admin) for an organization can use the YubiEnterprise API together with an IDP’s WebAuthn API and automated workflows to order pre-registered YubiKeys for end users. The YubiKeys are pre-registered and shipped directly to the specific end user who received a randomly generated PIN separately.

The following IDPs (Identity Providers) are supported:

  • Okta
  • Microsoft Entra ID (Early Access)

Note

Currently you can only request one (1) YubiKey per shipment request using Yubico FIDO Pre-reg.

Viewing Pre-reg Shipments

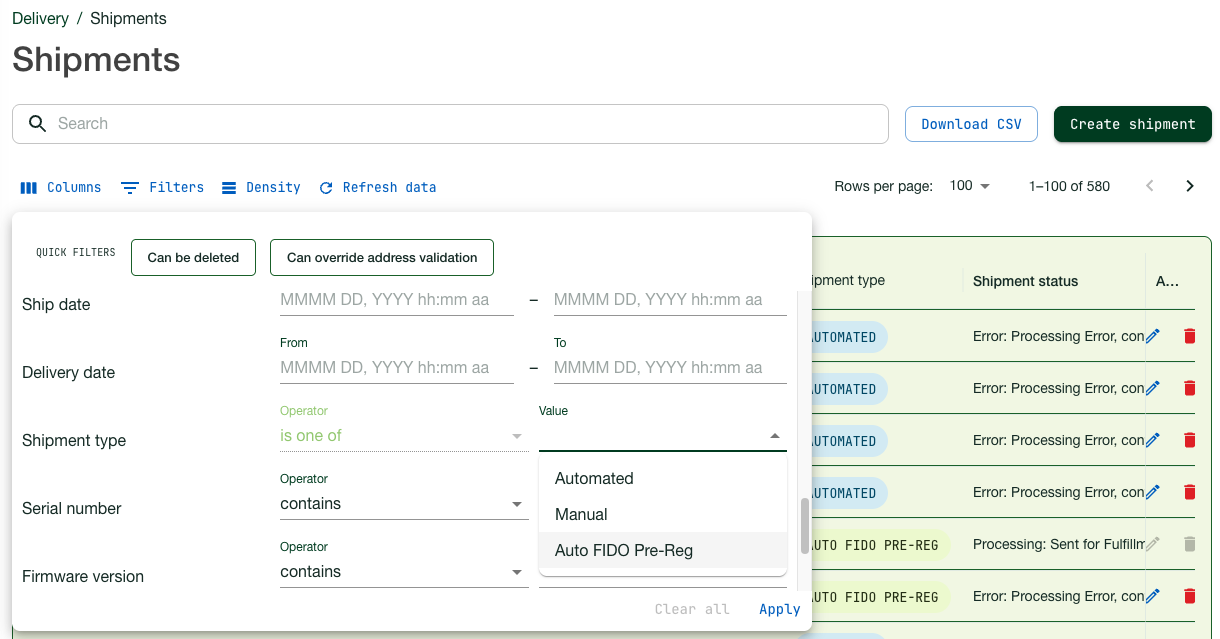
Just as for other types of shipment requests, you can monitor the status of pre-registered shipments for your organization in the All shipments page of the YubiEnterprise Console. Pre-registered shipments are indicated as AUTO FIDO PRE-REG in the Type column on the page.

To locate a specific pre-registered shipment, do the following:

  • Use the Filters function to filter out pre-registered shipments. Click Filters, select Auto FIDO Pre-reg as Type, and click Apply.
  • You can also use search in combination with filters to drill down further into the list of shipments. For more information, see Searching Shipments.
_images/prereg-filter2.png

Editing Pre-reg Shipments

Just as for other types of shipments, you can update a pre-registered shipment from the Console until it is locked for processing and fulfillment. Shipments that can be edited are indicated with an Edit icon in the Status column of the All shipments page.

You can update the recipient and address information, the delivery type, or you can delete the shipment request. Note that products included in a pre-registered shipment request cannot be modified. For more information, see Editing or Deleting Shipments.

Viewing Customization Information

A FIDO pre-registered YubiKey is considered a customization and therefore Yubico provides each customer with a unique Customization ID. An organization’s Customization ID is required for integrations such as with Okta. To view your organization’s Customization ID, see Customizations.

General Prerequisites

The following sections describe how to integrate Yubico FIDO Pre-reg with different IDPs. The instructions are intended for IT admins who are setting up shipments of pre-registered YubiKeys for their end users in an environment with an IDP and SSO.

The instructions assume IT administration skills and knowledge of the YubiEnterprise API as well as the specific IDP. Listed tasks include steps both in the YubiEnterprise Console and the IDP application. Refer to the IDP-specific documentation for details.

Ensure the following is in place before you start integrating Yubico FIDO Pre-reg with your IDP:

  • Your company is using a supported IDP.
  • YubiKey as a Service Plus plan subscription.
  • YubiEnterprise Console access with FIDO Pre-reg enabled.
  • Customization IDs and Product IDs for the YubiKey models you will be shipping to end users. These IDs are provided by Yubico during onboarding of your organization. For more information, see Customizations.

FIDO Pre-reg with Okta

The following describes the steps to get started using Yubico FIDO Pre-reg with Okta and Okta Workflows.

Important

Before you start implementing Yubico FIDO Pre-reg, ensure you have the Customization IDs and Product IDs for the YubiKey models you will be shipping to end users. These IDs are provided by Yubico during onboarding of your organization. For more information, see also Prerequisites.

How it Works

The Yubico FIDO Pre-reg integration streamlines the deployment process with improved ease of use and enhanced security. The diagram below illustrates the process.

The Yubico FIDO Pre-reg template developed specifically for Okta Workflows in this case, helps orchestrate the process steps. The Yubico Connector and the Yubico FIDO Pre-reg Workflow templates are both integrated with the Okta Workflows console.

Process Flow

The workflows are designed to ensure each request via Okta to Yubico contains all information needed to have the keys shipped to the end user. A secure and encrypted transfer process mitigates any risk of exposing sensitive information.

_images/workflow-okta-enduser1.png

Workflow: IT Admin and End User

  1. The IT admin initiates a shipment request for a pre-registered key from the Okta tenant. This triggers the Yubico FIDO Pre-reg Okta Workflows template. All information needed to program and ship a key for an individual user is sent to Yubico through a YubiEnterprise API request. Note that only one key per shipment can be requested.
  2. The IT admin receives updates based on the shipping status, and can monitor shipments of pre-registered keys using the YubiEnterprise Console.
  3. The end user receives an email containing their YubiKey PIN and their FIDO Pre-reg YubiKey is shipped to them directly. No IDP password or IDP registration is required. The YubiKey PIN is only communicated to the end user and is encrypted and obscured from Okta, the IT admin, and Yubico.
  4. The end user can immediately use the YubiKey and PIN to authenticate into Okta where they have Single Sign-On (SSO) access to applications to which they have access provided through Okta.

Workflow: Credential and PIN Provisioning

  1. The IT admin initiates a shipment request for a pre-registered YubiKey from the Okta tenant.
  2. Yubico receives the shipment request from Okta through the YubiEnterprise API. Yubico programs a YubiKey with the information provided in the request. The information contains the credential and PIN requests, end user shipping information, and YubiKey form factor.
  3. After the YubiKey is programmed, a response is sent back to the YubiEnterprise API including the randomly generated PIN, serial number, and firmware version. This response is retrieved by the Okta workflows.
  4. When the Okta workflows receive the response from the YubiEnterprise API, the YubiKey is enabled for usage. This triggers an email to the end user containing the PIN for the YubiKey.
  5. After the programming of the YubiKey the credential data, including the PIN, is purged from Yubico systems.

Additionally, the YubiKey can be used as a recovery tool for the IDP’s complementary passwordless feature such as Okta FastPass. For example, if an end user loses their phone and gets a replacement one, they can re-enroll in the Okta service using the YubiKey without needing to call their support services.

Workflow Integration

This section describes the integration between the Yubico Connector in Okta and the Okta Workflows. The integration provides the Yubico action cards used to set up the workflows in Okta for requesting shipments and retrieving shipment information. The Yubico workflow integration includes the action cards described below.

Action Description
Create Shipment Request
Create a new shipment request to provision
a YubiKey that will contain a pre-registered
WebAuthn credential.
Get Shipment Details
Get details about a specific shipment
request, including the shipment state, and
shipment items used for the pre-registration
of a WebAuthn credential.
Build Shipment Item
Helper action card that builds a “shipment
item” used in the “Create shipment request”
action card.
Get Public Transport Keys
and Signing Certificate

Pull the current public Yubico transport
and signing keys used to encrypt the PIN
and credential request payloads.

The input and output parameters for each action card are described in more detail in the following. For more information, see Configuring Workflow Connections.

When you add a Yubico card to a flow for the first time, you will be prompted to authorize the connection. This requires an API token generated from the YubiEnterprise Console. Once you have configured this connection and saved the API token information to it, you can reuse it for other YubiEnterprise-related actions. For more information, see Generating an Authorization Token.

Action: Create Shipment Request
Action card to create a new shipment request to provision a YubiKey that contains a pre-registered WebAuthn credential.

Note

Product ID and Inventory Product list can be found in the Product inventory type mapping table.

Input - Create Shipment Request

Field Definition Type Req’d
Company Company name of shipment recipient Text TRUE
Email Email address of shipment recipient Text FALSE
First Name First name of shipment recipient Text FALSE
Last Name Last name of shipment recipient Text FALSE
Phone Number
Telephone number of shipment recipient

The limit is 40 of the alphanumeric
characters “0-9+-( )” unless the
country code is IN, in which case
the limit is 255.

Any format is acceptable, with or
without spaces.
Text TRUE
Address
Street address of shipment recipient

Note: This field can also include the
apartment or unit number.
Text TRUE
Apt or Unit
Number
The apartment or suite or unit number
or designation of shipment recipient.
Text FALSE
City City of shipment recipient Text TRUE
Region
2-letter region or state code of
shipment recipient. Mandatory for
recipients in the US or Canada.
Text FALSE
Postal Code
Zip code or postal code of shipment
recipient.
Text TRUE
Country Code
2-letter ISO country code of shipment
recipient.
Text TRUE
List of
Shipment
Items


List of items and their configuration
details, to be included in this
shipment.
Note: Use the action card
to construct this object.
List of
objects


TRUE


Customization
ID

ID associated with
the specific Yubico customization
assigned to an organization.
Text TRUE
Product ID
ID for the YubiKey model.
Number TRUE
Inventory
Product ID
ID for the “bucket”
containing credits for YubiKey
ordering.
Note: This is not to be confused with
the serial number on each YubiKey.
Number TRUE
Quantity
Number of keys to include in
this shipment (current limit is 1).
Number TRUE
PIN Request -
Encrypted
Customization options for YubiKey
PIN generation, wrapped as
a JWE string.

This string is the output provided by
Okta’s WebAuthn pre-registration
enroll endpoint.
Text TRUE
Credential
Requests
PublicKeyCredentialCreationOptions for
WebAuthn credential creation, wrapped
as a JWE string.

This string is the output provided by
Okta’s WebAuthn pre-registration
enroll endpoint.

Note: This input item is noted as a
list. This is due to
YubiEnterprise’s API schema, which can
accept a list of credential requests
for provisioning multiple pre-
registered WebAuthn credentials.
List of
strings


TRUE
Delivery
Type


Type of delivery to be used for the
request. If unspecified, its default
is standard.

- 1 (Standard)
- 2 (Expedited)
Number FALSE

Output - Create Shipment Request

Field Definition Type
Shipment ID
The shipment ID of the newly created
shipment.

Value is null for non-successful API
response.
Text
Shipment State ID
The shipment state of the newly created
shipment. For values, see Shipment State
Codes.

Value is null for non-successful API
responses.
Number
Action: Get Shipment Details
Action card to get details about a specific shipment including the shipment state and the shipment items used for the pre-registration of a WebAuthn credential.

Input - Get Shipment Details

Field Definition Type Req’d
Shipment ID ID for a specific shipment. Text TRUE

Output - Getting Shipment Details

Field Definition Type
Shipment State ID
The shipment state of the newly created
shipment. For values, see Shipment State
Codes.

Value is null for non-successful API
responses
Number
Shipment Items
List of items included in the shipment.
Underlying objects include details for
each item.
List of
objects

 
product_data: Details about a shipment
item. Includes:
- serial
- version
- fido_pin_response
- fido_credential_response
List of
objects


serial: Serial number of the item
Text
 
version: Firmware version of the item
Text
 
fido_pin_response: PIN for the item. Is
encrypted as a JWE string.

This string should be provided to Okta’s
WebAuthn pre-registration activate
endpoint.
Text
 
fido_credential_response: List of FIDO
credentials for the item. Is encrypted as
a JWE string.

This string should be provided to Okta’s
WebAuthn pre-registration activate
endpoint.
List of
strings


product_id: ID for the YubiKey model.
Number
 
inventory_product_id: ID for the “bucket”
containing credits for YubiKey ordering.
Note: This is not to be confused with the
serial number on each YubiKey.
Number
 
product_quantity: Number of YubiKeys to
include in this shipment
(current limit is 1).
Number
Action: Build Shipment Item
Action card that builds a shipment item used in the Create shipment request action card.

Input - Build Shipment Item

Field Definition Type Req’d
Customization ID
ID associated with the specific
Yubico customization assigned to an
organization.
Text TRUE
Product ID
ID associated with the specific
YubiKey format.
Number TRUE
Inventory
Product ID
ID for the “bucket” containing credits
for YubiKey ordering.
Number TRUE
Quantity
Number of keys to include in this
shipment (current limitation is 1).
Number TRUE
PIN Request
- Encrypted


Customization options for YubiKey PIN
generation, wrapped as a JWE string.
This string is the output provided by
Okta’s WebAuthn pre-registration enroll
endpoint.
Text TRUE
Credential
Requests -
Encrypted


PublicKeyCredentialCreationOptions for
WebAuthn credential creation, wrapped
as a JWE string.

This string is the output provided by
Okta’s WebAuthn pre-registration enroll
endpoint.

Note: This input item is noted as a
as list. This is due to
YubiEnterprise’s API schema, which can
accept a list of credential requests
for provisioning multiple
pre-registered WebAuthn credentials.
List of
strings


TRUE

Output - Build Shipment Items

Field Definition Type
Shipment Item
Object that contains configuration details
for an item to include in a shipment.
Object
Action: Get Public Transport Keys and Signing Certificate
Action card to pull the current public Yubico transport and signing keys used to encrypt the PIN and credential request payloads.

Input - Get Public Transport Keys and Signing Certificate

No input required.

Output - Get Public Transport Keys and Signing Certificate

Field Definition Type
Transport Keys -
JWKS


Yubico JWKS (JSON Web Key Set) used for
deriving an ECDH shared secret.
Primarily used for encrypting the PIN and
credential requests for the
YubiEnterprise API.
Object
Signing Public
Keys - JWKS


Yubico JWKS (JSON Web Key Set) containing
signing certificates used for signing PIN
and credential responses from the
YubiEnterprise API.
Object

Implementation Overview

The following provides an overview of prerequisites and steps to get started using Yubico FIDO Pre-reg with Okta, and create a first shipment of pre-registered YubiKeys to an end user.

Prerequisites

Ensure you have the following before starting the implementation procedure:

Note

The FIDO Alliance recommends UV=Required. However, you will need to assess the impact of UV=Required based on your organization’s current settings, as it may impact users across operating systems and browser types if a PIN is not set. Preferred is an option, if you are concerned about blocking other users.

Important

It is strongly recommend to immediately add a backup YubiKey, WebAuthn, or Fastpass enrollment as protection in case the YubiKey is lost.

Procedure

The Yubico FIDO Pre-reg workflow template for Okta is flexible and you can request a pre-registered YubiKey using the following methods:

  • MFA initiated - trigger shipments using Pre-enrolled authenticators in Okta Workflows console (for an individual user).
  • Group Add - trigger shipments using the Group Add flow in the Okta Workflows console (for an individual user or multiple users).
  • Batch requests - use the API to order YubiKeys for multiple users. For more information, see Order pre-enrolled YubiKeys in a batch (Okta documentation).

Select the applicable method for your organization and follow these steps to set up the Yubico FIDO Pre-reg integration and create a first shipment request:

  1. Create groups for new and existing users
  2. Configure the Okta policies
  3. Add the Yubico FIDO Pre-reg Workflow template
  4. Configure the workflow connections
  5. Add new users to the directory
  6. Create a shipment request

Creating Groups for New and Existing Users

In this step you will create groups for new and existing users in Okta. For information on how to do this, see Create groups for new and existing users (Okta documentation).

Configuring Okta Policies

In this step you will configure the Okta policies to support the Yubico FIDO Pre-reg integration.

Global Session Policy

Create a Global Session Policy that is configured to establish the user session with any factor that is not a password. For information on how to do this, see Configure a global session policy (Okta documentation).

Authenticator Enrollment Policy

Authenticator enrollment policies let you manage how and when your end users enroll authenticators, for example to use “WebAuthn Only”. For more information, see Configure an authenticator enrollment policy (Okta documentation).

Adding the FIDO Pre-reg Workflow Template

In this step you will add the Yubico FIDO Pre-registration Okta workflow template to your Okta instance. The template includes flows for example for shipment triggers, shipment processing, and credential mapping.

To add the workflow templates to your Okta instance, do the following:

  1. Go to the Okta Workflows Template catalog.
  2. Locate the Yubico FIDO Pre-reg Workflow template by searching for “Yubico FIDO Pre-reg” in the search bar within the Okta Workflows console.
  3. Click Add Template.

Configuring Workflow Connections

In this step you will authorize and configure the Create shipment workflow connections.

Generating an Authorization Token

When you add a Yubico card to a flow the first time you are prompted to authorize the connection. This requires an API token generated from the YubiEnterprise Console. Once you have configured the connection and saved the API token, you can reuse it for other YubiEnterprise-related actions. To generate the token if not already done, see Generating API tokens.

Creating Connection from Okta Org

Do the following to create the connection from the Okta org:

  1. In the Okta Admin console, open Workflows and click Connections > New Connection.

  2. Locate and select the Okta connector icon.

  3. Add a display name for the connection in the Name field, and provide a description.

    _images/okta-connector.png
  4. Enter the Client ID and Client Secret values provided in Okta Workflows OAuth.

  5. In the Domain field, enter your Okta org domain without https://, for example, company.okta.com. If your org uses a custom domain, enter the custom domain.

  6. Click Create.

Creating Connection from Yubico Org

Do the following to create a connection from the Yubico org:

  1. If not already done, generate an API token as described in Generating an Authorization Token. Save the API token in a location from where you can easily copy and paste it.

  2. In the Okta Admin console, open Workflows and click Connections > New Connection.

  3. Locate and select the Yubico connector icon.

  4. Provide a display name for the connection in the Connection Nickname field, paste the previously generated API token into the API Secret field.

    _images/Admin21.png
  5. Click Create.

Updating the Create Shipment - Group Add Flow

If requesting a pre-registered YubiKey via the Group Add flow, you will need to add customization and product IDs to the Create shipment - Group Add flow as described in the following:

  1. In the Okta Admin console, open Workflows, select Flows and open the Create shipment trigger - Group add workflow.

    _images/okta-group-add-trigger.png
  2. In the Create shipment page, open the dropdown menu on the Edit Conditions card.

    _images/edit-conditions.png
  3. Update the fields as described below using input values provided by Yubico during onboarding of your organization. Note that in this example, the product_id is “1” for key model YubiKey 5 NFC and “29” for key model YubiKey 5C NFC. For more information, see Product and Inventory Identifiers.

    1. If product_id (for YubiKey 5 NFC): Your Customization ID.
    2. If inventory_product_id: Your Subscription ID.
    3. Else if product_id (for YubiKey 5C NFC): Your Customization ID.
    4. Else if inventory_product_id: Your Subscription ID.
    _images/cid-config3.png
  4. Click Save.

Shipping Pre-reg Keys to Users

In this step you will add new users for shipments and create a shipment request. In order to make a shipment request, the following information is required for the user, either from the Okta Universal Directory (UD) or from your organization’s HRIS (Human Resources Information System):

  • First Name
  • Last Name
  • Street Address
  • City
  • State/Province (two-letter format)
  • Postal Code
  • Country Code
  • Primary email
  • Secondary email (for onboarding new users to receive a PIN)
  • Primary phone number
  • Organization

Adding New Users to Directory

The following describes how to add a new user with status “Staged” in Okta. For more information, see Create staged user (Okta documentation).

To add a new user, do the following:

  1. In the Okta Admin console, go to Directory > People and click Add person.
  2. In the Add Person dialog, enter information as follows:
    • First name, Last name, and Username.
    • Primary email (work email) for active users.
    • Secondary email (personal email used prior to activation for new users).
    • Do not assign the user to any YubiKey groups, this is done later.
    • Set Activation to “Activate later”. This creates the user in status “Staged”.
  3. Click Save.
  4. On the People page, go to Staged > User > Profile > Edit.
  5. Enter the following information required for key shipment: Primary phone, Street address, City, State, Zip code, Country code, and Organization.
  6. Click Save.

Creating a Pre-reg Shipment Request

In this step, you will create a Yubico FIDO Pre-reg shipment request. You can create shipment requests either through the Okta Admin console using Okta Groups, or using the API for batch shipment requests. See Integration Procedure.

In this example we will use the Pre-enrolled authenticators option in the Okta Workflows console to create a shipment request.

Note

Only one FIDO Pre-reg YubiKey at a time can be requested for an Okta tenant.

To create a shipment request, do the following:

  1. In the Okta Workflows console, ensure the Create shipment trigger - MFA initiated flow is enabled.

    Note

    It is recommended that only one flow at a time be enabled: either the Group Add or the MFA Initiated flow.

    _images/okta-mfa-trigger-2.png
  2. In the Okta Admin console, ensure the user to whom you want to ship the key has a profile in the user directory. If not, create a new user as described in Adding New Users to Directory.

  3. Click the profile of the desired user and do the following:

    • If using the Okta Universal Directory (UD) to source the shipping information, ensure this is populated in the user profile.
    • Alternatively, confirm the user’s shipping information is being sourced from an HRIS or other source of truth.
  4. In the user profile, click Pre-enrolled authenticators and then click + Add.

    _images/okta-add-enroll.png
  5. On the YubiKey enrollment and delivery page, enter the Product ID, Inventory ID, and Customization ID provided by Yubico during onboarding. See General Prerequisites.

    _images/okta-enroll-ids.png
  6. On the Yubikey enrollment and delivery page, ensure all required fields are populated: Primary and secondary Email address (PIN will be sent to both), primary Phone number, Organization, and Shipping address.

    _images/okta-enroll-info.png
  7. If the user’s shipping information is being sourced elsewhere, you will receive a message stating that it is missing. Ensure that the information is retrieved from another endpoint or update the profile values before continuing.

    _images/okta-details-missing.png
  8. Click Continue.

  9. The Yubico FIDO Pre-reg workflow is triggered and the fulfillment starts.

    _images/okta-fulfillment.png

Yubico receives a request for a pre-registered YubiKey. The request contains all information needed to program and ship the key. When the request is fulfilled and the credential is activated by Okta, the randomly generated PIN associated with the YubiKey is emailed to the user’s secondary email address (new user). For existing users, it will be sent to their primary email address.

Note

Once the credential is programmed onto the YubiKey, the challenge and credential data, including PIN, is purged from Yubico systems.

FAQs - FIDO Pre-reg for Okta

  • Where can I view the status of the shipment?

    Shipment status can be viewed in the YubiEnterprise Console for your organization. Shipment status can also be viewed in the user’s Okta profile under “Pre-Enrolled Authenticators”. However, this information is pulled from YubiEnterprise Delivery.

  • Where do I get the product_id, inventory_product_id, and customization_id?

    Work with your Yubico CSM to obtain these IDs.

  • Where do I view errors with the Yubico FIDO Pre-reg template?

    As an Okta Administrator, errors and successes can be viewed in the FIDO Pre-reg Workflow Execution History. For more information, see the Okta Execution History documentation.

  • What if my shipment in the Okta Workflows Table is in an error state?

    • If the shipment is in an error state due to an invalid address within the Console, you can manually remove the shipment in the Console.
    • If the shipment is in an error state, but can be fixed, do not duplicate or re-add the entry. Manually change the state from “error” to “ongoing” in the Okta Workflows Shipments table.
  • What if the shipment request submitted has an error due to a missing user object field?

    • Review the Execution History for the Create shipment card in the FIDO Pre- reg template to determine the missing object. Navigate to the user object in the Okta Universal Directory (UD) and add the missing input into the appropriate field. Once the required information is provided, make the request again.

    If using an HRIS system, ensure that the user object contains all the necessary user shipping information: Address, city, state, zip code, country code, organization, primary email, secondary email, and primary phone number. Once the required information is provided, make the request again.

    Note

    For organization, the “organization” title may need to be hardcoded in the Okta Workflow card.

  • What if I have a custom Okta domain/vanity URL?

    If your Okta organization uses a vanity or custom URL, the Okta Connector and the Okta Device Connector in the Workflows should be configured to use the custom URL. Both the Okta and Okta Devices Connectors will need the custom URL.

  • How does the user receive the PIN?

    The user receives an email with the randomly generated PIN to their primary and secondary email addresses listed in the Okta Universal Directory (UD).

  • Can the user change a PIN?

    If the forcePINchange flag is set, a user can change the PIN via the Change PIN option in the Yubico Authenticator app. For more information, see Changing the FIDO2 PIN. Force PIN change is a feature of CTAP 2.1 on 5.7 firmware keys only and it must be specified by the customer ahead of time in the custom configuration form.

    Important

    When using the Yubico Authenticator app, ensure you click Change PIN (and not Reset PIN which will wipe the YubiKey).

  • Is there a PIN length requirement?

    FIDO Pre-reg YubiKeys are programmed with a 6 digit randomly generated PIN.

  • What happens if a user forgets their PIN?

    The only way to reset an unknown FIDO2 PIN is to reset the authenticator entirely. However, this will unregister your YubiKey with all accounts it has been registered with, including their pre-registered FIDO2 credential, necessitating re-enrollment using either FIDO U2F or FIDO2.

    If you have a general idea of the PIN, you can try a workaround that will give you 8 PIN attempts instead of 3 before being locked out. Removing and inserting the key will give you 3 retries each time until you are locked out. Once locked out, your only option is to reset the application.

    Before you do a reset, you should log in to affected accounts and unregister the key you plan to reset. Then make sure you can log back in and modify the account’s two-factor authentication (2FA) settings without your YubiKey. After the reset, you can re-register the key again. Alternatively, if you have a backup YubiKey registered with all of your accounts, you can also use this to log in to modify the 2FA settings.

  • What happens if a user accidentally deletes the PIN email or they are unable to retrieve it?

    In the Okta Admin console, the Okta administrator has the option to send the PIN to the user before the user makes their first authentication into the Okta tenant. After the user authenticates with their YubiKey and PIN, the “Send PIN” option is no longer available.

  • I see two trigger cards: MFA Initiated and Group Add, why?

    The Group Add trigger is available in order to allow customers to request YubiKeys based on group membership.

  • If I initiate a request using the Group Trigger, will I still see it in the user’s Okta profile?

    Yes, the request will be visible in the Okta Admin UI. In the user’s profile navigate to the “Pre-enrolled authenticators” tab.

  • I would like to request more than 1 pre-registered YubiKey. How do I trigger a batch Yubico FIDO Pre-reg YubiKey request?

    For information on how to trigger a batch of pre-registered YubiKeys, see Order pre-enrolled YubiKeys in a batch (Okta documentation).

  • What if I need to delete a FIDO Pre-reg YubiKey request?

    A request will need to be deleted in the following places: your YubiEnterprise Delivery organization and within the user’s Okta profile on the “Pre-enrolled authenticators” tab. Additionally, it can be removed from the Okta Workflow Pre-reg Shipments table. If not removed from the Shipments Table, on the next process run, the YubiEnterprise API will return a 404 message, and set the status to “error” and not run again.

FIDO Pre-reg with Microsoft

The following describes the steps to get started using Yubico FIDO Pre-reg with Microsoft Entra ID.

Note

Yubico FIDO Pre-reg with Microsoft is currently in Early Access for identity provider Microsoft Entra ID. For more information, see Yubico FIDO Pre-reg.

Important

Before you start implementing Yubico FIDO Pre-reg, ensure you have the Customization IDs and Product IDs for the YubiKey models you will be shipping to end users. These IDs are provided by Yubico during onboarding of your organization. For more information, see also Prerequisites.

How it Works

The Yubico FIDO Pre-reg integration streamlines the deployment process with improved ease of use and enhanced security. End users receive a YubiKey, already pre-registered in the customer’s Microsoft Entra ID tenant, directly from Yubico, ready to be used. All use cases such as new and existing employees as well as replacements are supported.

The image below provides an example of a customer environment setup based on Microsoft components.

_images/ms-architecture.png

Process Flow

The following steps illustrate the end-to-end YubiKey delivery flow:

  1. An authorized user (or process) triggers a YubiKey request for a user in Microsoft Entra ID via a front-end or IT Service Management (ITSM) orchestration platform.
  2. The YubiKey request is received by the Yubico FIDO Connector App which is deployed on the customer infrastructure. The connector then makes a request over Microsoft Graph API to retrieve the necessary parameters required to create a device-bound passkey credential.
  3. Microsoft Entra ID returns the passkey credential creation parameters for the target user to the Yubico FIDO Connector App which then encrypts the information as a credential request using JSON Web Encryption.
  4. The Yubico FIDO Connector App creates a shipment request to the YubiEnterprise Delivery service including the form factor and shipping information, and attaches the encrypted credential request.
  5. After passing through the YubiEnterprise Delivery service, Yubico decrypts the credential request and creates the credential (user private key) for the specified YubiKey form factor. The attestation response from the credential creation is then encrypted.
  6. Yubico ships the YubiKey to the intended end user.
  7. The Yubico FIDO Connector App continuously checks the YubiEnterprise Delivery service for updated shipment status.
  8. When the shipment reaches status Shipped in the YubiEnterprise Delivery service, the Yubico FIDO Connector App captures the shipping information including tracking number, serial number, firmware version, and encrypted credential response and PIN.
  9. The shipment status is updated in the customer’s front-end system of choice.
  10. The credential response is decrypted by the Yubico FIDO Connector App.
  11. The YubiKey device-bound passkey credential (user public key) is registered in Microsoft Entra ID through the Microsoft Graph API.
  12. The PIN is decrypted and provided to the customer’s delivery system of choice.
  13. The PIN is communicated to the targeted end user.
  14. The end user authenticates to Microsoft Entra ID using their YubiKey and PIN. If the PIN was configured for one-time use, the user will be prompted to change the PIN.

The following sections provide an overview of solution features and components.

Customer Orchestration

The custom-developed Customer Orchestration connects the various solution components and drives the interaction between them.

  • Interacts with an HR system or other sources to get user addresses for shipments.
  • Interacts with Microsoft Entra ID to initiate the registration of YubiKeys on behalf of end users.
  • Interacts with Yubico APIs to request shipment of YubiKeys to end users.
  • Communicates with end users to provide the PIN, separate from the YubiKey delivery.

The Customer Orchestration represents an aggregate of functional requirements for the orchestration, and can be implemented in any number of platforms, automation tools, or code. For example for Microsoft customers, the orchestration requirements can be fulfilled using services like Azure Logic Apps, Azure Function Apps, or other services in their Microsoft Azure subscription.

Yubico provides the FIDO Connector App that can be deployed to Microsoft Azure to perform the most complex orchestration parts. For more information, see Yubico FIDO Connector App.

Different components and orchestrations can be used for different use cases. Some onboarding YubiKey issuing workflows can be completely automated using Identity Governance and Administration (IGA) tooling. Other self-service workflows or admin-requested YubiKeys might involve manager approvals using ITSM tooling like ServiceNow.

The Customer Orchestration implements the client-side of the encryption/decryption scheme. It supports the encryption/decryption of individual elements in the credential request and response messages so that the PIN and other passkey (FIDO2) credential information remains accessible only to the Customer Orchestration. For more information, see Security Features.

The Customer Orchestration components can be configured, customized, and deployed by an IT administrator or a Customer Orchestration developer.

Yubico FIDO Connector App

The Yubico-developed FIDO Connector App is easily deployed to a Microsoft Azure subscription and handles most of the Customer Orchestration complexities:

  • Exposes an API that can be easily called from forms, processes, workflows.
  • Performs all interactions with the Microsoft Graph API for registering YubiKeys in a Microsoft Entra ID tenant.
  • Performs all transport encryption before securely transmitting the credential information from the Customer Orchestration to the Yubico FIDO Pre-reg service.
  • Keeps track of pending shipments and actively polls the Yubico FIDO Pre-reg service to check on status and updates to pending Yubico FIDO Pre-reg requests.
  • Once the shipment request is ready, the app decrypts and verifies the authenticity of the response from the Yubico FIDO Pre-reg service.
  • Completes the registration of the YubiKey by calling the Microsoft Graph API.
  • Emails the PIN to the correct contact (end user’s manager by default).

Yubico FIDO Pre-reg API

The Yubico FIDO Pre-reg API provides a shipping request API to the Customer Orchestration and generates fulfillment requests to Yubico. The API supports the communication of encrypted credential registration data between the Customer Orchestration and Yubico.

The Yubico FIDO Pre-reg API is an extension of the YubiEnterprise API which is a cloud-based service facilitating the global distribution of YubiKeys. For more information, see YubiEnterprise API.

Security Features

The following provides an overview of security features of an implementation of FIDO Pre-reg with Microsoft.

Microsoft Entra ID Access
Yubico has no access to enroll and/or activate user passkey (FIDO2) credentials directly into a customer’s Microsoft Entra ID tenant. Instead, all interactions with Microsoft Entra ID are handled by the Customer Orchestration.
Pre-Registered Credentials
Since Yubico has no access to the customer’s Microsoft Entra ID tenant, Yubico registers authenticators (YubiKeys) using the passkey credential creation parameters provided in a customer-initiated shipment request. The credential responses are then returned for retrieval by the Customer Orchestration, and the credential details are used by the Customer Orchestration to register YubiKeys with Microsoft Entra ID.
PIN Provisioning
Yubico generates a PIN for a given YubiKey and returns it to the YubiEnterprise Delivery service for retrieval by the Customer Orchestration, which then decides how that PIN gets communicated to the end user.
Transport Encryption
To mitigate the risk of exposing sensitive information, for example creation parameters, serial numbers, and PIN related to YubiKey assignments within the YubiEnterprise Delivery service, all data transferred from the Yubico environment to the Customer Orchestration system is encrypted using a secure transfer mechanism. This ensures that Yubico personnel and systems have no access to or visibility into, any credential-related data at any stage of the process.

Implementation Overview

The following provides an overview of the steps to get started using Yubico FIDO Pre-reg with Microsoft Azure components and Entra ID to create a first shipment of a pre-registered YubiKey.

Prerequisites

Ensure you have the following before starting the implementation procedure:

  • Access to a YubiEnterprise Console organization with FIDO Pre-reg enabled.

  • Customization IDs (CID) and Product IDs for the YubiKey models you will be shipping to end users.

    Note

    Customization and Product IDs are provided by Yubico during onboarding of your organization.

  • A YubiEnterprise API token. See Generating API Tokens.

  • An ARM Template JSON file, provided by Yubico.

  • A Docker Image for the Yubico FIDO Connector App, provided by Yubico.

  • An Azure Resource Group permissions template provided by Yubico.

  • The following administrative roles are required for the implementation:

    • Application Administrator - when registering apps (Microsoft Entra ID).
    • Authentication Policy Administrator - when enabling passkey authentication (Microsoft Entra ID).
    • Global Administrator - when registering apps and granting admin consent for tenant (Microsoft Entra ID).
    • Privileged Role Administrator - when granting Logic App permissions (Azure deployment).

Procedure

Follow these steps to set up the components required for using Yubico FIDO Pre-reg with Microsoft, and create a first shipment of pre-registered YubiKeys to an end user.

The sections in the following describe each step in detail.

Configuring Azure Permissions

In this step you will add permissions required for developers that will deploy and configure the applications in Azure.

When adding the permissions, use one of the following options:

  • Use an existing account with the required permissions.
  • Create a Resource Group and add a custom role using a predefined permissions template. The steps to do this are described in the following.

Creating a Resource Group

If not already available, you must create an Azure Resource Group prior to adding the required user permissions.

To create a Resource group, do the following:

  1. Log in to the Azure Portal .
  2. Search for and select “Resource groups”.
  3. Click Create.
  4. Select the appropriate Subscription and Region, and provide a descriptive Resource group name, for example “Yubico FIDO Pre-reg Service”.
  5. Click Review + create.

Adding a Custom Role

To add a custom role with the required permissions, do the following:

  1. In the Azure portal, create a custom role with the permissions from the predefined permissions template scoped to the previously created Resource group.
  2. When the custom role is created, assign the new “Privileged administrator role” to the user or the security group that is deploying the resources.

Note

The “Microsoft.Authorization/roleAssignments/write” permission results in the new role being a Privileged administrator role.

Assigning an Email License

To support the PIN mailing function, the designated sender account will need to have the required licensing. This setup uses the Microsoft 365 email service. If you want to use a different email service, you can update the “Send_shipment_pin Logic App flow” after the deployment to use a preferred delivery service.

To assign an Microsoft 365 license to the account, do the following:

  1. Log in to the Microsoft 365 admin center.
  2. Go to Billing > Licenses and assign a license granting access to Microsoft 365. If your organization requires additional licenses you might need to work with the Billing Account Owner or Billing Account Contributor.

Configuring Microsoft Entra ID

In this step you will configure Microsoft Entra ID for authentication and authorization management.

To complete all configuration steps described below, the following roles are required.

  • Application Administrator
  • Authentication Policy Administrator
  • Global Administrator
  • Privileged Role Administrator

Enabling Passkey (FIDO2) Authentication

In this step you will configure the authentication methods policies used in Microsoft Entra ID.

Note

To complete these configuration steps you must have either the Authentication Policy Administrator or the Global Administrator role.

To configure the Microsoft Entra ID policies to allow the use of YubiKeys, do the following:

  1. Log in to the Microsoft Entra admin center as at least an Authentication Policy Administrator.
  2. Go to Protection > Authentication methods > Policies.
  3. Under the method Passkey (FIDO2), set the toggle to “Enable”. Select “All users” or “Add groups” to select specific groups. Only security groups are supported (you cannot use dynamic groups or individual users).
  4. Save the configuration.

The Configure tab has additional settings to control the type of passkeys supported in the customer tenant, and their registration requirements:

  • Allow self-service set up: Must be set to “Yes”. If this is disabled, YubiKeys cannot be registered, not even using administrative registration processes.
  • Enforce attestation: Recommended setting “Yes”. Using cryptographic evidence attestation ensures that registered authenticators are genuine YubiKeys and not fraudulent products or low-assurance passkey credentials (which might not be able to support attestation).
  • Enforce key restrictions: Recommended setting “Yes”. This lets your organization allowlist specific YubiKey models by their associated Authenticator Attestation GUID (AAGUID). For more information, see YubiKey hardware FIDO2 AAGUIDs.

Important

If security keys such as device-bound passkeys or other types of passkeys are already used in your Microsoft Entra ID environment, ensure that these configuration changes do not break the sign-in for existing users.

For more information, see Enable passkeys (FIDO2) for your organization (Microsoft documentation).

Registering Apps

In this step you will register the Yubico FIDO Connector App and the Yubico FIDO Pre-reg Test Client (optional).

An app must be registered to allow the app itself to connect to the Microsoft Graph API, and to allow other clients such as Entra ID IGA, test clients, ServiceNow and other custom applications, to connect to the app to invoke requests.

It is recommended that any forms, processes, and workflows used to call the Yubico FIDO Connector App follow a similar registration pattern with distinct credentials as described in the following.

Note

Most of the registration steps can be performed by an admin user with the Application Administration role. However, to complete some steps a user with the Global Administrator role is required as indicated in the procedure.

Yubico FIDO Connector App

To register the Yubico FIDO Connector App, do the following:

  1. Log in to the Microsoft Entra admin center and go to Applications > App registrations.

  2. Click + New registration.

  3. Provide a descriptive name, for example “Yubico FIDO Pre-reg Service”, and click Register.

  4. Under Manage, click API permissions.

  5. Click + Add a permission.

  6. Select “Microsoft Graph”.

  7. Click Application permissions.

  8. Search for “UserAuthenticationMethod.ReadWrite.All” and select the permission.

  9. Click Add permissions.

  10. Next to the list of permissions, select “Grant admin consent for {tenant name}”.

    Note

    The Global Administrator role is required for this step.

  11. Under Manage, click Expose an API.

  12. Click Add next to the Application ID URI.

  13. Edit the Application ID URI to a value like “api://fido-connector-api.{verified domain name}.

    • The verified domain name can be either a custom domain that has been verified by the tenant, or you can use the default domain that ends with “.onmicrosoft.com”.
    • The Application ID URI represents the scope that clients will use when authenticating to call the API. This value will be populated as an ARM template parameter FIDO_Connector_Allowed_Audiences. The URI does not need to be resolvable, but should have a descriptive scope name.
  14. Click + Add a scope and set the following:

    • Scope name: “create_request”
    • Display name fields: “create_request”
    • Description fields: “Allows Yubico FIDO Pre-reg requests”
  15. Click Add scope.

  16. Under Manage, click Certificates & secrets.

  17. Click + New client secret.

  18. Provide a name for your client secret and accept the recommended expiration.

  19. Click Add.

  20. Copy the client secret. This will be used in the ARM template as FIDO_Connector_Client_Secret.

  21. Go to Overview and copy the Application (client) ID value. This will be used in the ARM template as FIDO_Connector_Client_Id.

For more information, see Register an application with the Microsoft identity platform (Microsoft documentation).

Yubico FIDO Pre-reg Test Client

Registering this app is optional. However, the app is useful when testing direct calls to the Yubico FIDO Connector App. The application credentials created here can be used in a Postman test client or any other HTTP test client when testing the app deployment.

To register the Yubico FIDO Pre-reg Test Client app, do the following:

  1. Log in to the Microsoft Entra admin center and go to Applications > App registrations.
  2. Click + New registration.
  3. Provide a descriptive name like “Yubico FIDO Pre-reg Test Client” and click Register.
  4. Under Manage, click Certificates & secrets.
  5. Click + New client secret.
  6. Provide a name for your client secret and accept the recommended expiration.
  7. Click Add.

The app credentials you created here will be used later when testing the app deployment. For more information, see Testing.

Other Forms and Workflows
It is recommended that any forms, processes, and workflows used to call the Yubico FIDO Connector App follow a similar registration pattern with distinct credentials, as described here for other app registrations.

Azure Deployment

In this step you will deploy the Yubico FIDO Connector App itself along with the underlying infrastructure and required configuration changes.

Prerequisites

Before you start the deployment, ensure you have the following:

  • Access to a YubiEnterprise Console organization with FIDO Pre-reg enabled, along with a YubiEnterprise API token. See Generating API Tokens.
  • An ARM Template JSON file, provided by Yubico.
  • A Docker Image for the Container app, provided by Yubico. The Docker image contains the Registry name/password used in the deployment.
  • Completed all steps in the Configuring Microsoft Entra ID. This includes developer permissions to deploy Azure services, along with FIDO policies, as well as App registrations.

Procedure

These are the steps to deploy the components in Azure:

  1. Deploy the ARM template
  2. Configure the Container app
  3. Grant permissions to the Container app
  4. Grant permissions to the Logic App
  5. Authorize Logic App to use Office 365 connector

Each step is described in detail in the following.

Deploying ARM Template

To deploy the ARM template, do the following:

  1. Log in to the Azure portal.
  2. In the Home view, search for and select “Deploy a custom template”.
  3. Click Build your own template in the editor.
  4. Click Load file, then select the ARM template file provided by Yubico.
  5. Click Save.
  6. In the configuration menu, provide the following values:
    • Subscription: Select your Azure Subscription.
    • Resource group: Select or create a resource group for this deployment.
    • Region: Leave as default, all resources are deployed to the local region of the resource group.
    • YED_API_TOKEN: Paste in the token generated in Prerequisites.
    • Key Vault_Resource_Name: Provide a unique name for your key vault instance.
    • Container_App_Name: Provide a unique name for your container app.
    • Container_Registry_Name: Use the Registry name from Prerequisites.
    • Container_Image_Name_Tag: Use the Registry Container Image name and version Tag from Prerequisites.
    • Container_Registry_User: Use the Registry user name from Prerequisites.
    • Container_Registry_Password: Use the Registry password from Prerequisites.
    • FIDO_Connector_Client_Id: Client ID from the app registration.
    • FIDO_Connector_Client_Secret: Client Secret from the app registration.
    • FIDO_Connector_Allowed_Audiences: List of scopes/audiences that a client application must use for calling the app’s API. The default value used earlier was api://fido-connector-api.{verified domain name}. Ensure this is formatted as an array of strings, for example ["scope_1", "scope_2"].
    • FIDO_Connector_Allowed_Client_Apps: List of app registrations that are allowed to call this app’s API, as registered in client app registrations. The optional app registration, if performed, can be used as the ID string. Ensure that the formatting is an array of strings including each client app ID. Example: ["client_app_id_1"].
    • Storage Account_Resource_Name: Provide a unique name for your storage instance.
    • Workflows_Send_shipment_pin_name: Leave as default, or enter a name based on your preferred naming convention.
  7. Click Review + create.
  8. When the validation completes, click Create and wait for your application to deploy.

Note

The following parameters in the ARM template have appropriate predefined values for standard Microsoft Azure deployments. They do not need to be changed unless specifically advised by your IT department, for example for government deployments:

  • MS_Login_Online_Endpoint
  • MS_Graph_Endpoint
  • Azure_Mgmt_Endpoint
  • Azure_Storage
  • Azure_Vault

Configuring Container App

To configure environment variables for the Container app, do the following:

  1. In your Container App resource, go to Application > Containers.
  2. Click Edit and deploy.
  3. In the Properties tab, set the Image source to “Docker Hub or other registries”.
  4. In the Container tab, click yubicofidopreregcontainer in the Container Image section.
  5. On the Properties tab, for Image source select “Docker Hub or Other Registries”.
  6. Click Environment Variables.
  7. Set SEND_PIN_URL as follows:
    1. Go to your Resource Group.
    2. Open the logic app resource Send_shipment_pin.
    3. Copy the value “Workflow URL”.
    4. Paste it into the SEND_PIN_URL value field.
    5. Click Save.
  8. Click Create.
  9. Wait for your application to instantiate.

Granting Container App Permissions

Note

This step requires Owner role, or role that can create role assignments.

To configure the managed identity for the Container app, do the following:

  1. In your Container App resource, go to Settings > Identity.
  2. Click Azure role assignments.
  3. Click Add role assignment and apply the following values:
    1. Scope: Key Vault.
    2. Subscription: Your subscription.
    3. Resource: The Key Vault deployed by this project.
    4. Role: Key Vault Administrator.
  4. Click Save.
  5. Click Add role assignment and configure as follows:
    1. Scope: Storage.
    2. Subscription: Your subscription.
    3. Resource: The Storage Account deployed by this project.
    4. Role: Storage Table Data Contributor.
  6. Click Save.

Granting Logic App Permissions

Note

These configuration steps require either the Privileged Role Administrator or Global Administrator roles.

To add authorization for the Send_shipment_pin Logic App to call the Microsoft Graph API, do the following:

  1. In the Send_shipment_pin Logic App, go to the resource group where the Send_shipment_pin Logic App was deployed.
  2. Select the “Send_shipment_pin” Logic App.
  3. Go to Settings > Identity.
  4. Copy the value for Object (principal) ID.
  5. Go to Entra ID in the Azure portal.
  6. Go to Manage > Role and administrators.
  7. Select the role “Directory Readers”.
  8. Click + Add assignments.
  9. Under Select members, select “No member selected”.
  10. In the search field, paste the “Object (principal) ID” copied from step 4.
  11. Select the Enterprise Application displayed and click Select.
  12. Click Next.
  13. Ensure the Assignment type is selected as “Active”.
  14. Enter a justification and click Assign.

Authorizing Office 365 Usage

To authorize the Send_shipment_pin Logic App to use the Office 365 connector, do the following:

  1. In the Send_shipment_pin Logic App, go to the resource group where the Send_shipment_pin Logic App was deployed.
  2. Select the “Send_shipment_pin” Logic App.
  3. Go to Development tools > API connections.
  4. Select the “office365” connection.
  5. Go to General > Edit API connection.
  6. Click Authorize.
  7. Log in with the account that will be used as sender of Yubico FIDO Pre-reg PIN emails.
  8. When logged in, click Save.

Testing

In this step you will retrieve an access token and make an API call to test that the app was correctly deployed to your environment. In the test you will leverage the APIs directly, for example by using a client like Postman, or any HTTP client. The test assumes that you have registered the Yubico FIDO Pre-reg Test Client as described in Registering Apps.

To retrieve an access token, do the following:

  1. Go to the previously created Yubico FIDO Pre-reg Test Client.
  2. From your client, make an API call using the following request:
    • Method: POST
    • URL: https://login.microsoftonline.com/{your azure tenant domain}/oauth2/v2.0/token
    • Header: Content-Type - application/x-www-form-urlencoded
    • Body:
      • grant_type: client_credentials
      • client_id: Client ID created for the Yubico FIDO Pre-reg Test Client.
      • client_secret: Client secret from when you created the test client.
      • scope: api://fido-connector-api.{verified domain name}/.default
  3. Send the request.
  4. From the response, copy the access_token value.

To call the API, do the following:

  1. From your client, make an API call using the following request:
    • Method: GET
    • URL: https://{url of your container app}/v1/status. For base URL, copy the Application URL from your Container App.
    • Header:
      • Authorization - Bearer {access_token from previous step} Example: Bearer eyJ0…
      • Content-Type - application/json
  2. From this API call you should receive a 200 status code, with a response payload that outlines the different environment configurations that were made during setup of the components. Double-check these responses to ensure that they are correct.

Troubleshooting

The following provides basic troubleshooting steps for common deployment issues.

Where to start?
  1. What is the error message that you are getting?
  2. Verify the environment variables and key vault values:
    1. Key Vault Administrator is required to view key vault entries.
    2. Verify secrets entries for the YubiEnterprise API. Must be a valid token retrieved from the YubiEnterprise Console, see Generating API Tokens.
  3. Review response message from the Credential API Container App.
  4. Check Container App Logs.
  5. Verify Environment Variables.
  6. Verify Azure Key Vault values.
Verifying shipment status in storage browser
  1. Log in to the Azure portal.
  2. Go to the Resource Group.
  3. Go to Storage Account > Storage Browser > Tables.
  4. Click the fprshipments table.
  5. Find the desired shipment by shipmentId.
  6. Verify that the state of the shipment is complete. A shipmentId status that is not updated to “complete” will continue to retry. Once you investigate and resolve the issue, the status can be manually updated to “complete”.
  7. If a shipmentId has encountered an error during processing, it will be recorded in the fprshipments table fields error_kind and error_message.
  8. Once you have investigated and resolved the issue, the shipment will be reprocessed during the next scheduled run to “complete” status. Alternatively, the status can be manually updated to “complete” if the cause of the error cannot be resolved.

Note

The shipment status and processing error recorded in the fprshipments table can also be obtained by calling the API Get Shipment Request Status. You can find more details to understand the error in Checking FIDO Connector App logs under Troubleshooting.

Verifying delivery status of YubiKey PIN

By default Yubico FIDO Pre-reg is configured to send emails to the end user’s manager. If the manager relationship for the end user is not set up, or the manager does not have an email address configured, the PIN delivery will fail.

To verify that the PIN delivery was successful, do the following:

  1. Log in to the Azure portal.
  2. Go to Resource Group > Logic App.
  3. In the left menu, click Development tools > Run history.
  4. Verify that you have a record with Status “Succeeded”.
  5. If the status is “Succeeded”:
    1. Open the history record.
    2. Select the connector for “HTTP - Get User Manager Details”.
    3. In the Parameters tab of the Outputs section, verify that Body has a field for the “mail” attribute populated with the email address of the end user’s manager.
  6. If the status is “Failed”:
    1. Open the history record.
    2. Review which connector had an error and investigate the details of the error by clicking the connector.
Verifying that end user has YubiKey registered in Microsoft Entra ID
  1. Log in to the Microsoft Entra admin center.
  2. Go to Users > All users.
  3. Search for the desired User.
  4. Go to Authentication method.
  5. Verify that the new YubiKey is listed.
Checking the Microsoft Entra ID audit log history for end user
  1. Log in to the Microsoft Entra admin center.
  2. Go to Users > All users.
  3. Search for the desired User.
  4. Go to Audit logs.
  5. Filter the Activity column for each of the following:
    1. “Get passkey creation options”.
    2. “Admin registered security info”.
    3. “User registered security info”.
  6. Check if any of the events indicate that an error occurred.

Note

If an error related to Microsoft Entra ID is encountered by the FIDO Connector App, the error_message in the fprshipments table, or error entry in FIDO Connector App logs, will contain a client-request-id which is related to the “Correlation ID” in Microsoft Entra ID Audit Logs.

Checking FIDO Connector App logs
  1. Log in to the Azure portal.

  2. Go to the Resource Group where the FIDO Connector App is deployed.

  3. Select the Container App.

  4. Select Monitoring > Logs.

  5. Within the open tab, if not already selected, in the drop-down, change from “Simple mode” to “KQL mode” (using Kusto Query Language).

  6. Paste a KQL query similar to the following to begin identifying errors and timeframes to investigate:

    ContainerAppConsoleLogs_CL
    | where Log_s contains "WARN" or Log_s contains "ERROR" or Log_s contains "Fail"
    | project TimeGenerated, ContainerName_s, Log_s
    

Shipping Pre-reg Keys to Users

The method for creating shipment requests for pre-registered YubiKeys depends on how your Yubico FIDO Pre-reg solution is set up in your Customer Orchestration environment.

As an IT administrator, you can for example trigger a shipment request for a pre-registered YubiKey through your front-end system, for example ServiceNow. Or, you can have some other integration process in your environment trigger the shipment request.

The shipment request is received by the Yubico FIDO Connector App which manages the credential encryption, requests recipient information from the customer’s system, and creates a shipment request to the YubiEnterprise Delivery service. For more information, see Process Flow and API Reference.

When a shipment request for a pre-registered YubiKey has been successfully processed it will return a shipmentId. This shipment ID can be used in the YubiEnterprise Console or the YubiEnterprise Shipment API to track the request status and get shipping updates and possible error states.

Post-Deployment Operations

The following describes useful runtime parameters and some important maintenance operations that are needed to avoid service interruption due to for example rotation of YubiEnterprise API tokens.

Additional Runtime Environment Parameters

The following table lists useful parameters for the FIDO Connector App that you can change in the Azure Container if needed. To add or change these variables, navigate to the container’s environment as described in Configuring Container App.

Variable

Default value (if not changed
by Environment Variable)
Possible values

CRON_PROCESS_SHIPMENT_SCHEDULE


0 0 * * * *


The cron expression for the
schedule that checks ongoing
shipments and processes them.

The default setting is to run
every hour at the top of the hour.

It can be changed to any valid
cron expression, for example to
run every 30 minutes:
0 */30 * * * *
LOGGING_LEVEL_COM_YUBICO
INFO
DEBUG
ENTRA_FIDO_API_CHALLENGE_TIMEOUT_MI
NUTES

20160


Numeric value representing time in
minutes that the Entra FIDO
challenge is valid for.
CRON_DATA_CLEANUP_COMPLETED_DAYS


0


The below cron schedule will purge
‘complete‘ shipment records that
are older than this value.

0 = do nothing, no records will be
deleted, the schedule is
effectively disabled.

n = integer value means delete
‘complete‘ shipment items older
than today - n days.
CRON_DATA_CLEANUP_SCHEDULE


0 30 * * * *


The cron expression for the
cleanup schedule that purges
‘complete’ shipments and their
secrets from the Azure table
and vault.

The default setting is to run
at every 30 minutes past the hour.

The effective values of the various runtime environment variables can be obtained by the API Check Deployment Component Status.

The Process Shipment job can also be run outside of the scheduled time to process shipments on demand by using the API Process Shipments.

Configuring Key Vault Permissions

To be able to change the YubEnterprise API token, you need a user with the Key Vault Secrets Officer role. Follow the steps below to set up these permissions in Key Vault.

Azure Key Vault Access configuration uses a permission model based on Azure RBAC (role-based access control). Access to Azure Key Vault is defined at a specific scope level by assigning appropriate Azure roles.

By default, the Resource Group Owner does not have permissions to view the contents of the Azure Key Vault. Therefore a special Key Vault Secrets Officer role can be assigned to a User or User Group for these to be able to access the Azure Key Vault.

To assign the “Key Vault Secrets Officer“ role, do the following:

  1. Log in to the Azure Portal.
  2. Go to your Resource Group > Key Vault > Access control (IAM).
  3. Add role assignment “Key Vault Secrets Officer”.
  4. Select a User Group or User to assign this role to.

As a user with this permission you can can now go to Resource Group > Key Vault > Secrets and view the Key Vault Secrets.

Rotating API Tokens

YubiEnterprise API tokens expire one year after generation. Since a user (API caller) can have only one API token at a time, you must have a plan to roll over to a new API token before the old one expires.

To avoid service interruptions, it is recommended to regularly rotate the API tokens. The YubiEnterprise API token can be easily changed from the Key Vault objects without having to perform a complete deployment.

Note

Ensure that the user performing the API token rotation in Azure Key Vault has the Key Vault Secrets Officer role, see Configuring Key Vault Permissions.

To manage the API tokens, do the the following:

  1. Log in to the Azure Portal.
  2. Go to your Resource Group > Key Vault > Secrets.
  3. List the YubiEnterprise API tokens and click to view versions. Open and view the current version, add a new version, and disable the previous version. For information on how to retrieve API tokens, see Generating API Tokens.

Rotating Application Client Secrets

The Application Client Secret created as part of the application registration steps for Yubico FIDO Connector App have an expiration set by the administrator.

To perform regular rotation, the Microsoft Entra ID Administrator can also delete an existing Client Secret and create a new Client Secret to be used by the registered Application.

The FIDO_Connector_Client_Secret can be easily changed from the Key Vault objects without having to perform a complete deployment.

Note

Ensure that the user performing the API token rotation in Azure Key Vault has the Key Vault Secrets Officer role, see Configuring Key Vault Permissions.

To manage the Client Secret, do the the following:

  1. Log in to the Azure Portal.
  2. Go to your Resource Group > Key Vault > Secrets.
  3. List the ENTRA-FIDO-API-CLIENT-SECRET and click to view versions. Open and view the current version, add a new version, and disable the previous version.

Changing Microsoft 365 Email Account

The Microsoft 365 email account is used for example to send the Yubico FIDO Pre-reg PIN to end users. If needed, the email account can be changed as described in the following.

To change the Microsoft 365 email account, do the following:

  1. Log in to the Azure Portal.
  2. Go to Resource Group > Logic App.
  3. In the left menu, click Development tools > API connections.
  4. Select Microsoft 365.
  5. Go to General > Edit API connection.
  6. Click Authorize.
  7. Click Authorize again.
  8. Log in with the account that will be used as the sender of emails for Yubico FIDO Pre-reg PINs.
  9. When logged in, click Save.

Resending PIN Email

The PIN email can be resent for a successfully completed shipment by using the API, see Resend PIN.

API Reference

Each deployment of the Yubico FIDO Connector will have its own instance of the API described in the following.

Base URL: URL provided by the Container App This URL will be dependent on the URL provided by your container app service, and will be unique for each deployment.

Check Deployment Component Status

GET /v1/status

Provides the status of deployment components. As part of the testing, you can first do a call to /v1/status to verify that the API is operational and the client can connect to it. It is also a way to ensure that some of the key properties provided during deployment are set.

Response: On success HTTP 200. Response body:

{
 "AZURE_TABLES_ENDPOINT": "string",
 "AZURE_TABLES_SHIPMENTS_TABLE_NAME": "string",
 "AZURE_KEY_VAULT_ENDPOINT": "string",
 "AZURE_TENANT_ID": "string",
 "CRON_PROCESS_SHIPMENT_SCHEDULE": "string",
 "CRON_DATA_CLEANUP_SCHEDULE": "string",
 "CRON_DATA_CLEANUP_COMPLETED_DAYS": "string",
 "EMAIL_API_SEND_ENDPOINT": "string",
 "ENTRA_FIDO_API_CLIENT_ID": "string",
 "ENTRA_FIDO_API_VERSION": "string",
 "ENTRA_FIDO_API_CHALLENGE_TIMEOUT_MINUTES": "string",
 "LOGGING_LEVEL_COM_YUBICO": "string",
 "YE_API_BASE_URL": "string",
 "YE_JWKS_SIGN_ENDPOINT": "string",
 "YE_JWKS_TRANSPORT_ENDPOINT": "string"
}

Create Shipment Request

POST /v1/fpr/shipments

Provides the ability to place a request for shipment of pre-registered YubiKeys. All fields in request are required.

Input value references:

Request:

{
 "user_id": "Object ID of the user in Entra",
 "pin_request": {
     "type": "generate",
     "length": 8, //value should be either 4, 6 or 8
 },
 "yubico_shipment_request": {
     "delivery_type": 1,
     "recipient": {
         "recipient_company": "Company name",
         "recipient_email": "Email address", //Should not be principle object name, should be email to receive PIN
         "recipient_firstname": "First name",
         "recipient_lastname": "Last name",
         "recipient_telephone": "5555555555"
     },
     "mailing_address": {
         "street_line1": "Street address",
         "street_line2": "Apt / unit #",
         "city": "City",
         "region": "2 char state",
         "postal_code": "Postal code",
         "country_code_2": "2 char country code"
     },
     "shipment_items": [
         {
             "product_id": 1, //YubiKey model ID
             "inventory_product_id": 18, //Subscription ID
             "product_quantity": 1, //# of keys to include
             "customization_id": "CUSTID" //Customization ID
         }
      ]
   }
}

Response:

  • On success:

    • HTTP 201

    • Response body: Created shipment_id from YubiEnterprise Delivery service

      {"data":{"shipment_id":"String"}}

  • On error:

    • HTTP 401 Unauthorized

    • HTTP 400 Bad Request

    • Bad request, response body examples:

      {"error_code":"ye_error","error_message":"Validation error when creating YED shipment","error_data":{"code":"validation_error","message":"Input for Last Name exceeded limit of 20 characters"}}

      {"error_code":"api_error","error_message":"PIN `length` must be between 4 and 8","error_data":{"error_type":"validation"}}

      {"error_code":"idp_error","error_message":"Could not find user: 7dc95e2f-53-..."}

Get Shipment Request Status

GET /v1/fpr/shipments/{shipment_id}

Provides the ability to get the processing state of a shipment_id created through the Create Shipment Request API.

The request in the FIDO Connector App has two distinct states: “ongoing” and “complete”. The states are described in more detail in the following.

shipment_state Description
ongoing


The request has been created in
YubiEnterprise with a Shipment ID.
Fulfillment operations and credential
creation are in progress with
MS Entra ID.
complete


Response from YubiEnterprise has been
received, the credential has been
created on the YubiKey and successfully
registered with MS Entra ID.

If a processing error has been encountered it will be saved in the fprshipments table and returned by the API. Details about the encountered error are provided in error_kind and error_message as described in the following.

Error Description
error_kind


This field will contain a string value
“GENERAL” if an error has been
encountered during processing.
error_message


This field will contain a string value
that has the detailed error message
returned by YubiEnterprise or
MS Entra ID.

Response:

  • On success:

    • HTTP 200

    • Response body for a shipment request without errors:

      {
       "shipment_id": "string",
       "shipment_state": "string"
      }
      
    • Response body for a shipment request with processing errors:

      {
       "shipment_id": "string",
       "shipment_state": "string",
       "error_kind": "string",
       "error_message": "string"
      }
      

Resend PIN

GET /v1/operations/resend-pin/{shipment_id}

Provides the ability to resend the PIN email for a shipment_id. For a shipment request in complete status, this operation retrieves the PIN response from the YubiEnterprise Delivery service and decrypts it to resend the PIN email.

Response: On success HTTP 204, no content body.

Process Shipments

GET /v1/operations/process-shipments

Provides the ability to trigger on-demand the process of retrieving shipment responses from the YubiEnterprise Delivery service and process them. This API is useful if shipment processing needs to be run right away instead of waiting for the scheduled job.

Response: On success HTTP 204, no content body.


To file a support ticket for YubiEnterprise Delivery, click Support.