Single Sign-On (SSO)
Single-Sign-On (SSO) lets users log in once with a single ID to multiple related software systems. The Security Assertion Markup Language (SAML) open standard is designed to deliver a seamless user experience through SSO flows.
A service provider (SP) provides services to end users and rely on an identity provider (IdP or IDP) to verify a user’s identity. SSO through SAML can be initiated by an IdP (IdP-initiated SSO) or an SP (SP-initiated SSO).
Supported SSO Initiation Forms
Both IdP- and SP-initiated SSO are supported, and users with the Console Owner role can enable IdP-initiated SSO from the Customer Portal. For more information, see SSO Enablement.
IdP-initiated SSO
The IdP authenticates users when they present their credentials so that those users can then access other websites and applications (relying applications). The SAML flow for an IdP-initiated SSO is as follows:
- When the IdP and SP established SSO trust, they shared a private key.
- The user’s identity is sent by the IdP to the SP in the form of a SAML assertion signed with the private key.
- To retrieve the SAML Assertion securely, the IdP uses the user’s browser or a reference that the SP can use.
SP-initiated SSO
Service providers rely on an IdP to store the user’s information (including attributes for the particular service requested), and make authentication decisions based on that information.
SP-initiated SSO comes into play when a user tries to access an application at the SP end without having first authenticated with an IdP. In this case, the SAML flow is as follows:
- In the absence of an active browser session, the SP redirects the user to the IdP to request authentication.
- The user’s identity is sent by the IdP to the SP in the form of a SAML assertion signed with the private key.
- If the SP supports SSO from multiple IdPs, it can determine which IdP to use by:
- Requesting the user to enter additional information.
- Showing the user the list of supported IdPs so the user can select the right one.
- Using a resource URL specific to a specific IdP.
- Restoring an IdP cookie in the user’s browser session from initial IdP login.
- Upon receipt of the SAML assertion, the SP validates the signature using the public key and presents the user with its landing page as if the user had logged in with the usual credentials instead of SSO.
Logging in Using SSO Only
SSO enablement introduces a new category of user: those who are able to log in only via SSO. Users added after SSO is enabled fall into this new category, while users enrolled prior to SSO enablement will still be able to log in with username and password.
Important
Users that were enrolled before enabling SSO can still log in with their credentials but only to perform SSO management actions. For other Customer Portal actions they need to authenticate via SSO. This permission setup prevents users from locking themselves out for example if they have forgotten their password, then log in with SSO and accidentally misconfigure or disable SSO, in which case they would be locked out.
If SSO is disabled, none of the users added after SSO is enabled will be able to log in. For more information, see Disabling SSO. API tokens are not affected by SSO enablement or disablement.
Only a single organization at a time can be logged into with SSO. A user who is a member of multiple organizations cannot use SSO-logged-in sessions to switch between organizations. If a user needs to switch from one SSO-enabled organization to another, they must log out of the first organization and use the login link supplied by the SP for the second organization. See also Authenticating with SSO.
Note
Even though authenticated through SSO when logging in, a user will again be prompted by the IdP for authentication with their credentials when initiating a Service Provider flow. This is due to the ForceAuthn configuration setting in SAML being set to “true” by default, following Yubico security recommendations.
Permissions and SSO
The following table lists Customer Portal action capabilities with and without SSO.
Capability
|
Logging in with SSO
|
Logging in with credentials
|
|---|---|---|
| Status | Users invited to join the Customer Portal
go into the
Active state andcan log in immediately via the
SP’s SSO login link.
|
Users invited to join the Customer
Portal without SSO
go into the
Pending stateuntil they enroll their credentials.
|
| Login Redirect | None: not applicable | If SSO has been enabled, users
who log in using credentials will
be redirected to log in via SSO.
|
| Customer Portal Operations | All are permitted (for example shipment
request creation, listing POs, inviting
users etc.) except configuring SSO and
updating credentials.
|
No operations other than
configuring SSO
(by Console Owner) and
updating credentials are
permitted.
|
| Credential Update | Not permitted; credential
management page is inaccessible.
|
All roles can update their
credentials: change password,
edit, delete, and add new
YubiKeys.
|
| SSO Configuration | Not permitted for any role. | Console Owners may
configure SSO.
|
SSO Enablement
The sections below describe how to configure and enable SSO for different identity providers. Console Owners can enable IdP-initiated SSO by logging in to the Customer Portal with credentials, going to Your organization > SSO, and selecting Allow IDP-initiated single sign-on.
Requirements
To enable SSO integration you need to:
- Use SAML 2.0 with Azure AD or Okta or Google Workspace as your IdP. Other IdPs are likely to be compatible, but are not supported. For more information, see Enabling SSO for Other IdPs.
- Have owner, admin, or super-admin access to the SSO app in your IdP account for permissions to manage the SAML configuration and users.
- Know how to enable, edit and disable your IdP’s SSO offering.
- Be able to share the SSO link with the Customer Portal users in your organization out-of-band after SSO is enabled, this is not something that the system does automatically.
- Be a Console Owner in the Customer Portal.
- Be able to log in to the Customer Portal with username/password and a registered YubiKey (via credentials, not SSO).
Known Limitations
- Since Customer Portal users invited after SSO enablement are not required to have username and password, they will not be able to log in if SSO access is disabled. These users must be reset to be able to log in using credentials. Resetting a user triggers the system to send the user an email directing them to reset their username/password and register a YubiKey. See Disabling SSO.
Google Workspace cannot support both the SP-initiated and the IdP-initiated ACS URL at the same time. It is also not possible to set up two different SAML Apps in the same Google Workspace, because Google Workspace enforces SP EntityID uniqueness across all SAML Apps in the workspace.
When IdP-initiated SSO is enabled with the Google Workspace SAML application, the IdP-initiated SSO ACS URL (
/realms/y4o-azad/broker/sso/endpoint/clients/idp-initiated) must be configured as the ACS URL in order for the Google Dashboard link to work. When the Google Workspace SAML application is configured with this URL, the IdP will not work with the SP-Initiated flow since the Reply URL (ACS) endpoint does not match what is configured above.
Enabling SSO with Azure AD
This section describes how to enable SSO between Azure AD (Microsoft Entra ID) and the Customer Portal. These instructions assume that your company’s SAML application has already been created in Azure AD.
Note
The Azure AD SAML Enterprise Application can be made to work with both the SP-initiated and IdP-initiated flows. Configure both the IdP-initiated ACS URL and the SP-initiated ACS URL as valid reply URLs. Make sure to mark the IdP-initiated URL as default.
Copy Entity ID from Customer Portal to Azure AD
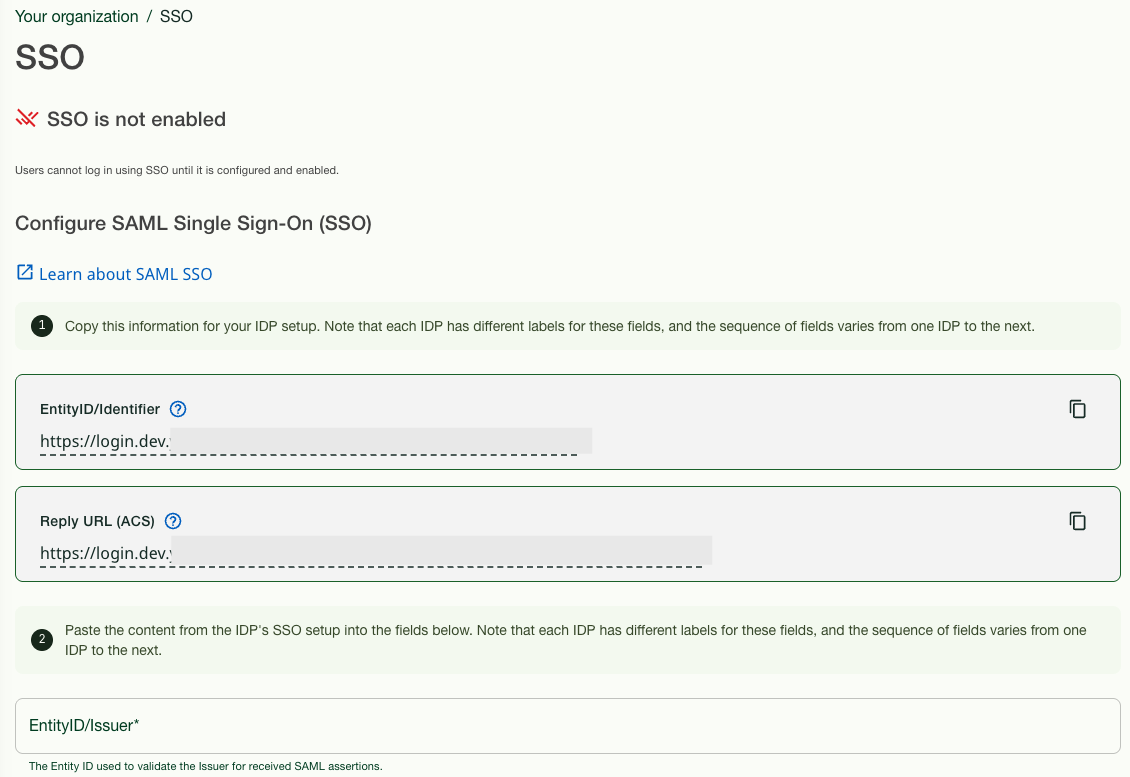
| Step 1: | Log in to the Customer Portal as Console Owner using credentials (password and MFA), and go to Your organization > SSO. The Configure SAML Single Sign-On page appears. Click the copy icon at the end of the EntityID/Identifier field in section 1. |
|---|---|
| Step 2: | Log in to your Azure tenant https://portal.azure.com/signin/index/. |
| Step 3: | Set up the new application in Azure AD (note that this does not mean “create the new application”) by going to Manage Azure Active Directory and clicking View. 
Your company’s Overview page for Azure AD appears. |
| Step 4: | From the menu on the left-hand side, select Enterprise Applications. Your company’s Overview page for all applications appears. |
| Step 5: | From the list in the center pane, select the appropriate SAML application. The Overview page for that application appears. 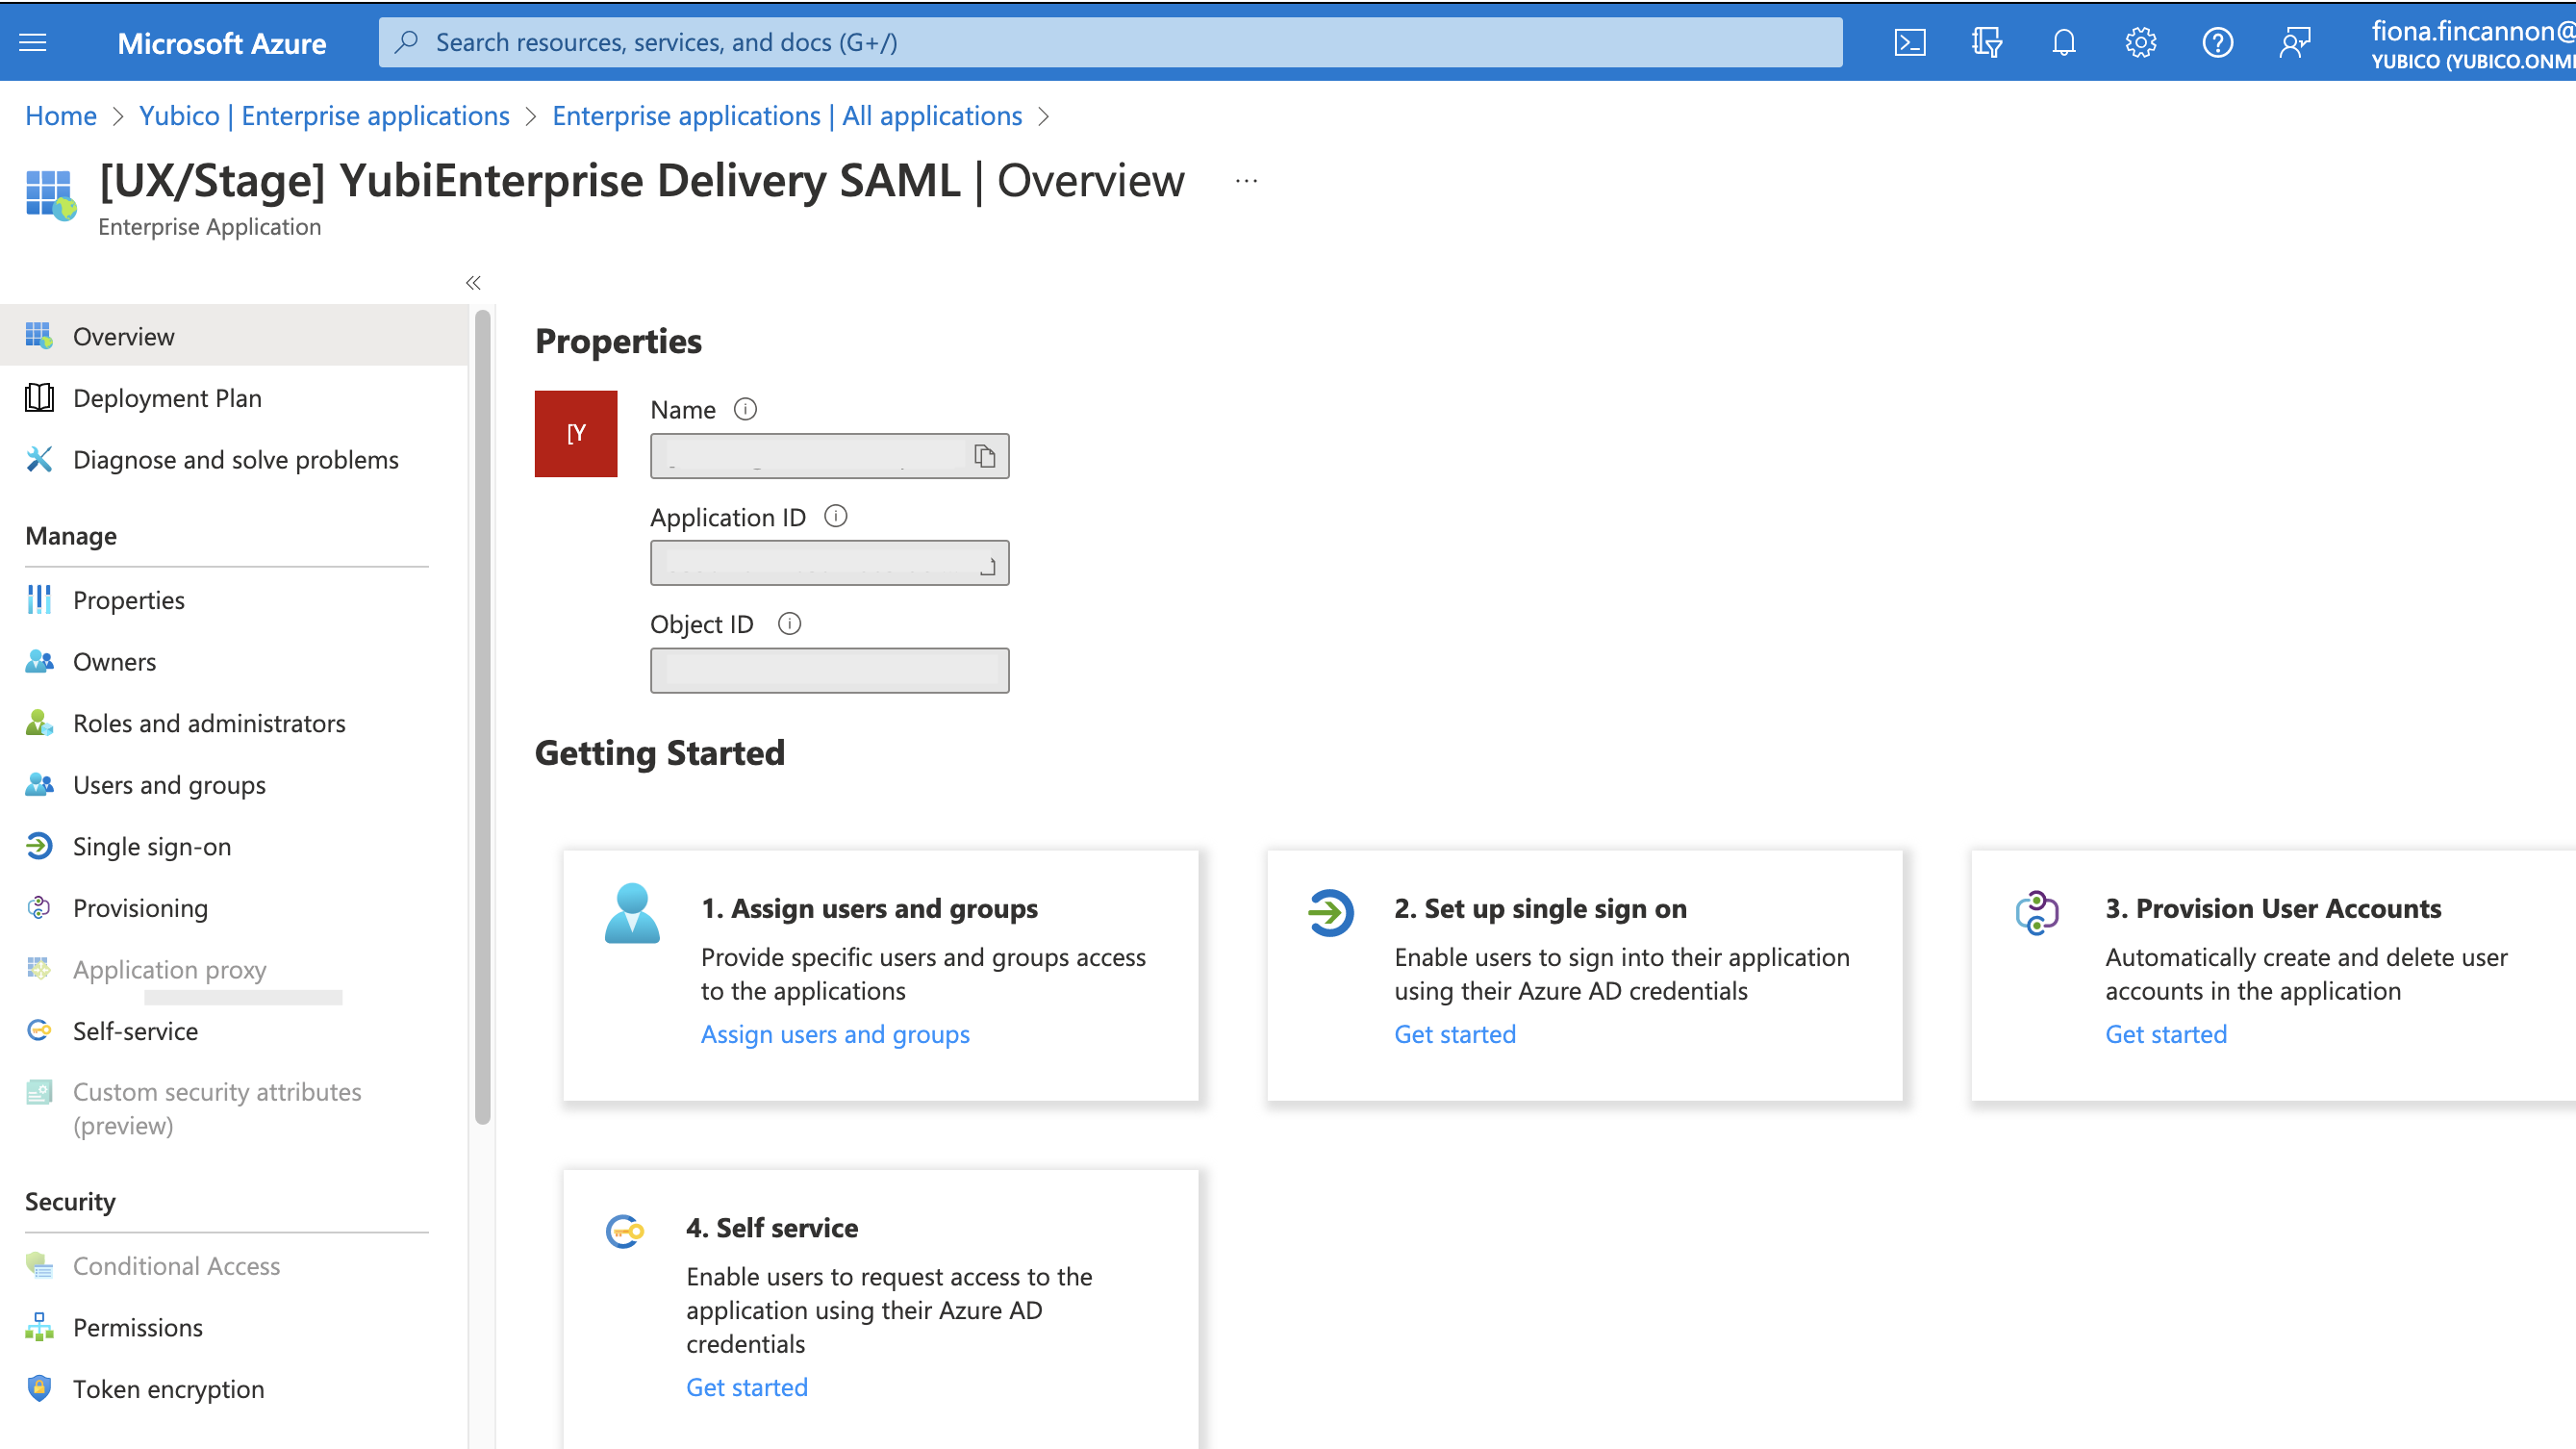
|
| Step 6: | Click Get started in the second box Set up single sign on. The [Name of your organization’s enterprise application] SAML | SAML-based Sign-on page appears. 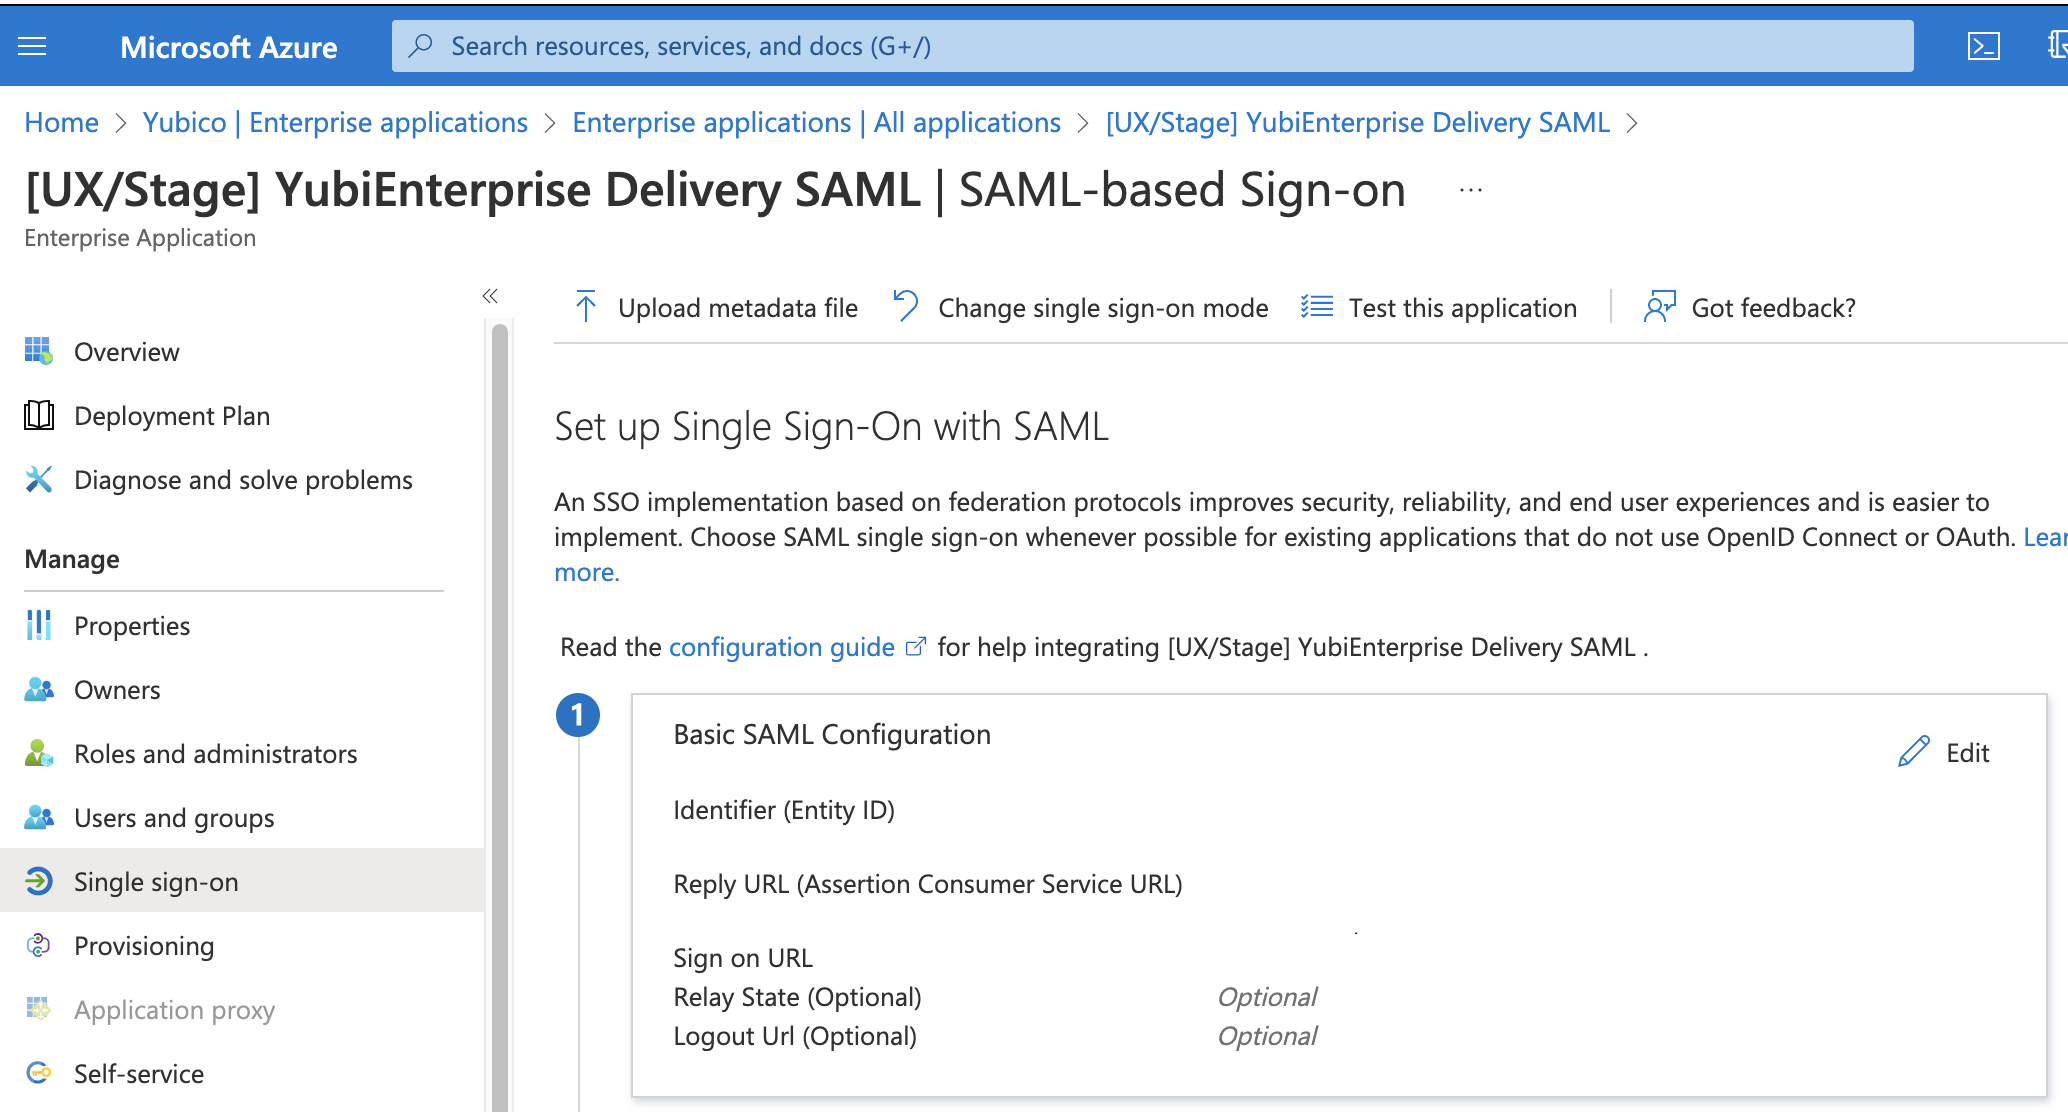
|
| Step 7: | Click the Edit icon for 1 Basic SAML Configuration. The Basic SAML Configuration window appears. 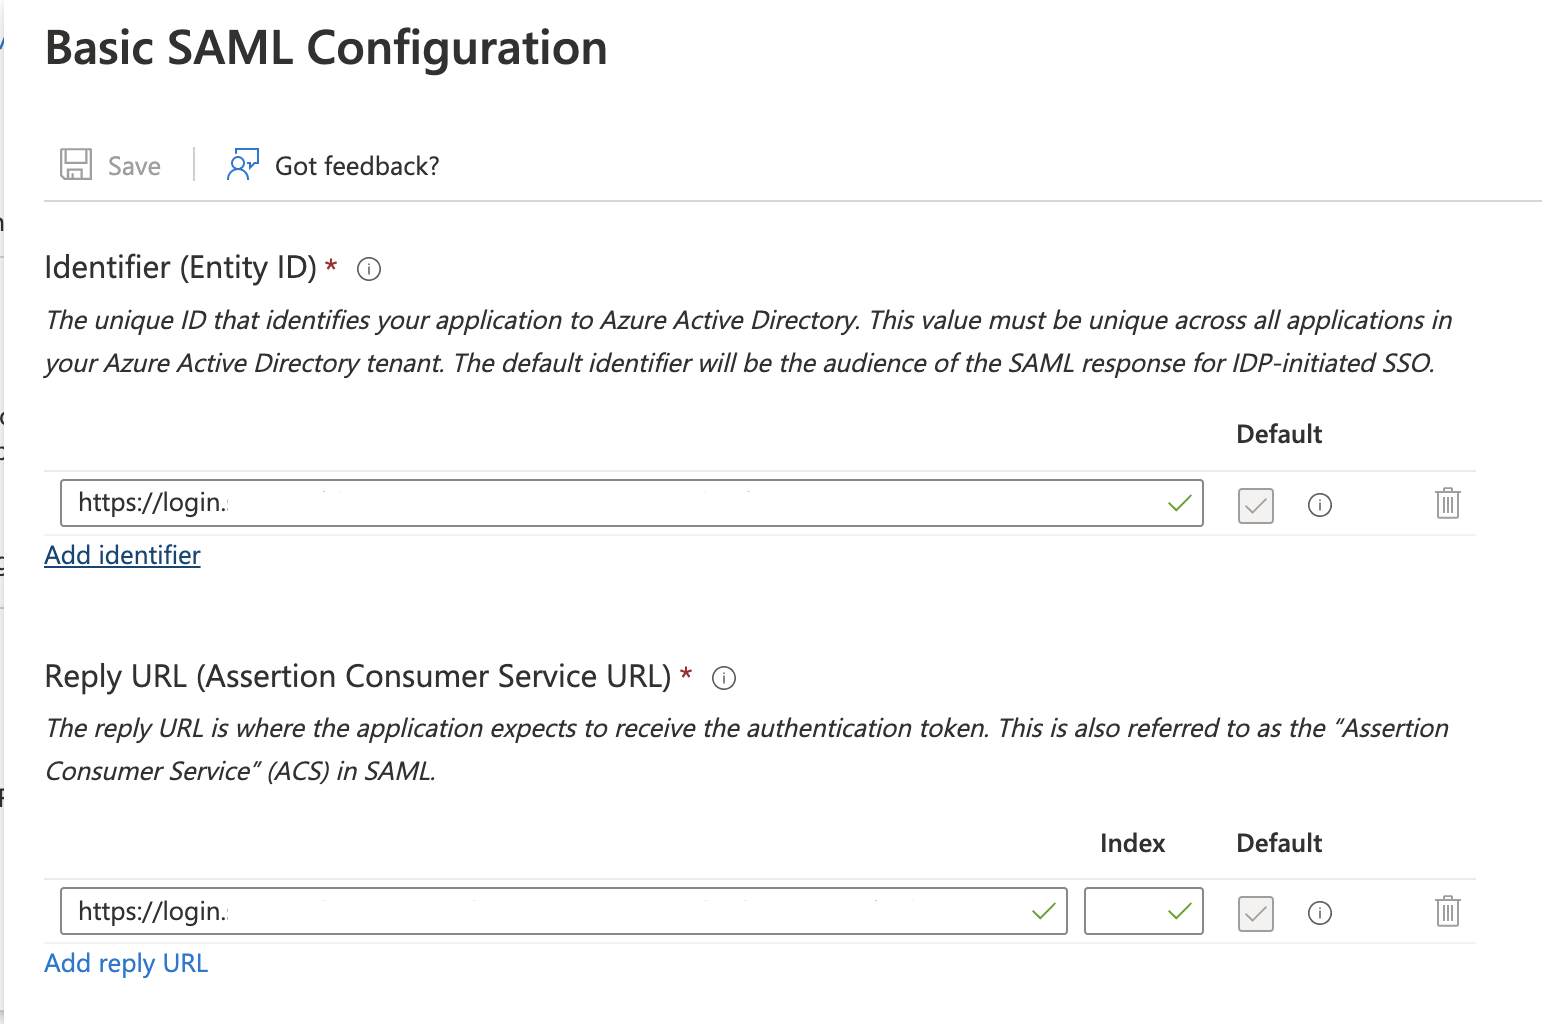
|
| Step 8: | Under Identifier (Entity ID), click Add identifier. A new field appears. 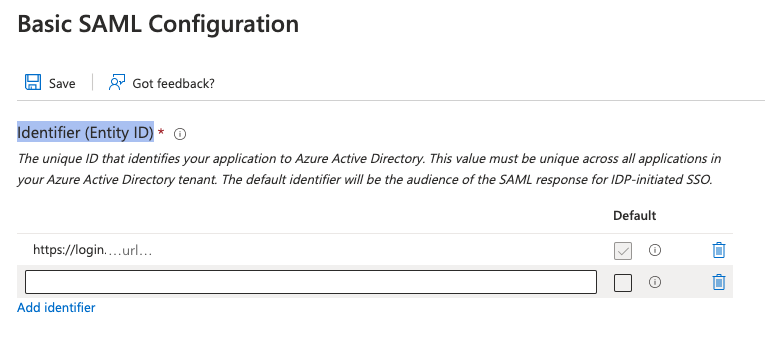
|
| Step 9: | Paste what you copied from the Customer Portal (in step 1) into the Identifier (Entity ID) field in Azure. If you select Default, this will be the primary identifier sent for IdP-initiated SAML responses. |
| Step 10: | Save your settings by clicking Save in the top left corner of the Basic SAML Configuration Edit window. |
Copy Reply URL from Customer Portal to Azure AD
| Step 1: | Log in to the Customer Portal as Console Owner and go to Your organization > SSO. The Configure SAML Single Sign-On page appears. Click the copy icon at the end of the Reply URL (ACS) field in section 1. |
|---|---|
| Step 2: | Unless you are already logged into Azure and on the Basic SAML Configuration Edit window, log into your Azure tenant https://portal.azure.com/signin/index/ and perform steps 2-7 in Copy Entity ID from Customer Portal to Azure AD above. |
| Step 3: | Under Reply URL (Assertion Consumer Service URL), click Add reply URL. A new field appears. 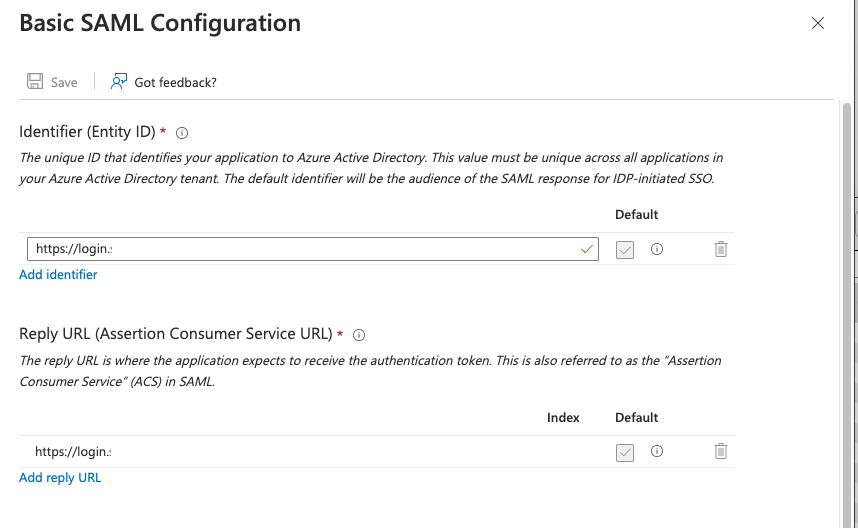
|
| Step 4: | Paste what you copied from the Customer Portal’s Reply URL (ACS) field (in “Step 1”) into the Reply URL (Assertion Consumer Service URL) field in Azure. If you select Default, this will be primary and IdP-initiated SAML responses will be sent to this reply URL. |
| Step 5: | In Azure, save your settings by clicking Save in the top left corner of the Basic SAML Configuration Edit window. |
Copy Login URL & Azure AD Identifier from Azure to Customer Portal
| Step 1: | Unless you are already logged into Azure and on the Basic SAML Configuration Edit window, log into your Azure tenant https://portal.azure.com/signin/index/ and perform steps 2-7 in Copy Entity ID from Customer Portal to Azure AD above. |
|---|---|
| Step 2: | In Azure, in section 4 Set up [your company’s] SAML, click the copy icon at the end of the Login URL field. 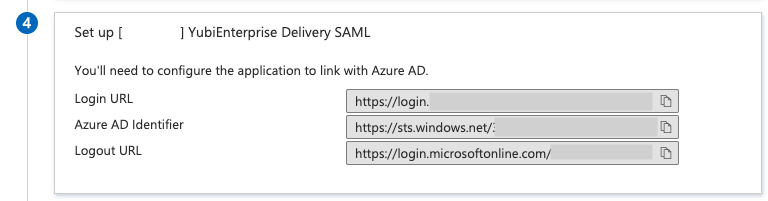
|
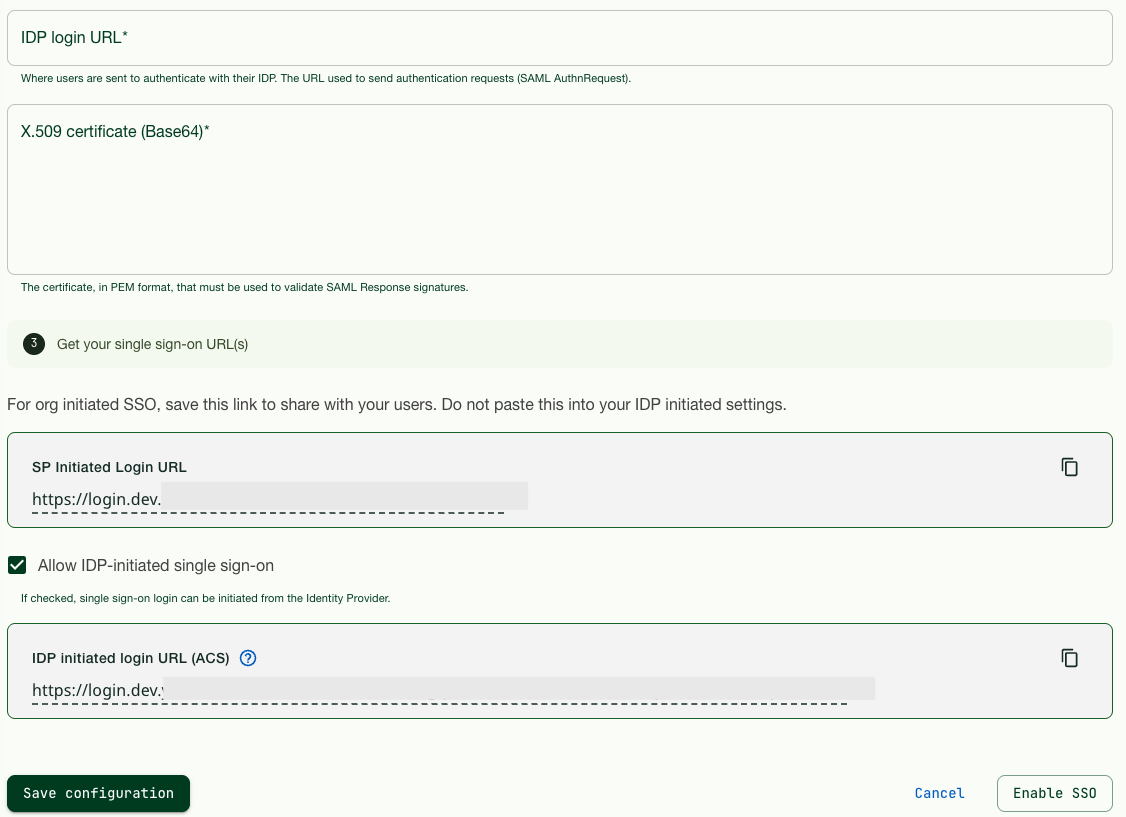
| Step 3: | Log in to the Customer Portal as Console Owner using credentials (password and MFA), and go to Your organization > SSO. The Configure SAML Single Sign-On page appears. Paste the content from the Login URL field in Azure into the IDP login URL field in section 2. |
| Step 4: | Go back to Azure, and in section 4 Set up [your company’s] SAML, click the copy icon at the end of the Azure AD Identifier field.
|
| Step 5: | In the Customer Portal, in Your organization > SSO, on the Configure SAML Single Sign-On page in section 2, paste the content from the Azure AD Identifier field in Azure into the EntityID/Issuer field. |
Copy X509 Certificate from Azure AD to Customer Portal
| Step 1: | Unless you are already logged into Azure and on the Basic SAML Configuration Edit window, log into your Azure tenant https://portal.azure.com/signin/index/ and perform steps 2-7 in Copy Entity ID from Customer Portal to Azure AD above. |
|---|---|
| Step 2: | In section 3, SAML Certificates, download the Certificate (Base64) by clicking Download. 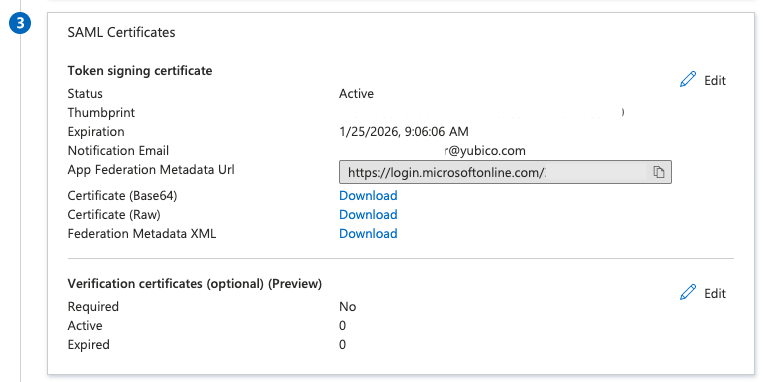
|
| Step 3: | Open the file in a text editor and copy it. You do not need to to remove the header and footer lines: 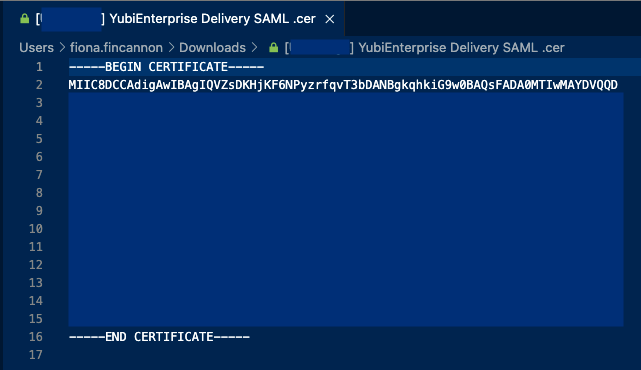
|
| Step 4: | In the Customer Portal, in Your organization > SSO, on the Configure SAML Single Sign-On page in section 2, paste the certificate content into the X.509 cert (Base64) field. (The header and footer in the file will be automatically stripped out when you save.) |
| Step 5: | Click the Save configuration button at the bottom of the Customer Portal page. |
Set Attributes & Claims in Azure AD
There is always a required claim. Ensure that the name identifier format is Email address.
| Step 1: | Unless you are already logged into Azure and on the Basic SAML Configuration Edit window, log into your Azure tenant https://portal.azure.com/signin/index/ and perform steps 2-7 in Copy Entity ID from Customer Portal to Azure AD above. |
|---|---|
| Step 2: | In section 2, Attributes & Claims, click the Edit icon. 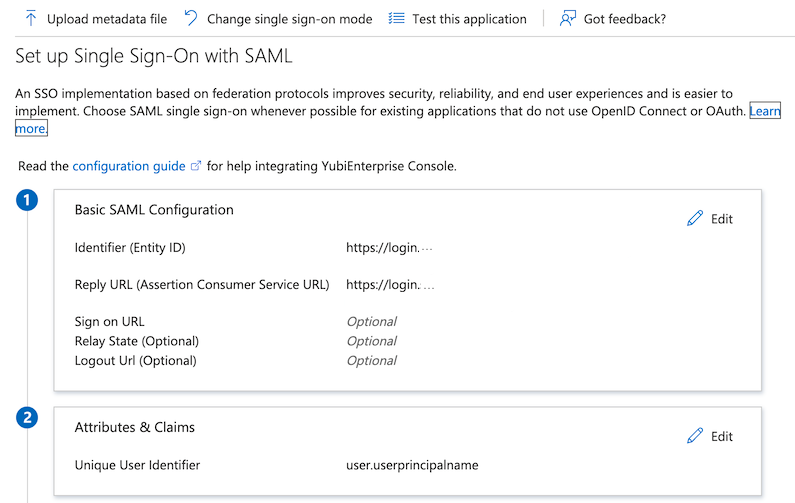
|
| Step 3: | In the Attributes & Claims window, click the Unique User Identifier (Name ID) in the Required claim section. 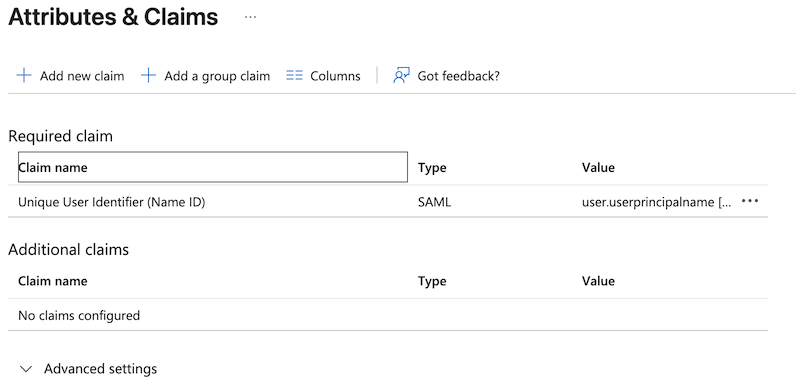
|
| Step 4: | In the Manage claim window, if the Name identifier format is not Email address, select it from the dropdown list. 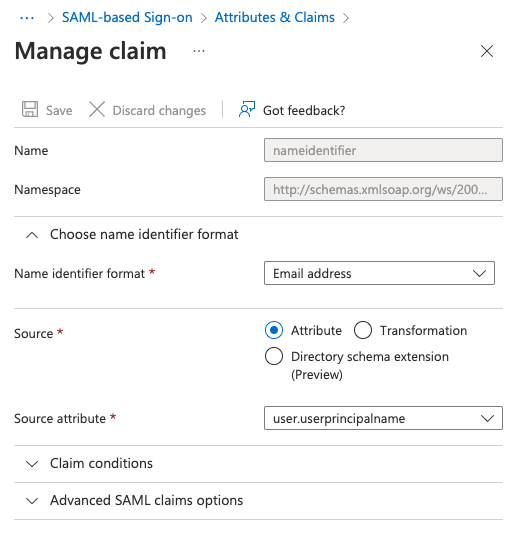
|
| Step 5: | Click Save in the top left corner of the Manage claim window. The Attributes & Claims window reappears. |
| Step 6: | In the Attributes & Claims window, directly underneath the title, click + Add new claim. The Manage claim window appears. 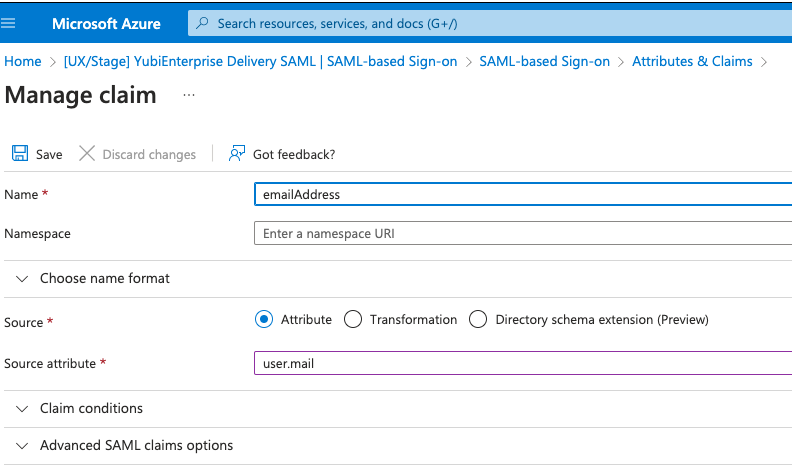
|
| Step 7: | In the Manage claim window, in the Name field, enter 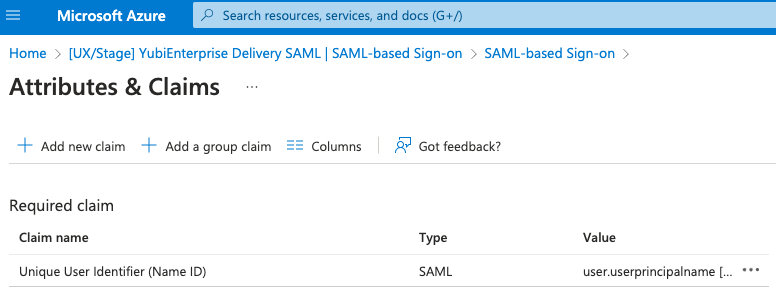
|
Verify and Save SSO Settings in Customer Portal
| Step 1: | In the Customer Portal, look at Your organization > SSO Configure SAML Single Sign-On to make sure that the content you pasted in is correct. |
|---|---|
| Step 2: | In section 3, copy the SP Initiated Login URL by clicking the copy icon at the end of it. Save the URL so that you can send it to your Customer Portal users. |
| Step 3: | Before enabling SSO, make sure to send all users who will be enabled for it this SP Initiated Login URL. The same link will also be shown in the login dialog after you have enabled SSO. |
Add Users and Enable User Login via SSO
Add users first to Azure, then to the Customer Portal. Before you can add them to your company’s SAML application in Azure, the users must be added to your company’s Azure AD instance at the top level. If needed, ensure you have the permissions in Azure to have groups available for assignment.
| Step 1: | On your company’s Overview page in Azure, from the menu on the left under Manage, select Users. On the Users page, the entire list of your company’s users appears. 
|
|---|---|
| Step 2: | To add entirely new users to Azure as opposed to adding them to the SAML organization, click New user at the top of the page and follow the directions provided in the subsequent pages. Otherwise select the users for whom you are enabling SSO by clicking on the checkbox next to the respective Display name. |
| Step 3: | From [your company’s] SAML Overview page, click Assign users and groups. The Users and groups window appears. 
|
| Step 4: | Click Add user/group at the top of the window. The Add Assignment screen appears. Under Users, click None Selected to display a list of your total users in Azure. 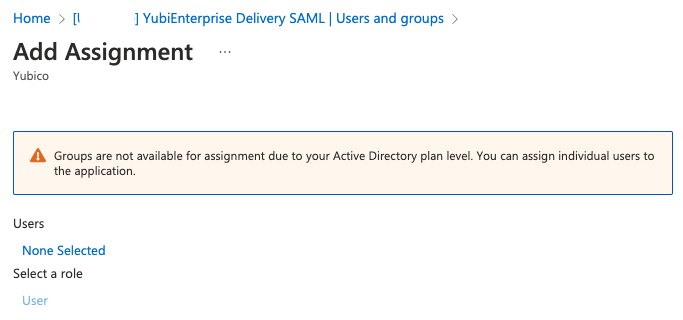
|
| Step 5: | Select the checkboxes for the requisite users, then click the Select button. |
| Step 6: | Users must have an account in the Customer Portal in order for the SSO-authentication to work. To add users, log in to the Customer Portal with the Console Owner role, go to Your organization > Users, and add users as needed. |
Important
Users that are not explicitly provisioned in the Customer Portal, will fail the SSO authentication. Furthermore, the Customer Portal does not support SCIM (System for Cross-domain Identity Management) or JIT (Just-in-time) login for users in Azure.
Enabling SSO with Okta
This section describes how to enable SSO between Okta and the Customer Portal. These instructions assume that your company’s SAML application has already been created in Okta.
Create App Integration
| Step 1: | Log in to the Customer Portal as Console Owner with user name and password, and go to Your organization > SSO. The Configure SAML Single Sign-On page appears. This is the location from which you will be copying information. |
|---|---|
| Step 2: | Log in to your company’s Okta tenant https://developer.okta.com/login/ as Admin, and navigate to Applications > Applications. The Applications page appears on the right. 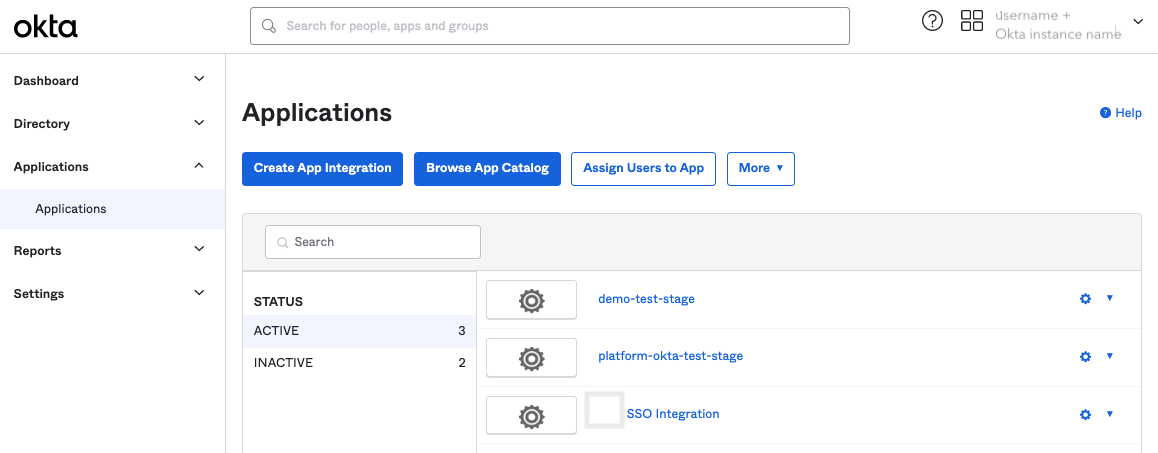
|
| Step 3: | Click Create App Integration. The Create a new app integration window appears. 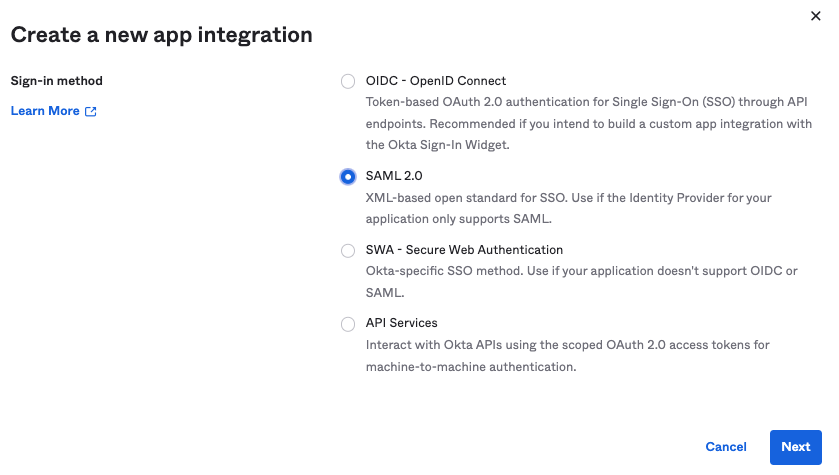
|
| Step 4: | Select SAML 2.0 and click Next. The Create SAML Integration window appears. 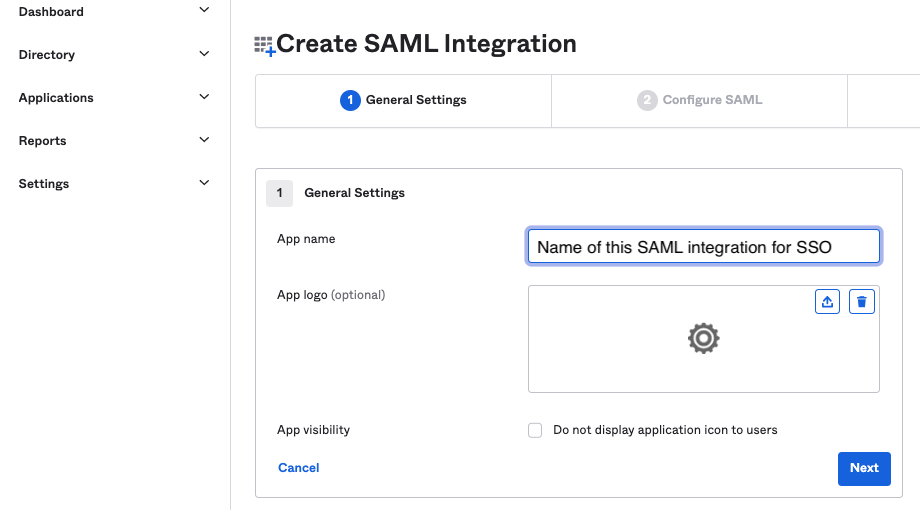
|
| Step 5: | On the 1. General Settings tab, enter the appropriate name in the App name field, make any other necessary settings and click Next. The Configure SAML tab of the Create SAML Integration window appears. 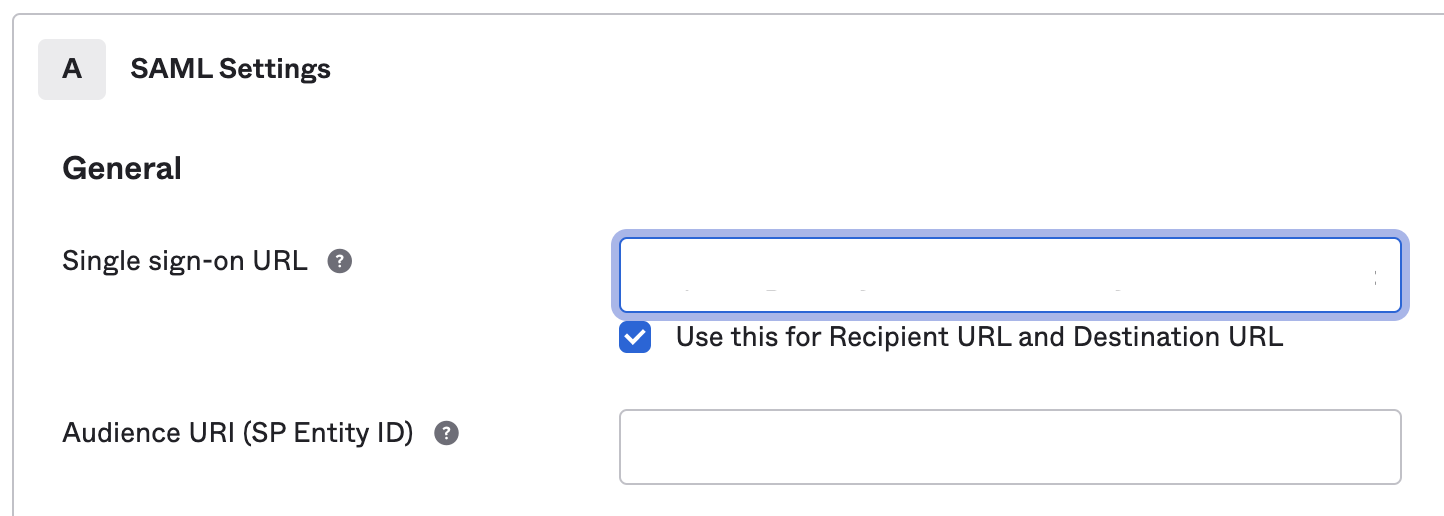
|
Copy Entity ID from Customer Portal to Okta
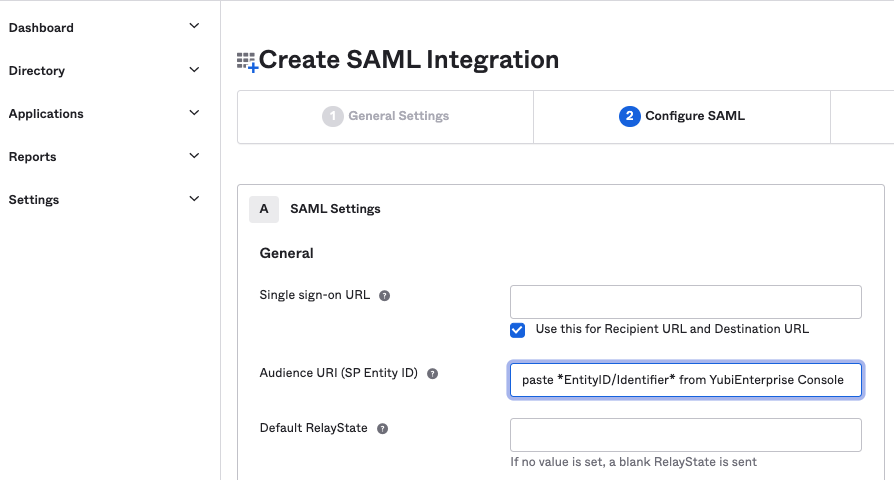
In the Customer Portal Your organization > SSO page from Step 1 in Enabling SSO with Okta, click the copy icon to copy the EntityID/Identifier from the Customer Portal.
Paste it into the Audience URI (SP Entity ID) field in Okta’s Configure SAML tab.
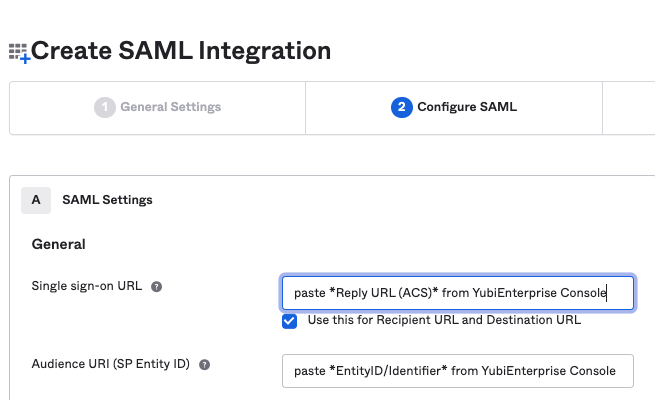
Copy Reply URL from Customer Portal to Okta
In the Customer Portal Your organization > SSO page from Step 1 in Enabling SSO with Okta, click the copy icon to copy the Reply URL (ACS) from the Customer Portal.
Paste it into the Single sign-on URL field in Okta’s Create SAML Integration window on the Configure SAML tab. Enable the checkbox for Use this for Recipient URL and Destination URL.
Set Name ID Format, Application Username, and Attribute Statement
| Step 1: | In Okta, still in the General section on the A SAML Settings tab, from the Name ID format dropdown, select EmailAddress. |
|---|---|
| Step 2: | From the Application username dropdown, select Email. 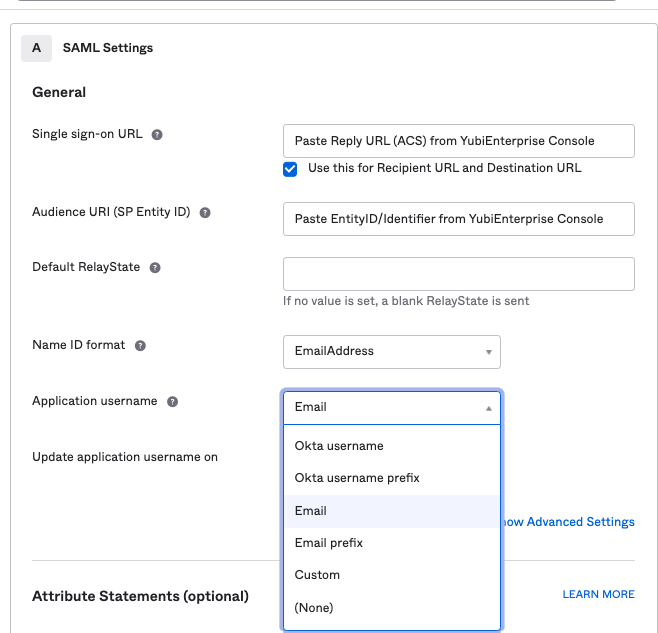
|
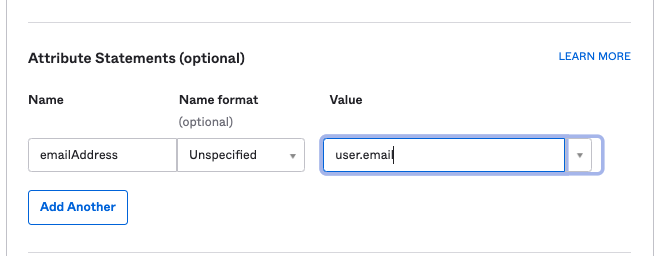
| Step 3: | Scroll down to the Attribute Statements (optional) section, and
|
| Step 4: | Scroll down to the bottom of the tab and click Next. The Feedback tab appears. |
| Step 5: | On the Feedback tab under Create SAML Integration, select either:
Provide feedback (optional) and click Finish. The Sign On tab for your application appears. 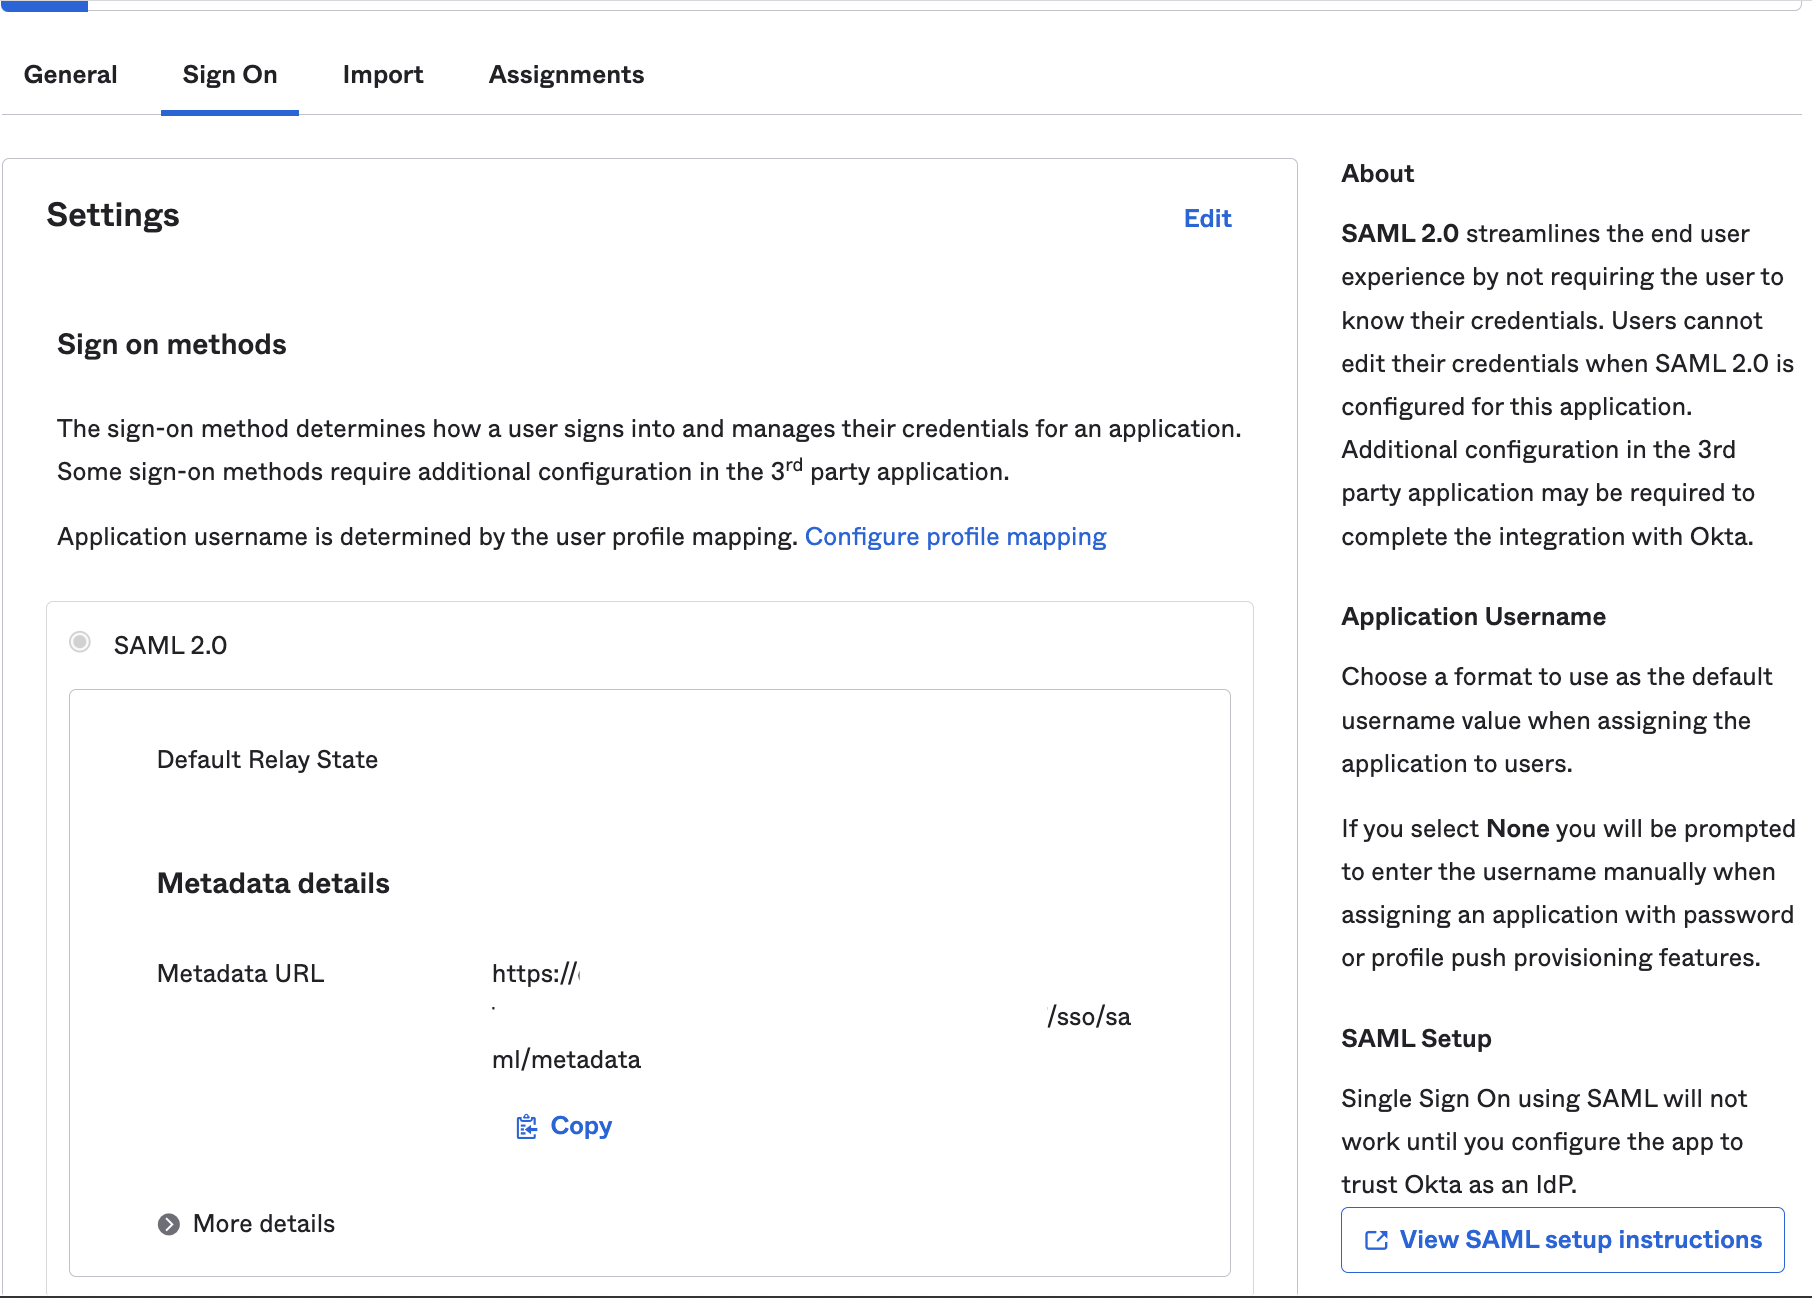
|
Copy IdP SSO URL & X509 Certificate from Okta to Customer Portal
| Step 1: | On the bottom right of Okta’s Sign On tab, click the View SAML setup instructions tab. 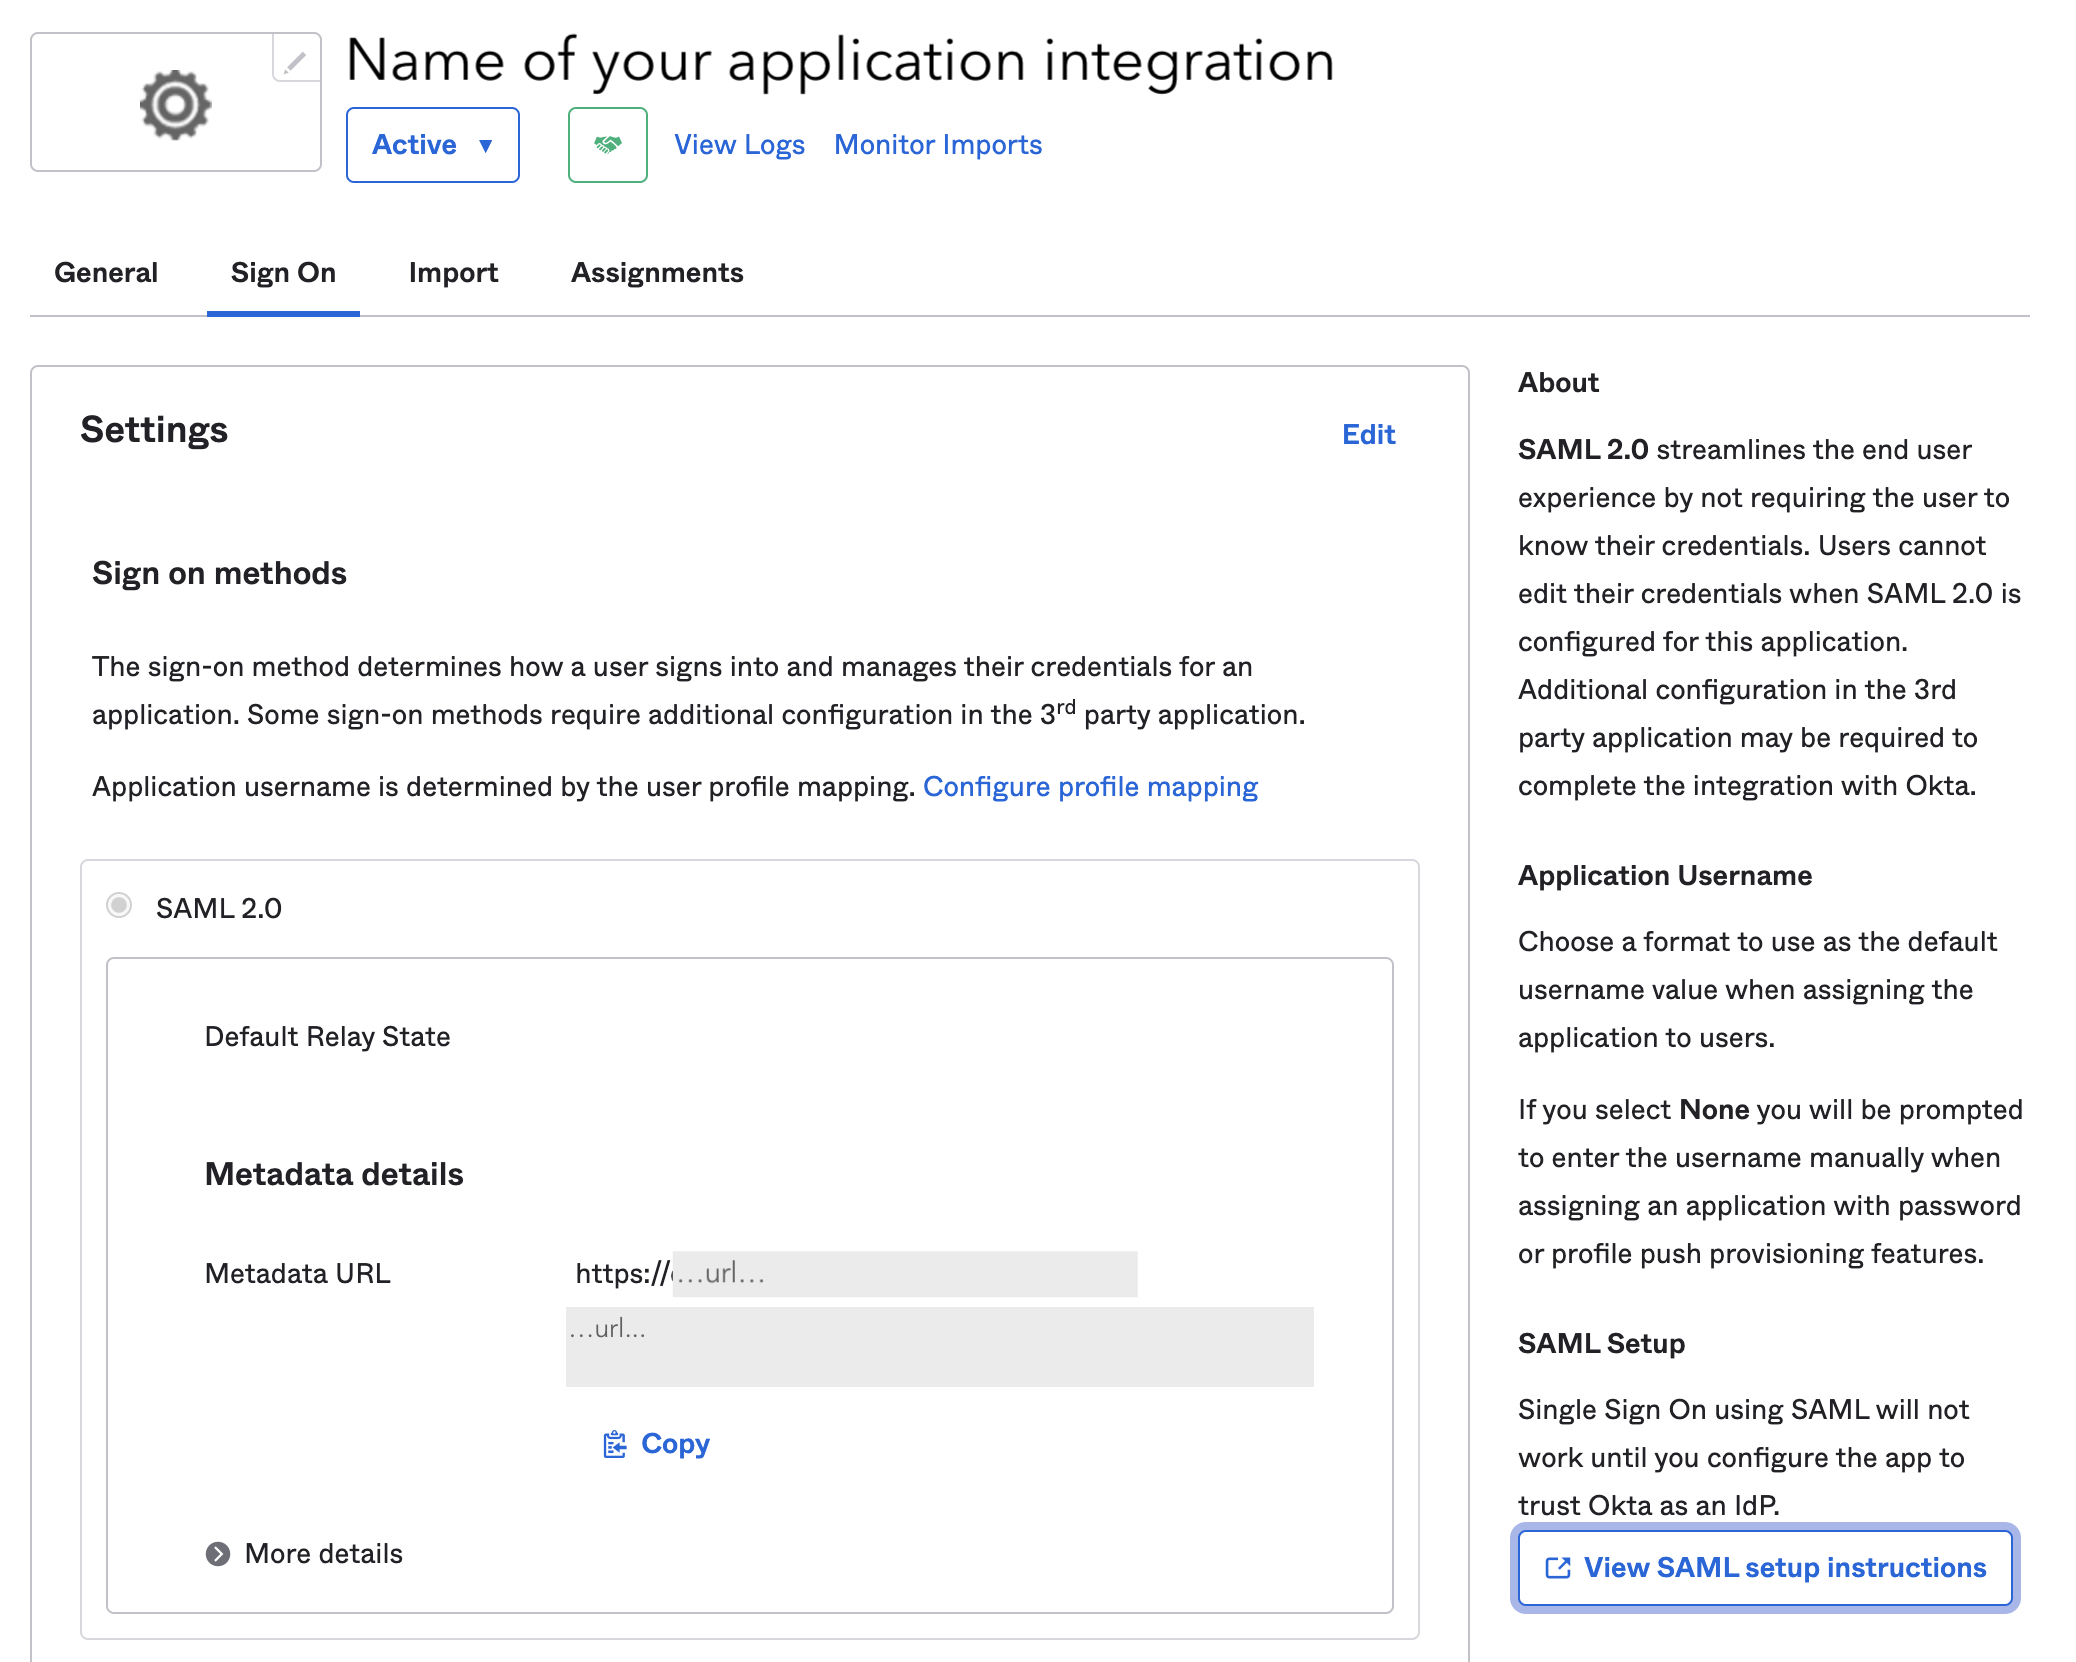
The How to Configure SAML 2.0 for [name of your] Application window appears. 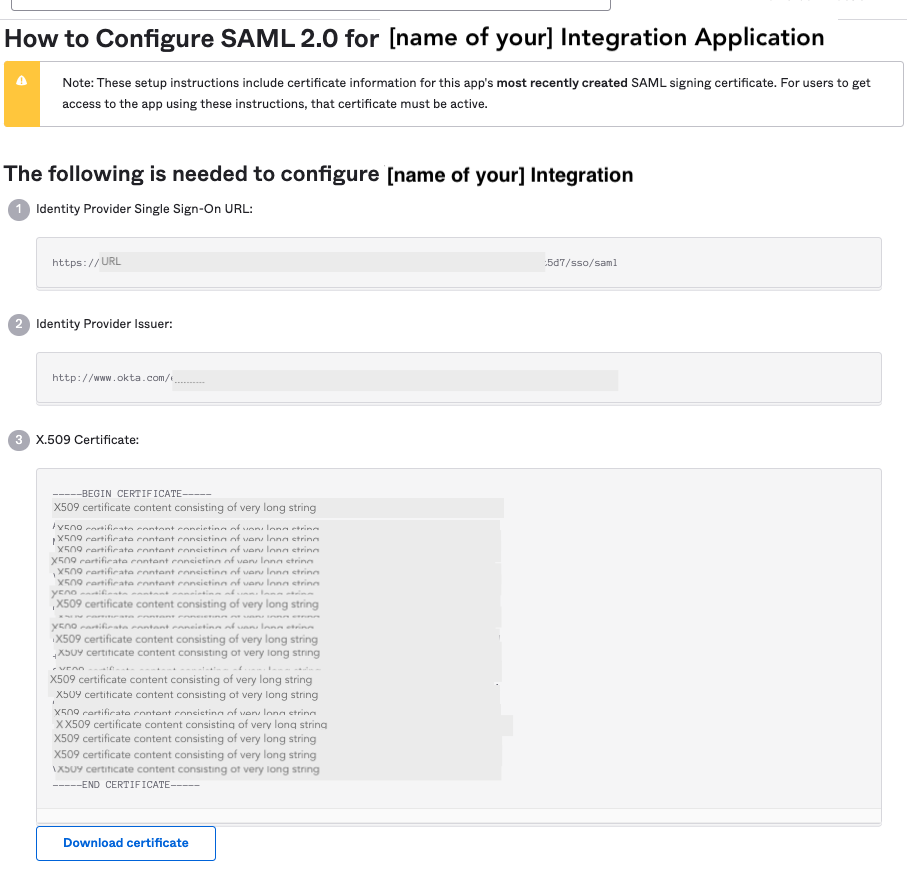
|
|---|---|
| Step 2: | Still in Okta, copy the content of the Identity Provider Single Sign-On URL: to the IDP login URL field in the Customer Portal. |
| Step 3: | From the Okta The following is needed to configure [application name] window, copy the Identity Provider Issuer to the Customer Portal’s EntityID/Issuer. |
| Step 4: | In Okta, click Download certificate under X.509 Certificate, then paste the content to the Customer Portal’s X.509 cert (Base64) field. |
| Step 5: | In the Customer Portal, click Save configuration. |
| Step 6: | From the Customer Portal, copy the SP Initiated Login URL and send it to your users. |
Add Customer Portal Users to Okta’s SAML App Integration
Users for whom you intend to enable SSO must first be in Okta to be available for adding to the application integration. For information on how to add users, see the Okta documentation.
In Okta, navigate to Applications > Applications and click Assign Users to App. The [name of app] page for your app appears.
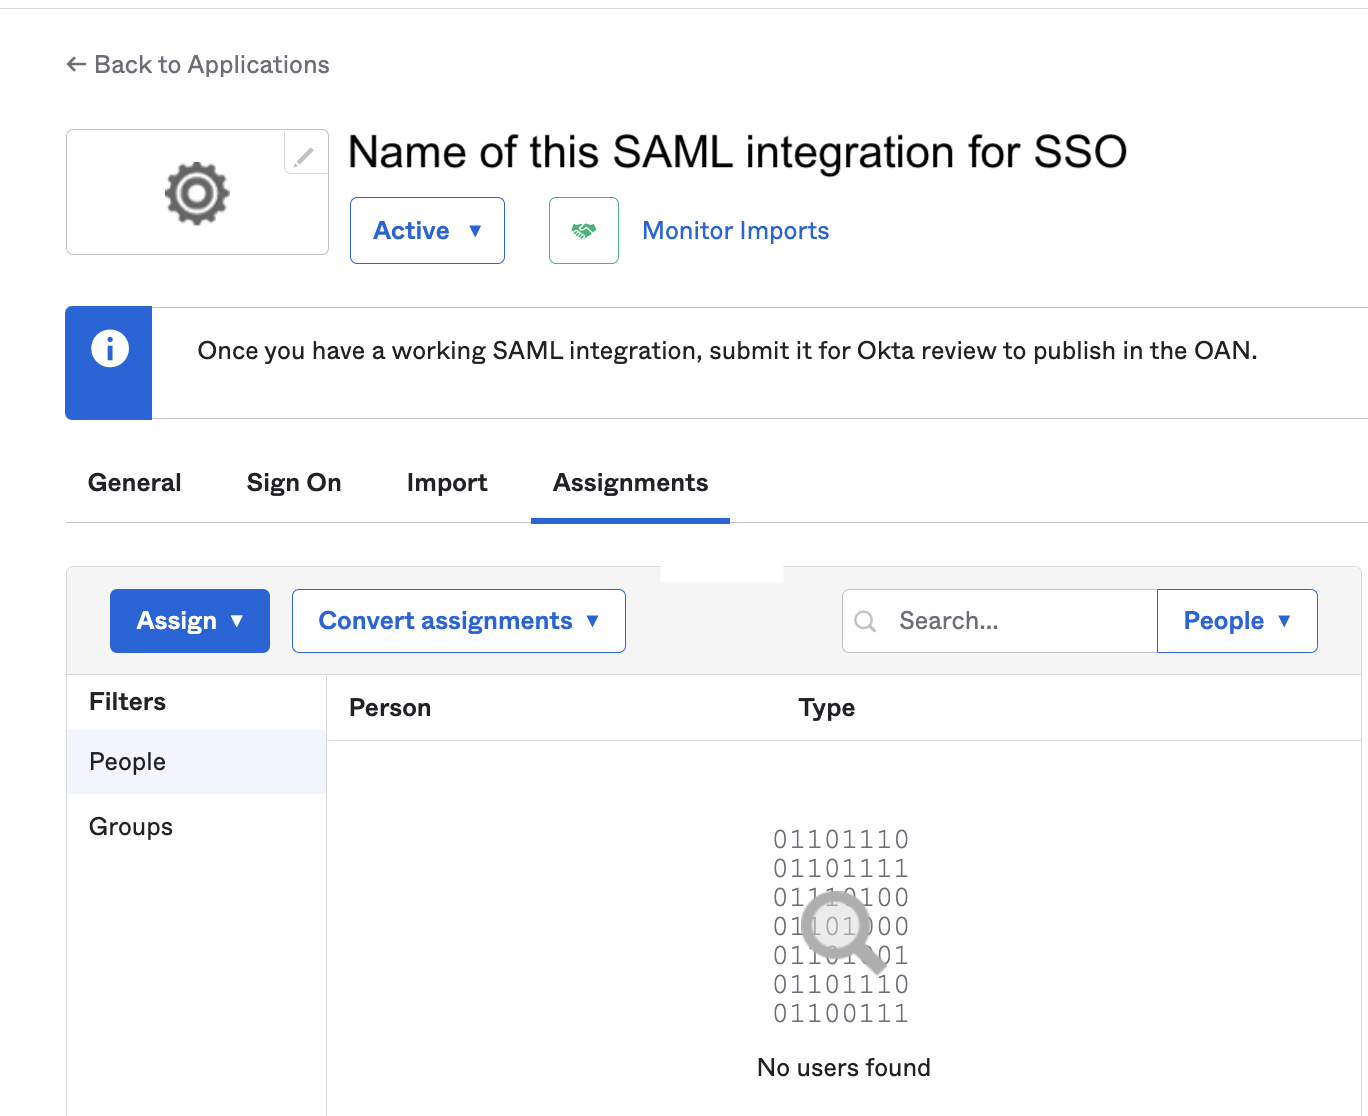
Assign Customer Portal organization members as a group or as individuals.
In the Customer Portal, enable SSO.
Enable IdP- and SP-initiated SAML Flows
This configuration enables both the IdP- and SP- initiated SAML flows for Okta. This subsection assumes that you are familiar with the instructions for IdP-initiated SAML flow with Okta.
| Step 1: | In the Customer Portal > Your organization > SSO, select Allow IDP initiated single sign-on to enable, and copy the IDP initiated login URL (ACS). |
|---|---|
| Step 2: | In Okta, go to App General > SAML Settings > Edit > Edit SAML Integration: General Settings > Configure SAML. |
| Step 3: | Still in Okta, paste the IDP-initiated Login URL from the Customer Portal into the Single sign-on URL field, click Use this for Recipient URL and Destination URL, then click Next and finally Finish. 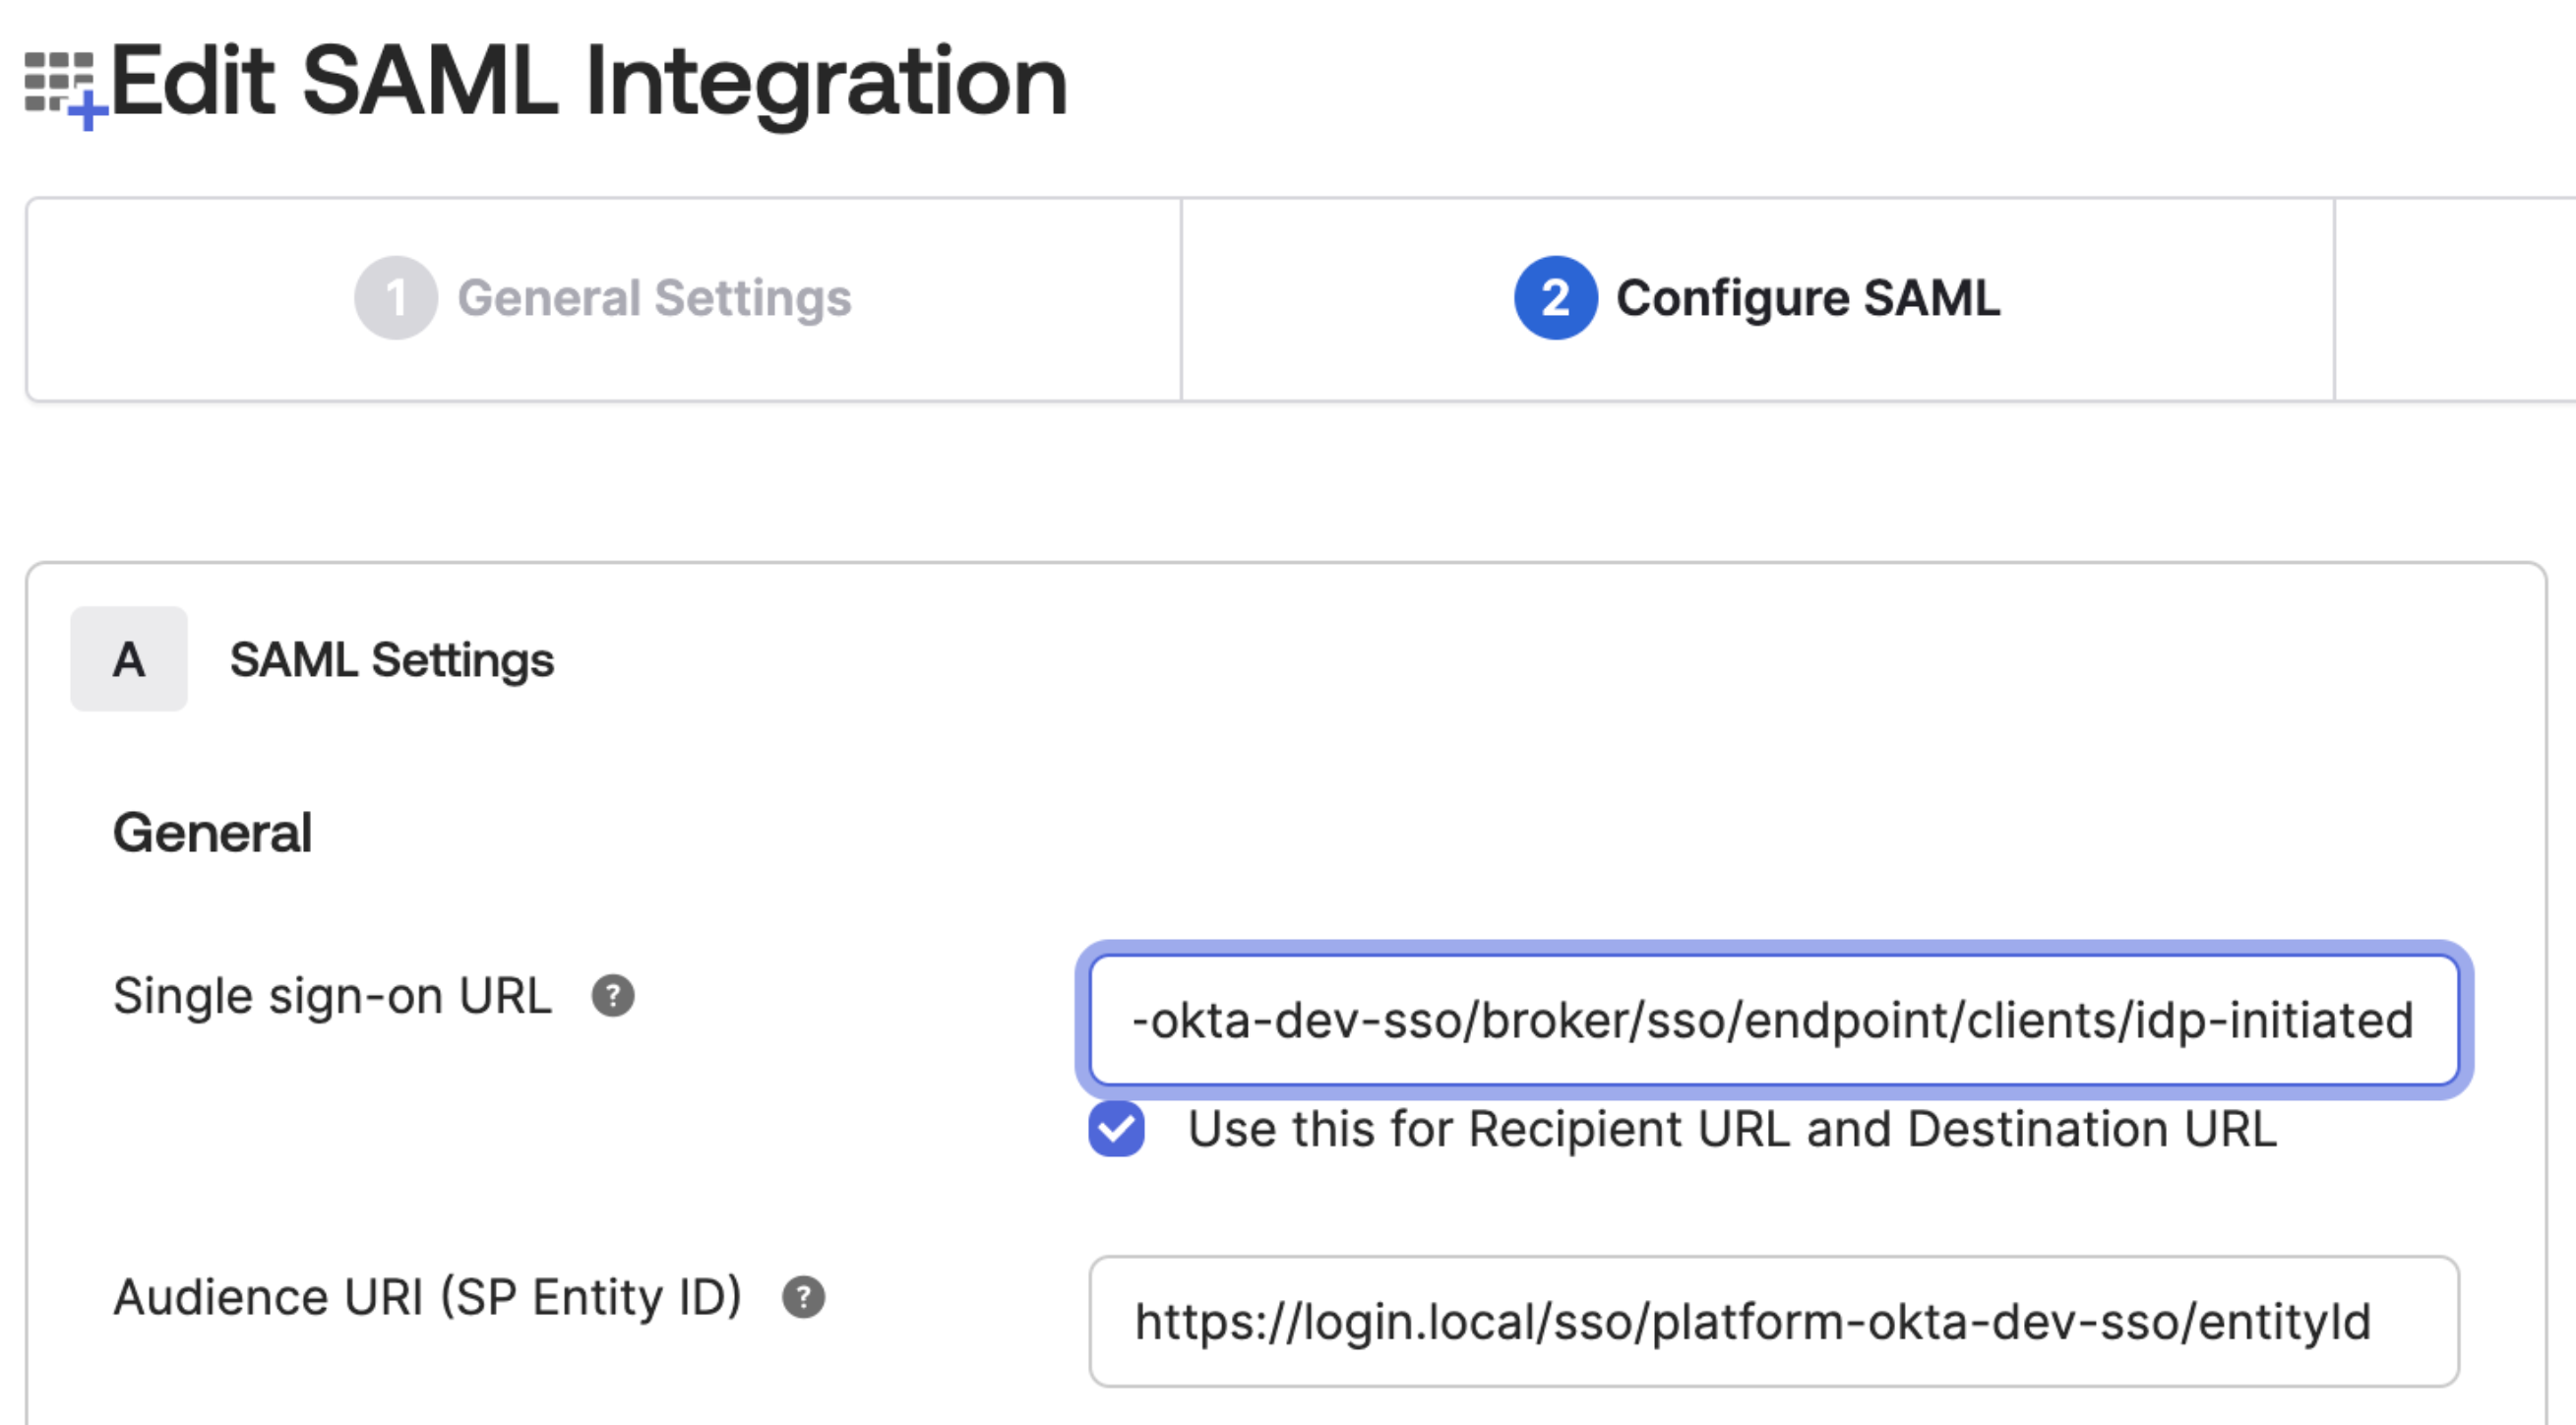
|
| Step 4: | Test: in Okta, on App General > App Embed Link, copy the IdP-initiated login link from the Embed link field into your browser to verify that the link redirects you to the Customer Portal after Okta login. 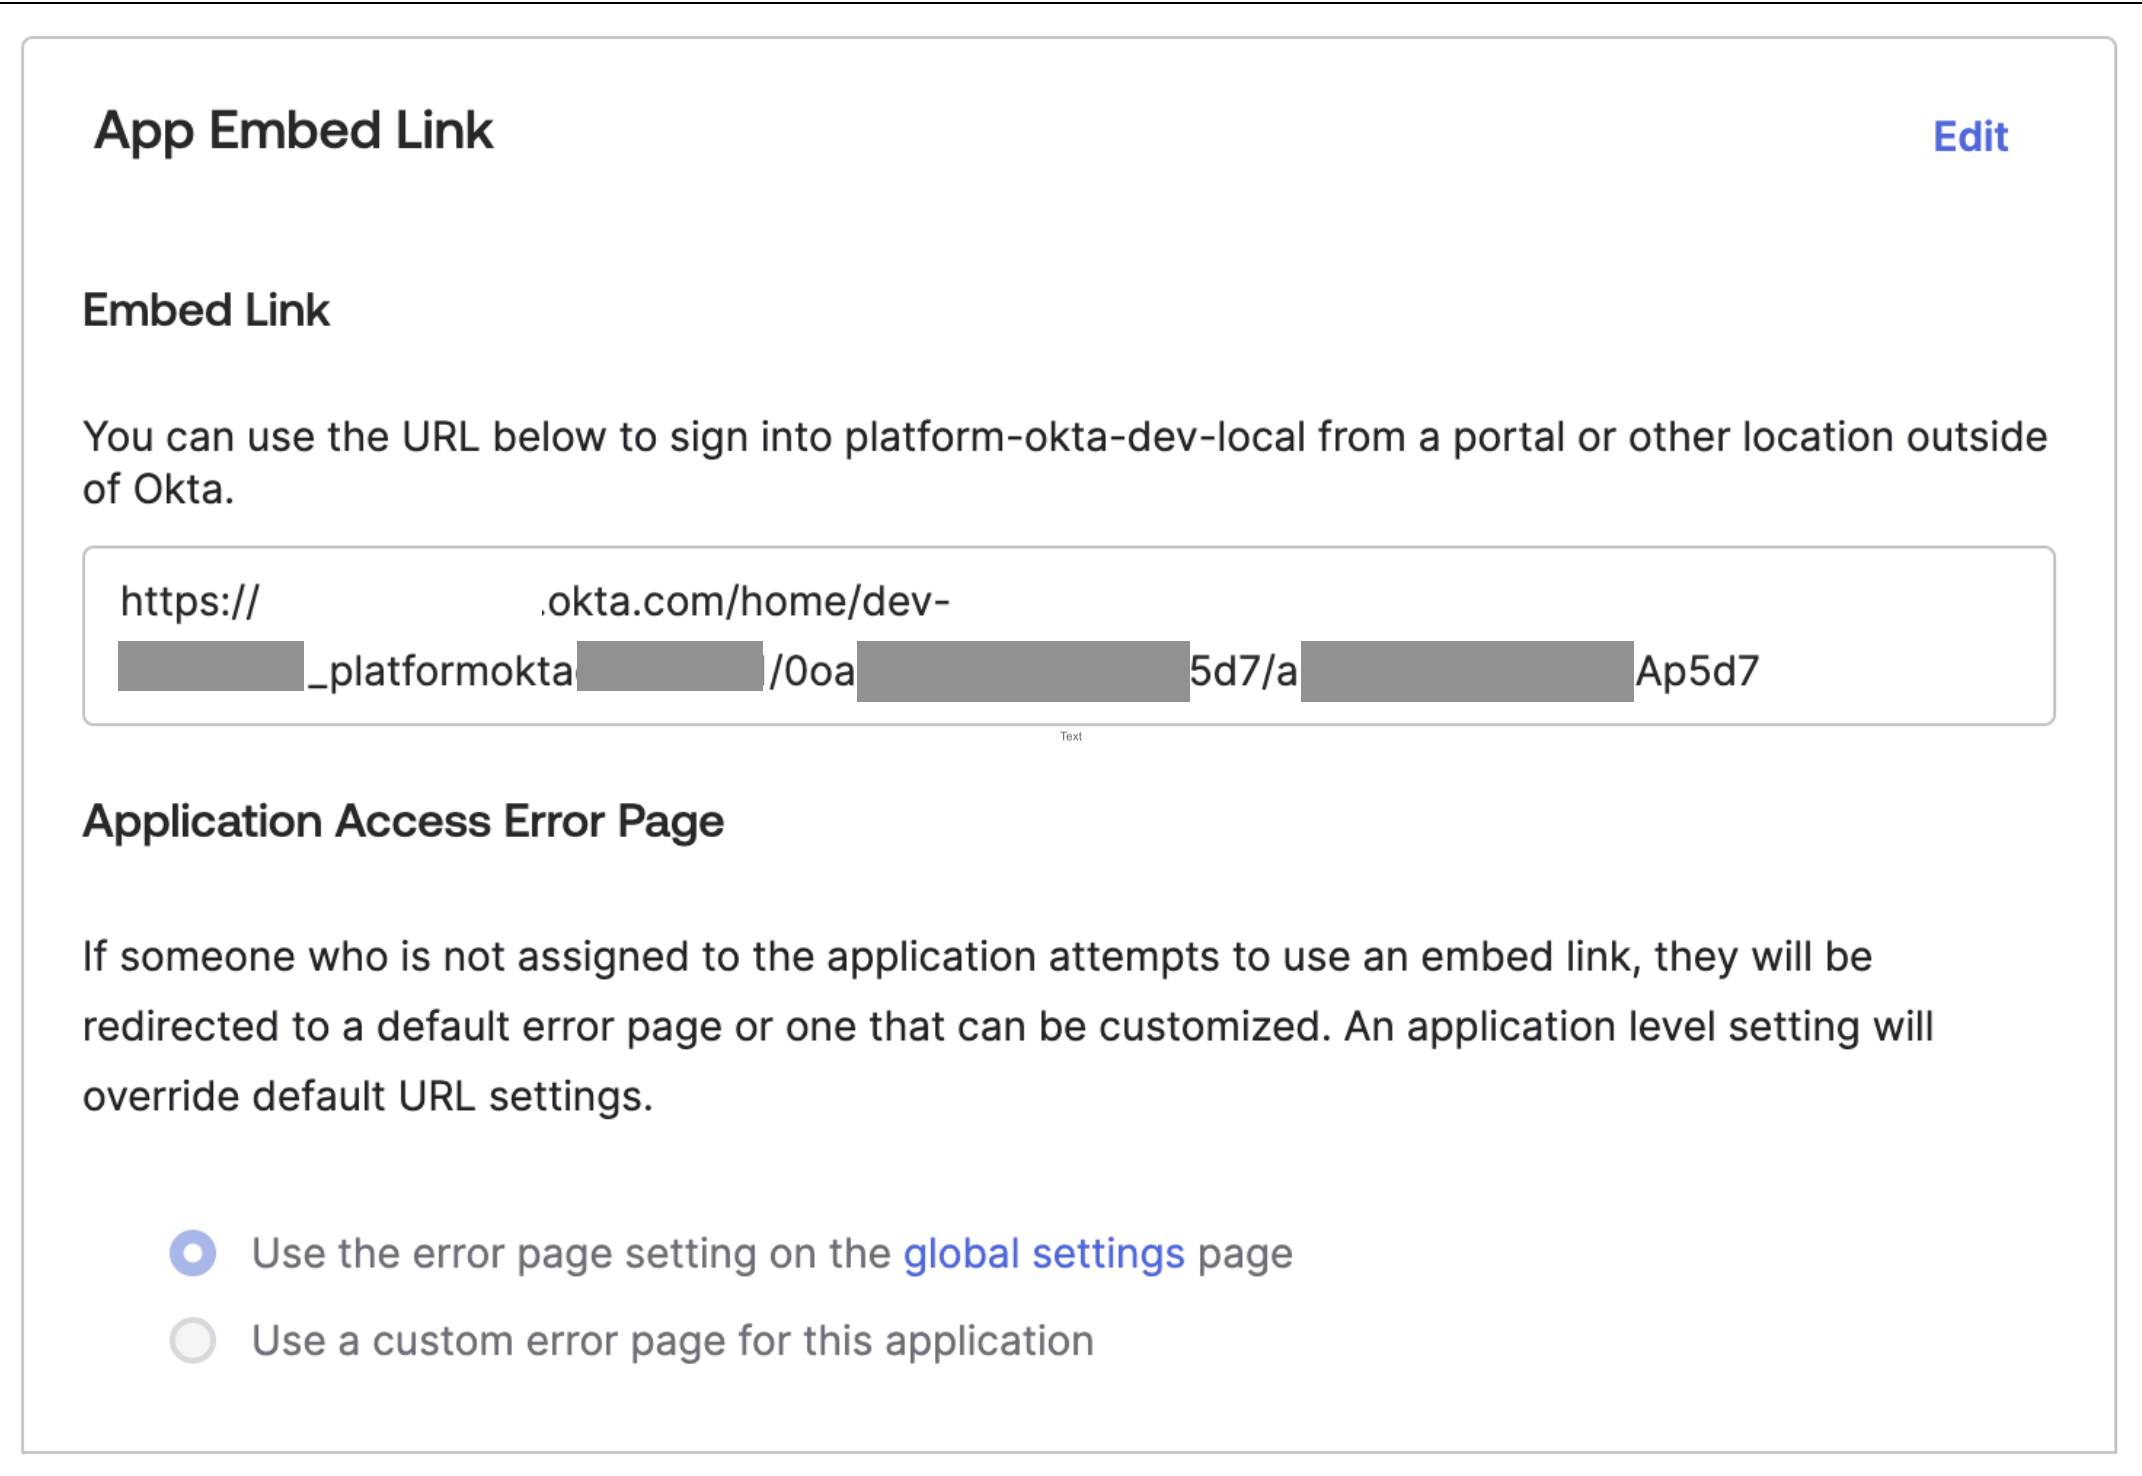
|
Enabling SSO with Google Workspace
This section describes how to enable SSO between Google Workspace and the Customer Portal.
Prerequisites
- Ensure that you are a Console Owner in the Customer Portal.
- System role: Your Google Workspace Administrator Seed Role must be Super Admin.
- Ensure you have access to the email account associated with that Google account.
Procedure
Add a Custom SAML App
| Step 1: | Log into the Google Admin Workspace by going to admin.google.com/ and selecting the appropriate account. |
|---|---|
| Step 2: | Enter username and password for the selected account. If your company has set up Google Groups to require a YubiKey, you will be prompted to plug one in and touch it. After login, the Admin page appears. 
|
| Step 3: | Go to Apps > Web and mobile apps. 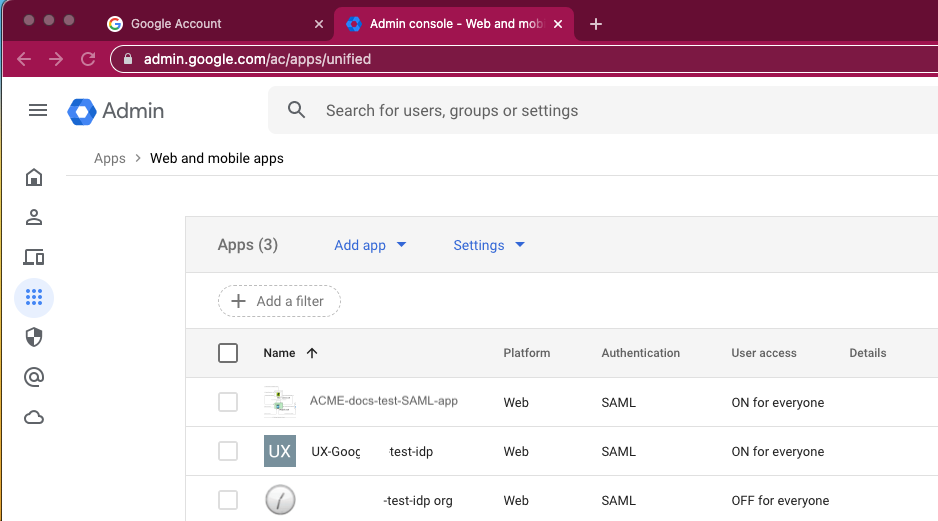
|
| Step 4: | Create a new SAML app by clicking on the Add app dropdown and selecting Add custom SAML app (you need be Super Admin to see this option.) 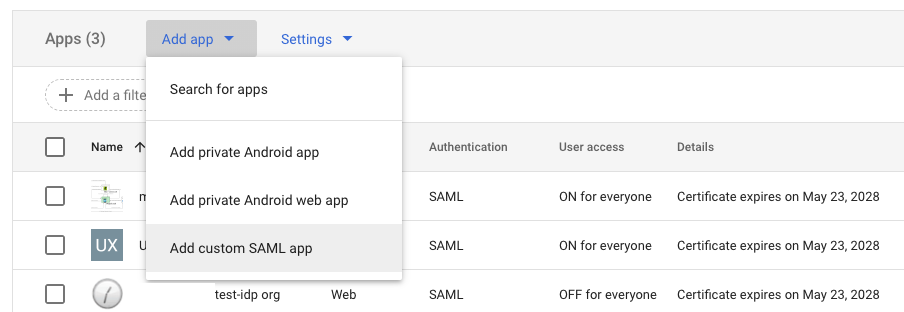
Under the Add custom SAML app banner, the 1 App details tab is displayed: 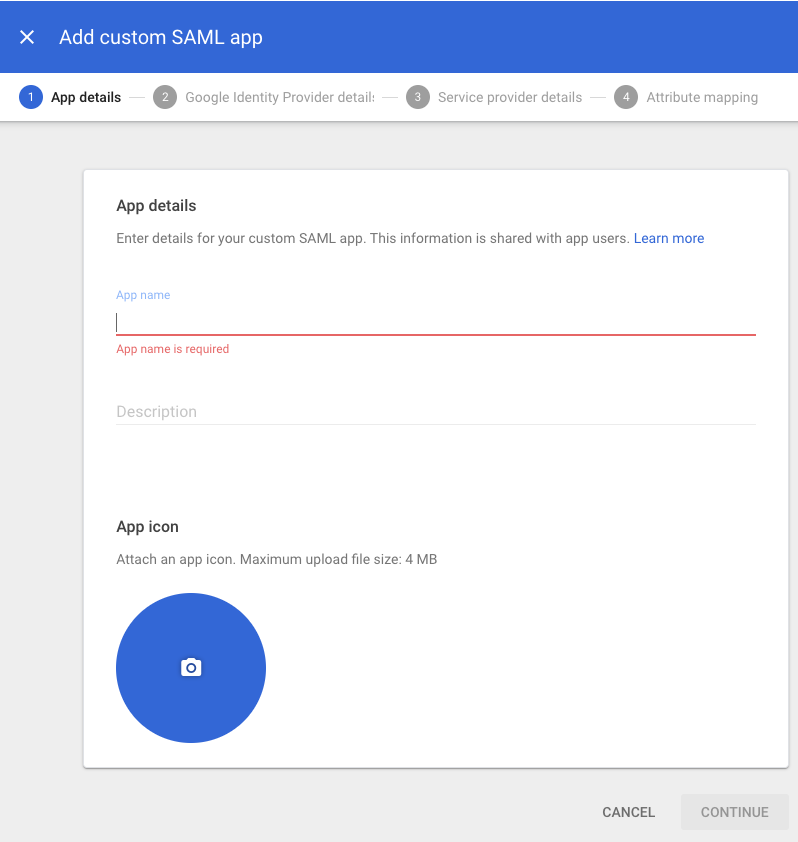
|
| Step 5: | In the 1 App details tab:
|
Configure the Custom SAML App
Copy and paste information between the Google Add custom SAML app and the Customer Portal Configure SAML Single Sign-On pages, have them open side-by-side in two browser windows.
| Step 1: | Log in to the Customer Portal as Console Owner and go to Your organization > SSO to open the the Configure SAML Single Sign-On. |
||||||||||||
|---|---|---|---|---|---|---|---|---|---|---|---|---|---|
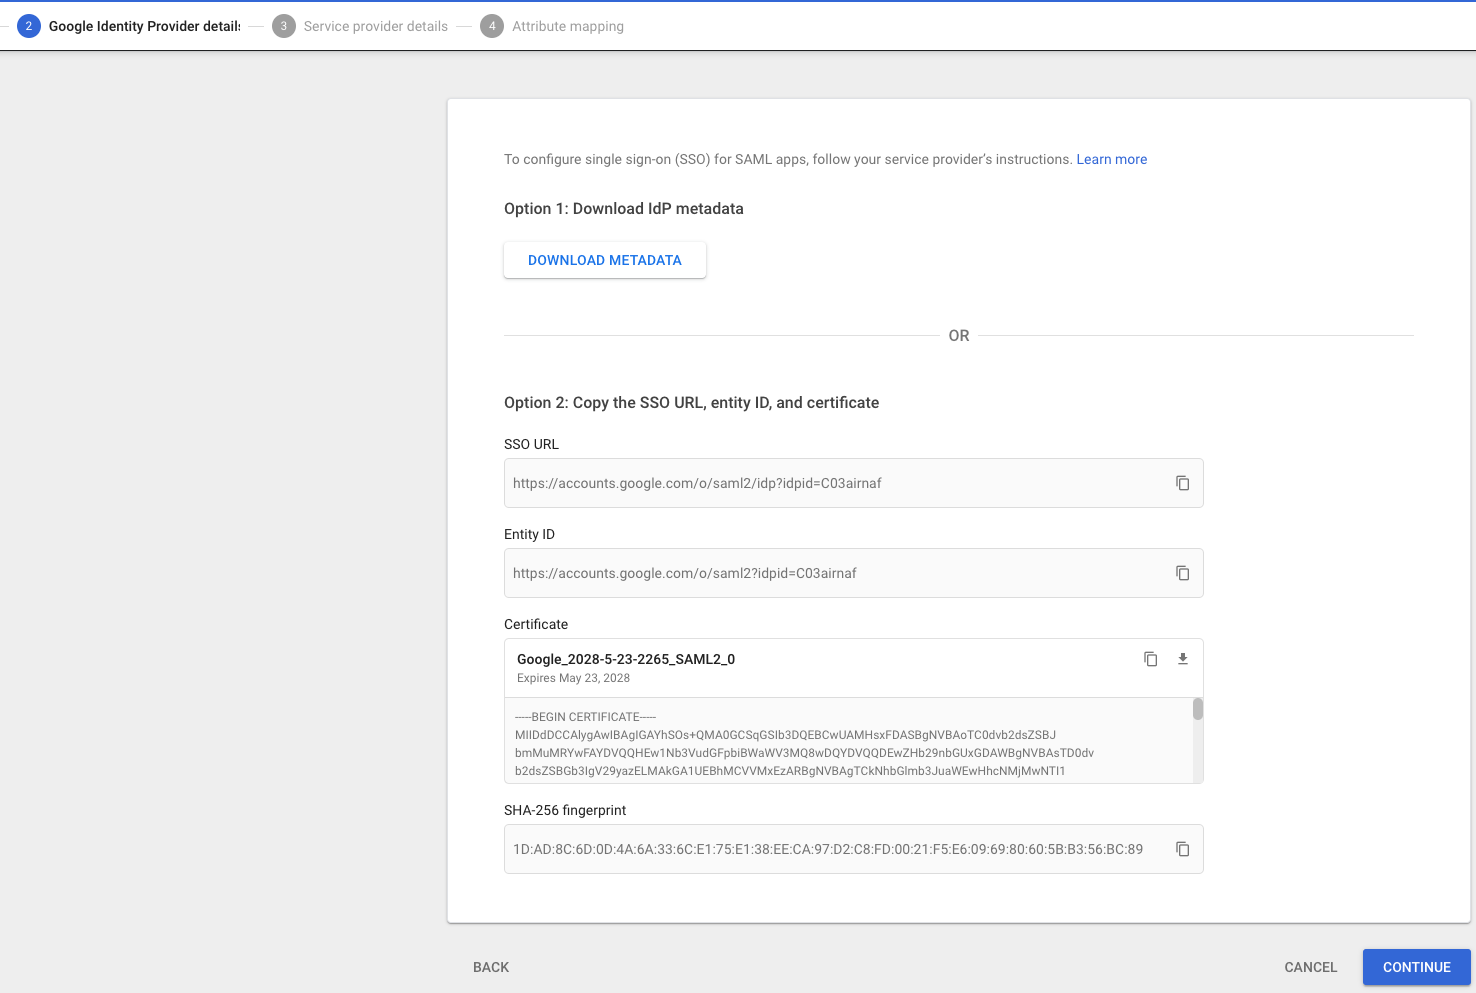
| Step 2: | Enter the following values from Google’s 2 Google Identity Provider detail page into the Customer Portal’s SSO configuration form, transferring them from the fields listed in the table:
On the Customer Portal’s Configure SAML Single Sign-On page, click Save configuration. |
||||||||||||
| Step 3: | In Google, in the Add custom SAML app screen, click CONTINUE. The 3 Service provider details window appears. 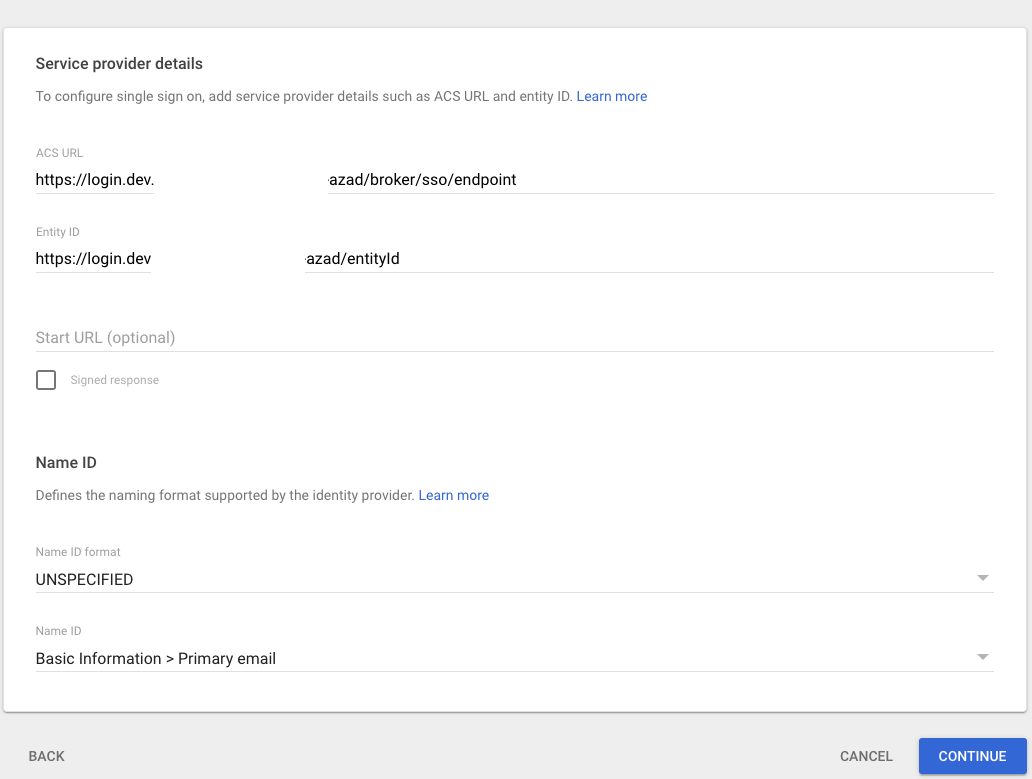
|
||||||||||||
| Step 4: | In Google, in the 3 Service provider details window, enter the following values from the Customer Portal into Google’s form, transferring them from the fields listed in the table:
|
||||||||||||
| Step 5: | In Google, in the 3 Service provider details screen, click CONTINUE. The 4 Attribute Mapping page appears (with Attributes and Group membership (optional). Skip these steps by clicking FINISH. The page for your new SAML app appears. 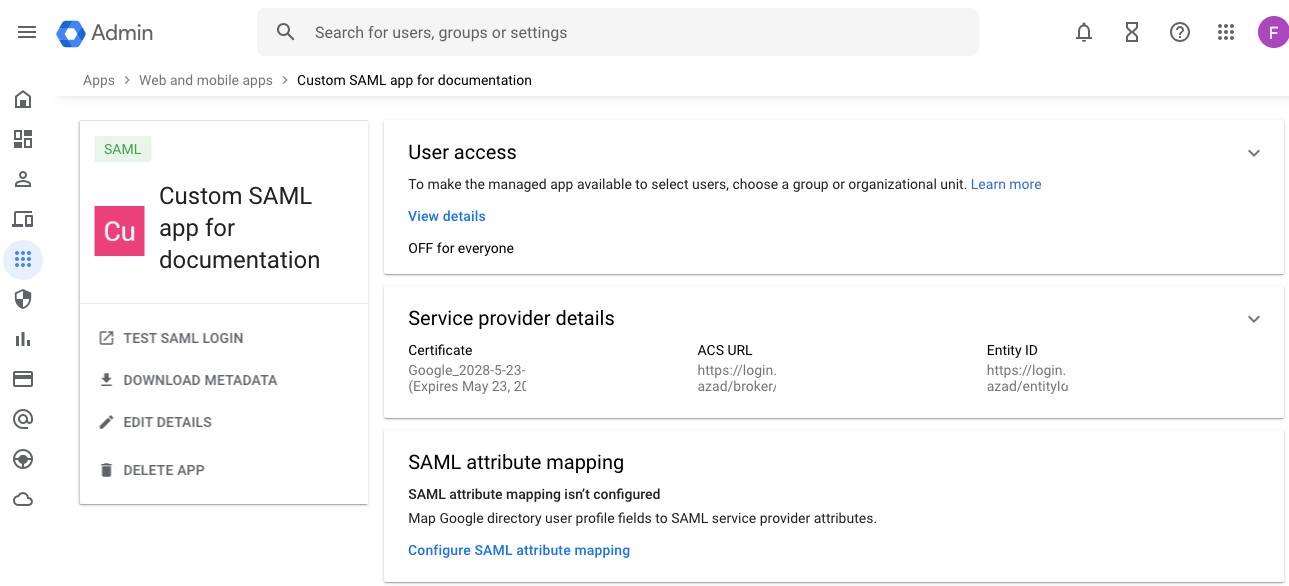
|
||||||||||||
| Step 6: | In Google, ensure that User Access is ON for everyone by clicking on the caret in the upper right corner of the User access section. The Service Status window opens. Toggle the service status radio control to ON for everyone and click SAVE. 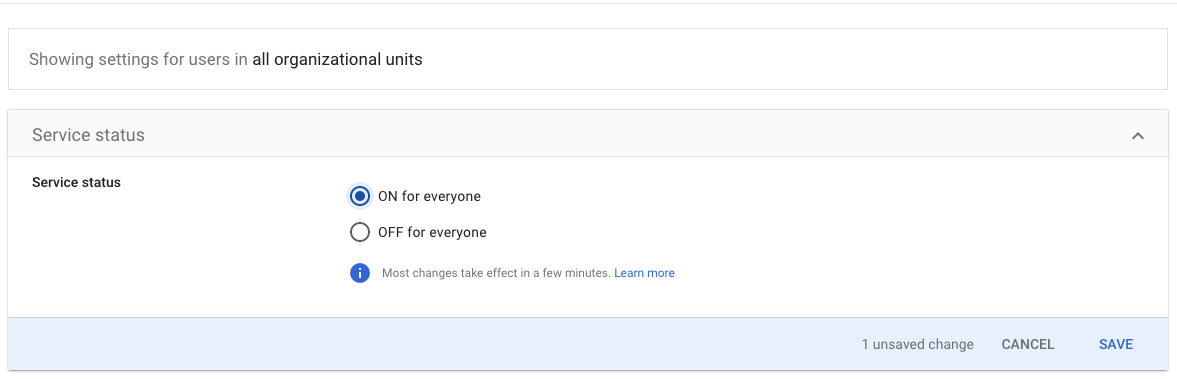
|
||||||||||||
| Step 7: | In the Customer Portal, click Save configuration and Enable SSO (unless already enabled). |
Troubleshooting
Issue: Changing the ACS URL in an existing Google IdP configuration does not appear to be successful even after waiting a significant amount of time.
- Workaround: Start over. Delete your Web and mobile app and start again.
Issue: Sometimes the Google site displays the 500 error after SSO configuration.
- Workaround: Update the Entity ID with a trailing forward slash “/”. If you already have such a slash, remove it.
Issue: Sometimes Google presents the message “Service is not configured for this user”.
- Workaround: Update the Entity ID with a trailing forward slash “/”. If you already have such a slash, remove it.
Enabling SSO with Duo
This section describes how to enable SSO between Duo and the Customer Portal. Note that unlike the other SAML integrations described above, Duo is not the IdP for the users. The following instructions assume that Duo is configured with Azure as the IdP, so those steps are not included.
Prerequisites
- Ensure that Duo’s IdP is configured (Azure for this environment).
- Ensure that you are a Console Owner in the Customer Portal.
- As Console Owner, add the SSO users to your organization in the Customer Portal, see Creating and Removing Users. Each user’s email address must match the email address used for that user in Duo and in Azure.
Procedure
To copy and paste information between the Duo and the Customer Portal configuration pages, have them open side-by-side in two browser windows.
| Step 1: | As administrator, log in to the Duo Tenant Admin portal: https://admin.duosecurity.com. 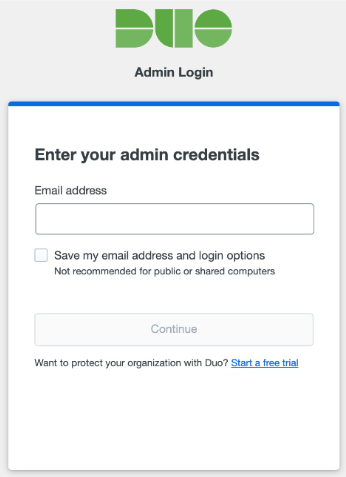
|
|---|---|
| Step 2: | Add the Delivery service application in Duo. Go to Applications > Protect an Application > YubiEnterprise Delivery > Protect. 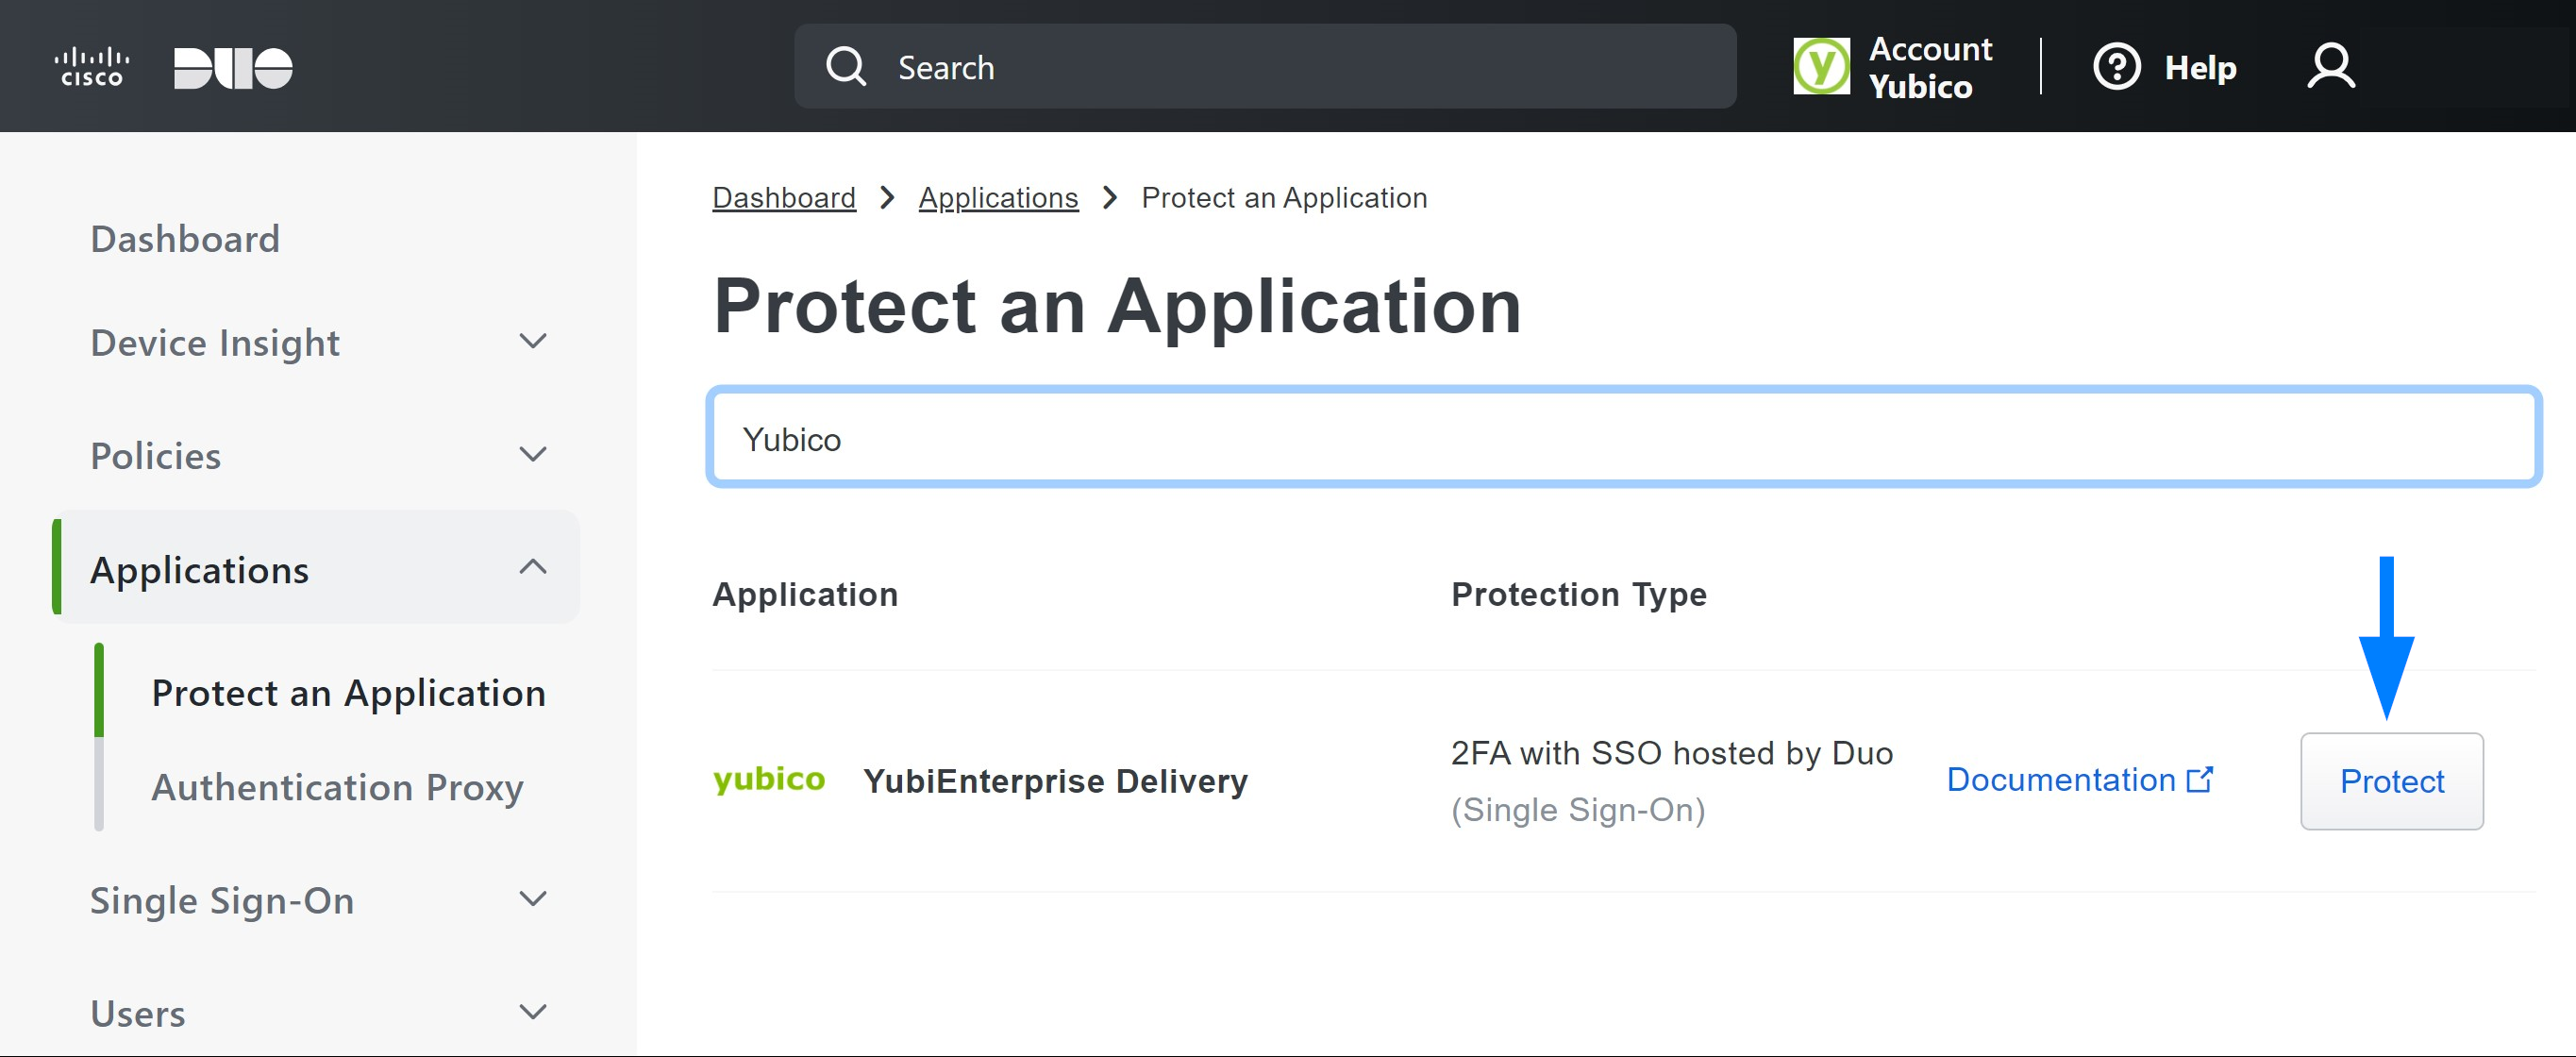
|
| Step 3: | Log in to the Customer Portal with the Console Owner role. |
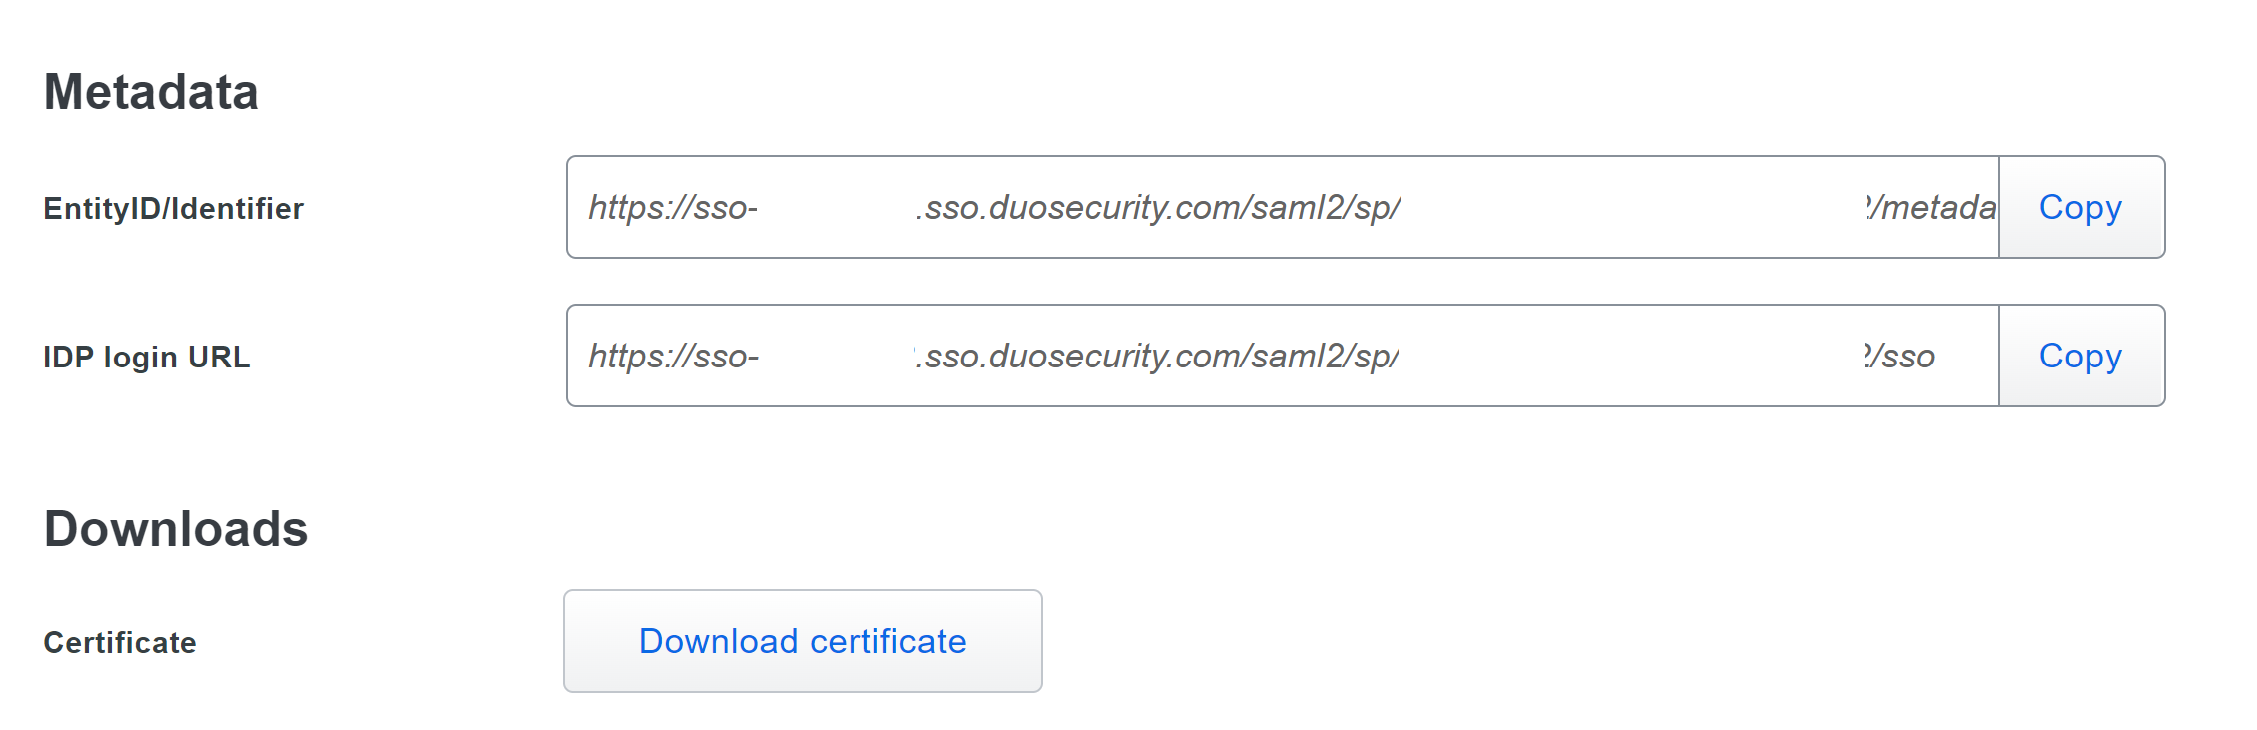
| Step 4: | Configure Customer Portal SSO to IdP (Duo). In the Customer Portal, go to Your organization > SSO to open the SAML Single Sign-On page. Copy the EntityID/Identifier field from section 1 in the Customer Portal to the EntityID/Identifier field in the Duo Service Provider section. |
| Step 5: | Configure IdP (Duo) to SP (Customer Portal).
|
| Step 6: | Save configuration and enable SSO in the Customer Portal. Ensure to click Save configuration and Enable SSO at the bottom of the SSO configuration page before closing your browser. |
| Step 7: | Configure Duo application attribute mapping. To configure a Duo attribute other than Email Address as the email address attribute sent to the Customer Portal in the SAML response, return to the Duo application configuration screen Service Provider section, check the box for Custom attributes, and then select the attribute to send as the email address attribute. 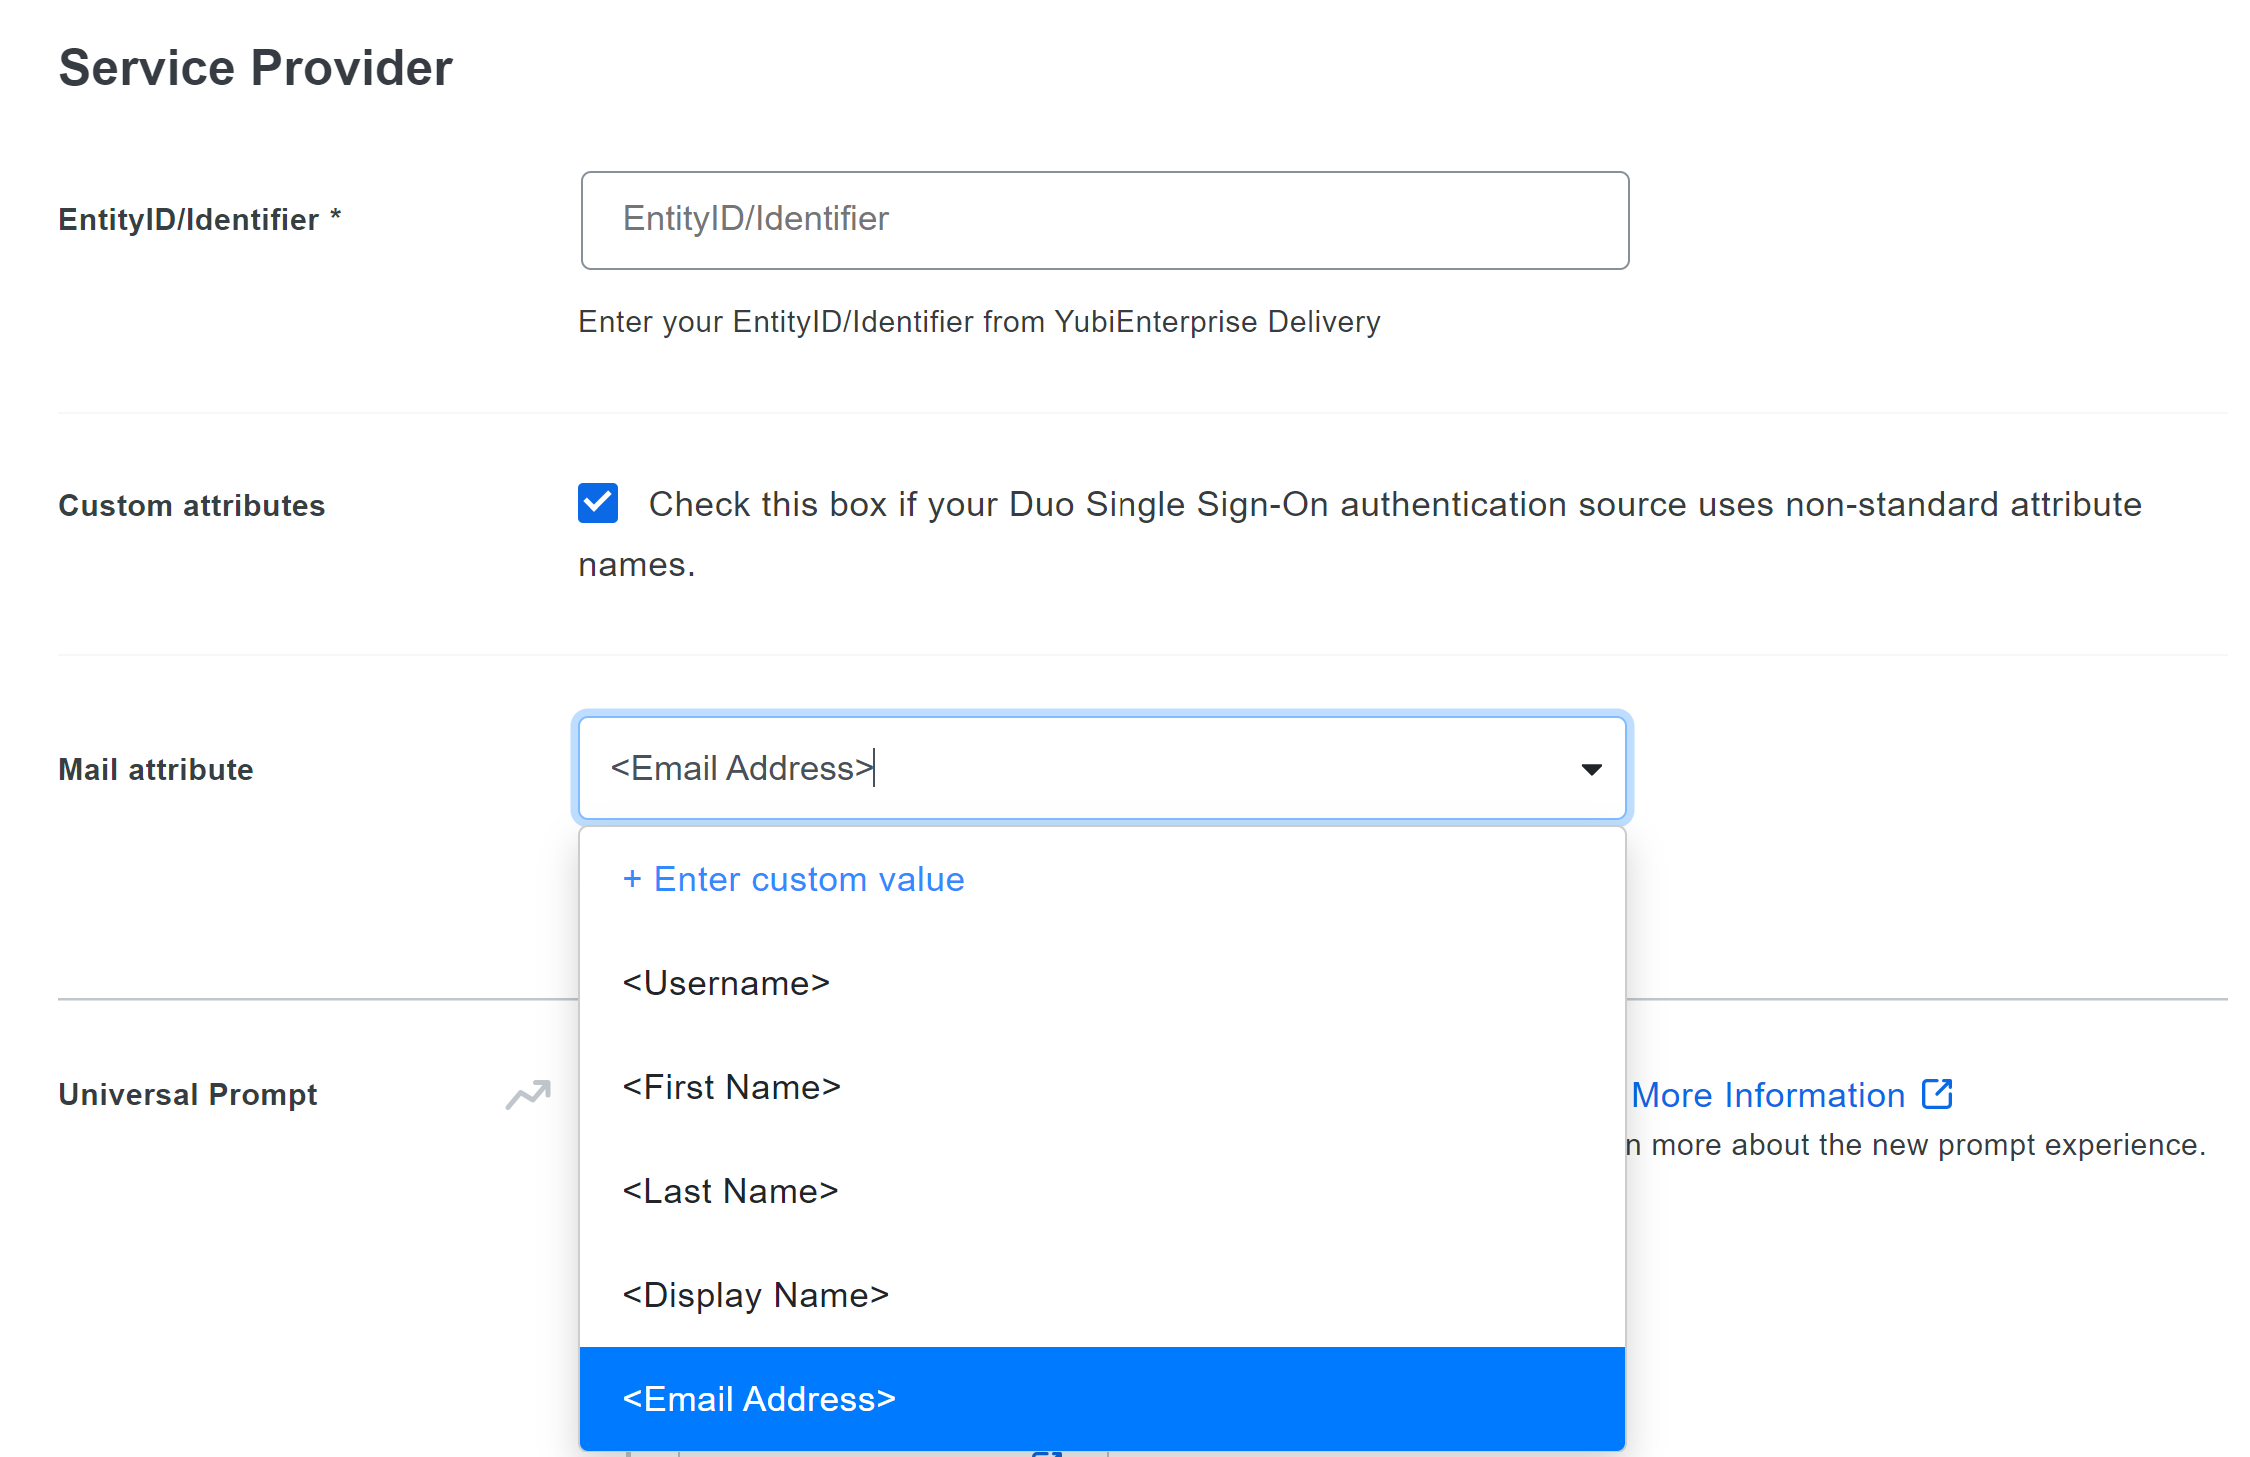
|
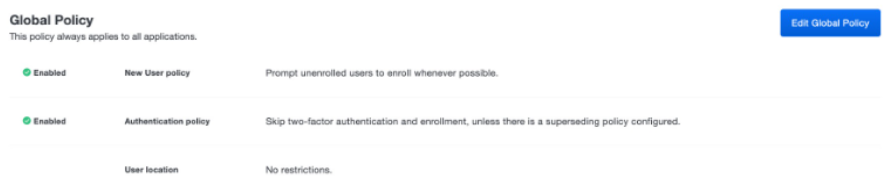
| Step 8: | Configure Duo application policy. Duo policies control how users authenticate to specific applications. Steps 8 and 9 ensure that MFA is enforced, and YubiKeys are enabled as Webauthn authentication method. These policies can be configured globally, or per application. If other applications are already being protected with Duo, ensure that the following settings can apply to all applications, or consider creating a unique Application policy for the Customer Portal. See the Duo documentation.

|
| Step 9: | Ensure hardware tokens are selected. In Duo, scroll down to the Authentication methods section, and ensure the Hardware tokens option is selected. 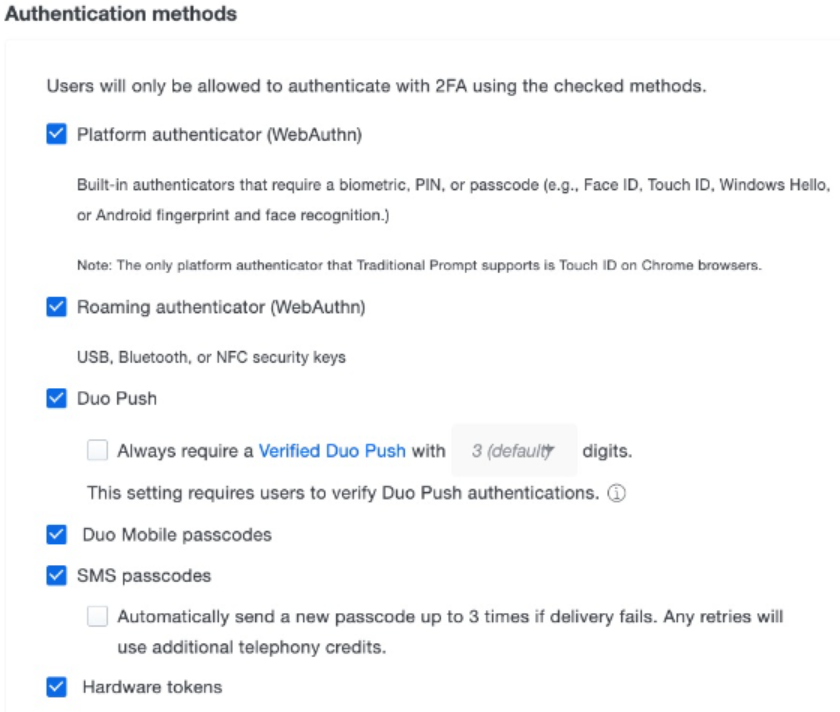
|
| Step 10: | Save the global policy. In Duo, click Save Policy at the bottom of the Global Policy configuration page. |
| Step 11: | Save the application configuration. In Duo, click Save at the bottom of the application configuration page. |
Enabling SSO for Other IdPs
To try out SSO for identity providers that Yubico does not explicitly claim to support, go to Your organization > SSO to open the Configure SAML Single Sign-On, and fill in the configuration fields.
Note
Be aware that the field labels vary depending on the IdP. For examples of these variances, look at the instructions for other supported IdPs.
Disabling SSO
To disable SSO, in the Customer Portal, go to Your organization > SSO. In the Configure SAML Single Sign-On page click Disable SSO.
Users added after SSO was enabled will not be able to login once SSO is disabled. Therefore you need to determine which users need to be enabled to log in with credentials again. To see which users have credentials, log in to the Customer Portal as Console Owner with credentials and go to Your organization > Users to open the Users page. The MFA column on the page indicates which users have credentials.
To enable users added after SSO enablement to enroll credentials and log in again, reset them as described in Account Resets and Role Changes.