Requesting Shipments
This section provides an introduction to shipment requests and how to work with product inventories. For more information, see also Delivery Concepts and Managing Shipments.
Shipments can be created in the Customer Portal for automatic processing and delivery using the Delivery service. Shipments can also be created through system integrations using the YubiEnterprise API, see Shipping Pre-enrolled Keys (FIDO Pre-reg).
In some cases shipments are also manually created by Yubico. Upon successful creation, shipments become visible in the Shipments page were you can monitor their status, and update information if needed. Shipments created through API integrations will also appear in the Shipments page, and can be managed there just like shipments created from other sources.
In the Customer Portal, you can create shipment requests using the following methods:
- Ship keys to a single address, see Shipping to a Single Address.
- Ship keys to multiple addresses in one request, see Shipping to Multiple Addresses.
- Ship keys through end user self-service, see Self-service Ordering.
Delivery Overview
The Delivery overview page in the Customer Portal provides an overview of your inventory of YubiKeys that are currently available for shipment. For an overview of all your purchased inventory, see Inventory.
Note
Due to for example inventory allocation, the number of shippable YubiKeys on the Delivery overview page, might differ from the number of remaining available licenses shown in the Inventory page. See Shippable Inventory.
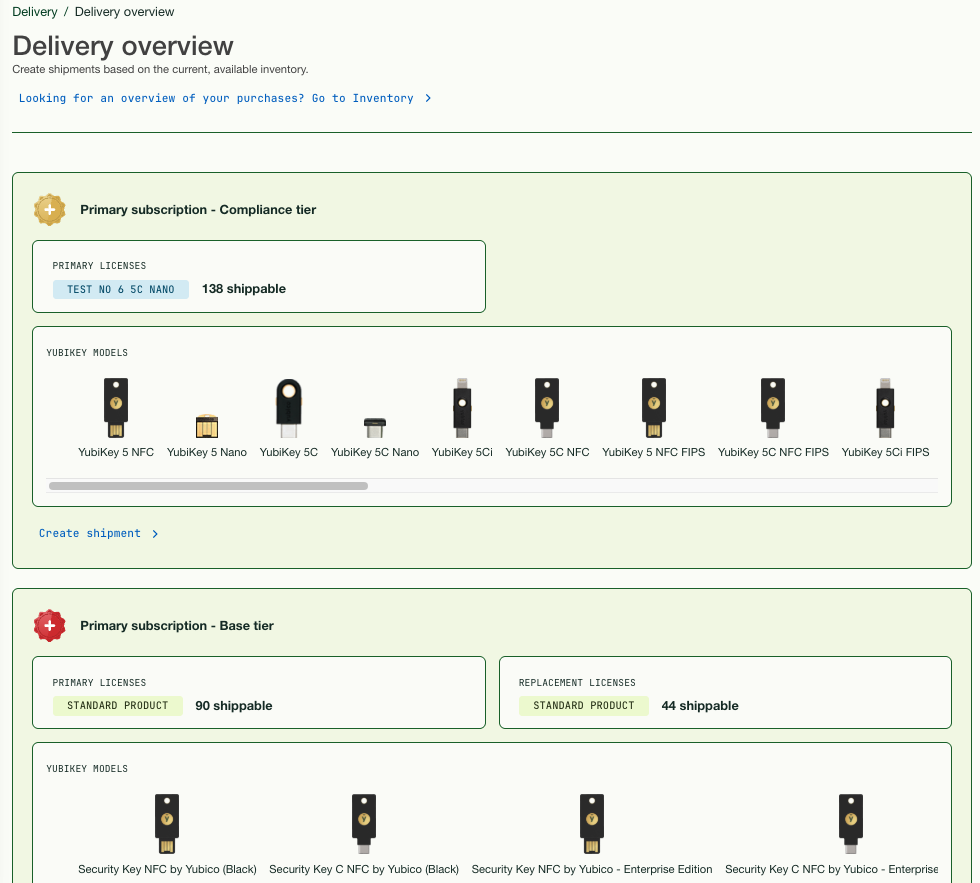
The Delivery overview page includes the following information:
- Subscription tiers purchased by your organization, for example “Primary subscription - Compliance Tier”. See Purchasing Models.
- Total number of licenses within each tier (Primary/Replacement/Backup) available to be used for shipment of YubiKeys.
- YubiKey models available for selection within each subscription tier, see Customizations.
- Inventory with customization options available for the organization.
- Perpetual purchase inventory, if available.
- List of recent shipments, click View all to open the Shipments page and see all shipments.
Selecting Product Inventory
To get the most value out of your subscription, it is important to select the appropriate product inventory to draw from when creating shipment requests. Available inventories of YubiKey models and licenses depend on the product tiers and subscription plans purchased by your organization as described in Purchasing Models.
These are the product license types and their intended usage:
Primary: The main license for primary active users at the purchasing occasion for the initial deployment of YubiKeys in an organization, during the subscription term period.
Backup: Licenses to provide new keys to primary users, to replace lost or unavailable keys during the subscription term period.
A Backup license is only available to use with a Primary license purchase, and is granted to a primary user needing 2 or more YubiKeys. It is a separate license because Yubico provides a 25% discount per Backup license when 2 or more keys are supplied to the same user. A Backup license also applies to replacement YubiKeys when an employee (primary user) leaves and takes their 2 keys with them, and the new employee requires a backup key.
Replacement: Licenses for new non-primary users that join the organization during the subscription term period.
For example, a new hire replacing an employee who left the organization. The employee that left is allowed to keep their YubiKey for personal use. The new employee takes over the Primary license and is granted their own key via the Replacement license. The replacement inventory is also designed to cover lost, damaged, or stolen keys for primary users. A subscription includes up to 25% Replacement licenses at no extra cost for the subscription term period.
Backup - Replacement: Replacement of backup YubiKeys for non-primary users.
If a primary user has been granted two keys (Primary and Backup licenses), and that user leaves and a new (non-primary) user is hired to replace the employee that left, the new user will receive both a Primary license (Primary replacement) and a Backup license (Backup replacement).
The following image shows an example of a purchase order for YubiKey licenses. When Yubico has added the purchase order to your organization account, the information appears on your Purchase orders > Purchase order details page.
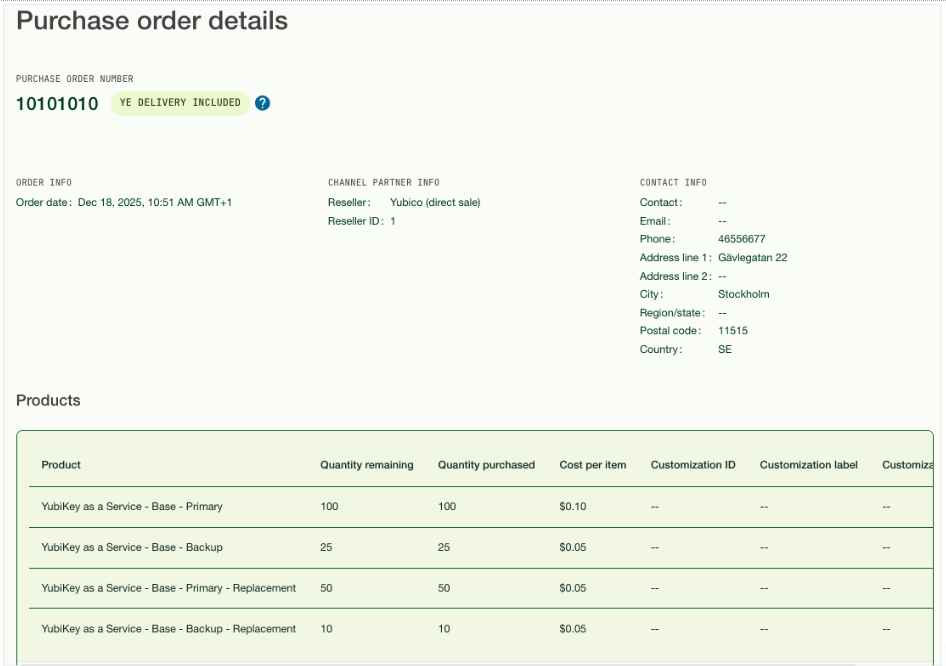
In this example, an organization has purchased a Base tier subscription with the following YubiKey licenses:
- 100 Primary licenses - for primary users at the purchasing occasion, to cover the initial deployment of YubiKeys in the organization, during the subscription term period.
- 50 Primary Replacement licenses - for new non-primary users that join the organization during the subscription term period, replacing primary users that left.
- 25 Primary Backup licenses - to provide new keys to primary users, replacing their lost or unavailable keys during the subscription term period.
- 10 Backup Replacement licenses - to provide backup keys to new non-primary users, replacing backup license for employees that left.
The following image shows what these product inventories look like in the Delivery overview page. The YubiKey models are those included in the Base tier, and are available for selection with all license types in the subscription when requesting shipments.
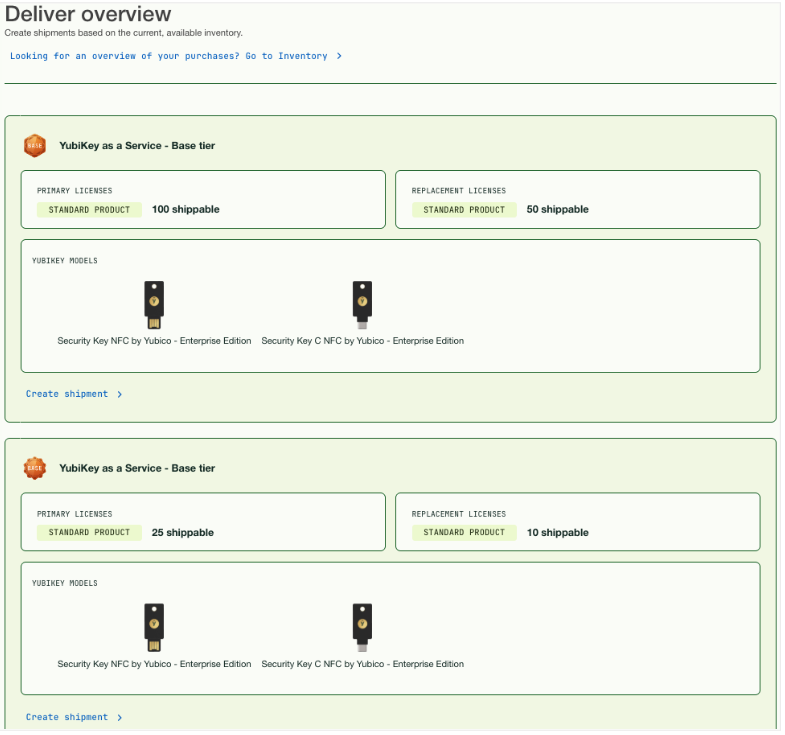
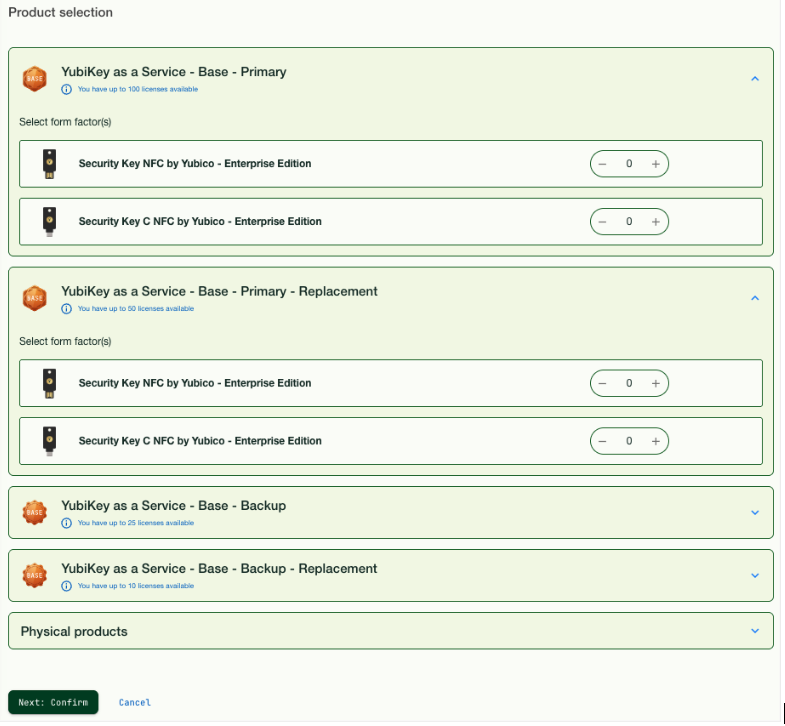
To help users select products from the Primary/Primary Replacement inventories before drawing from a Backup/Backup Replacement inventory, the Primary/Primary Replacement inventories are expanded when clicking Create shipment in the Delivery overview page.
The following scenarios based the above example, provide guidelines for determining which inventory to draw from when requesting shipment of YubiKeys:
- Initial rollout to primary (active) users in the organization - select keys from the Base-Primary inventory.
- Primary user lost their key (existing Primary license) - select key from the Base-Primary-Replacement inventory.
- Primary user needs a second key as backup (existing Primary license) - select key from the Base-Backup inventory.
- Primary user needs a different key model (existing Primary license) - select key from the Base-Backup inventory.
- New employee (replacement, non-primary user taking over Primary license) - select keys from the Base-Primary-Replacement inventory.
- New employee (replacement) needs a backup key (existing Primary-Backup license) - select key from the Base-Backup-Replacement inventory.
Common Inventory Issues
If you run out of Primary or Replacement subscription inventory during the subscription term period, for example by having more new hires than anticipated, you cannot use Backup or Backup-Replacement licenses to provide YubiKeys to these (non-primary) users. Backup and Backup-Replacement licenses can only be used with Primary licenses.
To replenish the Primary product inventory, reach out to Yubico to place a purchase order for more Primary licenses.
The following are other common reasons why a shipment is not possible:
- The Purchase order is out of inventory. Contact Yubico for replenishment.
- There is an inventory allocation for your organization, see Shippable Inventory.
- The selected inventory is for pre-registered YubiKeys. These cannot be ordered from the Customer Portal, only through an API integration, see Shipping Pre-enrolled Keys.
- The Purchase order does not have the Delivery service enabled. Contact Yubico for enablement.
If you are using the YubiEnterprise API to integrate with the Delivery service, ensure you are referencing the correct inventory when requesting shipments through the API. For more information, see Product Inventory Type Mapping.