Passkeys: FIDO2
Important
Yubico Authenticator’s FIDO2 functionality is only available for FIDO2-certified YubiKeys. This includes YubiKey 5 Series (standard, FIPS, and CSPN), YubiKey Bio Series, and Security Key Series. For a complete breakdown of Yubico Authenticator functionality by platform and connection type for each YubiKey model, see the Yubico Authenticator Functionality table.
Passkeys are credentials that allow you to perform passwordless authentication to accounts or services using the FIDO2 standard. Passkeys are created by relying parties (the sites and services that use them for authentication).
Passkeys can be stored on FIDO2-certified YubiKeys, and Yubico Authenticator helps you manage them. For more information on which services support FIDO2 authentication and an overview of their unique security key registration processes, see the Works with YubiKey catalog.
Non-passkey FIDO2 credentials can also be stored on YubiKeys, but they are not discoverable and cannot be listed and managed on the Passkeys page.
The Passkeys feature of Yubico Authenticator allows you to:
- View and delete passkeys stored on a YubiKey.
- Create or change a YubiKey’s FIDO2 PIN.
- Enable Enterprise Attestation (EA) and check a YubiKey’s EA status.
Creating and managing the FIDO2 PIN
Before you can register a YubiKey for passwordless FIDO2 authentication with an account or service (which means a passkey credential is created, linked to a specific account, and stored on the YubiKey), you must create a FIDO2 PIN.
If you have not created a PIN via Yubico Authenticator prior to your first registration attempt with an account/service, you will be prompted to do so during the registration process. Once the PIN is created, you will have to provide it during each subsequent registration with other accounts and services.
For YubiKey Bio Series Multi-protocol Edition keys, the FIDO2 application and the PIV application share a PIN. Therefore, performing the “Change PIN” action on the Passkeys, Fingerprints, or Certificates screen modifies the same PIN.
Warning
The YubiKey provides a total of eight (8) attempts to enter the correct current PIN during a PIN change attempt or registration attempt. After three (3) incorrect attempts in a row, that key must be removed and reinserted into your device. After 8 incorrect attempts, the FIDO2 application becomes blocked and must be reset. Entering the PIN correctly resets the PIN attempt counter back to 8.
For more information on the FIDO2 PIN, see Yubico’s knowledge base article, Understanding YubiKey PINs.
Creating a FIDO2 PIN on desktop and Android
To create a FIDO2 PIN on desktop and Android devices, do the following:
Plug your YubiKey into your device, click on the left menu icon in the upper left corner of the app and select Passkeys.
To connect via NFC on desktop, click the NFC icon in Yubico Authenticator and place your YubiKey on top of a desktop NFC reader. The key must maintain constant contact with the reader throughout the operation.
To connect via NFC on Android, tap your YubiKey on the back of your device to scan.
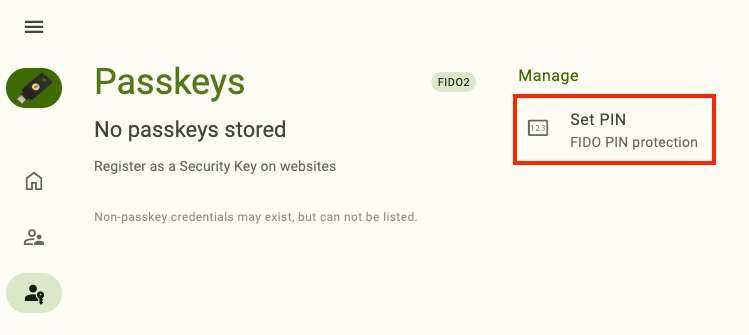
Click Set PIN under Manage.
To find the Manage section in a narrow app window, click on the right menu icon in the upper right corner of the app.
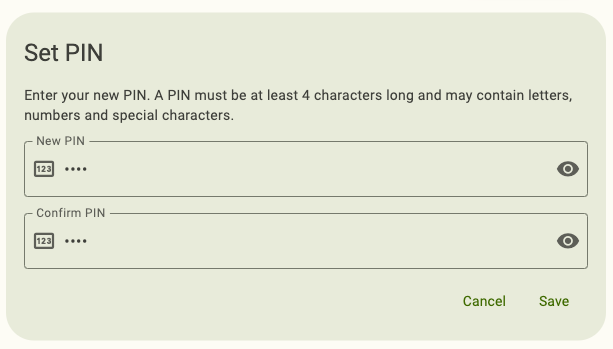
In the Set PIN window, enter your new PIN.
Note
PIN requirements depend on your YubiKey’s model, firmware version, and PIN complexity enforcement.
Enter the new PIN again to confirm and click Save. For NFC connections on Android, tap your key to complete the operation.
Creating a FIDO2 PIN on iOS/iPadOS
To create a FIDO2 PIN on iOS/iPadOS devices, do the following:
Plug your YubiKey into your device.
To connect via NFC on iOS, swipe down on the screen and tap your YubiKey on the back of your device to scan.
Note
Lightning is currently the only supported physical connection type for iOS and iPadOS devices. NFC wireless connections are supported on iOS but not on iPadOS. For a complete breakdown of Yubico Authenticator functionality by platform and connection type for each YubiKey model, see the Yubico Authenticator Functionality table.
Click the three dots in the upper right corner of the app and select Configuration. Select Manage PIN under the FIDO section.
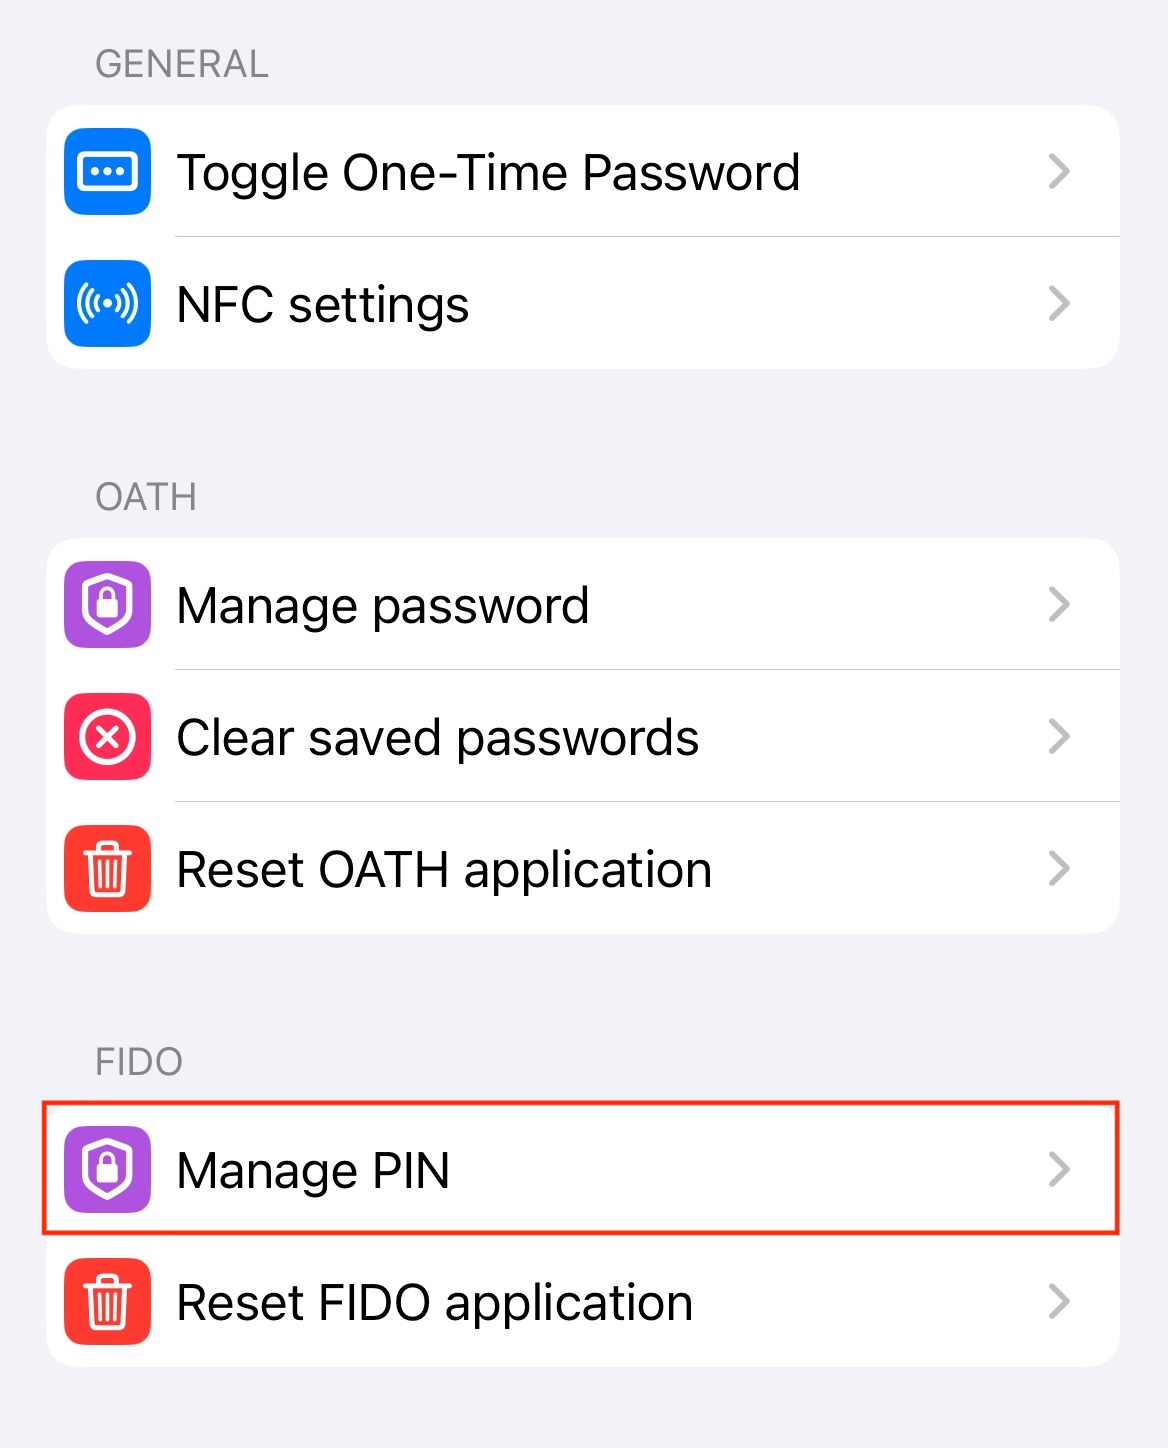
In the FIDO PIN window, click Set PIN. Enter your new PIN.
Note
PIN requirements depend on your YubiKey’s model, firmware version, and PIN complexity enforcement.
Enter the new PIN again to confirm and click Set. For NFC connections on iOS, scan your key when prompted to complete the operation.

Changing the FIDO2 PIN on desktop and Android
To change the FIDO2 PIN on desktop and Android devices, do the following:
Plug your YubiKey into your device, click on the left menu icon in the upper left corner of the app, and select Passkeys.
To connect via NFC on desktop, click the NFC icon in Yubico Authenticator and place your YubiKey on top of a desktop NFC reader. The key must maintain constant contact with the reader throughout the operation.
To connect via NFC on Android, tap your YubiKey on the back of your device to scan.
Enter your FIDO2 PIN and click Unlock. For NFC connections on Android, tap your key to complete the operation.
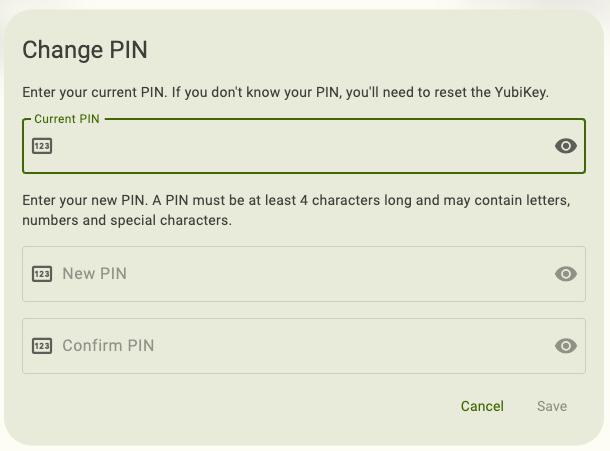
Click Change PIN under Manage.
To find the Manage section in a narrow app window, click on the right menu icon in the upper right corner of the app.
In the Change PIN window, enter your current PIN.
If you have forgotten your current PIN, the only way to change it is to reset the FIDO2 application of your YubiKey to factory default settings (which will remove the PIN). Note that this will delete ALL fingerprints and passkeys stored on the YubiKey, and you will no longer be able to access those accounts with that key (we recommend registering at least one backup YubiKey with each account/service to maintain access). Once reset, you can always re-register your key with those same accounts and services.
Enter your new PIN.
Note
PIN requirements depend on your YubiKey’s model, firmware version, and PIN complexity enforcement.
Enter the new PIN again to confirm and click Save. For NFC connections on Android, tap your key to complete the operation.
Changing the FIDO2 PIN on iOS/iPadOS
To change a FIDO2 PIN on iOS/iPadOS devices, do the following:
Plug your YubiKey into your device.
To connect via NFC on iOS, swipe down on the screen and tap your YubiKey on the back of your device to scan.
Note
Lightning is currently the only supported physical connection type for iOS and iPadOS devices. NFC wireless connections are supported on iOS but not on iPadOS. For a complete breakdown of Yubico Authenticator functionality by platform and connection type for each YubiKey model, see the Yubico Authenticator Functionality table.
Click the three dots in the upper right corner of the app and select Configuration. Select Manage PIN under the FIDO section.
In the FIDO PIN window, click Change PIN. Enter your current PIN followed by your new PIN.
Note
PIN requirements depend on your YubiKey’s model, firmware version, and PIN complexity enforcement.
Enter the new PIN again to confirm and click Set. For NFC connections on iOS, scan your key when prompted to complete the operation.
Viewing and deleting passkeys
Note
Passkeys can be managed on Yubico Authenticator for Desktop and Android only.
With Yubico Authenticator, you can view all passkeys stored on a YubiKey. Passkeys can only be deleted with the app; you cannot create or modify them with Yubico Authenticator.
Warning
Once a passkey is deleted, you cannot use the YubiKey to log into an account or service for which the passkey was registered. To re-register a YubiKey, you must be able to log into that account/service with an alternate credential (we recommend registering at least one backup YubiKey with each account/service for this reason).
To view and/or delete a passkey stored on your YubiKey, do the following:
Plug your YubiKey into your device, click on the left menu icon in the upper left corner of the app, and select Passkeys.
To connect via NFC on desktop, click the NFC icon in Yubico Authenticator and place your YubiKey on top of a desktop NFC reader. The key must maintain constant contact with the reader throughout the operation.
To connect via NFC on Android, tap and hold your YubiKey on the back of your device to scan. Reading passkeys on a YubiKey is quite slow, and depending on how many are stored on your key, it could take up to several seconds for the NFC sensor to read the passkey information. You must maintain constant contact with the NFC sensor until all passkeys are read.
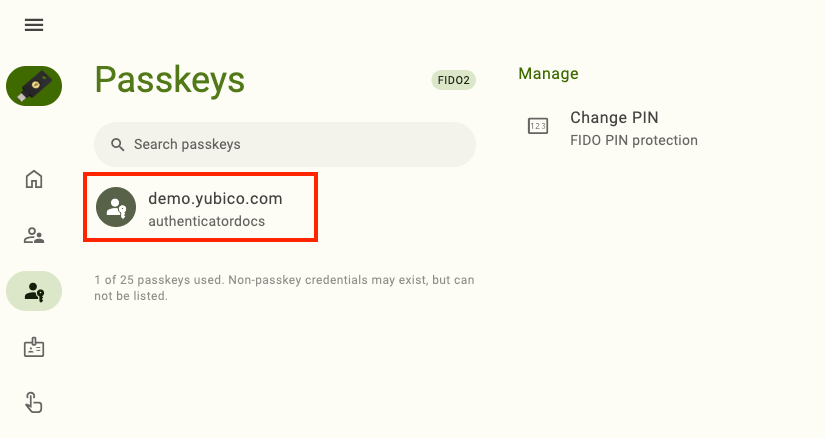
Enter your FIDO2 PIN and click Unlock. For NFC connections on Android, tap your key to complete the operation. All passkeys stored on your YubiKey will be listed under Passkeys.
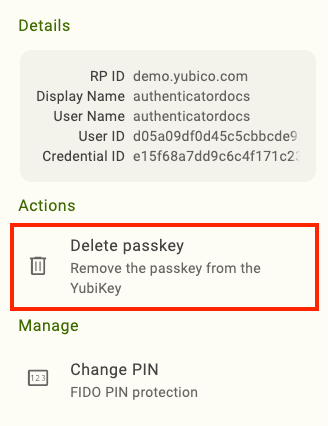
To view properties including RP ID, Display Name, User Name, User ID, and Credential ID for a specific passkey, click on it to open the Details section. To copy any of these properties to the clipboard, double-click on it.
Note
Does your YubiKey have so many passkeys that you must scroll down the screen to find the one you’re looking for? If you have a desktop or Android tablet device, you can take advantage of their wider screens by changing the screen layout.
To delete a passkey, click on it to open its Details tab.
Click Delete passkey under Actions. To confirm the operation, click Delete. For NFC connections on Android, tap your key.
Enterprise Attestation
Note
Enterprise Attestation can be managed on Yubico Authenticator for Desktop and Android only.
Enterprise Attestation (EA) is a feature available for custom-configured YubiKeys with firmware version 5.7 or later. EA enables Identity Providers (IdPs) to read the serial number (or other unique identifier specific to the organization) during FIDO2 registration. For more information on Enterprise Attestation, see the YubiKey Technical Manual
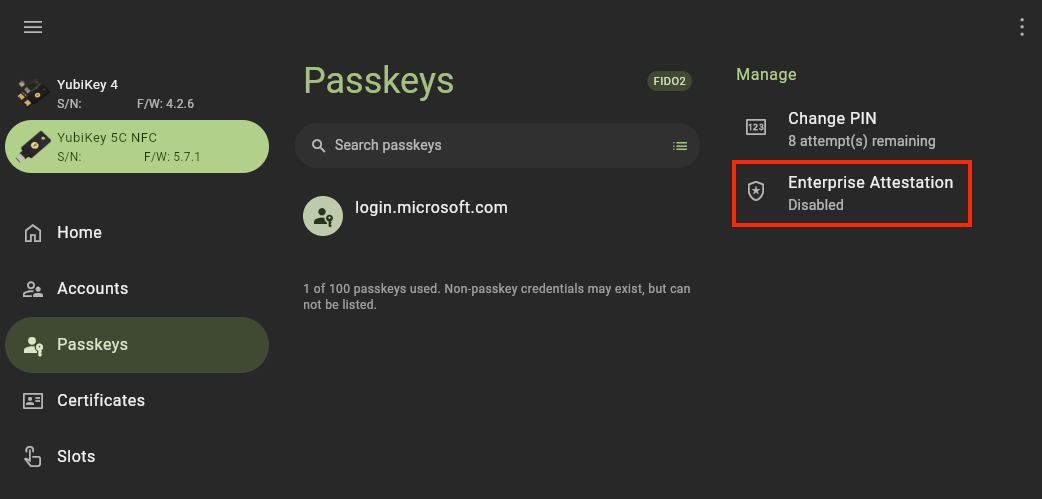
The Passkeys screen in Yubico Authenticator allows you to easily check your key’s EA status and enable the feature (if available for your key).
Check status and enable Enterprise Attestation
To check your key’s EA status and enable the feature, do the following:
Plug your YubiKey into your device, click on the left menu icon in the upper left corner of the app, and select Passkeys.
To connect via NFC on desktop, click the NFC icon in Yubico Authenticator and place your YubiKey on top of a desktop NFC reader. The key must maintain constant contact with the reader throughout the operation.
To connect via NFC on Android, tap and hold your YubiKey on the back of your device to scan. Reading passkeys on a YubiKey is quite slow, and depending on how many are stored on your key, it could take up to several seconds for the NFC sensor to read the passkey information. You must maintain constant contact with the NFC sensor until all passkeys are read.
Enter your FIDO2 PIN if prompted and click Unlock. For NFC connections on Android, tap your key to complete the operation.
To check your key’s EA status, find Enterprise Attestation under Manage.
To find the Manage section in a narrow app window, click on the right menu icon in the upper right corner of the app.
To enable EA, click on Enterprise Attestation. In the Enable Enterprise Attestation window, select Enable to confirm the operation.
Custom icons
Note
Custom icons are only available for Yubico Authenticator for Desktop and Android.
When viewing OATH accounts on a YubiKey within Yubico Authenticator, each account is listed with a colored icon that contains the first letter of the issuer by default. Similarly, Passkeys are listed with a default Passkey icon.
To make OATH accounts and Passkeys more easily distinguishable from one another, custom icons can be uploaded and used in Yubico Authenticator. For example, with custom icons, instead of seeing the default “D” icon next to an OATH account for Docker, an icon containing the Docker logo and colors would be shown. For a Microsoft Passkey, an icon with the Microsoft logo and colors would be shown in place of the default Passkey icon.
Icon packs must be in the Aegis Icon Pack format. Feel free to use a pre-built icon pack from Aegis or create your own.
To upload an icon pack to Yubico Authenticator on desktop or Android, do the following:
Download a pre-built icon pack from Aegis or create your own.
Click on the left menu icon in the upper left corner of the app, and select Settings.
On the Settings screen, click Custom icons under APPEARANCE.
Under ACTIONS, click Load icon pack. Select the file containing the icons (for example, aegis-icons.zip).
To find the ACTIONS section in a narrow app window, click on the icon with the three dots next to Custom icons.
Once loaded, any OATH account or Passkey with an issuer that is supported by the icon pack will display the custom icon. To delete the icon pack, click Remove icon pack. Similarly, to update the icon pack, click Replace icon pack and select the new file.
