Slots: Yubico OTP Application
Important
The Slots feature is only available for Yubico Authenticator for Desktop and Yubico OTP-compatible YubiKeys. This includes the YubiKey 5 Series (standard, FIPS, and CSPN), YubiKey 4 Series, and YubiKey NEO. For a complete breakdown of Yubico Authenticator functionality by platform and connection type for each YubiKey model, see the Yubico Authenticator Functionality table.
The Slots feature of Yubico Authenticator allows you to manipulate both the short press (or short touch) slot and the long press (long touch) slot of the YubiKey’s Yubico OTP application. Each OTP application slot can be configured with one of the following types of credentials:
Once a slot has been configured with a credential, that credential can be used during authentication to a compatible site, service, or application. See the Works with YubiKey Catalog for credential compatibility information.
Slot configurations can also be swapped or deleted.
Yubico OTPs
A Yubico OTP (one-time password) is a unique 44-character string that is generated by the YubiKey using a secret key and other YubiKey device fields. Yubico OTPs look similar to the following: ccccccjlkgjlevtdernkbbnrrvhcvdbljgchbgbdbvgk.
Once an OTP application slot has been configured with a Yubico OTP credential, “activation” of that slot triggers the generation of a new Yubico OTP. For more information on authenticating with Yubico OTPs, see Performing authentication with OTP application slot credentials.
To find a list of sites and services that use Yubico OTPs, see the Works with YubiKey Catalog. For in-depth information on the Yubico OTP and how they work, see the .NET SDK manual.
Note
Standard YubiKeys are preconfigured with a Yubico OTP in the short press slot. This credential is also preregistered with YubiCloud for out-of-the-box validation.
Configuration
To configure an OTP application slot with a Yubico OTP, do the following:
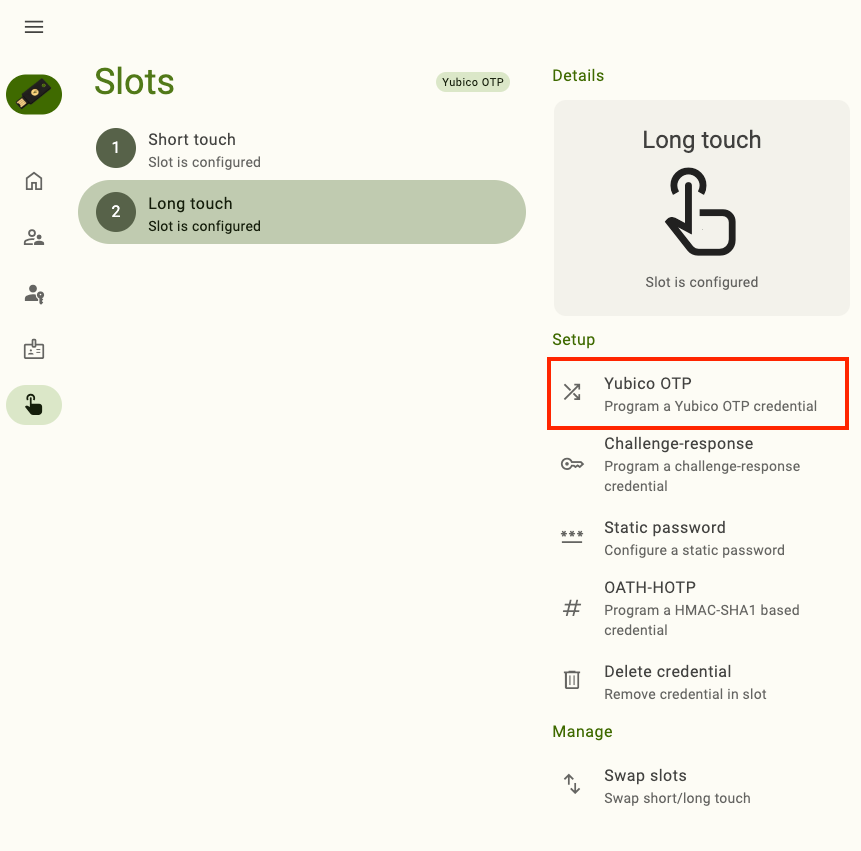
Plug your YubiKey into your device, click on the left menu icon in the upper left corner of the app, and select Slots.
To connect via NFC on desktop, click the NFC icon in Yubico Authenticator and place your YubiKey on top of a desktop NFC reader. The key must maintain constant contact with the reader throughout the operation.
Click on the slot you would like to configure and select Yubico OTP under Setup.
To find the Setup section in a narrow app window, click on the right menu icon in the upper right corner of the app.
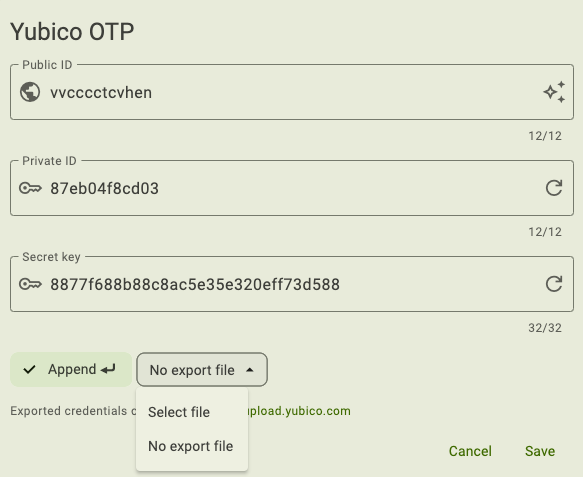
Enter a 12-digit Public ID. You can either type in your own or use a ModHex representation of your YubiKey’s serial number. If using your own ID, only ModHex characters (bcdefghijklnrtuv) are allowed. To use the serial number, click the star icon in the Public ID box.
Enter a 12-digit Private ID. You can either type in your own or generate one randomly. If using your own ID, only the following characters are allowed: abcdef0123456789. To generate a random 12-digit ID, click the arrow icon in the Private ID box.
Enter a 32-digit Secret key. You can either type in your own or generate one randomly. If using your own key, only the following characters are allowed: abcdef0123456789. To generate a random 32-digit secret key, click the arrow icon in the Secret key box.
By default, a carriage return (an Enter keystroke) will be applied to the end of the OTP. This means that when the OTP is generated and typed into a field on a login screen, you won’t have to click another button to start the validation process. To remove the carriage return, click Append until the check mark disappears.
To export the credential to a file, click on the export file drop-down menu and click Select file. Enter a name for the file, select a location, and click Save. You should now see the name of your file in the drop-down. This step isn’t required, but keep in mind that these fields will need to be shared with the validation server for every site or service you wish to authenticate to with this Yubico OTP configuration, so they will need to be saved somewhere (at least temporarily).
If you elect to save the credential fields to a text file, they will be in a comma-separated list in the following order: YubiKey serial number, Public ID, Private ID, Secret key, date and time the configuration was created.
Click Save to complete the configuration. If the slot is already configured with a credential, click Overwrite when prompted.
Once configured, share the credential fields with the validation server for every site and service you wish to authenticate to with this Yubico OTP configuration. Remember, during Yubico OTP authentication, the validation server must decrypt the OTP with the secret key in order to determine validity. If the server does not have this information, it cannot validate any OTPs generated with your new configuration for any account.
If a site/service uses the YubiCloud validation service, these fields can be uploaded at https://upload.yubico.com/. If a site/service uses an alternative validation server, refer to their setup instructions.
After the credential has been added to the appropriate validation servers, you must register your key with your accounts. See the Works with YubiKey Catalog for setup instructions for your particular sites/services.
This step links the Public ID for the credential with your account; if the Public ID of an OTP submitted for validation does not match the Public ID linked to your account, the OTP will be rejected.
Static passwords
A static password, as the name implies, is a string of characters that never changes. It is no different from a password that you would create for any standard account.
Once an OTP application slot is configured with a static password, that password will be typed into a text field by the YubiKey whenever the slot is “activated” (provided that your device’s cursor has been placed into the text field). Slot activation occurs when a YubiKey is connected to a desktop or mobile device and its gold contacts are touched. For more information on authenticating with static passwords and the OTP application, see Performing authentication with OTP application slot credentials.
Think of the OTP application’s static password functionality as akin to a physical password manager. You can set up an account with a long, complicated, and difficult-to-guess password, and instead of trying to remember that password or writing it down in an insecure location, it can be stored safely in the YubiKey.
Static passwords can be communicated over USB connections only.
Configuration
To configure an OTP application slot with a static password, do the following:
Plug your YubiKey into your device, click on the left menu icon in the upper left corner of the app, and select Slots.
To connect via NFC on desktop, click the NFC icon in Yubico Authenticator and place your YubiKey on top of a desktop NFC reader. The key must maintain constant contact with the reader throughout the operation.
Click on the slot you would like to configure and select Static password under Setup.
To find the Setup section in a narrow app window, click on the right menu icon in the upper right corner of the app.
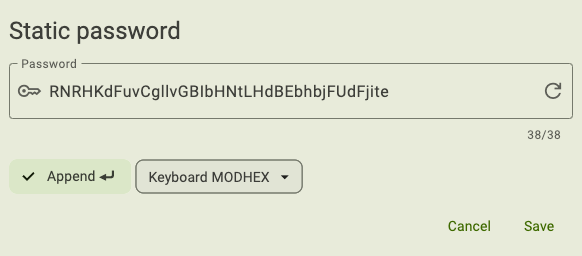
Enter a Password with up to 38 bytes worth of characters in length. If you’d prefer to generate a 38-byte password randomly, click the arrow icon in the Password box.
Note
Most characters that you would find on a standard keyboard are one byte in length. However, some special characters, such as the degree sign (°), copyright sign (©), and the Pound sign (£), are more than one byte in length. The count underneath the Password box indicates the total byte count for the characters entered.
By default, a carriage return (an Enter keystroke) will be applied to the end of the static password. This means that when the password is typed into a field on a login screen, you won’t have to click another button to continue the login process. To remove the carriage return, click Append until the check mark disappears.
Select a Keyboard layout from the drop-down menu. Choose the layout that matches the keyboard configuration on the devices you will use your YubiKey with. If you use devices with more than one configuration or you aren’t sure what they are, pick ModHex. With ModHex characters, the password will be communicated to a host device correctly, regardless of its keyboard layout setting. Note that if you select ModHex, your password may only contain the following characters: bcdefghijklnrtuv.
Click Save to complete the configuration. If the slot is already configured with a credential, click Overwrite when prompted.
If you haven’t already, register the static password with your accounts. This can be accomplished by the standard “create a new password” or “change your password” flows. If you’ve forgotten the static password you configured the slot with, simply place your cursor into any text field and activate the slot (tap the key for the short press slot or touch and hold for a few seconds for the long press slot). The static password will be typed into the text field.
Challenge-response
Challenge-response is a type of authentication where a host (the site, service, or application you are trying to log in to) sends a “challenge” in the form of a byte array to your YubiKey. The YubiKey receives the challenge and “responds” by hashing the challenge with a secret key and the HMAC-SHA1 algorithm. This operation produces a response code in the form of an HOTP, which is sent back to the host for authentication.
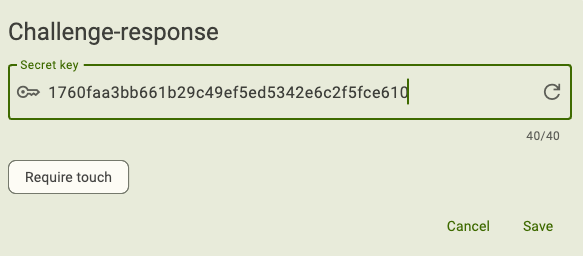
When configuring a Yubico OTP slot with a challenge-response credential, a secret key (even-numbered, 2-40 characters in length) must be provided. An optional touch requirement can also be set.
To find a list of sites and services that use challenge-response authentication, see the Works with YubiKey Catalog. For in-depth information on how challenge-response works with the Yubico OTP application, see the .NET SDK manual.
Note
Challenge-response authentication with the Yubico OTP application works over USB connections only.
Configuration
To configure an OTP application slot with a challenge-response credential, do the following:
Plug your YubiKey into your device, click on the left menu icon in the upper left corner of the app, and select Slots.
To connect via NFC on desktop, click the NFC icon in Yubico Authenticator and place your YubiKey on top of a desktop NFC reader. The key must maintain constant contact with the reader throughout the operation.
Click on the slot you would like to configure and select Challenge-response under Setup.
To find the Setup section in a narrow app window, click on the right menu icon in the upper right corner of the app.
Enter an even-numbered Secret key up to 40 digits in length. You can either type in your own or generate one randomly. If using your own key, only the following characters are allowed: abcdef0123456789. To generate a random 40-digit secret key, click the arrow icon in the Secret key box.
Be sure to make a copy of your secret key; you will need to share it with the site/application for each of your accounts during registration process.
Optionally, toggle on Require touch. This setting requires the user to touch the YubiKey before the key will process the challenge and communicate the response to the host device.
Click Save to complete the configuration. If the slot is already configured with a credential, click Overwrite when prompted.
After the credential has been added to the appropriate validation servers, you must register your key with your accounts. See the Works with YubiKey Catalog for setup instructions for your particular sites/services.
OATH HOTPs
OATH HOTPs (Initiative for Open Authentication HMAC-based one-time passwords) are 6 or 8 digit unique passcodes that are used as the second factor during two-factor authentication. An HOTP looks like the following: 154916.
Generally, we recommend using the YubiKey’s OATH application for HOTP and TOTP authentication. With the OATH application, you can add OATH credentials for numerous accounts, there are more configuration options (including algorithm, touch requirement, account name, etc.), OTP generation is triggered via the Authenticator application, and the app itself can display the resulting OTPs on all platforms.
With the Yubico OTP application, only counter-based HOTPs generated via the HMAC-SHA1 algorithm are supported. Configuration options are limited to the secret key, OTP size (6 or 8 digits), and an optional carriage return appendage (an Enter keystroke).
Once an OTP application slot is configured with an HOTP credential, an HOTP can be generated by “activating” the slot via touch (if the key is connected over USB) or an NFC scan. See Performing authentication with OTP application slot credentials for more information.
Note
For additional information on OATH HOTPs and the Yubico OTP application, see the .NET SDK manual.
Configuration
To configure an OTP application slot with an OATH HOTP credential with the HMAC-SHA1 algorithm, do the following:
Plug your YubiKey into your device, click on the left menu icon in the upper left corner of the app, and select Slots.
To connect via NFC on desktop, click the NFC icon in Yubico Authenticator and place your YubiKey on top of a desktop NFC reader. The key must maintain constant contact with the reader throughout the operation.
Click on the slot you would like to configure and select OATH-HOTP under Setup.
To find the Setup section in a narrow app window, click on the right menu icon in the upper right corner of the app.
Enter an even-numbered Secret key up to 40 digits in length. Only the following characters are allowed: letters a through z and numbers 2 through 7.
Be sure to make a copy of your secret key; you will need to share it with the validation server for each of your accounts during registration process.
By default, a carriage return (an Enter keystroke) will be applied to the end of the OTP. This means that when the password is typed into a field on a login screen, you won’t have to click another button to continue the login process. To remove the carriage return, click Append until the check mark disappears.
Select an OTP length (6 or 8 digits).
Click Save to complete the configuration. If the slot is already configured with a credential, click Overwrite when prompted.

After the credential has been added to the appropriate validation servers, you must register your key with your accounts. See the Works with YubiKey Catalog for setup instructions for your particular sites/services.
Performing authentication with OTP application slot credentials
Once an OTP application slot has been configured with a credential, and that credential has been registered with a compatible site, service, or application, follow the steps detailed here to perform authentication via your designated device and connection type.
Yubico OTP, static password, and HOTP authentication on desktop and Android devices via USB
To generate and submit a Yubico OTP, static password, or HOTP from an OTP application slot for authentication on a desktop or Android device over USB, do the following:
- Connect your YubiKey to your device over USB.
- Begin the sign-in process for an account with which your slot credential has been registered.
- Place your cursor in the OTP code/password text field on the account login screen.
- Tap the YubiKey’s gold contact(s) to activate the credential in the short press slot or touch and hold the YubiKey for a few seconds to activate the credential in the long press slot.
- The YubiKey will type the Yubico OTP, static password, or HOTP into the text field. If you did not configure the slot to append an Enter keystroke following the OTP/password, click Submit (or similar) to complete the login process.
Yubico OTP and HOTP authentication on Android and iOS devices via NFC
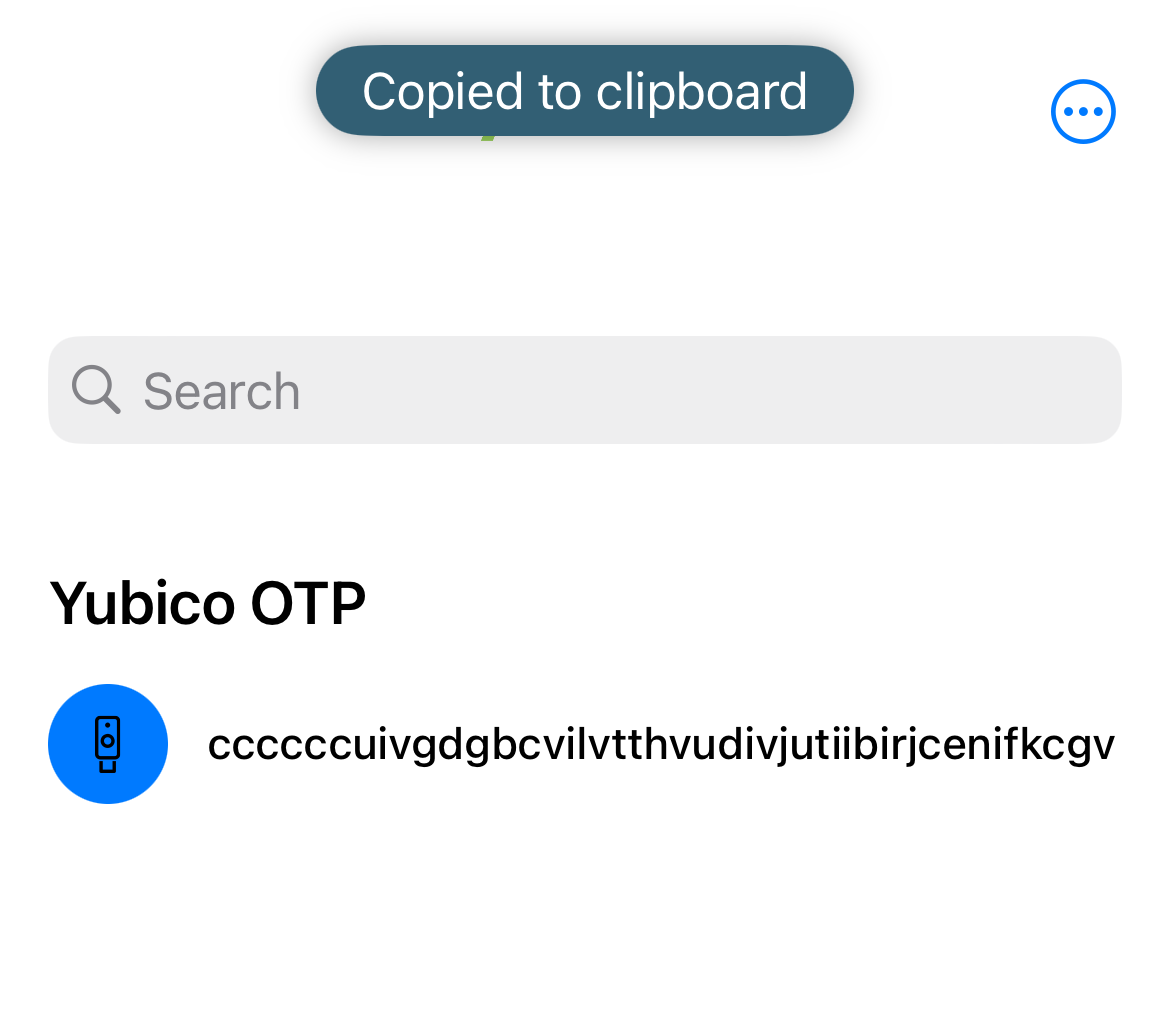
Yubico Authenticator for Android and iOS both support Yubico OTP and HOTP generation via NFC. On iOS devices, the OTP is displayed in the app itself, while on Android devices, the OTP is copied to the clipboard.
Only one slot can be activated over NFC. By default, this is the short press slot. If the slot credential you wish to use over NFC was configured in the long press slot, we recommend swapping slot configurations.
Note
Alternatively, the YubiKey can be configured to activate the long press slot over NFC by manipulating the YubiKey’s NDEF tag with the YubiKey Manager CLI tool. When calling ykman otp ndef, you must use a URI payload with the value https://my.yubico.com/yk/#. If a different URI or text payload is used, the Authenticator app will not receive the OTP from the YubiKey.
To get started, do the following:
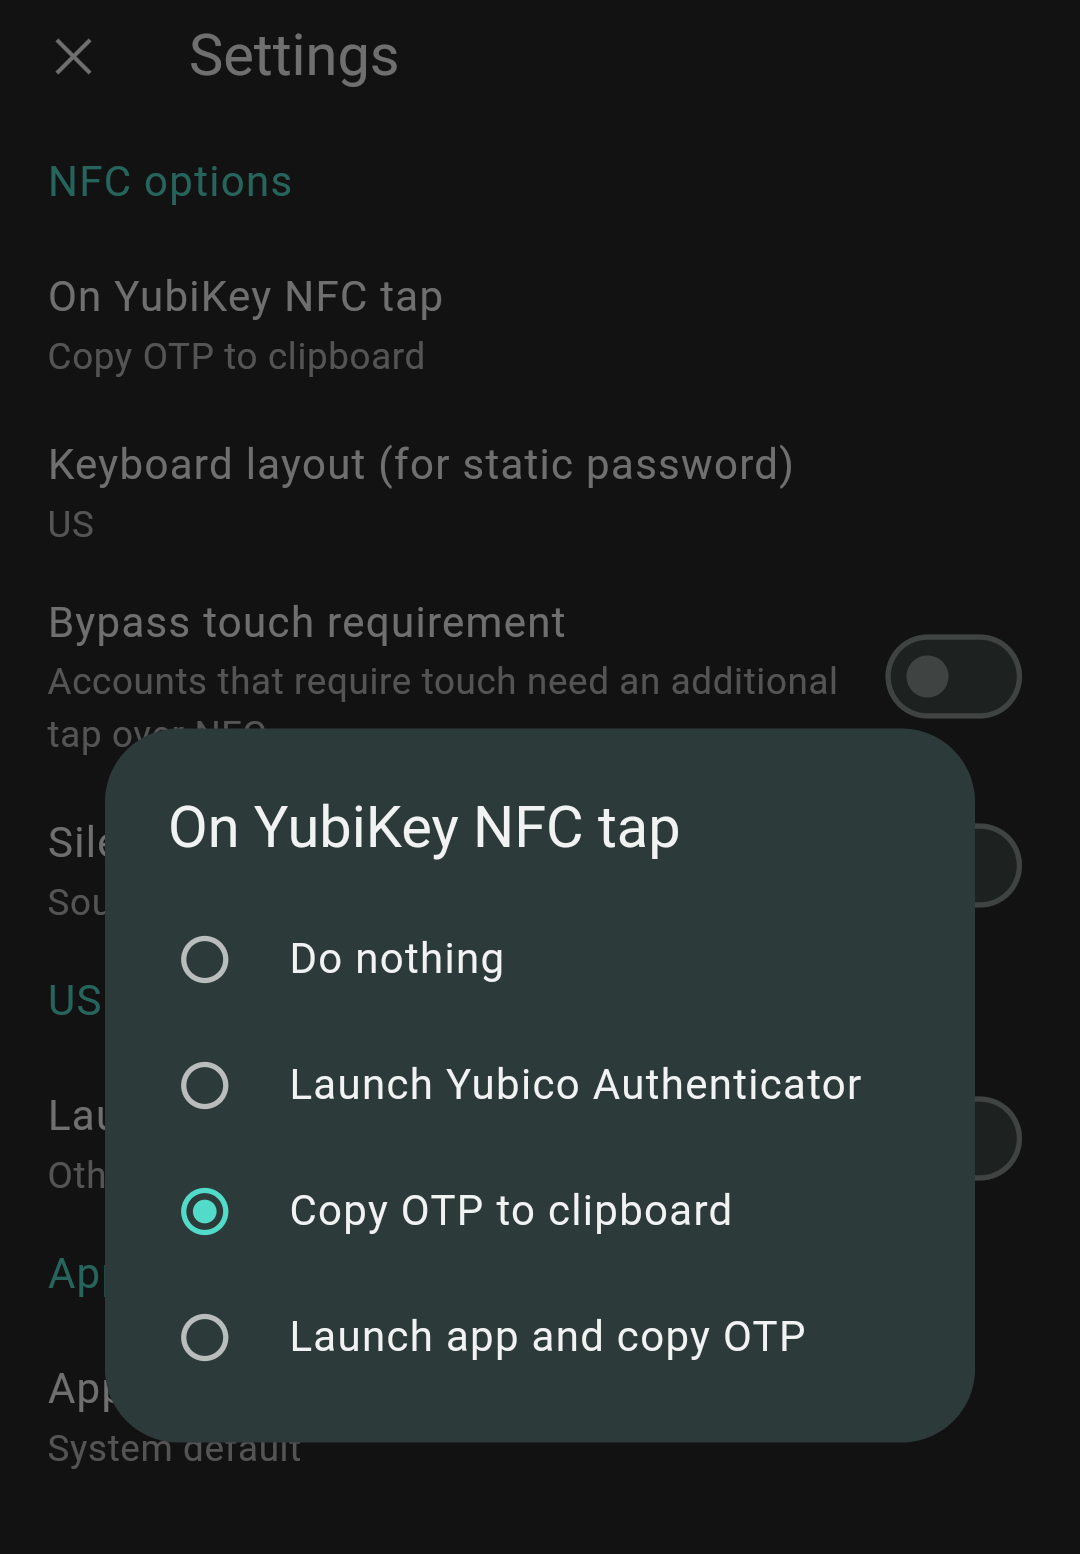
Yubico Authenticator for Android and iOS will not generate OTPs via NFC by default. To enable this feature on Android, go to Settings, click NFC & USB options, and select either Copy OTP to clipboard or Launch app and copy OTP under the ON NFC TAP section.
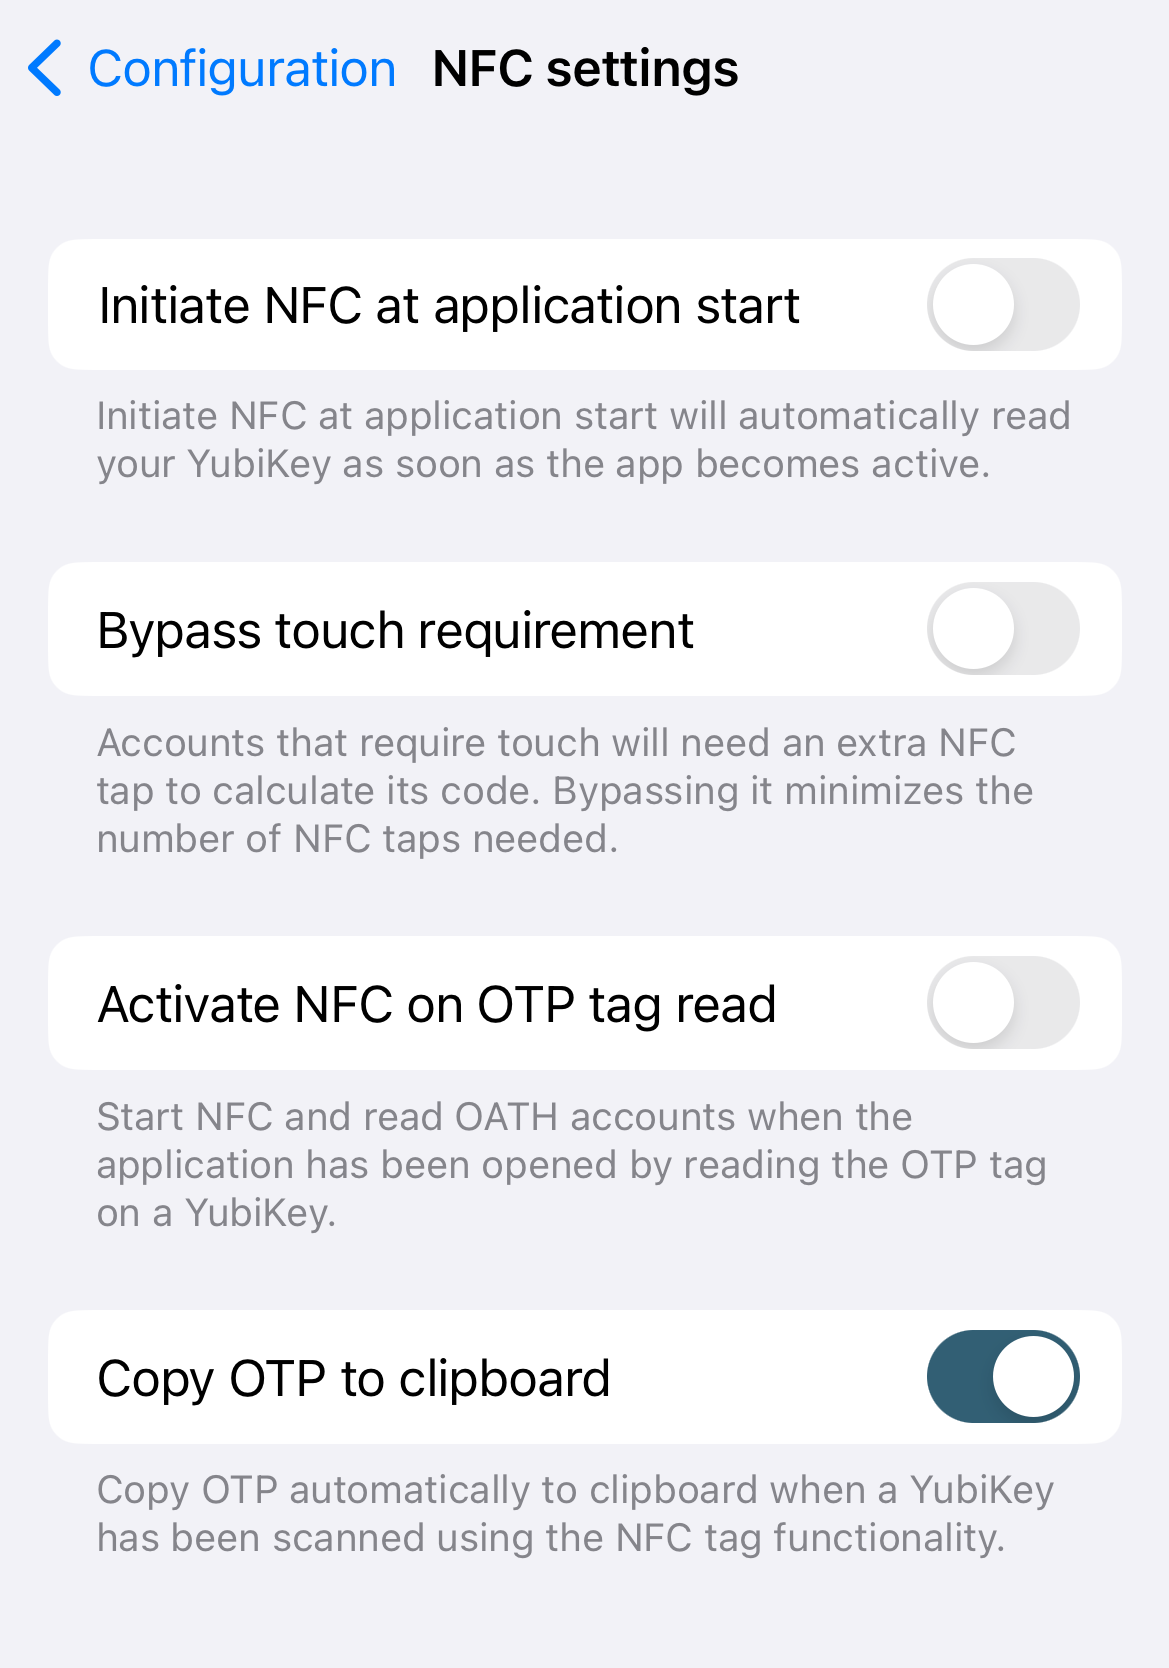
To enable this feature on iOS, go to Configuration, click NFC settings, and select Copy OTP to clipboard.
Begin the sign-in process for an account with which your OTP credential has been registered.
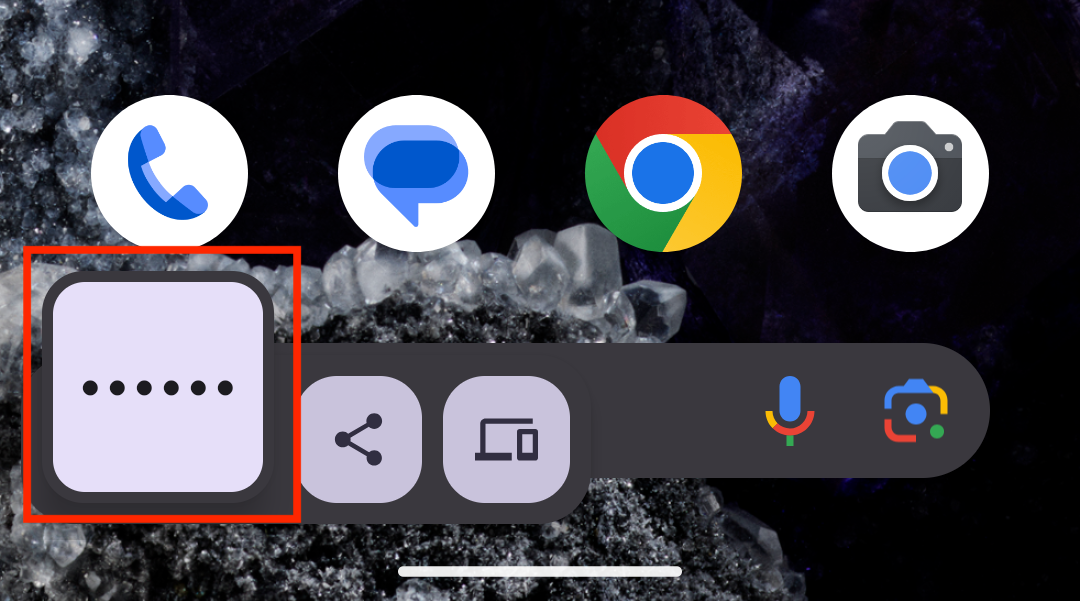
To generate the OTP on Android, start by closing or hiding the Authenticator app. If the app is open on screen, a new OTP will not be generated. Next, hold the YubiKey up to the device’s NFC reader. Once the key is scanned, you will see the clipboard preview icon (for Android 13 devices and newer) or a message confirming receipt of the OTP (for Android 12 devices and older) at the bottom of the screen.
Now that the clipboard contains the OTP, paste it into the login screen to complete authentication.
To generate the OTP on iOS, hold the YubiKey up to the device’s NFC reader (the Authenticator app can be open, closed, or hidden). Click on the notification that appears at the top of the screen prompting you to open the NFC tag in Authenticator. The OTP will be displayed in the app and copied automatically to the clipboard. Paste the OTP into the login screen to complete authentication.
Challenge-response authentication
Unlike the other slot configuration types, challenge-response is initiated via an API call from the site or application you are attempting to authenticate to. This API call sends a challenge to the YubiKey, which must be physically connected to your device. The YubiKey takes the challenge (after the user touches the key, if touch is required) and hashes it using the secret key the slot was configured with. The key then sends the response back to the site or application for validation.
See the Works with YubiKey Catalog for more specific authentication instructions for your particular site or application.
Managing slots
There are only two options for managing Yubico OTP application slots: swap or delete.
Swapping slots means moving the configuration in the short press slot to the long press slot and vice versa. This could be useful when the credential you use most often is in the long press slot; by moving that credential to the short press slot, activation only requires tapping the key briefly instead of touching and holding for a few seconds.
Deleting a slot’s configuration is an irreversible operation, so exercise caution. We recommend registering at least one spare key with your accounts in order to maintain account access prior to deleting a configuration.
Swap slots
To swap the slot configurations, do the following:
Plug your YubiKey into your device, click on the left menu icon in the upper left corner of the app, and select Slots.
To connect via NFC on desktop, click the NFC icon in Yubico Authenticator and place your YubiKey on top of a desktop NFC reader. The key must maintain constant contact with the reader throughout the operation.
Select Swap slots under Manage.
To find the Manage section in a narrow app window, click on the right menu icon in the upper right corner of the app.
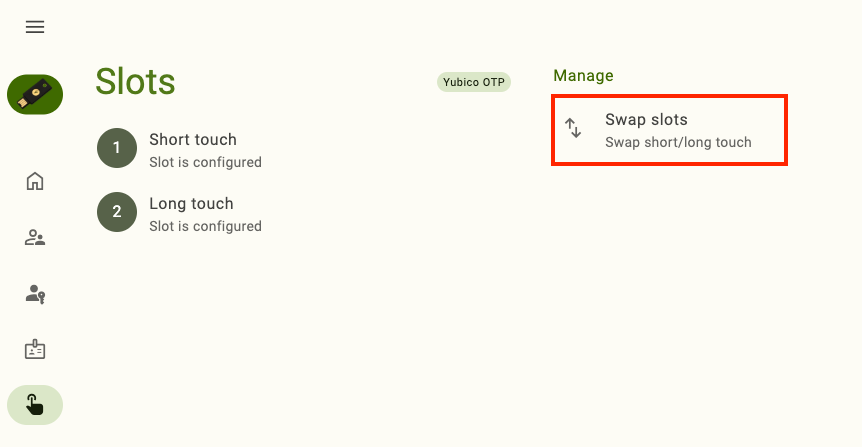
Click Swap to confirm the operation. The configuration that was previously in the short touch slot is now in the long touch slot and vice versa.
Delete a slot’s configuration
To delete a slot’s configuration, do the following:
Plug your YubiKey into your device, click on the left menu icon in the upper left corner of the app, and select Slots.
To connect via NFC on desktop, click the NFC icon in Yubico Authenticator and place your YubiKey on top of a desktop NFC reader. The key must maintain constant contact with the reader throughout the operation.
Click on the slot whose configuration you would like to delete and select Delete credential under Setup.
To find the Setup section in a narrow app window, click on the right menu icon in the upper right corner of the app.
Click Delete to confirm the operation.