Accounts: OATH
Important
The Accounts feature is available for Yubico Authenticator for Desktop and Mobile (all platforms) and OATH-compatible YubiKeys. This includes the YubiKey 5 Series (standard, FIPS, and CSPN), YubiKey 4 Series, and YubiKey NEO. For a complete breakdown of Yubico Authenticator functionality by platform and connection type for each YubiKey model, see the Yubico Authenticator Functionality table.
The Accounts feature of Yubico Authenticator allows you to:
- Configure a YubiKey with OATH account credentials.
- Generate and display OATH account OTPs for two-factor authentication.
- Protect the OATH application of a YubiKey with a password.
- Pin OATH accounts to the top of the Accounts screen in Yubico Authenticator for easier access.
- Rename OATH accounts on a YubiKey.
- Delete OATH account credentials from a YubiKey.
- Configure the Yubico Authenticator application with custom OATH account icons.
What is OATH authentication?
OATH (Initiative for Open Authentication) is an organization that specifies two open authentication standards: time-based one-time passwords (TOTPs) and HMAC-based one-time passwords (HOTPs). The term “OTP” encompasses both TOTPs and HOTPs.
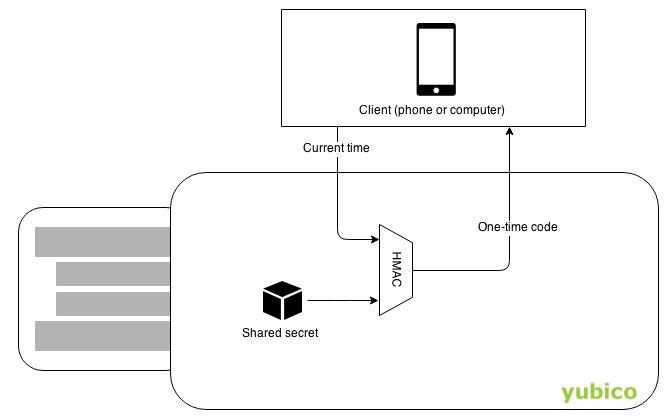
HOTPs are generated by hashing a secret key, counter, and length value with a hashing algorithm (such as SHA-1). TOTPs are generated by hashing a secret key, current time, period, and length value with a hashing algorithm. The resulting HOTPs and TOTPs are codes of 6 or 8 digits in length, such as 076 838.
Once generated, HOTPs are valid until an HOTP generated with a subsequent counter is used for authentication. TOTPs are only valid for the length of the period, which is often 30 seconds.
HOTPs and TOTPs cannot be decrypted. Therefore, OATH authentication works by comparing the OTP generated and submitted by a user with the OTP generated by the relying party (the site/application you are authenticating to) using the same credentials. If the OTPs match, the user is authenticated.
When using OATH for two-factor authentication with a YubiKey and Yubico Authenticator, the OATH credentials are stored in the OATH application in the YubiKey’s secure element. During authentication, Yubico Authenticator is used to trigger OTP generation within the YubiKey and to display the OTP code. This OTP can then be copied and pasted onto a login screen. This has two major advantages over storing secrets on a phone:
- Security: The OATH secrets (account credentials) always stay within the YubiKey. A phone can get stolen, sold, infected by malware, have its storage read by a connected computer, etc. Furthermore, the OATH application itself can be protected by a password, which ensures that OATH account details cannot be easily accessed in the event of a lost or stolen YubiKey.
- Accessibility: Once a YubiKey is configured with an OATH account, OTPs can be generated by that key and Yubico Authenticator on any device. For example, if your phone dies, you could still generate OTPs with your YubiKey via Yubico Authenticator on a friend’s phone.
Adding a new account
Adding a new account for OATH authentication requires a YubiKey, Yubico Authenticator, and the secret key information provided by the site/account/service you are registering the YubiKey with.
Note
Sites, services, and applications typically describe OATH authentication as “two-factor authentication using an authenticator app”. They may also refer to authentication with a One-Time Password (OTP).
During registration, the YubiKey stores the secret key and associated account information. With Yubico Authenticator, OATH accounts can be added via QR code or by entering the secret key and other fields manually.
Once an account is registered with a YubiKey, the OTPs for that account can be generated via Yubico Authenticator on ANY device. For example, suppose you have Yubico Authenticator on both your desktop and mobile devices. If you register an account with a YubiKey on your mobile device, you can generate OTPs with that key on your desktop and vice versa.
When adding a new OATH account to a YubiKey, you are given the option to “require touch” as a means of user presence. With the touch requirement enabled, you must manually initiate the OTP calculation in Yubico Authenticator and touch (or scan) your YubiKey for each OTP you wish to generate. If you do not enable the touch requirement, the YubiKey will begin generating TOTPs once it is connected to your device, and these TOTPs will be visible next to the account name in Yubico Authenticator. Counter-based HOTPs must be generated manually regardless of the touch requirement.
To add an account, do the following:
Plug your YubiKey into your device. On desktop and Android devices, click on the left menu icon in the upper left corner of the app and select Accounts.
To connect via NFC on desktop, click the NFC icon in Yubico Authenticator and place your YubiKey on top of a desktop NFC reader. The key must maintain constant contact with the reader throughout the operation.
To connect via NFC on Android, tap your YubiKey on the back of your device to scan.
To connect via NFC on iOS, swipe down on the screen and tap your YubiKey on the back of your device to scan.
Note
NFC wireless connections are natively supported on iOS but not on iPadOS (current iPads do not have built-in NFC readers). For a complete breakdown of Yubico Authenticator functionality by platform and connection type for each YubiKey model, see the Yubico Authenticator Functionality table.
Enter your OATH password if prompted and click Unlock (on desktop and Android) or Ok (on iOS/iPadOS). For NFC connections on Android or iOS, scan your YubiKey again when prompted.
Note
If connected over USB-C on iOS or iPadOS, you must disable Yubico OTP generation in order to access your on-screen keyboard. For instructions and additional information, see Disable Yubico OTPs.
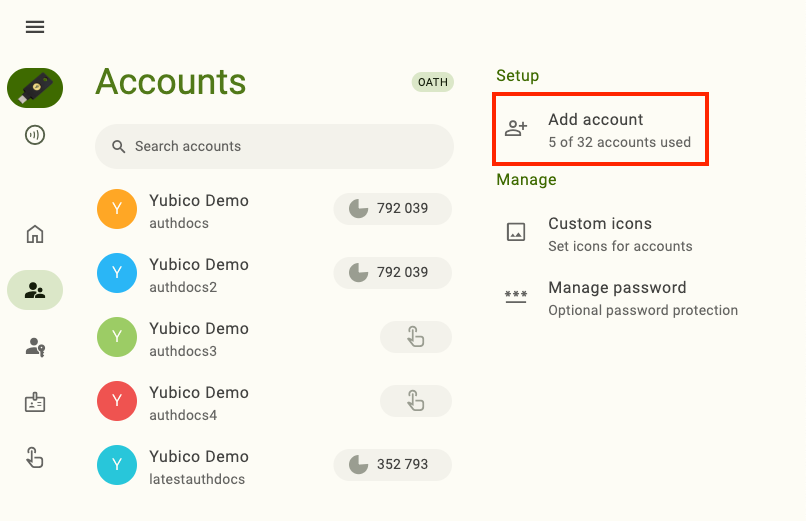
Click Add account.
On desktop and Android, this is located under Setup. To find the Setup menu in a narrow app window, click on the right menu icon in the upper right corner of the app.
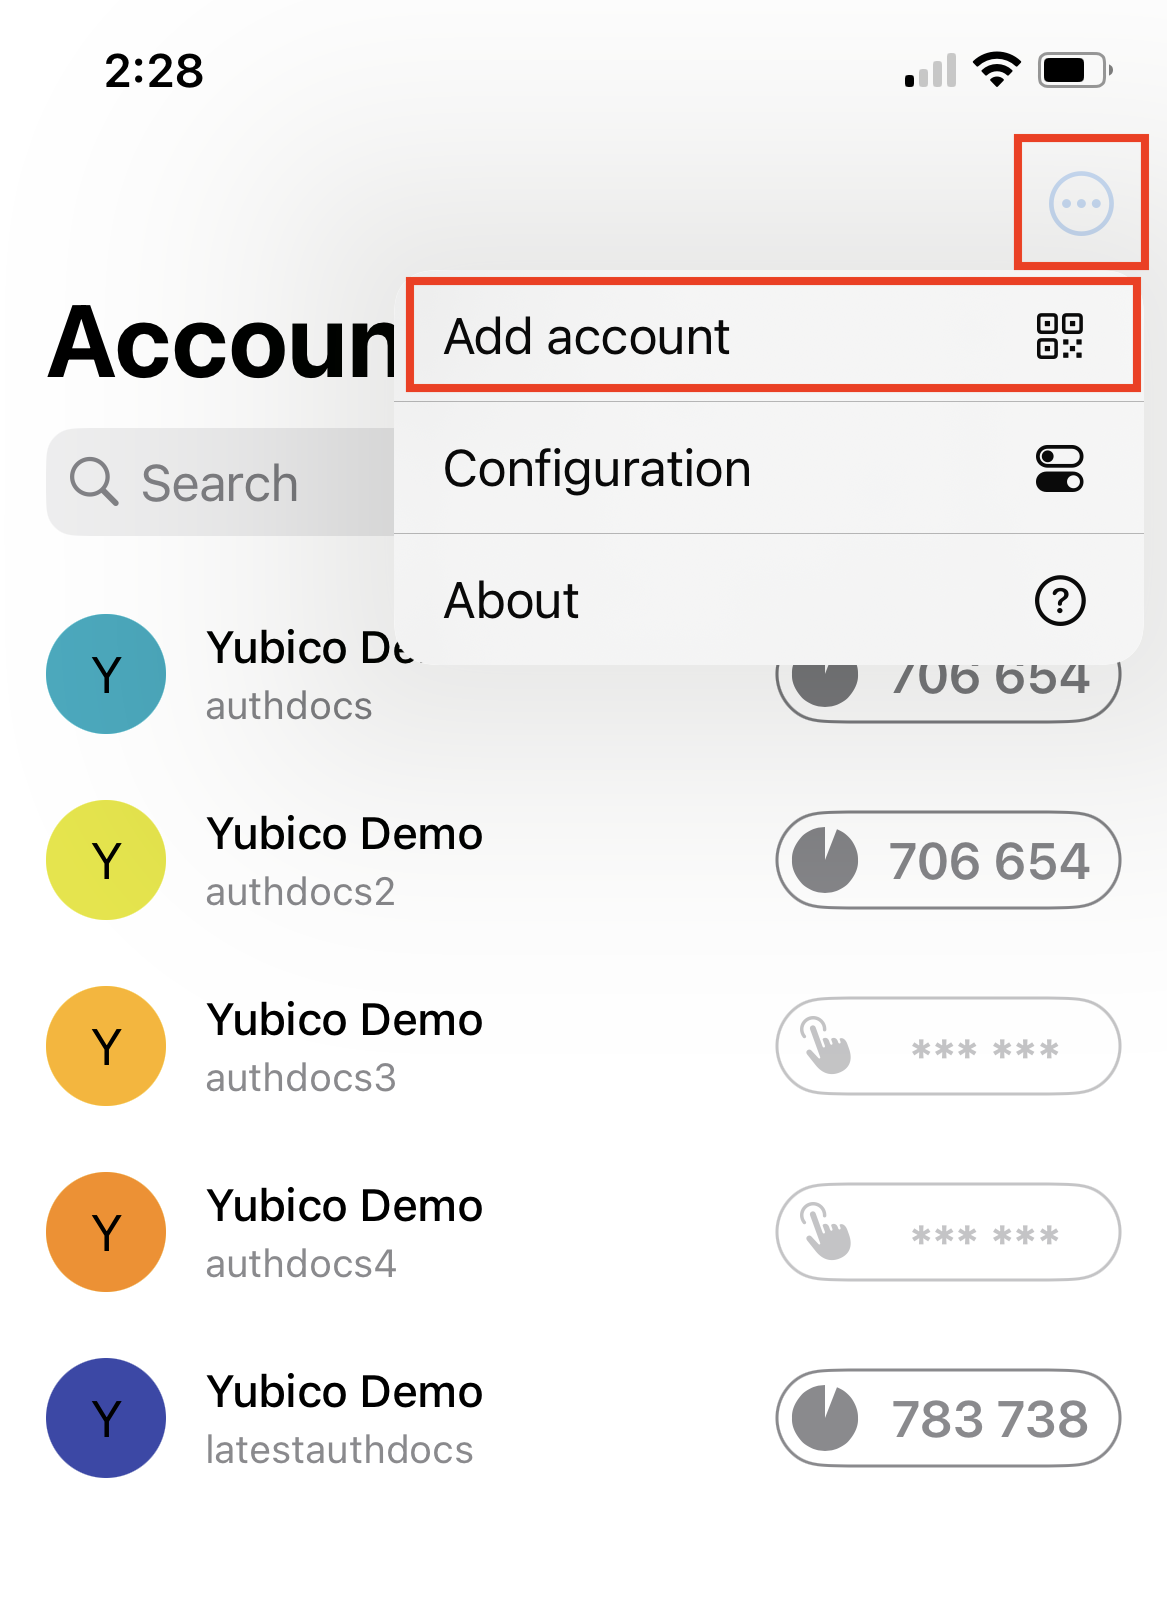
On iOS/iPadOS, click the three dots in the upper right corner of the app to find Add account.
Locate the QR code or secret key information in the site/account/service you wish to register with.
This typically requires logging into your account and going to “settings” or “security” > “two-factor authentication” or “two-step verification” > “register an authenticator application” (or similar). See the Works with YubiKey catalog for information on where to find these settings for your particular site/service/application.
Important
Yubico recommends registering at least one backup key for each account to preserve access in the event of a loss of your primary YubiKey. Make a copy of the QR code or secret key information; you will need it when registering a second YubiKey.
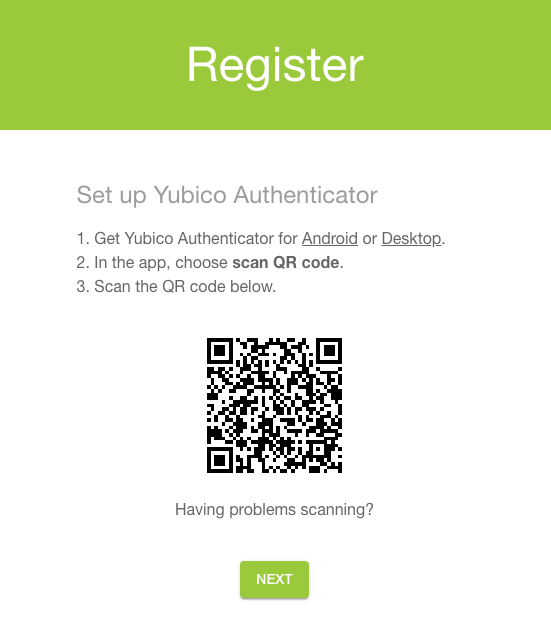
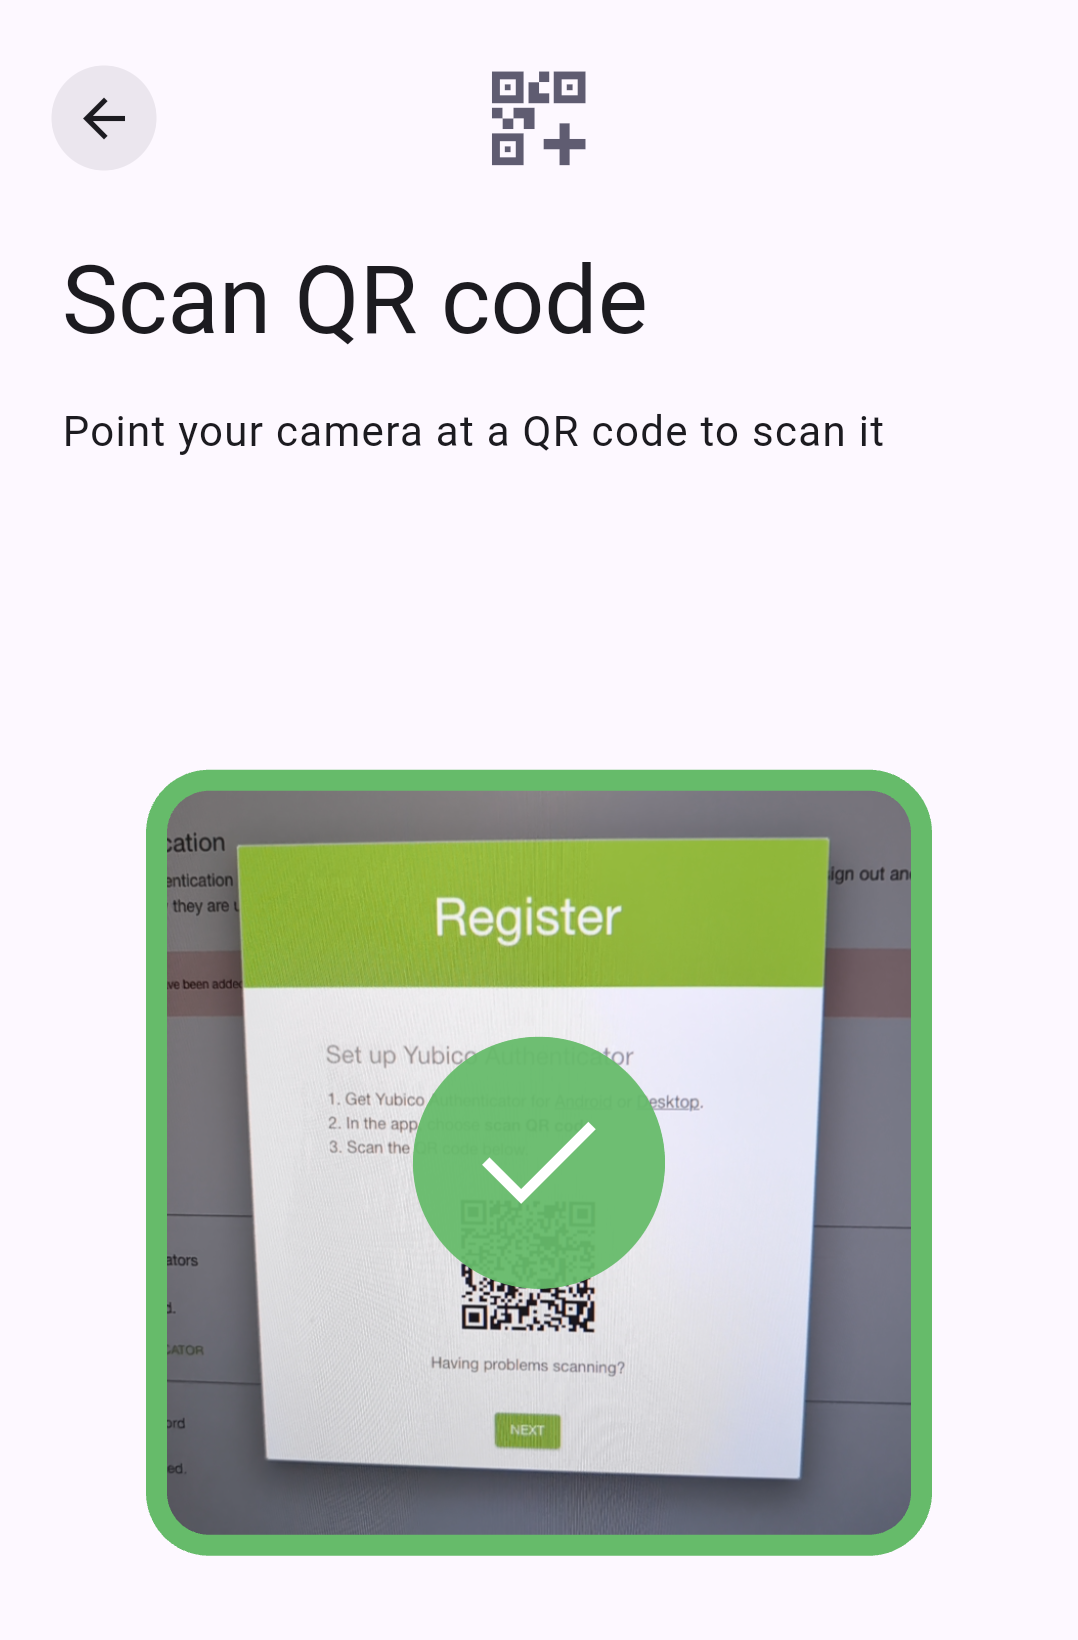
To add an account via QR code on desktop, ensure the QR code, which is provided by the site/service/application you are registering with, is completely visible on your screen (no obstructions) and click Scan QR code.
For Android and iOS/iPadOS, point your camera at the QR code to scan (if the QR code is on a separate screen/device).
Alternatively, on Android, take a screenshot of the QR code on your Android device, click Read from file, and select the screenshot.
On the Add account screen, make edits to the Issuer (site/service/application) and/or Account name (your username) if needed, click Require touch to enable the touch requirement (optional), and then click Save. For NFC connections on Android and iOS, tap your key to complete the operation.
Note
macOS requires permission to record your screen in order to scan the QR code. You will likely be prompted to set up these permissions the first time you attempt the QR scan, but you can also toggle them in System Settings at any time.
To add an account manually, proceed to entering the account details (desktop and Android). On iOS/iPadOS, click Enter manually first to reach the Add account screen.
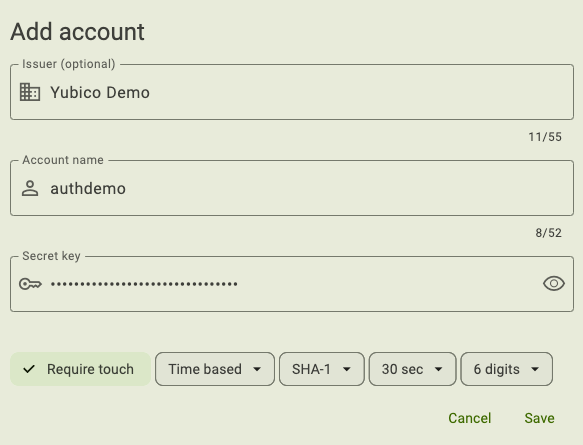
On the Add account screen, enter an Issuer (the site/service/application), Account name (your username), and Secret key. Underneath these fields, select the appropriate OATH options for type of OTP, algorithm, period, and OTP length. These settings must match those specified by the site/service/application. If they do not, authentication will fail because the OTPs generated by the YubiKey will not match those generated by the relying party.
Note
If connected over USB-C on iOS or iPadOS, you must disable Yubico OTP generation in order to access your on-screen keyboard. For instructions and additional information, see Disable Yubico OTPs.
Click or toggle Require touch to enable the touch requirement (optional) and then Save. For NFC connections on Android and iOS, tap your key to complete the operation.
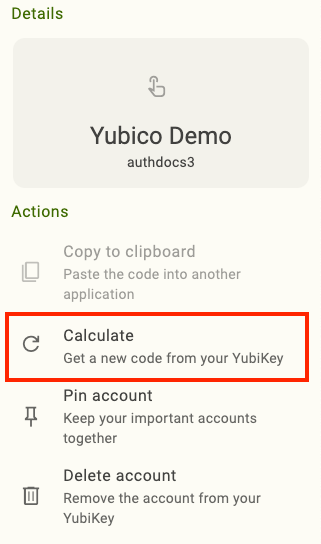
The site/service/application you are registering the YubiKey with will likely ask for an OTP code to complete the registration. If you did not check “require touch” during setup and the OTP type is TOTP, enter the OTP listed next to the account in Yubico Authenticator. If you enabled the touch requirement or the OTP type is HOTP, click on the account name (on desktop and Android, this opens the Actions section), select Calculate, and touch or scan the YubiKey when prompted. Enter the OTP that is generated.
Your YubiKey is now registered for OATH authentication. To register a backup YubiKey with your account, repeat this process using the same QR code/account information.
For TOTPs, the primary YubiKey and backup YubiKey will always generate the same OTPs, which allows you to use the keys interchangeably.
HOTPs are more complicated. Given that HOTPs use a counter that is incremented with each OTP generated, the primary and backup YubiKeys will become out of sync unless OTPs are generated on both keys at the same time.
Tip
Pin frequently used OATH accounts to the top of the screen for easier access. Desktop and Android tablet devices can also use their wider screens to display more OATH accounts by changing the screen layout.
Bonus step: Yubico highly recommends setting an OATH application password if you haven’t already done so. An OATH password improves the security of your YubiKey in that it blocks access to your YubiKey’s OATH functionality until the correct password is entered. In the event that your YubiKey is lost or stolen, anyone in possession of your key could not generate OATH OTP codes or see any OATH account details in Yubico Authenticator without entering your OATH password.
Importing OATH account credentials from Google Authenticator
If you’d like to transfer existing OATH two-factor authentication accounts from Google Authenticator to a YubiKey for use in Yubico Authenticator, you can do so via the “Export accounts” feature in Google Authenticator.
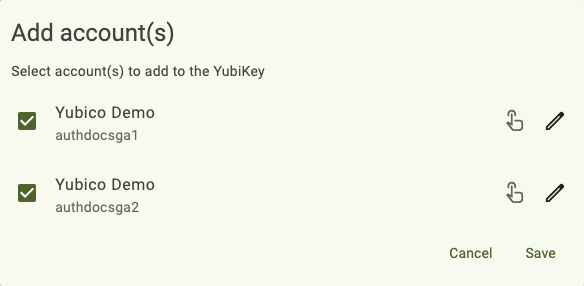
To get started, follow the instructions in the Google Help docs to create a QR code containing your account credentials through Transfer accounts -> Export accounts. If you have more than one account in Google Authenticator, you’ll be able to select which ones you’d like to transfer.
Once you have generated the QR code, follow the instructions in Adding a new account to connect your YubiKey to your device and scan the QR code in Yubico Authenticator. After scanning, Yubico Authenticator will allow you to rename the accounts and set their touch policy. Also note that QR codes from Google Authenticator are only compatible with the desktop and Android versions of Yubico Authenticator–if you try to scan the QR code with Yubico Authenticator for iOS/iPadOS, the operation will fail. However, once the accounts have been transferred to a YubiKey from Google Authenticator, you will be able to generate and display OATH two-factor authentication codes in Yubico Authenticator on any device, iOS/iPadOS included.
Authenticating with OATH and Yubico Authenticator
Once an OATH account has been added to a YubiKey, that key can be used with Yubico Authenticator to generate OTP codes for two-factor authentication.
When you connect your YubiKey to your device, navigate to Accounts in the Yubico Authenticator app, and enter your OATH password (if prompted), you will see a list of the accounts on your YubiKey. For accounts with a TOTP that was not configured with the touch requirement, the TOTP code will be visible next to the account name and will refresh automatically at the end of the TOTP period. For accounts with either an HOTP or a TOTP that was configured with the touch requirement, the HOTP/TOTP code will not be listed next to the account name until the calculation step is performed.
Note
TOTPs without the touch requirement will only refresh automatically when Yubico Authenticator is the active application. This behavior is intentional—when Yubico Authenticator is continuously recalculating TOTP codes, other applications may not be able to interact with the YubiKey.
To authenticate with OATH, do the following:
Begin the login process for your account. This typically requires entering a username and password.
Launch Yubico Authenticator and plug your YubiKey into your device. On desktop and Android, click on the left menu icon in the upper left corner of the app and select Accounts.
To connect via NFC on desktop, click the NFC icon in Yubico Authenticator and place your YubiKey on top of a desktop NFC reader. The key must maintain constant contact with the reader throughout the operation.
To connect via NFC on Android, tap your YubiKey on the back of your device to scan.
To connect via NFC on iOS, swipe down on the screen and tap your YubiKey on the back of your device to scan.
Note
NFC wireless connections are natively supported on iOS but not on iPadOS (current iPads do not have built-in NFC readers). For a complete breakdown of Yubico Authenticator functionality by platform and connection type for each YubiKey model, see the Yubico Authenticator Functionality table.
Enter your OATH password if prompted and click Unlock (on desktop and Android) or Ok (on iOS/iPadOS). For NFC connections on Android or iOS, scan your YubiKey again when prompted.
Note
If connected over USB-C on iOS or iPadOS, you must disable Yubico OTP generation in order to access your on-screen keyboard. For instructions and additional information, see Disable Yubico OTPs.
Locate your account on the Accounts screen. Next to the account name, you will see either an OTP code or a touch icon.
If the touch icon is present, click on the account name, select Calculate, and touch or scan the YubiKey when prompted to generate the OTP code. Time-based OTPs are only valid for a short period of time (often 30 seconds). Once this period has lapsed (in other words, the OTP has expired), the OTP code becomes greyed out. To perform authentication again, you will need to repeat this process to generate a new code.
Next, click on the account in Yubico Authenticator and select Copy to clipboard (desktop and Android) or Copy (iOS/iPadOS).
Note
On desktop devices, you can speed up this process by double-clicking or long-clicking on the account name (to perform a long click, press and hold the mouse button for a couple of seconds). For accounts whose OTPs do not require user-initiated calculation, this action copies the OTP to the clipboard. For accounts whose OTPs do require user-initiated calculation, the double/long click will perform the calculation and the copy action. If touch is required, you will be prompted by Yubico Authenticator after clicking. You can also perform the same operation by selecting the account and typing command+C (macOS) or Ctrl+C (Windows/Linux).
On iOS/iPadOS devices, touch and hold (long-click) the account name to copy the OTP to clipboard (and perform the calculation if applicable). On Android devices, touch and hold the account name to copy the OTP to clipboard. If user-initiated OTP generation is required, you will have to perform the long click operation twice: first to perform the calculation and again to copy the OTP to clipboard.
Your account will prompt you for a code from your authenticator app. Paste (or type) the OTP from Yubico Authenticator and click Sign In (or similar).
Password protection
Yubico highly recommends setting an OATH application password. An OATH password improves the security of your YubiKey in that it blocks access to your key’s OATH functionality until the correct password is entered. In the event that your YubiKey is lost or stolen, anyone in possession of your key could not generate OATH OTP codes or see any OATH account details in Yubico Authenticator without first entering your OATH password.
Once created, the OATH password can be:
- remembered/forgotten on a trusted device
- changed
- removed
Important
If you have forgotten your OATH password, the only way to change it is to reset the OATH application of your YubiKey to factory default settings, which will remove the password. Note that this will delete ALL OATH account credentials stored on the YubiKey, and you will no longer be able to generate OATH OTPs for those accounts with that key (we recommend registering at least one backup YubiKey with each account/service to maintain access for this reason). Once the OATH application has been reset, you can always add the accounts to your YubiKey again.
Desktop and Android
Create an OATH password
To create an OATH password for your YubiKey’s OATH application, do the following:
Plug your YubiKey into your device, click on the left menu icon in the upper left corner of the app and select Accounts.
To connect via NFC on desktop, click the NFC icon in Yubico Authenticator and place your YubiKey on top of a desktop NFC reader. The key must maintain constant contact with the reader throughout the operation.
To connect via NFC on Android, tap your YubiKey on the back of your device to scan.
Click Set password under Manage.

In a narrow app window, click on the right menu icon in the upper right corner of the app to find the Manage section.
In the Set password window, enter your new password. The password may contain letters, numbers, and special characters. Enter your password again to confirm and click Save.
For NFC connections on Android, tap your key to complete the operation.
Remember or forget an OATH password
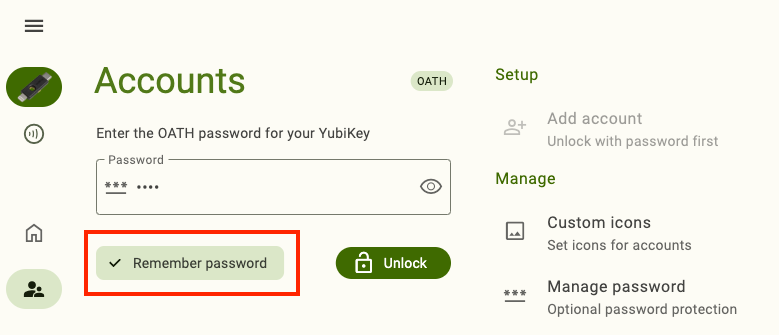
Once the password has been created, you must enter it every time you want to access the Accounts features in Yubico Authenticator. However, you can bypass this requirement on trusted devices by enabling the “remember password” feature. This setting allows the Yubico Authenticator app to store your OATH password and automatically submit it to your YubiKey whenever you open the Accounts page. As this feature affects the app itself and not your YubiKey, you will need to enable it in the app on each device you wish to use it with.
Once a password is “remembered”, it can also be “forgotten” (cleared from application memory) at any time. Updating or reinstalling the app will clear the remembered password from memory as well.
To remember or forget an OATH password on a particular device, do the following:
Plug your YubiKey into your device, click on the left menu icon in the upper left corner of the app and select Accounts.
To connect via NFC on desktop, click the NFC icon in Yubico Authenticator and place your YubiKey on top of a desktop NFC reader. The key must maintain constant contact with the reader throughout the operation.
To connect via NFC on Android, tap your YubiKey on the back of your device to scan.
To remember the password on your device, enter your OATH password when prompted, click Remember password followed by Unlock. For NFC connections on Android, tap your key to complete the operation. The next time you connect your YubiKey to your device, you will not be prompted to enter the OATH password to view and manage OATH accounts.
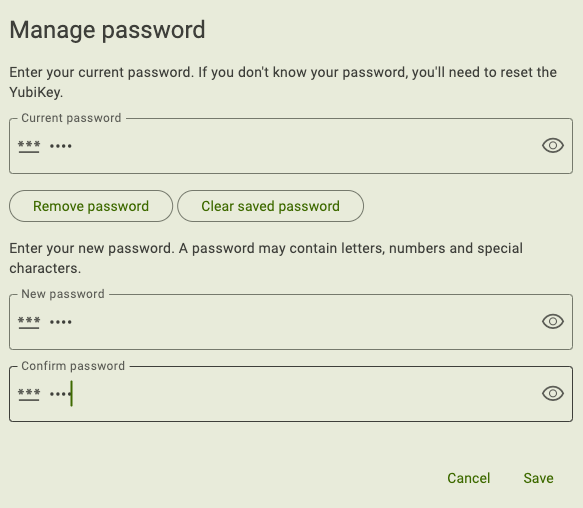
To forget a remembered password, click Manage password under Manage. In the Manage password window, enter your current password and click Clear saved password. For NFC connections on Android, scan your YubiKey again when prompted. The next time you connect your YubiKey to your device, you will be prompted to enter the OATH password to view and manage OATH accounts.
In a narrow app window, click on the right menu icon in the upper right corner of the app to find the Manage section.
Change or remove an OATH pasword
To change or remove an OATH password, do the following:
Plug your YubiKey into your device, click on the left menu icon in the upper left corner of the app and select Accounts.
To connect via NFC on desktop, click the NFC icon in Yubico Authenticator and place your YubiKey on top of a desktop NFC reader. The key must maintain constant contact with the reader throughout the operation.
To connect via NFC on Android, tap your YubiKey on the back of your device to scan.
Click Manage password under Manage.
In a narrow app window, click the right menu icon in the upper right corner of the app to find the Manage section.
In the Manage password window, enter your current password.
To remove the password, click Remove password. For NFC connections on Android, tap your key to complete the operation. Once removed, a new password can be set at any time.
To change a password, enter a new password in the box provided. Enter the new password again to confirm and click Save. For NFC connections on Android, tap your key to complete the operation.
iOS/iPadOS
Create an OATH password
To create an OATH password, do the following:
Plug your YubiKey into your device and select Accounts.
To connect via NFC on iOS, swipe down on the screen and tap your YubiKey on the back of your device to scan.
Note
NFC wireless connections are natively supported on iOS but not on iPadOS (current iPads do not have built-in NFC readers). For a complete breakdown of Yubico Authenticator functionality by platform and connection type for each YubiKey model, see the Yubico Authenticator Functionality table.
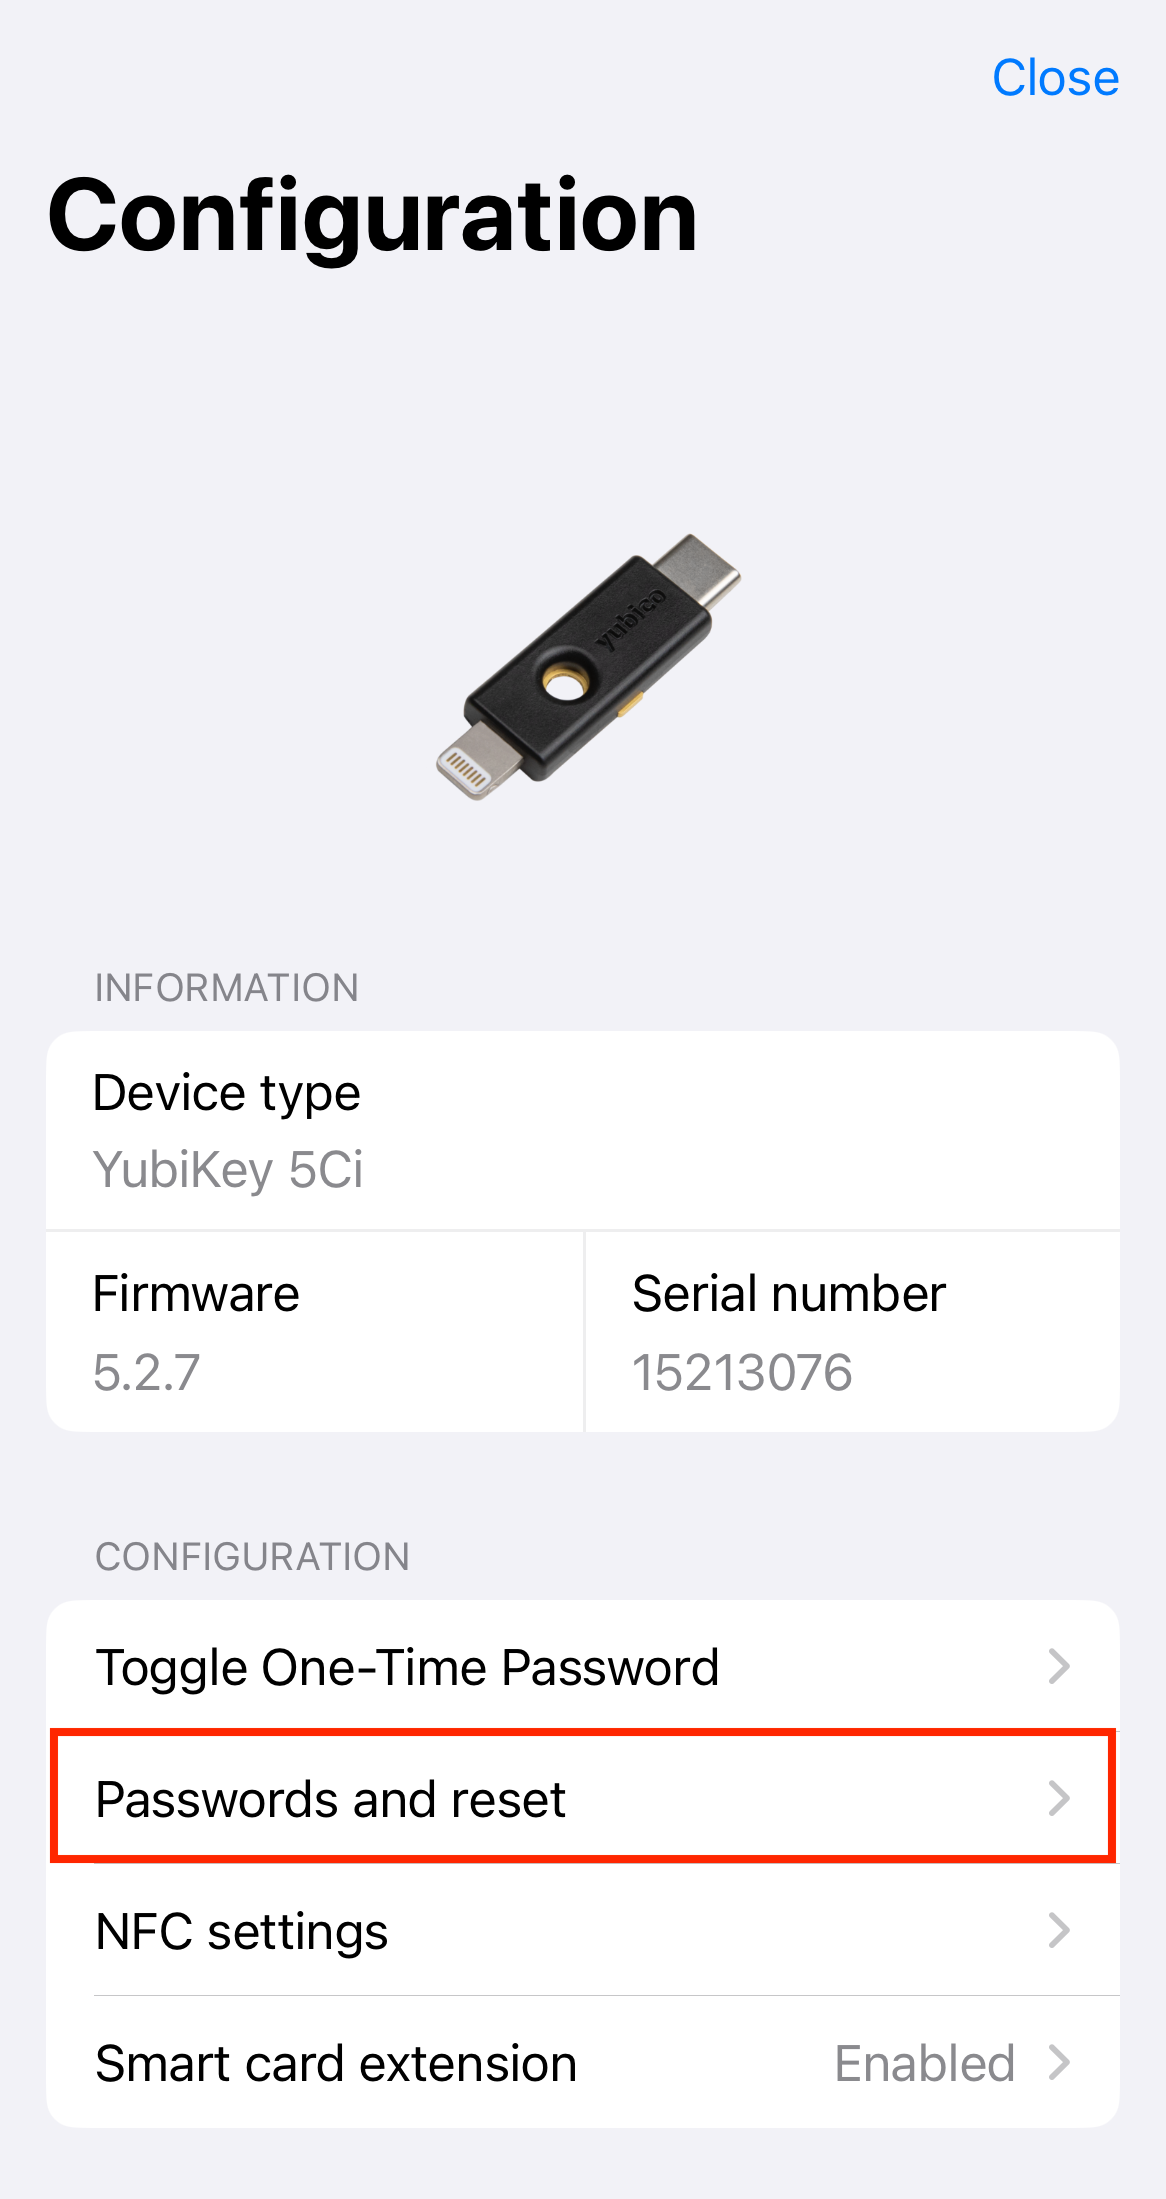
Click the three dots in the upper right corner of the app and select Configuration.
On the Configuration screen, select Manage password under the OATH section.
Click Set password and enter your new password. The password may contain letters, numbers, and special characters. Enter your password again to confirm and click Set.
For NFC connections, tap your key to complete the operation.
Note
If connected over USB-C on iOS or iPadOS, you must disable Yubico OTP generation in order to access your on-screen keyboard. For instructions and additional information, see Disable Yubico OTPs.
Remember or forget an OATH password
Once the password has been created, you must enter it every time you want to access the Accounts features in Yubico Authenticator. However, you can bypass this requirement on trusted devices by enabling the “remember password” feature. This setting allows the Yubico Authenticator app to store your OATH password and automatically submit it to your YubiKey whenever you open the Accounts page. As this feature affects the app itself and not your YubiKey, you will need to enable it in the app on each device you wish to use it with.
Once a password is “remembered”, it can also be “forgotten” (cleared from application memory) at any time. Updating or reinstalling the app will clear the remembered password from memory as well.
To remember or forget an OATH password on a particular device, do the following:
Plug your YubiKey into your device and select Accounts.
To connect via NFC on iOS, swipe down on the screen and tap your YubiKey on the back of your device to scan.
Note
NFC wireless connections are natively supported on iOS but not on iPadOS (current iPads do not have built-in NFC readers). For a complete breakdown of Yubico Authenticator functionality by platform and connection type for each YubiKey model, see the Yubico Authenticator Functionality table.
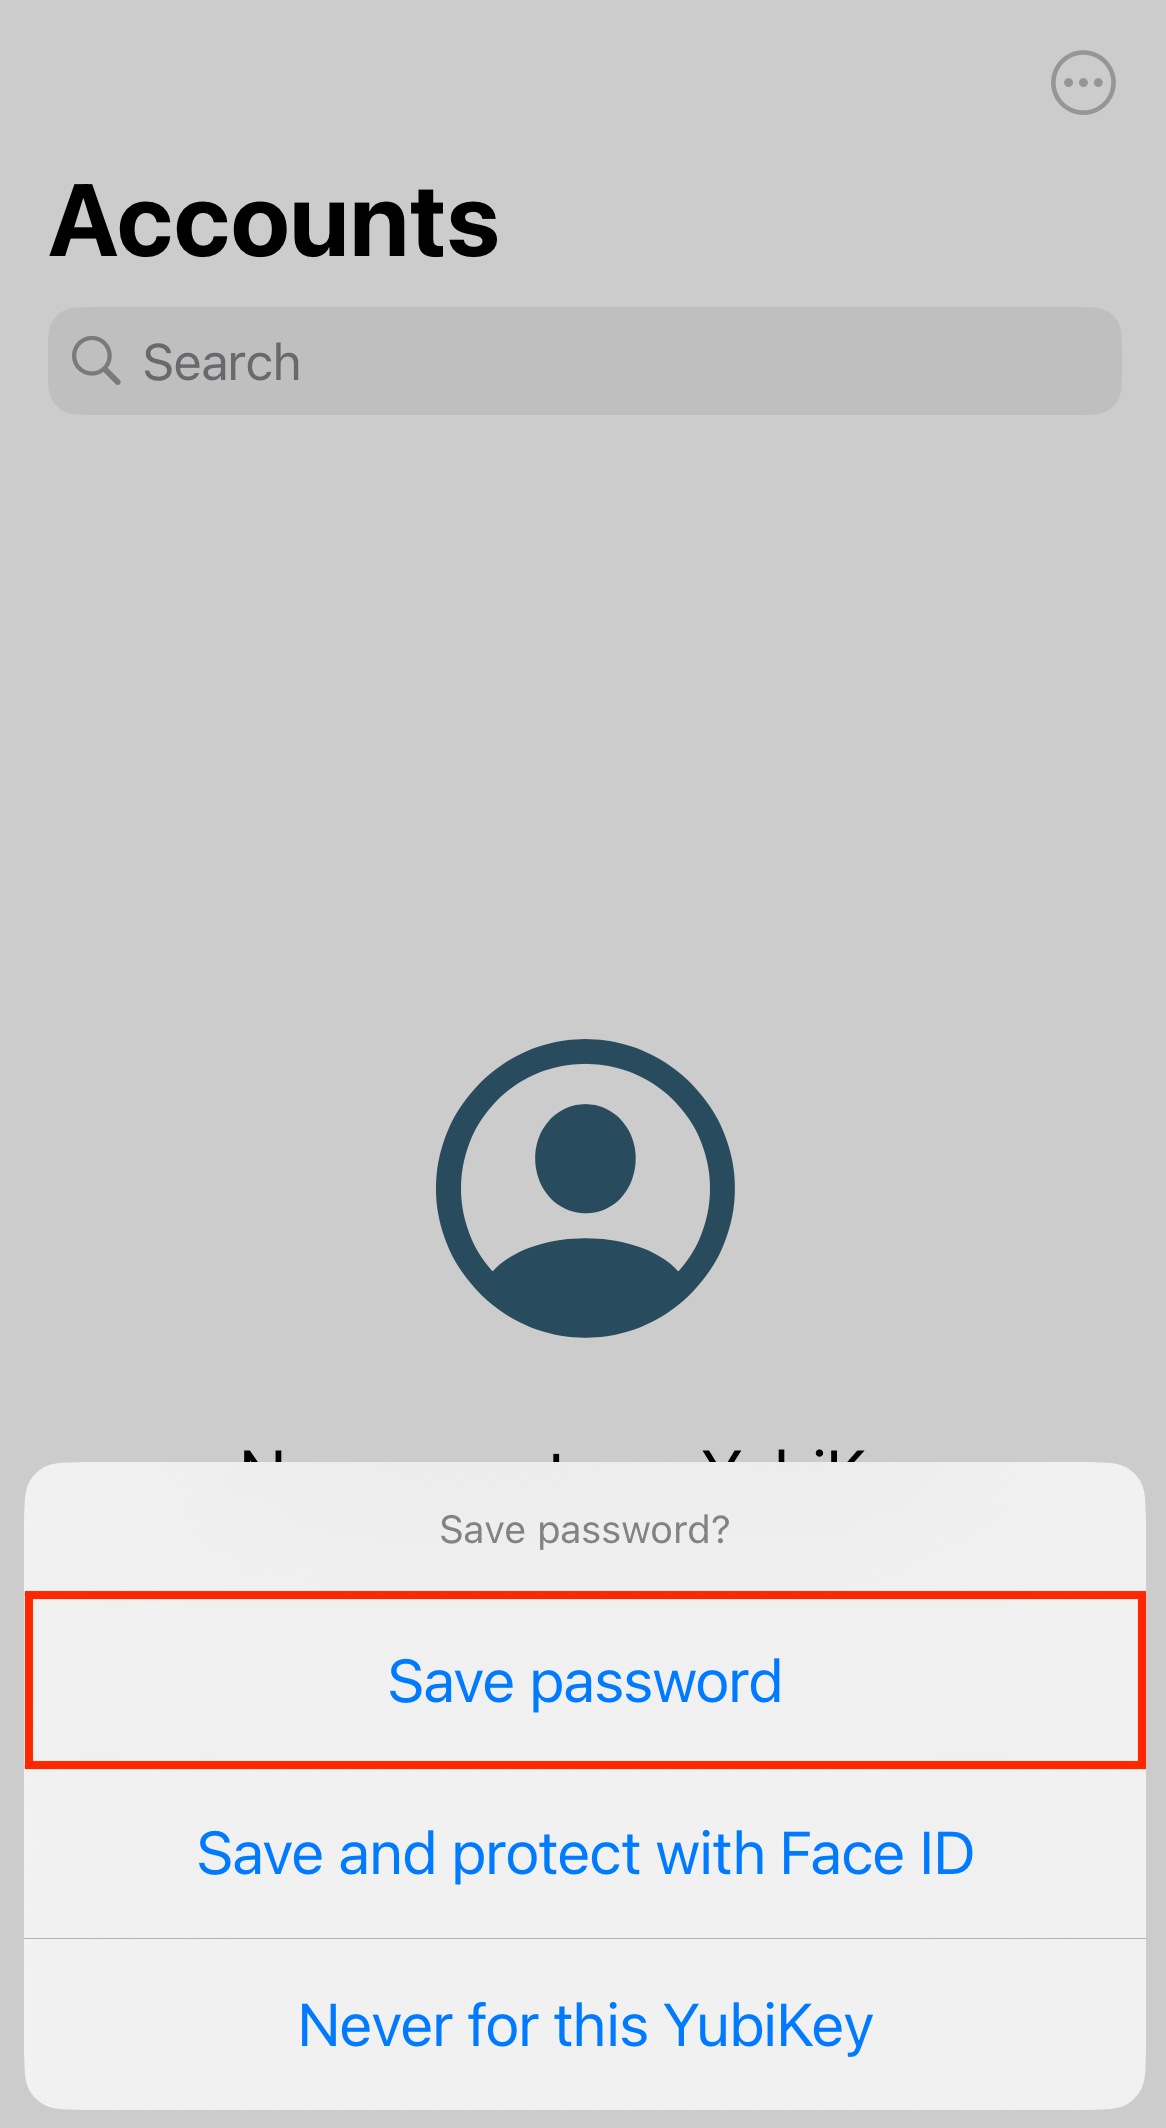
To remember the password on your device, enter your OATH password when prompted, scan the key again if connected via NFC, and click Save password. The next time you connect your YubiKey to your device, you will not be prompted to enter the OATH password to view and manage OATH accounts.
Note
If connected over USB-C on iOS or iPadOS, you must disable Yubico OTP generation in order to access your on-screen keyboard. For instructions and additional information, see Disable Yubico OTPs.
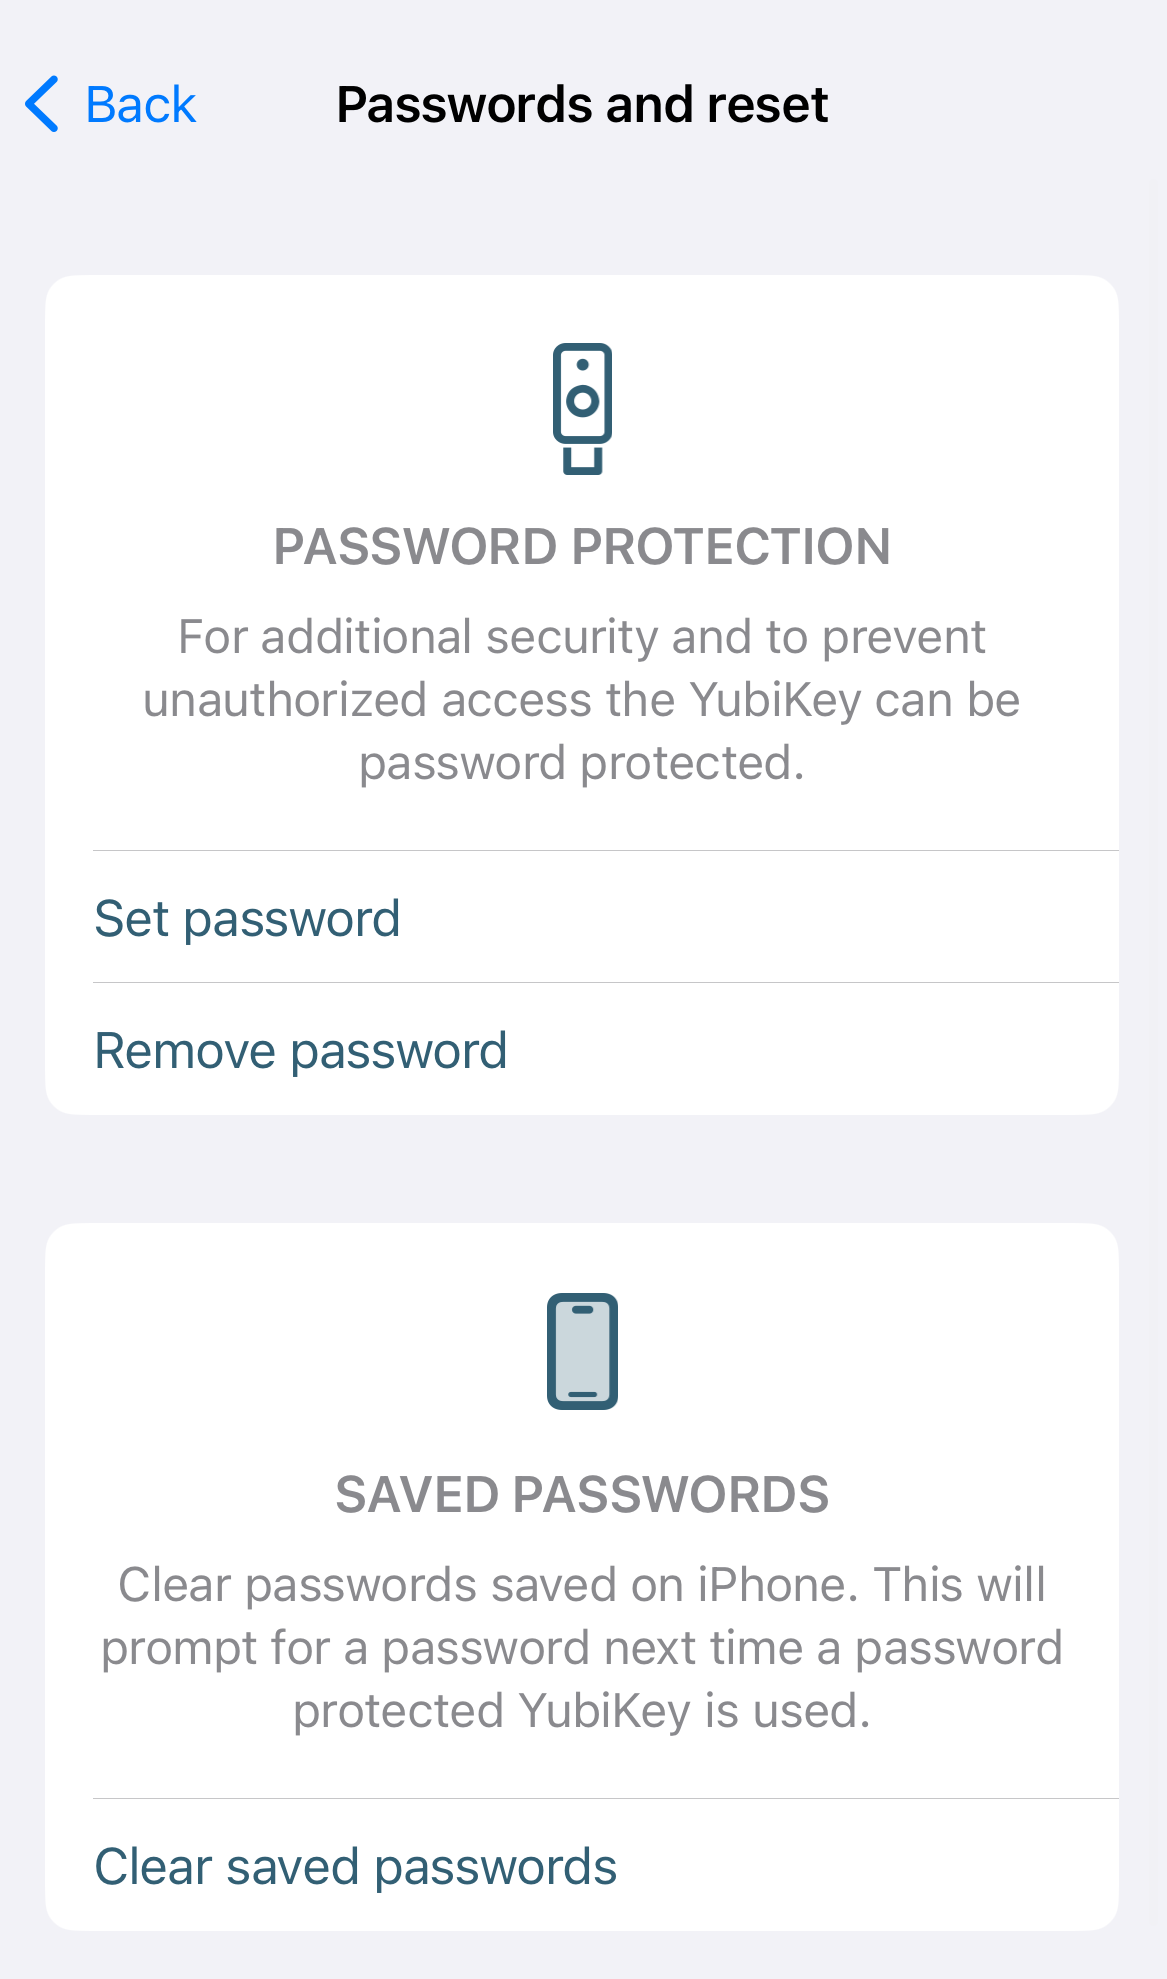
To forget a remembered password, click the three dots in the upper right corner of the app and select Configuration. Select Clear saved passwords under the OATH section. Click Clear saved passwords again and then OK to confirm the operation. The next time you connect your YubiKey to your device, you will be prompted to enter the OATH password to view and manage OATH accounts.
Change or remove an OATH password
To change or remove an OATH password, do the following:
Plug your YubiKey into your device and select Accounts.
To connect via NFC on iOS, swipe down on the screen and tap your YubiKey on the back of your device to scan.
Note
NFC wireless connections are natively supported on iOS but not on iPadOS (current iPads do not have built-in NFC readers). For a complete breakdown of Yubico Authenticator functionality by platform and connection type for each YubiKey model, see the Yubico Authenticator Functionality table.
Click the three dots in the upper right corner of the app and select Configuration. Select Manage password under the OATH section.
To remove the password, click Remove password. Enter your current password and click Remove. For NFC connections, tap your key to complete the operation. Once removed, a new password can be set at any time.
Note
If connected over USB-C on iOS or iPadOS, you must disable Yubico OTP generation in order to access your on-screen keyboard. For instructions and additional information, see Disable Yubico OTPs.
To change a password, click Change password. Enter your current password and the new pasword. Enter the new password again to confirm and click Change. For NFC connections, tap your key to complete the operation.
Pinning an account
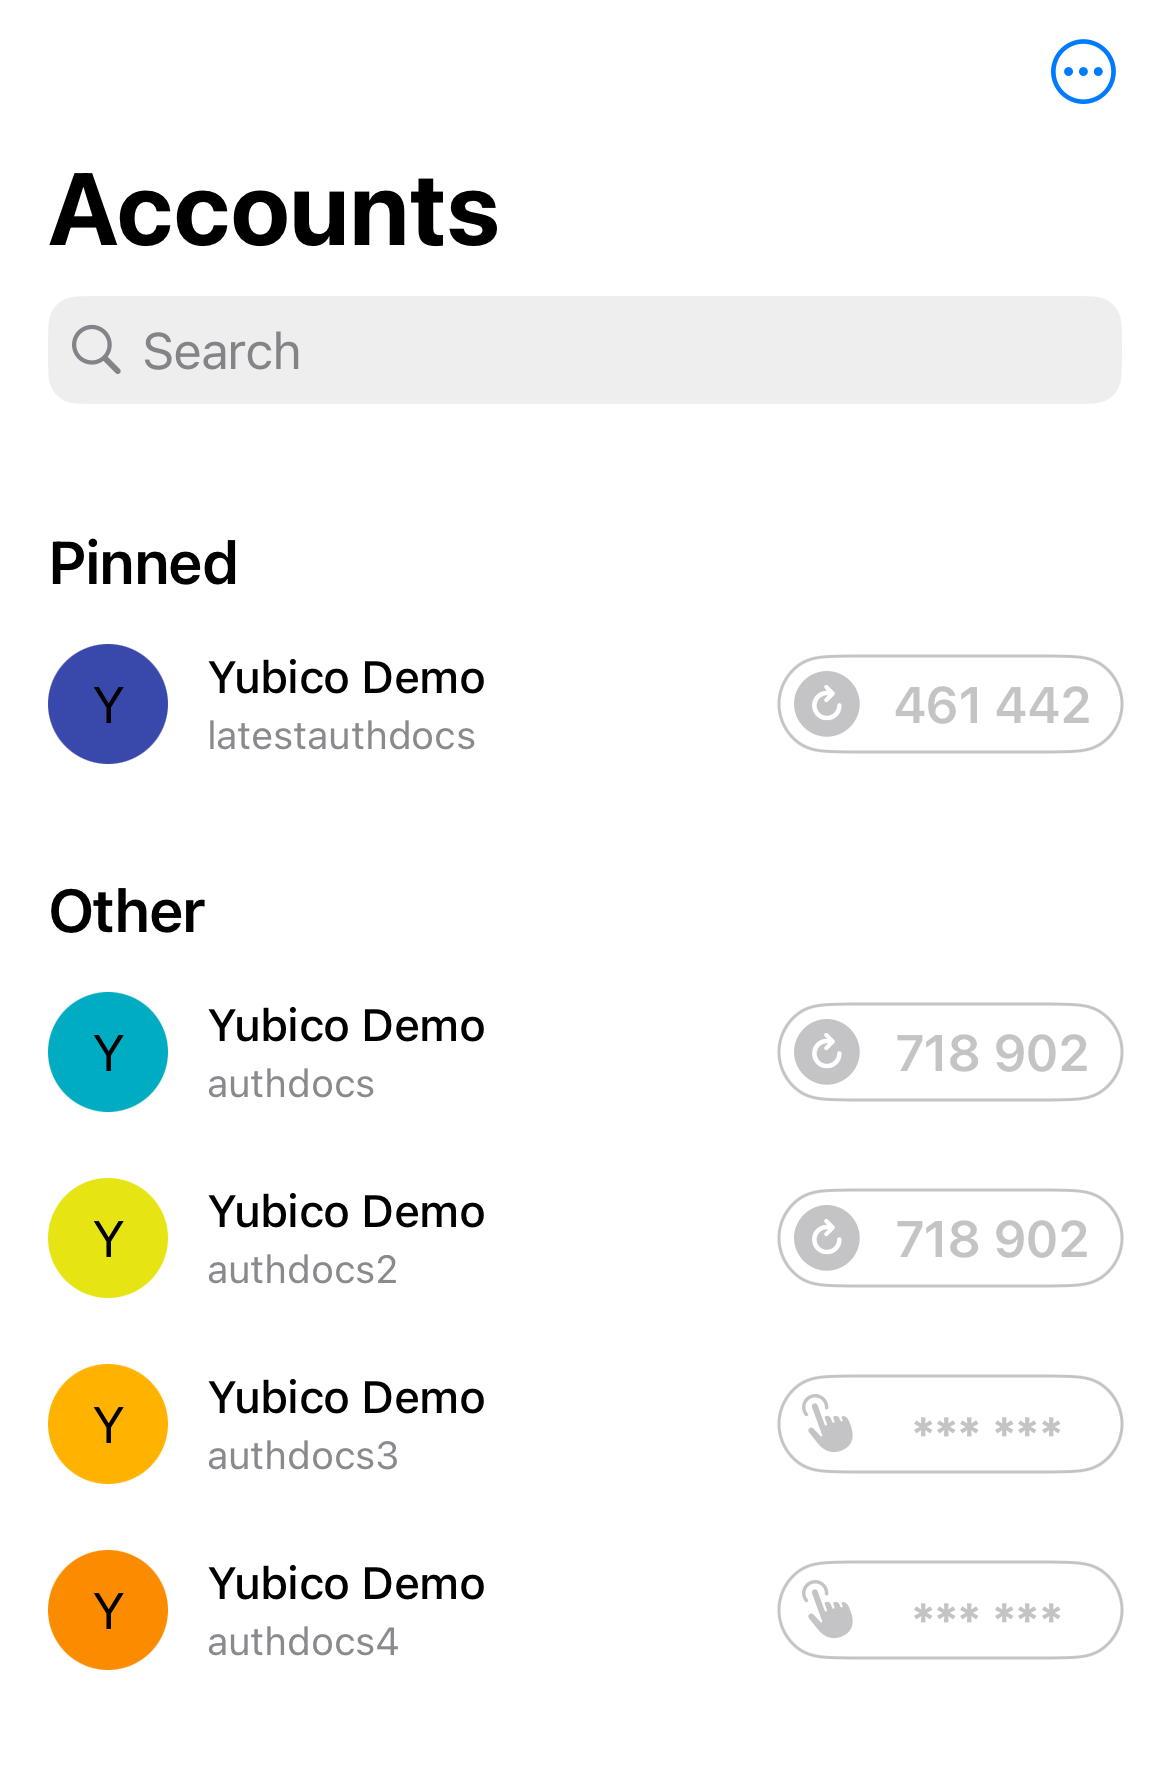
Once an OATH account has been created, it will be listed on the Accounts screen in Yubico Authenticator whenever the YubiKey is connected to the device. If several accounts have been registered, not all of them will be visible in the app window at the same time, and you will need to scroll down the page to view the accounts at the bottom of the list. If some accounts are accessed more often than others, you may wish to pin them.
Pinning an account ensures that it remains at the top of the Accounts screen. If you have more than one account pinned, they will be ordered alphabetically (first by issuer, then by account name).
Tip
Desktop and Android tablet devices can also use their wider screens to display more OATH accounts by changing the screen layout.
To pin an account, do the following:
Plug your YubiKey into your device. On desktop and Android devices, click on the left menu icon in the upper left corner of the app and select Accounts.
To connect via NFC on desktop, click the NFC icon in Yubico Authenticator and place your YubiKey on top of a desktop NFC reader. The key must maintain constant contact with the reader throughout the operation.
To connect via NFC on Android, tap your YubiKey on the back of your device to scan.
To connect via NFC on iOS, swipe down on the screen and tap your YubiKey on the back of your device to scan.
Note
NFC wireless connections are natively supported on iOS but not on iPadOS (current iPads do not have built-in NFC readers). For a complete breakdown of Yubico Authenticator functionality by platform and connection type for each YubiKey model, see the Yubico Authenticator Functionality table.
Enter your OATH password if prompted and click Unlock (on desktop and Android) or Ok (on iOS/iPadOS). For NFC connections on Android or iOS, scan your YubiKey again when prompted.
Note
If connected over USB-C on iOS or iPadOS, you must disable Yubico OTP generation in order to access your on-screen keyboard. For instructions and additional information, see Disable Yubico OTPs.
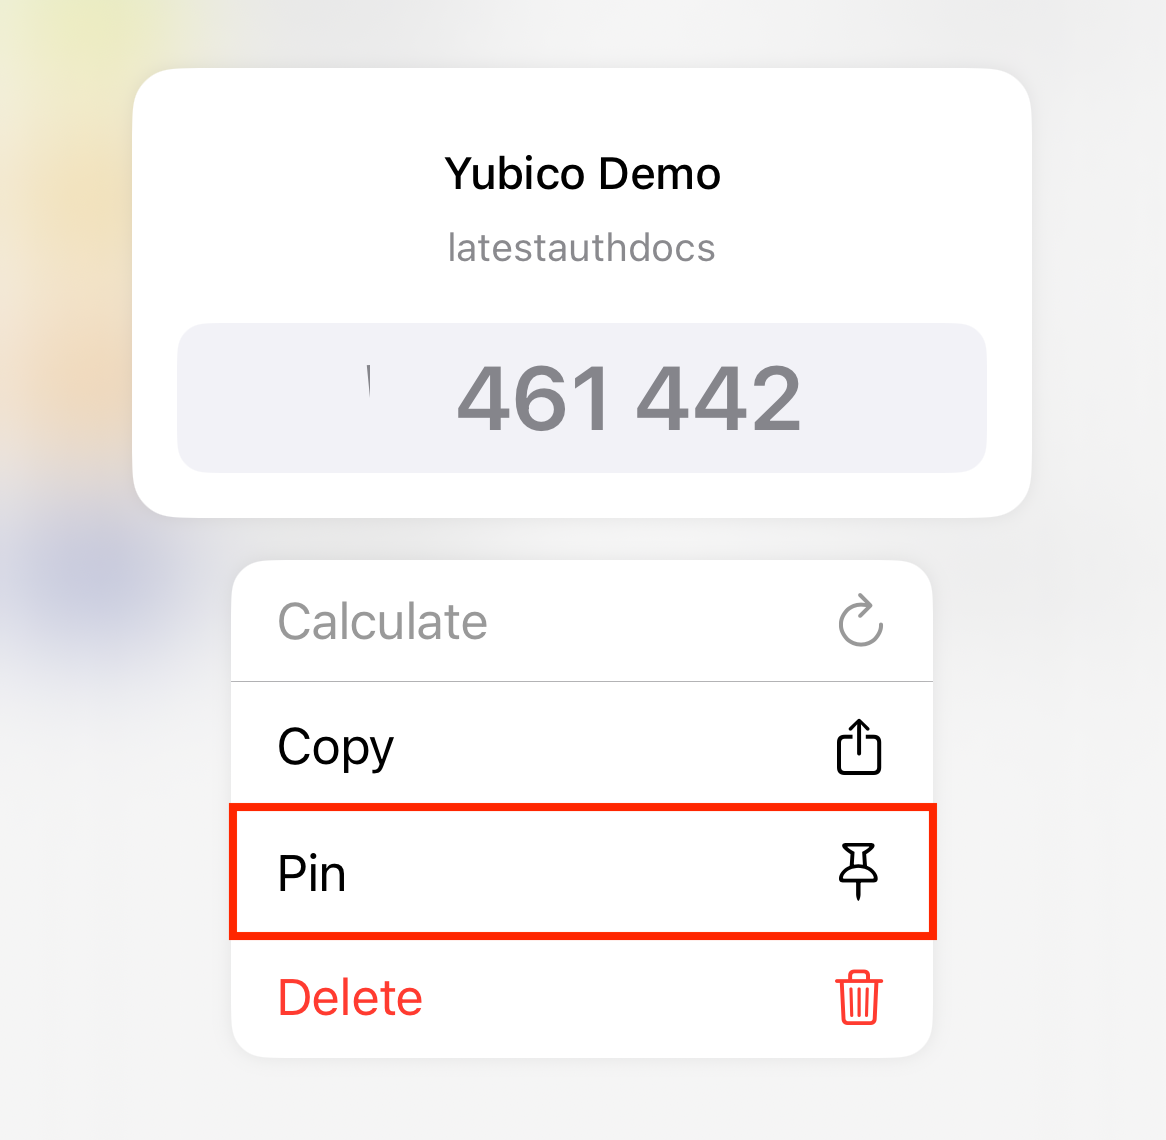
Select the account you wish to pin and click Pin (iOS/iPadOS) or Pin account (on desktop and Android, this is located under Actions). Once pinned, you can unpin the account at any time by clicking Unpin (iOS/iPadOS) or Unpin account (desktop and Android).
Renaming an account
Note
The OATH account renaming feature is only available for YubiKeys with firmware version 5.3.1 or later.
Once an OATH account has been added to your YubiKey, both the issuer and account name can be edited. To rename an OATH account, do the following:
Plug your YubiKey into your device. On desktop and Android, click on the left menu icon in the upper left corner of the app and select Accounts.
To connect via NFC on desktop, click the NFC icon in Yubico Authenticator and place your YubiKey on top of a desktop NFC reader. The key must maintain constant contact with the reader throughout the operation.
To connect via NFC on Android, tap your YubiKey on the back of your device to scan.
To connect via NFC on iOS, swipe down on the screen and tap your YubiKey on the back of your device to scan.
Note
NFC wireless connections are natively supported on iOS but not on iPadOS (current iPads do not have built-in NFC readers). For a complete breakdown of Yubico Authenticator functionality by platform and connection type for each YubiKey model, see the Yubico Authenticator Functionality table.
Enter your OATH password if prompted and click Unlock (on desktop and Android) or Ok (on iOS/iPadOS). For NFC connections on Android or iOS, scan your YubiKey again when prompted.
Note
If connected over USB-C on iOS or iPadOS, you must disable Yubico OTP generation in order to access your on-screen keyboard. For instructions and additional information, see Disable Yubico OTPs.
Select the account you wish to rename and click Rename (iOS/iPadOS) or Rename account (on desktop and Android, this is located under Actions). Edit the Issuer and/or Account name as desired. Click Save to confirm the operation.
For NFC connections on Android or iOS, tap your key to complete the operation.
Deleting an account
OATH accounts can be deleted from your YubiKey via Yubico Authenticator. Before deleting an account from a YubiKey, make sure you have either disabled two-factor authentication within your account settings with the site/service/application or added the account to a backup YubiKey to maintain access. (And make sure to test your backup key to verify it works.) This operation is not reversible–once an OATH account is deleted from your YubiKey, there is no way to recover the account credentials.
To delete an account, do the following:
Plug your YubiKey into your device. On desktop and Android, click on the left menu icon in the upper left corner of the app and select Accounts.
To connect via NFC on desktop, click the NFC icon in Yubico Authenticator and place your YubiKey on top of a desktop NFC reader. The key must maintain constant contact with the reader throughout the operation.
To connect via NFC on Android, tap your YubiKey on the back of your device to scan.
To connect via NFC on iOS, swipe down on the screen and tap your YubiKey on the back of your device to scan.
Note
NFC wireless connections are natively supported on iOS but not on iPadOS (current iPads do not have built-in NFC readers). For a complete breakdown of Yubico Authenticator functionality by platform and connection type for each YubiKey model, see the Yubico Authenticator Functionality table.
Enter your OATH password if prompted and click Unlock (on desktop and Android) or Ok (on iOS/iPadOS). For NFC connections on Android or iOS, scan your YubiKey again when prompted.
Note
If connected over USB-C on iOS or iPadOS, you must disable Yubico OTP generation in order to access your on-screen keyboard. For instructions and additional information, see Disable Yubico OTPs.
Select the account you wish to delete and click Delete (iOS/iPadOS) or Delete account (on desktop and Android, this is located under Actions). Click Delete to confirm the operation.
For NFC connections on Android or iOS, tap your key to complete the operation.
Custom icons
Note
Custom icons are only available for Yubico Authenticator for Desktop and Android.
When viewing OATH accounts on a YubiKey within Yubico Authenticator, each account is listed with a colored icon that contains the first letter of the issuer by default. Similarly, Passkeys are listed with a default Passkey icon.
To make OATH accounts and Passkeys more easily distinguishable from one another, custom icons can be uploaded and used in Yubico Authenticator. For example, with custom icons, instead of seeing the default “D” icon next to an OATH account for Docker, an icon containing the Docker logo and colors would be shown. For a Microsoft Passkey, an icon with the Microsoft logo and colors would be shown in place of the default Passkey icon.
Icon packs must be in the Aegis Icon Pack format. Feel free to use a pre-built icon pack from Aegis or create your own.
To upload an icon pack to Yubico Authenticator on desktop or Android, do the following:
Download a pre-built icon pack from Aegis or create your own.
Click on the left menu icon in the upper left corner of the app, and select Settings.
On the Settings screen, click Custom icons under APPEARANCE.
Under ACTIONS, click Load icon pack. Select the file containing the icons (for example, aegis-icons.zip).
To find the ACTIONS section in a narrow app window, click on the icon with the three dots next to Custom icons.
Once loaded, any OATH account or Passkey with an issuer that is supported by the icon pack will display the custom icon. To delete the icon pack, click Remove icon pack. Similarly, to update the icon pack, click Replace icon pack and select the new file.