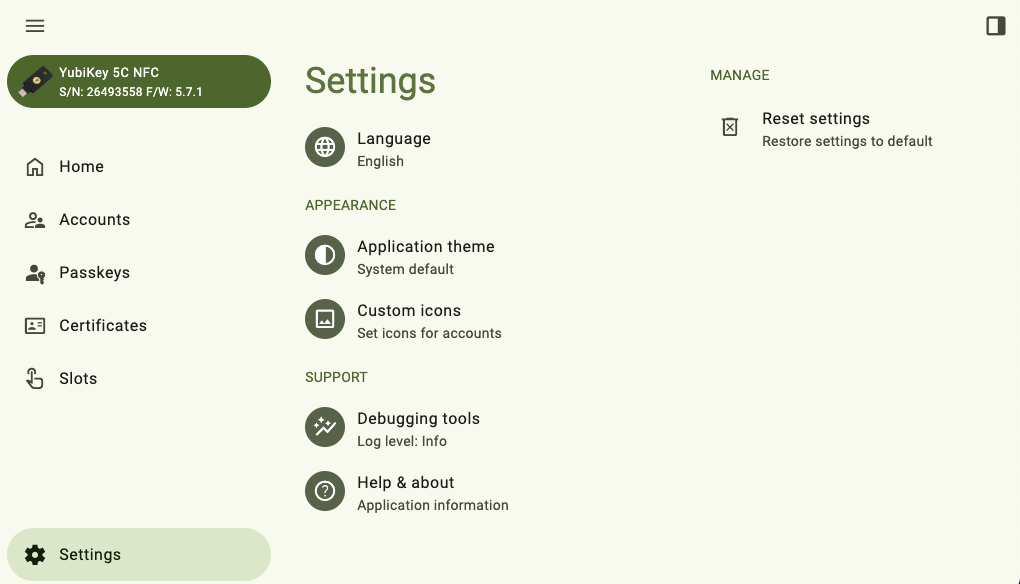
Settings
The Settings page in Yubico Authenticator for Desktop and Android allows you to manage application settings, including:
- the application theme
- custom OATH account and Passkey icons
- the application language
- NFC smart card reader visibility
Once modified, these application settings can be reset to their factory default states at any time.
Additional Android-specific settings, including NFC tap behavior, are also available via the Settings page.
Application settings for Yubico Authenticator for iOS/iPadOS, including NFC tap behavior and Yubico OTP generation, are managed via the Configuration page. See iOS/iPadOS-specific settings for guidance on modifying these settings.
Change the Authenticator theme
Note
The app theme can be changed on Yubico Authenticator for Desktop and Android only.
Yubico Authenticator for Desktop and Android have three themes available: default, light, and dark. The color of the default theme is dependent on your system settings.
To change the theme, do the following:
Open Yubico Authenticator, click on the left menu icon in the upper left corner of the app and select Settings.
In the Settings window, click Application theme under APPEARANCE. Select a new theme under OPTIONS.
To find the OPTIONS section in a narrow app window, click on the icon with the three dots next to Application theme.
Load a custom icon pack
Note
Custom icons are only available for Yubico Authenticator for Desktop and Android.
When viewing OATH accounts on a YubiKey within Yubico Authenticator, each account is listed with a colored icon that contains the first letter of the issuer by default. Similarly, Passkeys are listed with a default Passkey icon.
To make OATH accounts and Passkeys more easily distinguishable from one another, custom icons can be uploaded and used in Yubico Authenticator. For example, with custom icons, instead of seeing the default “D” icon next to an OATH account for Docker, an icon containing the Docker logo and colors would be shown. For a Microsoft Passkey, an icon with the Microsoft logo and colors would be shown in place of the default Passkey icon.
Icon packs must be in the Aegis Icon Pack format. Feel free to use a pre-built icon pack from Aegis or create your own.
To upload an icon pack to Yubico Authenticator on desktop or Android, do the following:
Download a pre-built icon pack from Aegis or create your own.
Click on the left menu icon in the upper left corner of the app, and select Settings.
On the Settings screen, click Custom icons under APPEARANCE.
Under ACTIONS, click Load icon pack. Select the file containing the icons (for example, aegis-icons.zip).
To find the ACTIONS section in a narrow app window, click on the icon with the three dots next to Custom icons.
Once loaded, any OATH account or Passkey with an issuer that is supported by the icon pack will display the custom icon. To delete the icon pack, click Remove icon pack. Similarly, to update the icon pack, click Replace icon pack and select the new file.
Change the application language
Note
The app language can be changed on Yubico Authenticator for Desktop and Android only.
Yubico Authenticator supports multiple languages. Translations are a community effort and are managed by the Yubico Authenticator Crowdin project. Languages are not included in Yubico Authenticator until they reach a 70% completion rate on Crowdin.
The default language the application uses depends on your device’s system settings, but it is also possible to manually select the app language. Supported languages include:
- Bulgarian
- Chinese (Simplified and Traditional)
- Czech
- Dutch
- English
- French
- German
- Greek
- Hebrew
- Hungarian
- Italian
- Japanese
- Polish
- Portuguese (Brazil)
- Russian
- Slovak
- Spanish
- Swedish
- Turkish
- Ukrainian
- Vietnamese
To change the app language, do the following:
Open Yubico Authenticator, click on the left menu icon in the upper left corner of the app and select Settings.
In the Settings window, click on Language. Select your preferred language under OPTIONS.
To find the OPTIONS section in a narrow app window, click on the icon with the three dots next to Language.
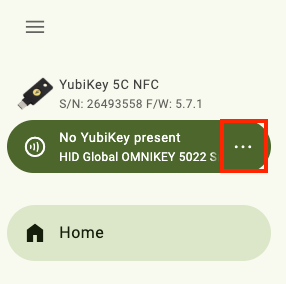
Show/hide NFC smart card readers
Note
The Toggle readers feature is only available on Yubico Authenticator for Desktop.
By default, any NFC smart card reader connected to a desktop device will be shown in Yubico Authenticator (regardless of whether a YubiKey is on the reader). Settings includes a toggle that allows you to show/hide connected readers. If a reader is hidden, you will not be able to interact with an NFC-enabled YubiKey in contact with the reader from within Yubico Authenticator.
To show/hide an NFC smart card reader, do the following:
Open Yubico Authenticator, click on the left menu icon in the upper left corner of the app and select Settings.
In the Settings window, click Toggle readers.
To show/hide a reader, click the toggle to the on/off position next to the reader name under TOGGLE READERS.
To find the TOGGLE READERS section in a narrow app window, click on the icon with the three dots.

Note
Readers can also be toggled off by clicking the three dots next to the reader name (or right-clicking on the NFC icon in a narrow app window) and selecting Hide reader.
Reset application settings
Note
Application settings can be reset on Yubico Authenticator for Desktop and Android only.
It is possible to reset the application settings (including language, application theme, NFC reader visibility, Accounts and Passkeys layouts, and YubiKey labels and colors) to their factory default settings in a single operation.
To perform an application settings factory reset, do the following:
Open Yubico Authenticator, click the on left menu icon in the upper left corner of the app and select Settings.
In the Settings window, click Reset settings under MANAGE. Click Reset to confirm the operation.
To find the MANAGE section in a narrow app window, click on the right menu icon in the upper right corner of the app.
Android-specific settings
There are several settings that are unique to Yubico Authenticator for Android. These include:
- NFC tap behavior
- Keyboard layout
- Touch requirement with NFC
- NFC sounds
- USB behavior
Note
Android NFC settings are only visible in the Yubico Authenticator app on devices that support NFC.
To toggle these settings, open Yubico Authenticator, click on the left menu icon in the upper left corner of the app and select Settings. On the Settings page, select NFC & USB options.
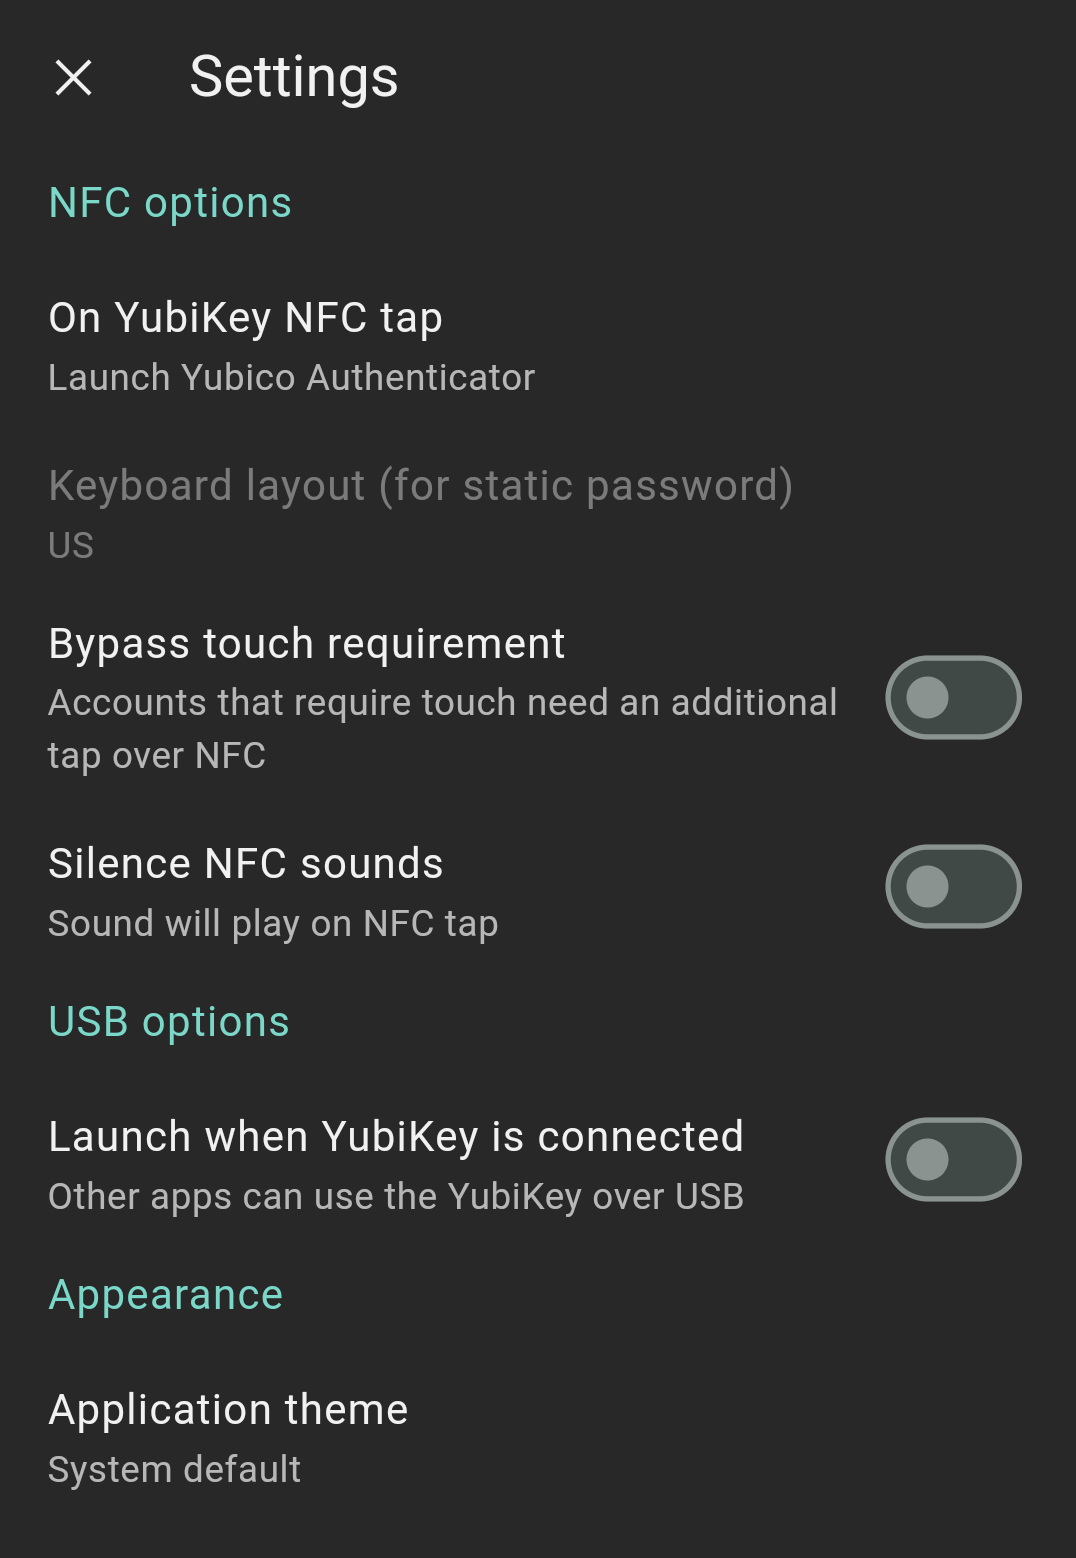
NFC tap behavior
Yubico Authenticator can be configured to do one of the following when a YubiKey is tapped against the Android device’s NFC reader:
- Launch Yubico Authenticator
- Generate a Yubico OTP and copy it to clipboard
- Launch Yubico Authenticator, generate a Yubico OTP, and copy it to clipboard
- Nothing
By default, Launch Yubico Authenticator is selected. To toggle this setting, select a new option under ON NFC TAP.
Keyboard layout
When transmitting a static password from a YubiKey to an Android device, that device will map the input (a series of HID codes) to characters from a specific keyboard layout. If the layout the device uses is different from the layout that the YubiKey was programmed with, the static password can be translated incorrectly.
By default, Yubico Authenticator for Android uses the US keyboard layout. To select a different layout, click on Keyboard layout (for static password) and choose another option.
Touch requirement with NFC
When an OATH account is added to a YubiKey, it can be configured to “require touch” in order to generate an OTP. For NFC connections, this means tapping the YubiKey against the device’s NFC reader at least twice: once to display the OATH accounts and again to generate and display the OTP for a particular account.
However, on Android, this touch requirement can be bypassed so that OTPs are generated and displayed for all TOTP OATH accounts on the initial NFC tap. To do so, toggle on Bypass touch requirement.
NFC sounds
By default, Android devices with volume on will emit a sound whenever a YubiKey is scanned by the NFC reader. To turn this sound off, click the toggle next to Silence NFC sounds.
USB behavior
By default, Yubico Authenticator does not automatically launch when a YubiKey is connected to an Android device over USB.
To enable this feature, toggle on Launch Yubico Authenticator under ON USB INSERT. Note that this prevents other apps from using the YubiKey when connected over USB.
iOS/iPadOS-specific settings
There are several settings that are unique to Yubico Authenticator for iOS/iPadOS. These include:
- NFC reader initiation after opening the app
- Touch requirement with NFC
- Clipboard settings for copying Yubico OTPs
- NFC reader initiation after generating a Yubico OTP
- Yubico OTP generation
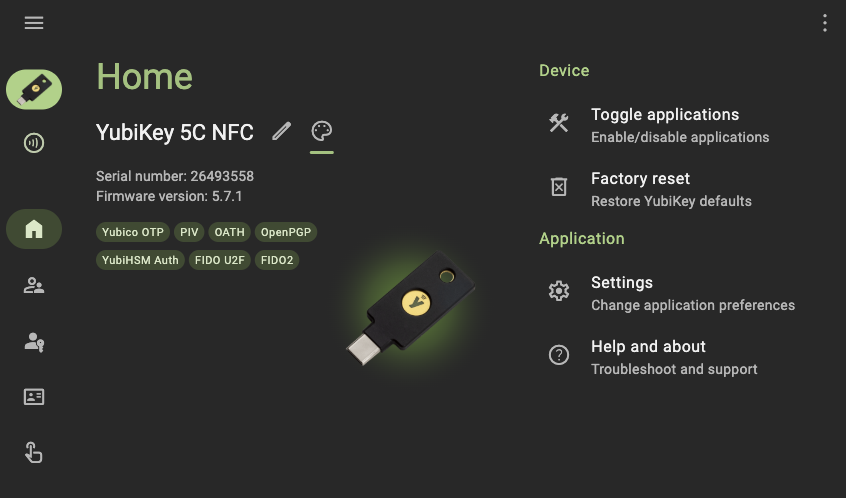
YubiKey overview
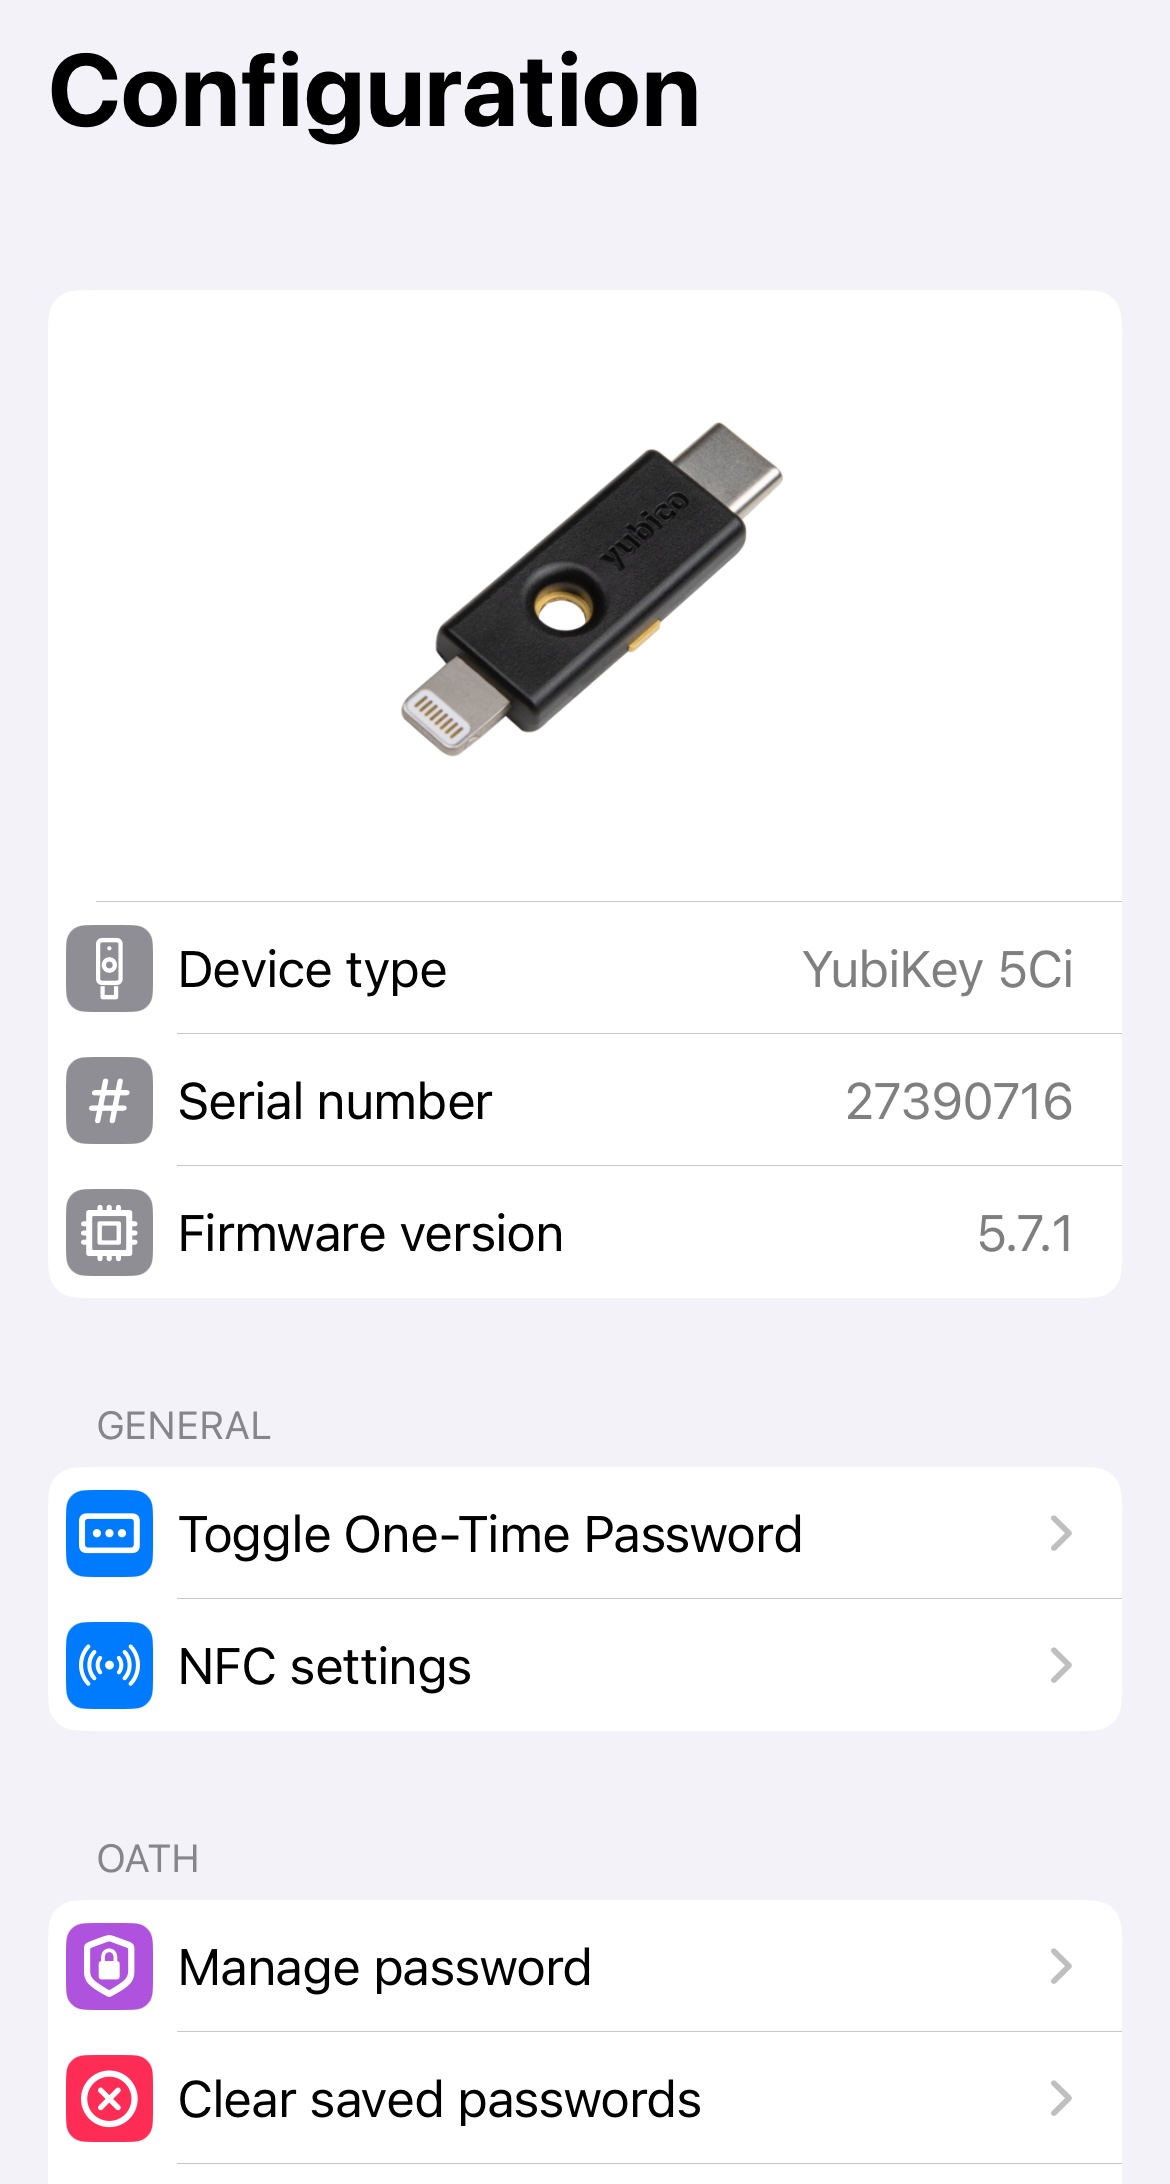
To get an overview of a YubiKey connected to an iOS/iPadOS device, click the three dots in the upper right corner and select Configuration.
The Configuration screen displays the key’s model name, firmware version, and serial number.
Initiate NFC at application start
By default, to connect to a YubiKey over NFC on iOS/iPadOS, you must swipe down on the screen to initiate the NFC reader prior to scanning the key. To automatically trigger the NFC reader when the application is launched (as in, the app will prompt you to scan your key without having to swipe down on the screen first), do the following:
- Click the three dots in the upper right corner and select Configuration.
- Click NFC settings.
- On the NFC settings page, toggle on Initiate NFC at application start.
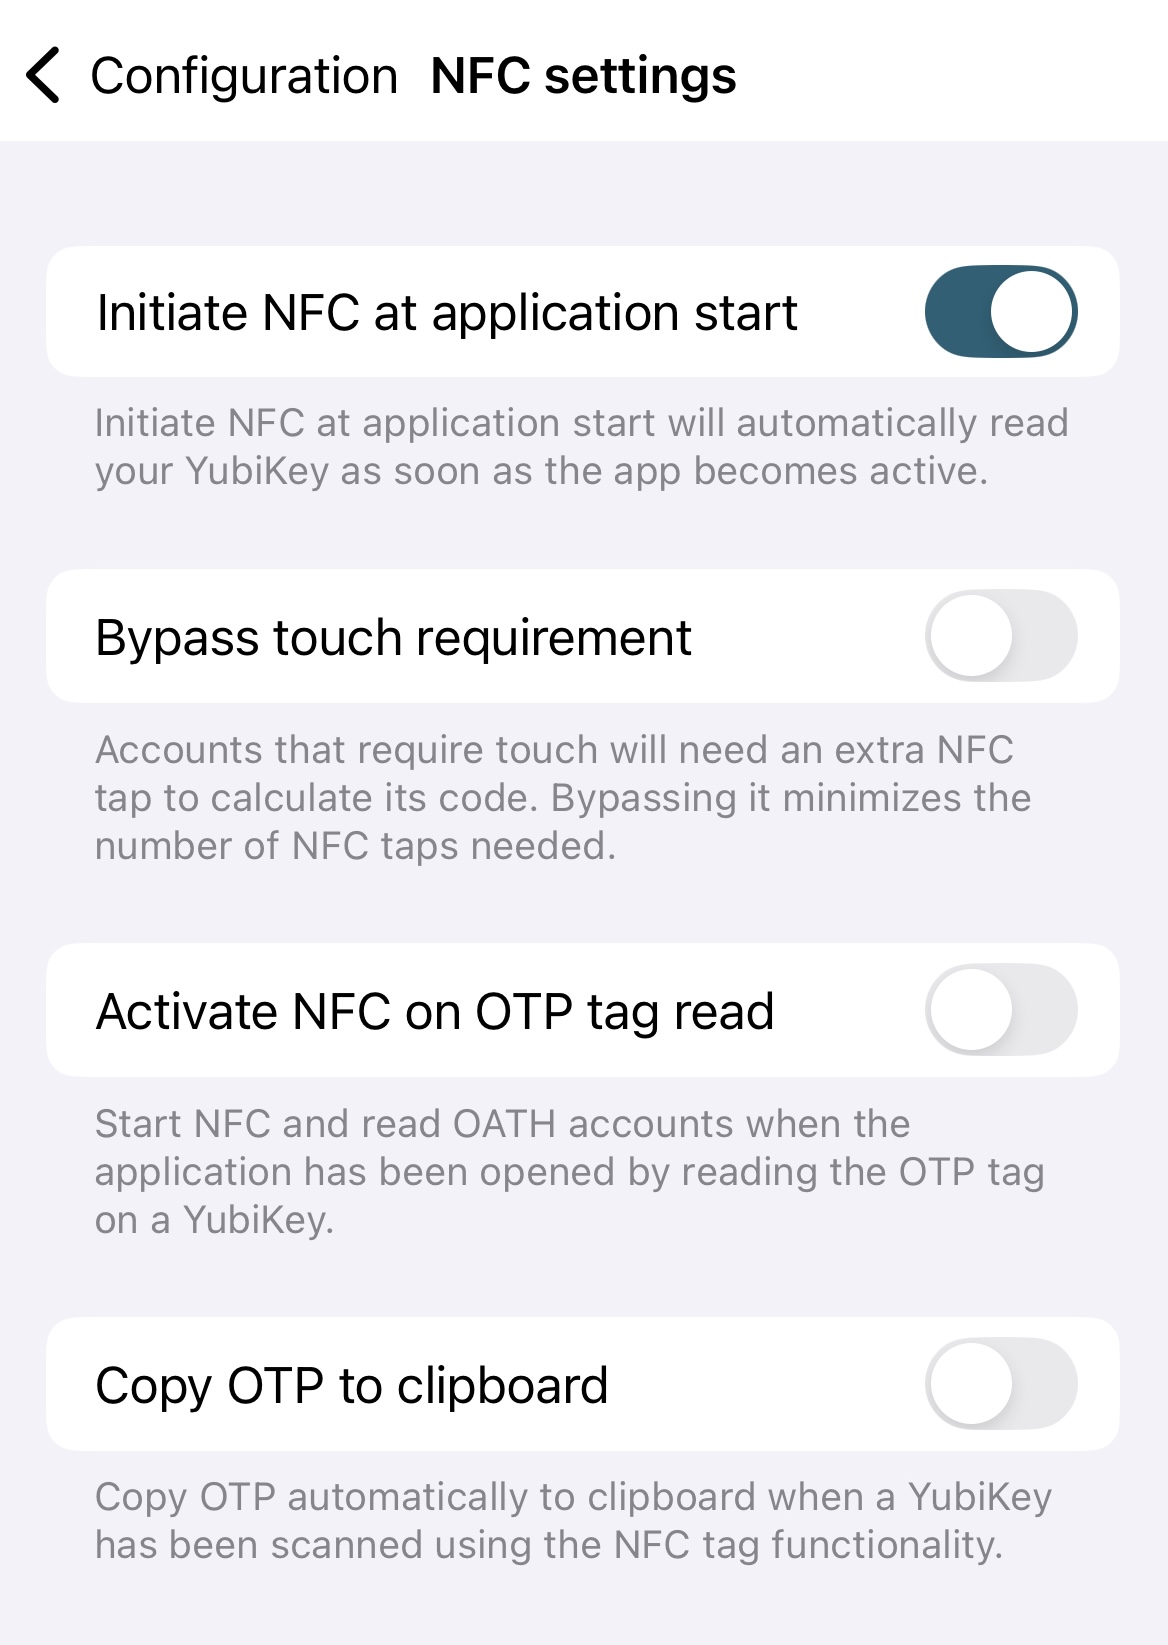
Touch requirement
When an OATH account is added to a YubiKey, it can be configured to “require touch” in order to generate an OTP. For NFC connections, this means tapping the YubiKey against the device’s NFC reader at least twice: once to display the OATH accounts and again to generate and display the OTP for a particular account.
However, on iOS/iPadOS, this touch requirement can be bypassed so that OTPs are generated and displayed for all TOTP OATH accounts on the initial NFC tap. To do so, do the following:
- Click the three dots in the upper right corner and select Configuration.
- Click NFC settings.
- On the NFC settings page, toggle on Bypass touch requirement.
Copy Yubico OTP to clipboard
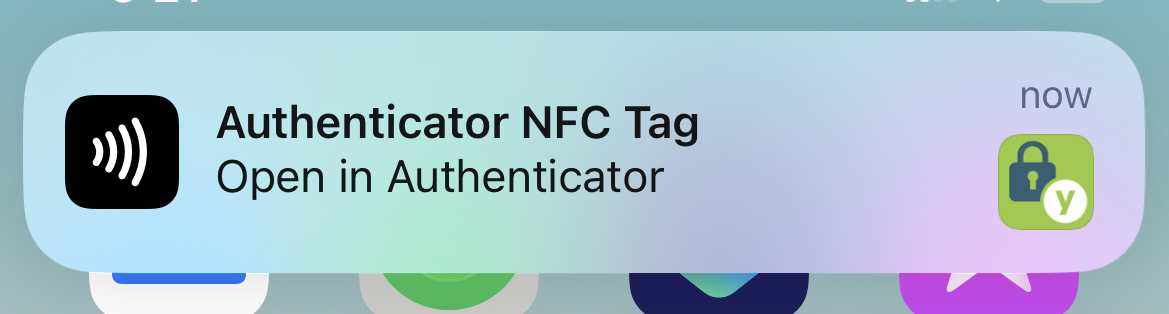
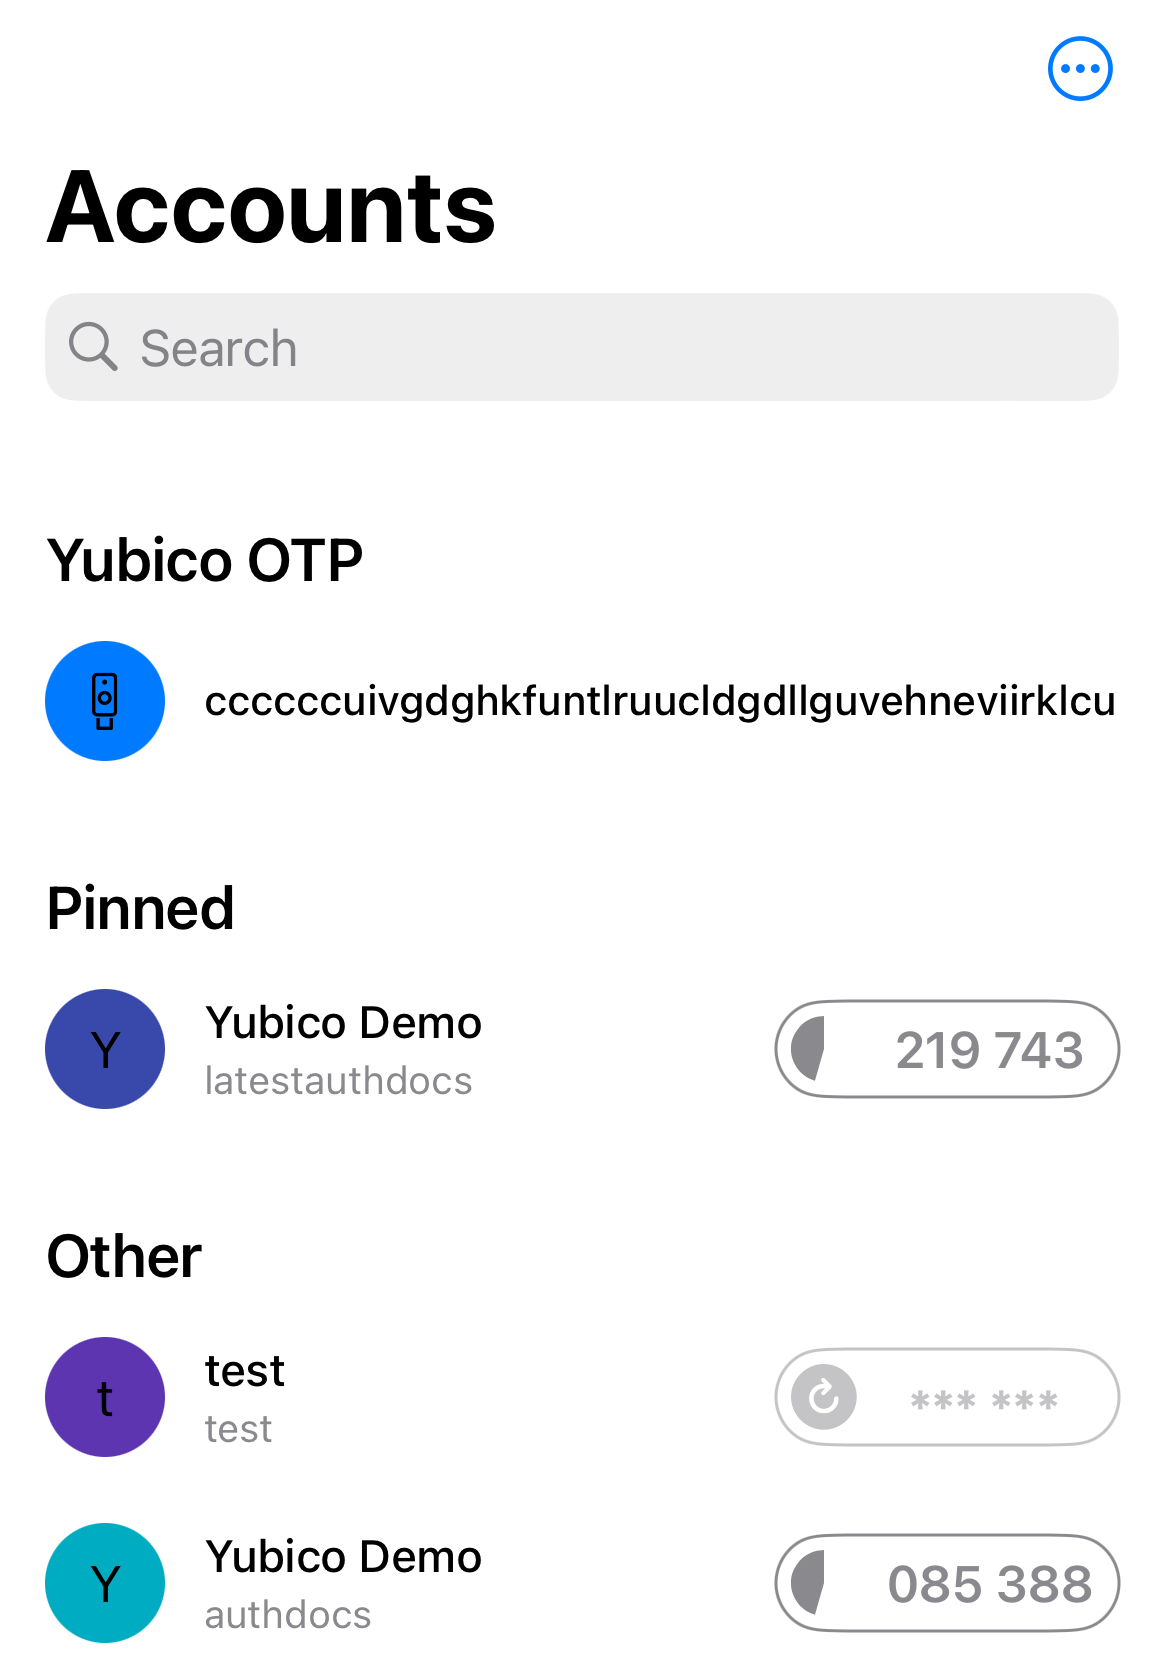
When a YubiKey is held next to an iOS/iPadOS device’s NFC reader (whether the Authenticator app is open or not), the key will generate a Yubico OTP (if a slot is configured), and the device will prompt you to open Yubico Authenticator, where the OTP will be displayed. Clicking on the OTP will copy it to the clipboard.
To copy the OTP to the clipboard automatically after opening Yubico Authenticator, do the following:
- Click the three dots in the upper right corner and select Configuration.
- Click NFC settings.
- On the NFC settings page, toggle on Copy OTP to clipboard.
Activate NFC on OTP tag read
When a YubiKey is held next to an iOS/iPadOS device’s NFC reader (whether the Authenticator app is open or not), the key will generate a Yubico OTP (if a slot is configured), and the device will prompt you to open Yubico Authenticator, where the OTP will be displayed. The app can also be configured to launch the NFC reader once the app is opened in this scenario. Once the key is scanned, the OATH accounts are displayed along with the Yubico OTP.
This is set to “On” by default. To toggle this setting off, do the following:
- Click the three dots in the upper right corner and select Configuration.
- Click NFC settings.
- On the NFC settings page, toggle off Activate NFC on OTP tag read.
Disable Yubico OTPs
By default, YubiKeys will generate a Yubico OTP (if a slot is configured) when the key is touched or scanned with an NFC reader.
Due to a platform limitation in iOS/iPadOS, when a YubiKey is connected to an iOS or iPadOS device over USB-C, the key is detected by the OS as an external keyboard, which causes the OS to automatically disable the on-screen keyboard. This causes issues in situations where the keyboard is needed to perform an operation in Yubico Authenticator, such as entering your OATH password or PIV PIN, as well as in other apps, including email and Messages.
To work around this limitation, Yubico OTPs can be disabled. Once disabled, Yubico OTPs can be re-enabled at any time.
To toggle Yubico OTPs off/on, do the following:
- Click the three dots in the upper right corner and select Configuration.
- On the Configuration page, select Toggle One-Time Password.
- If connecting over NFC, scan your key when prompted. Otherwise, plug in your key.
- Click the toggle next to One-Time Password. If connected over USB-C or Lightning, disconnect and reconnect your YubiKey to complete the operation. If connecting over NFC, scan your key when prompted.
Important
This toggle changes a setting on the YubiKey itself, not the app. If you toggle this setting off, the YubiKey will not emit an OTP when touched or scanned on ANY device. Also, if you toggle this setting off while connected over NFC, it will only prevent OTPs from being generated and submitted over NFC; touching the key when connected over USB or Lighting will still generate an OTP. Similarly, if you toggle this setting off when the key is plugged into your device, it will only prevent OTPs from being generated and submitted over USB/Lighting; scanning the key with an NFC reader will still generate an OTP.