Import a Certificate and Private Key onto Your YubiKey
Before you can use the Smart Card on iOS features, you must first import applicable X.509 smart card certificates and their private keys onto your YubiKey. This can be done on a computer through either of the following tools:
- Yubico Authenticator for Desktop
- YubiKey Manager CLI (ykman)
Yubico Authenticator for Desktop is a GUI (graphical user interface) tool that allows you to configure PIV functionality by clicking through a series of screens, whereas the YubiKey Manager CLI (command line interface) tool allows you to configure the same functionality via commands in a terminal. Both tools are supported for Windows, Linux, and macOS.
Follow the steps detailed below to import your smart card certificates and their private keys onto your YubiKey using your preferred tool.
Note
If you have already completed these steps, skip ahead to Provision Your Certificate onto Your iOS Keychain.
Import via Yubico Authenticator for Desktop
To use Yubico Authenticator for Desktop to import your certificate and private key, follow the steps below:
If you haven’t already, download and install the appropriate version of Yubico Authenticator onto your host computer.
Open Yubico Authenticator, and plug your YubiKey into your computer or place it on top of a desktop NFC reader.
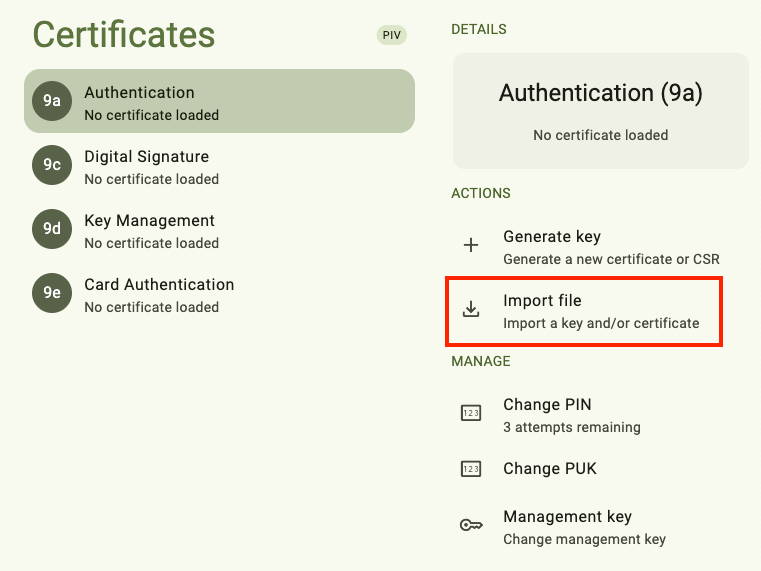
Select Certificates from the left-hand menu.
Click on the slot you would like to import your file into and select Import file under Actions.
To use the Smart Card on iOS functionality, you can import your certificate and private key into any of the main PIV slots, including 9A, 9C, 9D, and 9E, as well as any of the retired key slots (82-95). While the most appropriate slots based on application are 9A for TLS authentication, 9C for digital signatures, and 9D for decryption, as long as your certificate/key pair is in one of the slots mentioned, those operations will work.
Note that with Yubico Authenticator for Desktop, you can only import certificate and key pairs directly into slots 9A, 9C, 9D, and 9E. Once the certificate and key are in one of these slots, they can then be moved into a retired key slot. If slots 9A, 9C, 9D, and 9E are already occupied, you must move the contents of one of these slots to an empty retired key slot before a new certificate/key pair can be imported onto your key.
For more information on PIV application slots, see the slot documentation.
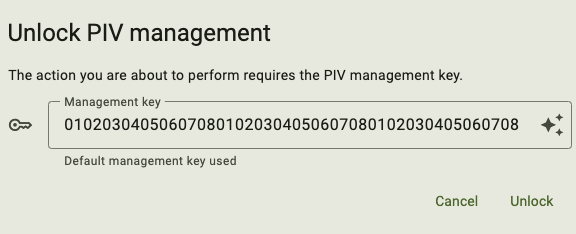
Depending on your YubiKey’s firmware version and your management key, you may be prompted to enter your management key to complete the import operation. If prompted, enter your management key in the Unlock PIV management window and click Unlock.
Tip
To enter the default management key (010203040506070801020304050607080102030405060708), click the star icon in the text box. If your YubiKey is managed by your organization and you do not know your management key, reach out to your IT admin for assistance.
Navigate to where the file is stored on your computer and select it to begin the import process. Enter the file’s password when prompted and click Unlock. On the Import file screen, click Import.
The public certificate and its private key must be imported onto your YubiKey. While the YubiKey can store any X.509 certificate in the PEM, DER, and PKCS12 format, we recommend using PKCS12 files (which have .pfx or .p12 file extensions) because the public certificate and private key are stored in a single file.
If you do not know your file’s password, check with your IT admin (if applicable) or the certificate provider.
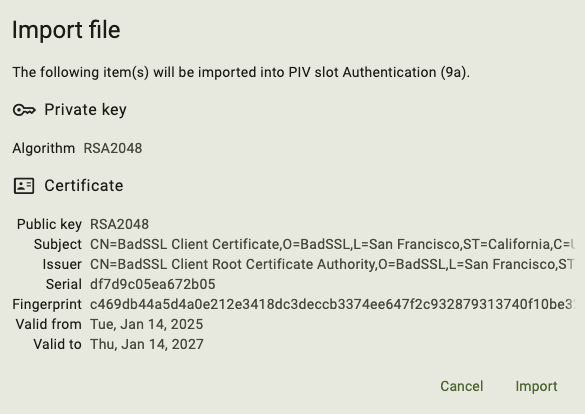
If the import was successful, you will see the certificate information under the Details section for the slot.
Import via YubiKey Manager CLI
If you prefer to use the YubiKey Manager CLI tool (ykman) to import your certificate, follow the steps below:
Install ykman onto your host computer.
ykman can be run within a command prompt, terminal, or PowerShell and must be configured appropriately. See the ykman documentation for configuration guidance.
Once your system has been configured, open a command prompt, terminal, or PowerShell.
Plug your YubiKey into your computer.
Enter
ykman piv infoto check if any slots on your YubiKey are already occupied.To use the Smart Card on iOS functionality, you can import your certificate and private key into any of the main PIV slots, including 9A, 9C, 9D, and 9E, as well as any of the retired key slots (82-95). While the most appropriate slots based on application are 9A for TLS authentication, 9C for digital signatures, and 9D for decryption, as long as your certificate/key pair is in one of the slots mentioned, those operations will work.
Once you have identified an appropriate empty slot, navigate to the folder containing your smart card certificate and private key.
Enter
ykman piv certificates import <slot> <filename>to import your certificate onto your YubiKey.<slot>refers to the slot number (e.g. 9a), and<filename>refers to the name of your certificate file (e.g. certificate.p12).The public certificate and its private key must be imported onto your YubiKey. While the YubiKey can store any X.509 certificate in the PEM, DER, and PKCS12 format, we recommend using PKCS12 files (which have .pfx or .p12 file extensions) because the public certificate and private key are stored in a single file.
Note
For more information on ykman PIV commands, see the ykman documentation.
When prompted, enter your certificate’s password and your PIV application management key.
If you do not know your certificate’s password, check with your IT admin (if applicable) or the certificate provider. If you do not know your management key, and your YubiKey is managed by your organization, reach out to your IT admin for assistance.
Enter
ykman piv infoagain to verify that the certificate import was successful. You will see the slot number listed along with the public and private key algorithm, subject DN, issuer DN, serial number, fingerprint, and the time period the certificate is valid for.% ykman piv info PIV version: 5.7.1 PIN tries remaining: 3/3 PUK tries remaining: 3/3 Management key algorithm: AES192 WARNING: Using default PIN! WARNING: Using default PUK! WARNING: Using default Management key! CHUID: 3019d4e739da739ced39ce739d836858210842108421c84210c3eb341081d743ea9fde436fb4bc8d9c6268da27350832303330303130313e00fe00 CCC: No data available Slot 9A (AUTHENTICATION): Private key type: RSA2048 Public key type: RSA2048 Subject DN: CN=BadSSL Client Certificate,O=BadSSL,L=San Francisco,ST=California,C=US Issuer DN: CN=BadSSL Client Root Certificate Authority,O=BadSSL,L=San Francisco,ST=California,C=US Serial: 16104199391768161029 (0xdf7d9c05ea672b05) Fingerprint: c469db44a5d4a0e212e3418dc3deccb3374ee647f2c932879313740f10be3283 Not before: 2025-01-14T21:00:15+00:00 Not after: 2027-01-14T21:00:15+00:00
Next steps
Now that you have imported your smart card certificate and its accompanying private key onto your YubiKey, you must provision the certificate onto your iOS Keychain through the Yubico Authenticator application on your iOS/iPadOS device.