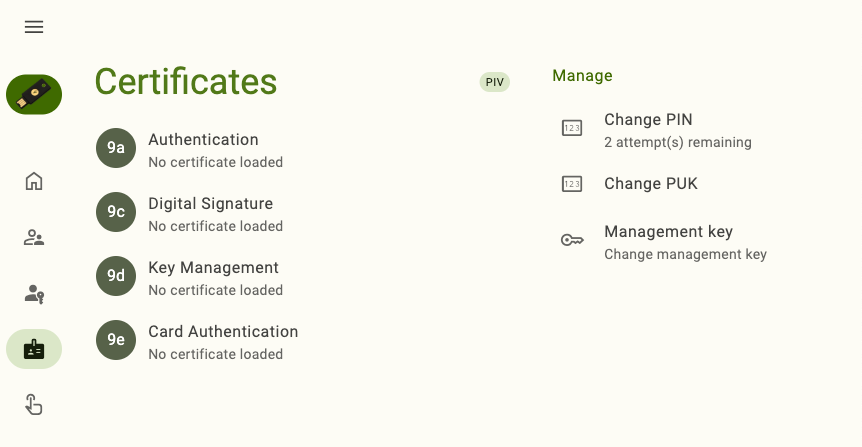
Certificates: PIV
Important
The Certificates feature is available for Yubico Authenticator for Desktop and Android and PIV-compatible YubiKeys. This includes the YubiKey 5 Series (standard, FIPS, and CSPN), YubiKey Bio Series Multi-protocol Edition, YubiKey 4 Series, and YubiKey NEO. On iOS and iPadOS, PIV functionality is limited to the Smart Card on iOS feature. For a complete breakdown of Yubico Authenticator functionality by platform and connection type for each YubiKey model, see the Yubico Authenticator Functionality table.
Managing the PIN, PUK, and Management Key
The PIN, PUK, and Management Key are essential to the functionality of the YubiKey’s PIV application.
The PIN is a 6-8 character value (default: 123456) that protects the YubiKey’s PIV slot credentials. It is required when performing operations such as authentication, encryption/decryption, and digital signature creation.
The PUK, or PIN Unblocking Key, is a 6-8 character value (default: 12345678) that is used, as the name implies, to unblock a blocked PIN. The PIN has a set retry count. Once the PIN has been entered incorrectly too many times in a row and the retries have been exhausted, the PIN becomes blocked and all PIV operations that require the PIN cannot be performed. The PUK, along with Yubico Authenticator, can be used to unblock (change) the PIN and reset the PIN’s retry count without needing to perform a factory reset of the entire PIV application.
The Management Key (default: 010203040506070801020304050607080102030405060708) is required when performing certain operations with the YubiKey’s PIV application slots, including the generation, importation, and deletion of keys and certificates. For YubiKeys with firmware version 5.7, the default Management Key is an AES-192 key. For YubiKeys with firmware versions prior to 5.7, the default Management Key is a Triple DES (TDES) key. Depending on your YubiKey, you may be able to select a different algorithm (TDES, AES-128, AES-192, or AES-256) when changing the Management Key. Management Key length is also dependent on the algorithm: 32 characters for AES-128, 48 characters for TDES and AES-192, and 64 characters for AES-256. Yubico Authenticator also provides the ability to toggle on the “Protect with PIN” feature, which allows you to use the PIN in place of the Management Key when performing operations that require Management Key verification.
To improve the security of your YubiKey, Yubico recommends changing the PIN, PUK, and Management Key from their default values before use. For YubiKey 5 FIPS Series keys with firmware 5.7 or later, these changes are required to enter FIPS approved mode.
Changing the PIN
Note
For YubiKey Bio Series Multi-protocol Edition keys, the FIDO2 application and the PIV application share a PIN. Therefore, performing the “Change PIN” action on the Passkeys, Fingerprints, or Certificates screen modifies the same credential.
To change the PIN, do the following:
Plug your YubiKey into your device, click on the left menu icon in the upper left corner of the app, and select Certificates.
To connect via NFC on desktop, click the NFC icon in Yubico Authenticator and place your YubiKey on top of a desktop NFC reader. The key must maintain constant contact with the reader throughout the operation.
To connect via NFC on Android, tap your YubiKey on the back of your device to scan.
Select Change PIN under MANAGE.
To find the MANAGE section in a narrow app window, click on the right menu icon in the upper right corner of the app.
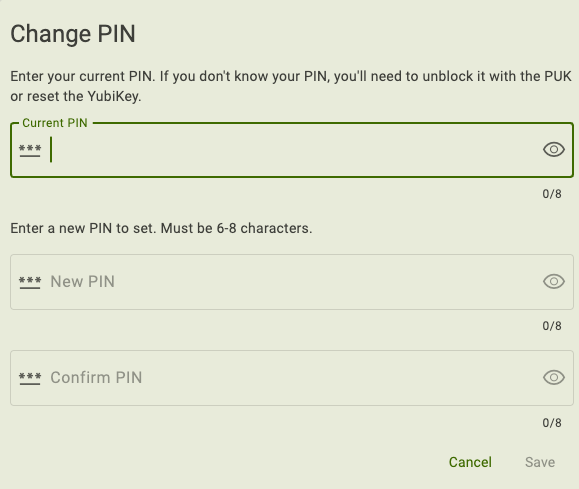
Enter your current PIN.
For YubiKeys with firmware version 5.4.x and later, if the current PIN is the default PIN (123456), this value will be prepopulated in the Current PIN box.
Enter a new PIN.
In general, the PIN must be 6 to 8 characters long and can contain any ASCII character, which includes letters (uppercase and lowercase), numbers, and special characters (such as +, &, #). However, there may be additional PIN requirements depending on your YubiKey’s model, firmware version, and PIN complexity enforcement. These requirements will be noted in the Change PIN window.
Yubico Authenticator uses UTF-8 to encode the PIN and allows you to enter up to 8 bytes worth of (printable) UTF-8 encoded characters. The UTF-8 byte count is shown underneath the New PIN window. This is important because ASCII codes 0-127 (letters, numbers, and special characters found on a US keyboard) are one byte in length when encoded in UTF-8, but ASCII codes 128-255, which include less common symbols such as the degree sign (°), copyright sign (©), and the Pound sign (£), are more than one byte in length. So for example, if you enter
123456as the PIN, the byte count in the Authenticator will show 6/8. However, if you enter££££for your new PIN, the byte count will show 8/8.For YubiKeys with firmware versions prior to 5.7, the YubiKey will accept the PIN as long as the UTF-8 byte count as shown in the Authenticator is 6-8. For YubiKeys with firmware version 5.7 and later, the YubiKey will only accept the PIN if it contains 6-8 individual characters. To reuse the previous example, a PIN of four £ sign characters would be rejected by a YubiKey with firmware version 5.7 for being too short (less than 6 characters) even though the Authenticator app shows the byte count as 8.
Note
YubiKeys with firmware version 5.7 and later require PINs to be 6-8 unicode code points in length instead of 6-8 bytes. Each ASCII character is represented by a single code point, which means that PINs must include 6-8 individual characters.
Yubico recommends creating a PIN that is easy to type–entering the PIN incorrectly too many times will result in the PIN becoming blocked. Also note that other PIV clients and applications that you interact with may not support all ASCII characters or may use a different encoding scheme for the PIN.
Enter the new PIN again to confirm and click Save. For NFC connections on Android, tap your key to complete the operation.
Changing the PUK
Note
YubiKey Bio Series Multi-protocol Edition keys do not have a PUK.
To change the PUK, do the following:
Plug your YubiKey into your device, click on the left menu icon in the upper left corner of the app, and select Certificates.
To connect via NFC on desktop, click the NFC icon in Yubico Authenticator and place your YubiKey on top of a desktop NFC reader. The key must maintain constant contact with the reader throughout the operation.
To connect via NFC on Android, tap your YubiKey on the back of your device to scan.
Select Change PUK under MANAGE.
To find the MANAGE section in a narrow app window, click on the right menu icon in the upper right corner of the app.
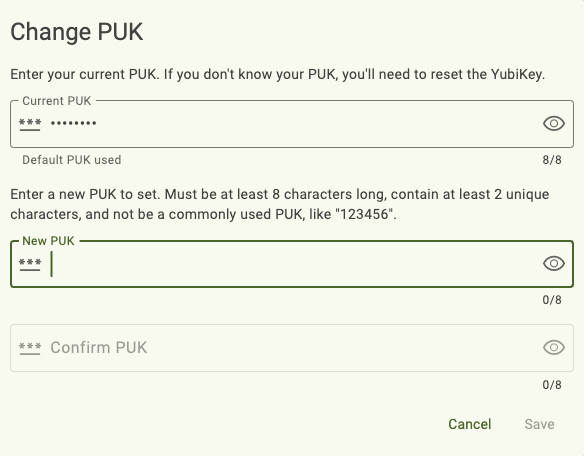
Enter your current PUK.
For YubiKeys with firmware version 5.4.x and later, if the current PUK is the default PUK (12345678), this value will be prepopulated in the Current PUK box.
Enter a new PUK.
In general, the PUK must be 6 to 8 characters long and can contain any ASCII character, which includes letters (uppercase and lowercase), numbers, and special characters (such as +, &, #). However, there may be additional PUK requirements depending on your YubiKey’s model, firmware version, and PIN complexity enforcement. These requirements will be noted in the Change PUK window.
Yubico Authenticator uses UTF-8 to encode the PUK and allows you to enter up to 8 bytes worth of (printable) UTF-8 encoded characters. The UTF-8 byte count is shown underneath the New PUK window. This is important because ASCII codes 0-127 (letters, numbers, and special characters found on a US keyboard) are one byte in length when encoded in UTF-8, but ASCII codes 128-255, which include less common symbols such as the degree sign (°), copyright sign (©), and the Pound sign (£), are more than one byte in length. So for example, if you enter
123456as the PUK, the byte count in the Authenticator will show 6/8. However, if you enter££££for your new PUK, the byte count will show 8/8.For YubiKeys with firmware versions prior to 5.7, the YubiKey will accept the PUK as long as the UTF-8 byte count as shown in the Authenticator is 6-8. For YubiKeys with firmware version 5.7 and later, the YubiKey will only accept the PUK if it contains 6-8 individual characters. To reuse the previous example, a PUK of four £ sign characters would be rejected by a YubiKey with firmware version 5.7 for being too short (less than 6 characters) even though the Authenticator app shows the byte count as 8.
Note
YubiKeys with firmware version 5.7 and later require PUKs to be 6-8 unicode code points in length instead of 6-8 bytes. Each ASCII character is represented by a single code point, which means that PUKs must include 6-8 individual characters.
Yubico recommends creating a PUK that is easy to type–entering the PUK incorrectly too many times will result in the PUK becoming blocked, and you will need to perform a factory reset of the PIV application in order to reset it. Also note that other PIV clients and applications that you interact with may not support all ASCII characters or may use a different encoding scheme for the PUK.
Enter the new PUK again to confirm and click Save. For NFC connections on Android, tap your key to complete the operation.
Changing the Management Key
To change the Management Key, do the following:
Plug your YubiKey into your device, click on the left menu icon in the upper left corner of the app, and select Certificates.
To connect via NFC on desktop, click the NFC icon in Yubico Authenticator and place your YubiKey on top of a desktop NFC reader. The key must maintain constant contact with the reader throughout the operation.
To connect via NFC on Android, tap your YubiKey on the back of your device to scan.
Select Management key under MANAGE.
To find the MANAGE section in a narrow app window, click on the right menu icon in the upper right corner of the app.
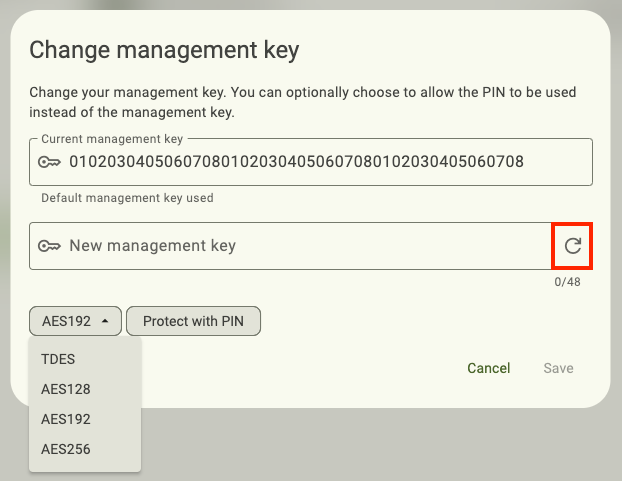
Enter your current Management Key.
Depending on your key’s firmware version, if your current Management Key is the default value (010203040506070801020304050607080102030405060708), you will either see this value prepopulated in the Current management key box or you will be able to insert the value by clicking the star icon.
If you enabled the “Protect with PIN” setting when you created the current Management Key, you will be prompted to enter the PIN instead.
Select an algorithm if the option is available. This is the algorithm that the YubiKey and the Authenticator will use during Management Key authentication to perform an authentication handshake.
For YubiKeys with firmware version 5.3.x and earlier, Triple DES (TDES) is the default and only Management Key algorithm.
For YubiKeys with firmware 5.4.x through 5.6.x, TDES is the default algorithm, but AES-128, AES-192, and AES-256 are supported as options and can be selected from the drop-down menu.
Standard YubiKey 5 Series keys with firmware 5.7.x and later use AES-192 by default. TDES, along with AES-128 and AES-256, are supported as options. YubiKey 5 FIPS Series keys with firmware 5.7.x and later allow AES keys only, with AES-192 as the default.
Enter a new Management Key. The length requirement is determined by the algorithm you selected in the previous step and will be displayed underneath the New management key box (32 characters for AES-128, 48 characters for TDES and AES-192, and 64 characters for AES-256). To generate one randomly, click the arrow icon inside the New management key box. The following characters are allowed: abcdef0123456789.
Store your new Management Key in a secure location. If you forget the Management Key, there is no way to recover it, and you will need to perform a factory reset of the PIV application to reset the Management Key to its default value.
To use the PIN in place of the Management Key during operations that require Management Key authentication, select Protect with PIN (optional).
Note
The “Protect with PIN” feature is available for all PIV-capable YubiKeys. However, YubiKey 5 FIPS Series keys with firmware version 5.7 or later must enter FIPS approved mode before the feature can be enabled.
Operations that require Management Key authentication include the generation, importation, or deletion of certificates. If this setting is enabled, you will be prompted to enter the PIN when initiating these operations.
Note that this setting does not remove the Management Key. The Authenticator will still perform Management Key authentication during an applicable operation, but only the PIN is required from the user.
If this setting is enabled and the PIN becomes blocked, any operation requiring Management Key authentication or PIN authentication will not be possible until the PIN is unblocked with the PUK.
Click Save. For NFC connections on Android, tap your key to complete the operation.
Unblocking the PIN
When you enter the PIN incorrectly too many times in a row, the PIN becomes blocked. The point at which this occurs is determined by your key’s retry count, which is 8 by default for the YubiKey Bio Series Multi-protocol Edition and 3 by default for all other PIV-compatible YubiKeys.
Note
The retry count can be reconfigured to any value from 1 to 255 with the YubiKey Manager CLI tool.
Once the PIN in blocked, you will not be able to perform any PIV actions that require the PIN. However, you can unblock the PIN using the PUK (for all YubiKeys except for the YubiKey Bio Series Multi-protocol Edition), which will allow you to change the PIN and reset the number of PIN attempts back to the full retry count value.
To unblock the PIN on an eligible key, follow the Changing the PIN instructions. Instead of entering the current PIN, you will be prompted to enter the PUK. For YubiKeys with firmware version 5.4 and later, if the current PUK is the default PUK (12345678), this value will be prepopulated in the Current PUK box.
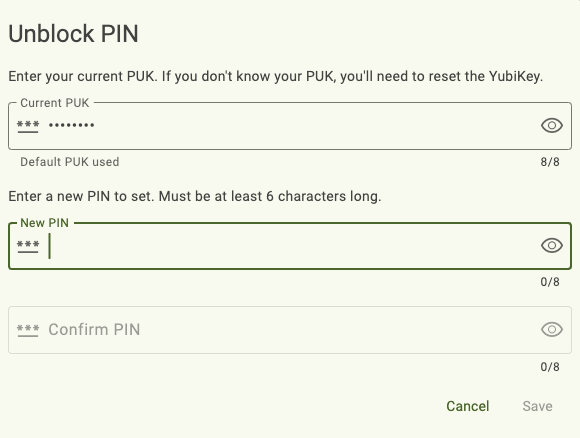
Because YubiKey Bio Series Multi-protocol Edition keys do not have a PUK, you cannot unblock the PIN using the method described above. The only way to change a blocked PIN on these keys is to perform a factory reset of the PIV application. This will remove all private keys and certificates from the YubiKey, and the PIN and Management Key will be reset to their factory default values.
Recovering from a blocked or forgotten PUK or Management Key
If you forgot your PUK or Management Key or the PUK has become blocked, the only way to recover them is to perform a factory reset of the PIV application. This will remove all private keys and certificates from the YubiKey, and the PIN, PUK, and Management Key will be reset to their factory default values.
PIN and PUK attempts remaining and total retry count
The Certificates screen in Yubico Authenticator displays the attempts remaining for both the PIN (all YubiKeys) and the PUK (for YubiKeys with firmware version 5.4 and above) under Manage. To find the Manage menu in a narrow app window, click the three dots in the upper right corner of the app.
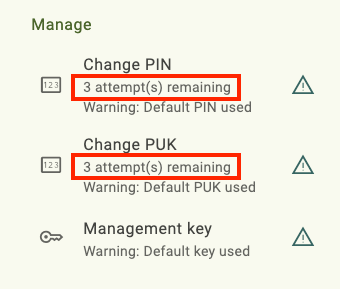
Both the PIN and PUK have a total retry count of 3 by default for all YubiKeys except for the YubiKey Bio Series Multi-protocol Edition, which has a PIN retry count of 8 by default. However, the retry count for the PIN and PUK can be reconfigured to any value from 1 to 255 with the YubiKey Manager CLI tool.
There is no direct way to verify the total retry count for a particular YubiKey in Yubico Authenticator. However, the retry count is reset whenever the PIN/PUK is entered correctly, so the retries remaining will reflect the total retry count at that moment. Alternatively, you can use the ykman piv info command with the YubiKey Manager CLI tool to display both total and remaining retries for the PIN and PUK.
Add and manage certificates
To add a certificate to one of the PIV application slots, do the following:
Plug your YubiKey into your device, click on the left menu icon in the upper left corner of the app, and select Certificates.
To connect via NFC on desktop, click the NFC icon in Yubico Authenticator and place your YubiKey on top of a desktop NFC reader. The key must maintain constant contact with the reader throughout the operation.
To connect via NFC on Android, tap your YubiKey on the back of your device to scan.
Select a slot and click Import file under ACTIONS.
To find the ACTIONS section in a narrow app window, click on the right menu icon in the upper right corner of the app.
Enter the PIV management key when prompted and click Unlock.
Select the certificate file on your device and click Choose (or similar).
