Azure MFA with Yubico Authenticator
These instructions show how to use YubiKeys with Azure Multi-Factor Authentication (Azure MFA). This document focuses on cloud-based Azure MFA implementations and not on the on-premises Azure MFA Server. For an overview of Azure MFA see Microsoft’s How it works: Azure Multi-Factor Authentication.
There are two methods to use a YubiKey with Azure MFA as an OATH-TOTP token. Both are described below. The recommended method is to have users self register their YubiKey to their account. The second method is for an Azure AD administrator to register a YubiKey on behalf of the user.
Objectives:
- Register a YubiKey to a user account in Azure AD as an OATH-TOTP token.
- Authenticate using a YubiKey as an OATH-TOTP token.
Self registration (recommended method)
A user can self register a YubiKey with their Azure AD Account. This is the recommended method for registering a YubiKey as an OATH-TOTP token.
Before you begin
- Your user account must be in Azure Active Directory (AD)
- Have a compatible YubiKey.
- Install Yubico Authenticator on your mobile device and/or workstation. Since the YubiKey does not contain a battery, it cannot track time. Yubico Authenticator is required to generate and display OATH-TOTP codes.
Register a YubiKey
Step 1: Open a browser window and navigate to https://myprofile.microsoft.com.
Step 2: Sign in to your account.
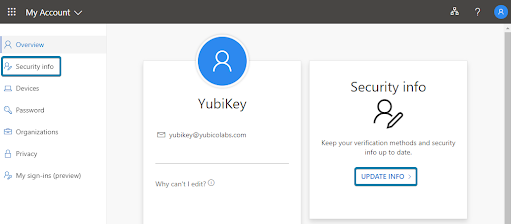
Step 3: Select Security Info in the left navigation or Update Info in the Security Info tile.
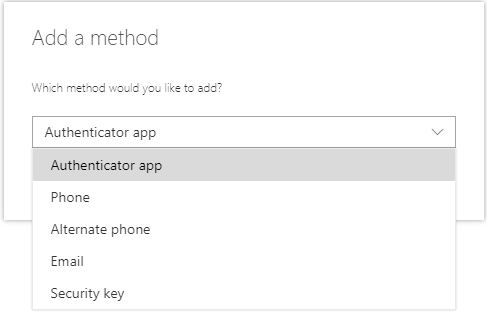
Step 4: Select Add Method.
Step 5: Select Authenticator app.
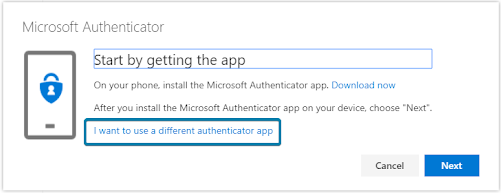
Step 6: Select I want to use a different authenticator app.
Step 7: Select Next.
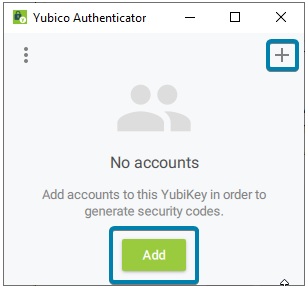
A QR code is displayed on the screen.Step 8: Insert your YubiKey and open Yubico Authenticator. Select Add or +. If the QR Code is visible, it automatically fills in the fields required.
Step 9: Select Add.
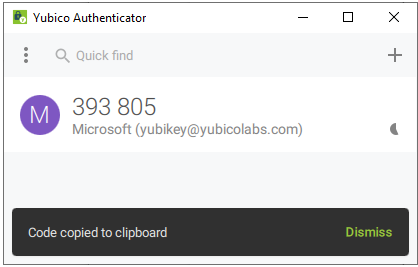
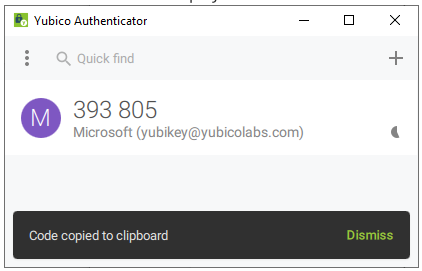
Step 10: Double-click the Microsoft entry to copy the code to your clipboard. If successful, the message displays Code copied to clipboard.
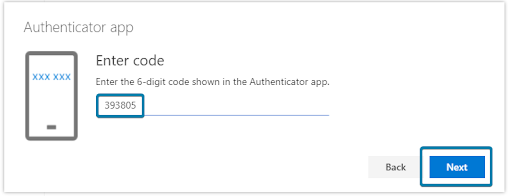
Step 11: Back in your internet browser window paste the code in the box and click Next.
Step 12: Select Done.
You have now successfully registered your YubiKey to your account!
Administrator registration (alternative method)
An Azure AD administrator can register and assign a YubiKey to users’ accounts. This is an alternative method for registering a YubiKey as an OATH-TOTP token and requires the YubiKey to be registered and activated by an Azure AD Administrator then distributed to a user before use.
There are several steps for the Azure AD Administrator to follow outlined below. The high level process is outlined in Microsoft article, What authentication and verification methods are available in Azure Active Directory.
Note
Yubico can generate the TOTP secrets and program them onto YubiKeys before they are shipped to you. There is a minimum order requirement. Please contact your Yubico sales representative or request someone to contact you.
Before you begin
- The user account must be in Azure AD.
- Have a compatible YubiKey.
- Install Yubico Authenticator.
Since the YubiKey does not contain a battery it cannot track time and will require software to generate OATH-TOTP codes. Yubico provides Yubico Authenticator for all major platforms (Windows, MacOS, Android, and iOS) to display the one time passcodes generated on the YubiKey.
- Install the latest version of YubiKey Manager.
- Ensure users that will be assigned a YubiKey have been assigned an Azure AD Premium license, this may also be included in an Office 365 license.
Generate TOTP secrets
The secrets that are stored on the YubiKey need to be generated. A comma separated value (CSV) text file will be used to track the secrets and associate them to a YubiKey. This file should be considered extremely sensitive and should be protected at all times.
For simplicity the example will only use one account in the file, but Azure supports multiple accounts to be added in one file.
Step 1: Create a text file beginning with upn, serial number, secret key, time interval, manufacturer, model (see screenshot below). The meaning of each of these are as follows.
- upn: Each user’s User Principal Name from Azure AD
- serial number: A unique identifier, recommend using the serial number of the YubiKey
- secret key: A randomly generated OTP secret. Limited to 128 characters. The secret key can only contain the characters a-z or A-Z and digits 1-7
- timeinterval: The time interval for generating new a OTP
- manufacturer: Any text used to identify the hardware token, recommend using YubiKey
- model: Any text used to identify the model of hardware token, recommend using the YubiKey model
Step 2: Add the UPN of the account to register.
Example:yubikey@yubicolabs.comStep 3: Add the YubiKey serial number that will be assigned to each user.
Example:8672451Step 4: Generate and add a Base32 string that will be used as the secret (see Generating Base32 string examples for examples of how to generate a random Base32 string).
Example:zsgyzti7z6hecscitbxz6wmt737j2dpaStep 5: Use 30 for the time interval.
Step 6: Use YubiKey for the manufacturer.
Step 7: Add the model of the YubiKey that will be registered.
Example:YubiKey5NFCStep 8: Save and close the file.

Program a YubiKey with a generated secret
The TOTP secrets generated in the previous step now need to be programmed onto the associated YubiKey using YubiKey Manager.
Step 1: Open a terminal window and change the directory to the ykman.exe install directory.
Step 2: Insert the YubiKey associated with the secret (if you are using YubiKey serial numbers).
Step 3: Run the ykman command to program the YubiKey with the appropriate account name and secret from the CSV file created in the previous section.
ykman oath add -i Microsoft <accountname> <secret>For example:
ykman oath add -i Microsoft test1@yubicolabs.com zsgyzti7z6hecscitbxz6wmt737j2dpaStep 4: Open Yubico Authenticator to verify the creation of the TOTP token on the YubiKey while the YubiKey is still inserted.
To see all the configuration options, consult the YubiKey Manager CLI (ykman) User Manual.
Upload TOTP secrets and activate the YubiKey
The file generated with the account and secret information needs to be uploaded to Azure AD MFA.
Step 1: Open a browser window and navigate to https://portal.azure.com.
Step 2: Sign in with a Global Administrator account.
Step 3: Select Active Directory, then Security, then MFA, then OATH tokens.
Step 4: Select Upload and select the generated CSV file.
Step 5: Select Refresh to see the accounts in the file are listed. It may take several minutes for the file to process and display the user accounts.
Step 6: Select Activate for a user.
Step 7: Open Yubico Authenticator.
Step 8: Insert the YubiKey associated with the user.
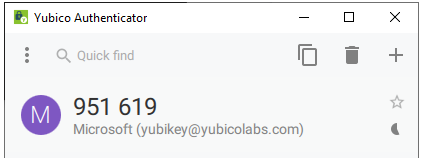
Step 9: Double click the code displayed in Yubico Authenticator.
Step 10: Paste the code into the web browser window and select Ok.
Step 11: Verify the user was successfully activated by looking for a check mark.
The YubiKey can now be distributed to the associated person for use.
Use a YubiKey to sign in
It is simple to use your YubiKey as an OATH token to sign in to a Microsoft site, or site that has been federated to Azure AD. Generating the YubiKey OTP code to sign in can be done on any device where the Yubico Authenticator is installed (Linux, MacOS, Microsoft Windows, Android, and iOS).
Before you begin
- Your YubiKey will need to be registered to your Azure AD account.
- Install Yubico Authenticator
Website sign in
Step 1: Open the Yubico Authenticator application.
Step 2: Insert the YubiKey into the device.
Step 3: Sign into a Microsoft site with a username and password.
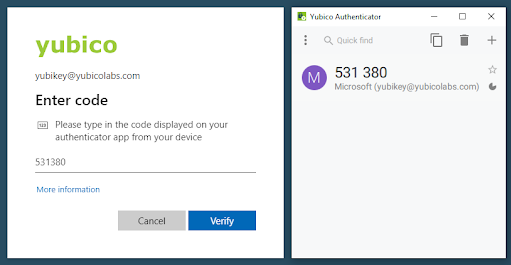
Step 4: Double click the code in Yubico Authenticator application to copy the OTP code.
Step 5: Paste the code into the prompt.
Step 6: Select Verify to complete the sign in.
Troubleshooting
Listed below are some common troubleshooting tips. In addition, you can visit Microsoft’s “Troubleshooting Azure Multi-factor Authentication issues” site.
(Self-service) QR code not recognized by Yubico Authenticator
If one does not click I want to use a different authenticator app when setting up TOTP MFA via self-service, the QR code produced will only be readable by Microsoft Authenticator. When trying to scan such a QR code, Yubico Authenticator for desktop will indicate that no QR code is visible on screen (No QR code found on screen), Yubico Authenticator for iOS version will produce the error Error occurred - Invalid URI format, and Yubico Authenticator for Android, The scanned barcode is invalid.
Azure AD Admin cannot access the MFA section in Azure AD.
The Azure AD MFA feature to manage OATH-TOTP tokens requires an Azure AD Premium license, this may also be included in an Office 365 subscription.
CSV file (OATH script) will not load.
The most common reasons for failure to upload are:
- The file is improperly formatted
- The header row is not included in the file
- here are duplicate entries in the file
Be sure to check the current status of the upload by clicking on the refresh button. If an error message appears, click on the Details link and download the file that had failures. The downloaded file will have a Status column that will include information on the failure.
YubiKey is not working after an Administrator enrolled on behalf of the user.
Verify that the OATH token is activated in the Azure MFA portal.
Another OATH token cannot be added.
Microsoft specifies in the article, What authentication and verification methods are available in Azure Active Directory? that up to five MFA tokens can be associated with one account. The limit applies to hardware and software OATH-TOTP implementation including Microsoft Authenticator apps. For example, you can associate three YubiKeys, one Microsoft Authenticator app, and a phone number to an individual account if no other OATH token is being used.
