Self-service Ordering
This section, intended for IT administrators responsible for distributing YubiKeys in their organization, describes the Self-service Ordering user experience, and how to set up and manage YubiKey orders as an IT administrator using Self-service Ordering. If your organization is using the Delivery service, you will also have access to Self-service Ordering.
How it Works
Self-service Ordering reduces the workload of the IT admin of an organization by allowing end users to order their YubiKeys themselves for delivery to their preferred geographical location. Self-service Ordering can be made available for customer organizations’ end users, as well as partners, contractors, and customers associated with an organization.
Using Self-service Ordering you can create a branded user experience where recipients can claim YubiKeys assigned to them by your organization. Recipients can be for example employees, contractors, or your customers. The recipient selects their products and provides the preferred address to which the YubiKeys will be shipped using the Delivery service.
The Self-service Ordering web page is where the recipient is directed when clicking the link in the invite email to claim their YubiKeys. You can brand the design of both the Self-service Ordering web page and the invite emails, to match your organization’s branding guidelines.
Invites are allocations of YubiKey licenses from your available product inventory, including custom configured YubiKeys. The invite is sent as a branded email which allows the recipient to select their YubiKeys, enter their personal address, and have the YubiKeys shipped to that address.
Recipients do not need to have a Yubico account, you only provide their email address when creating their invite. An email with a link to your branded Self-service Ordering web page is sent to the recipient, who authenticates using a one-time code (OTC) also sent to the email address.
The recipient selects their desired YubiKey model and enters their delivery address, which is validated in real-time for deliverability. The recipient providing their delivery address themselves greatly reduces the risk of incorrect delivery addresses causing delivery failures. When the invite claim is submitted, a shipment request is created under your account in the Delivery service. The recipient can track the delivery of their shipment in their Self-service Ordering web page.
You can brand the Self-service Ordering web page to use your own organization’s fonts, color scheme etc. You can also brand the greeting messages displayed to recipients, for a unified user experience. When adding branding you can preview the results for both the Self-service Ordering page and the invite email.
The Self-service Ordering Invites page provides IT admins with an overview of sent invites and their statuses. You can identify and act on invites with delivery issues, and view details of each invite. Using product selection templates you can create new invites, reusing product selections from previous invites.
Recipient Process Flow
The following describes the user experience when claiming YubiKeys through Self-service Ordering.
The recipient receives the invite email which contains the link to access the Self-service Ordering web page from which the YubiKeys are claimed. When setting up Self-service Ordering as an administrator, you will be able to brand all communication with the recipient.
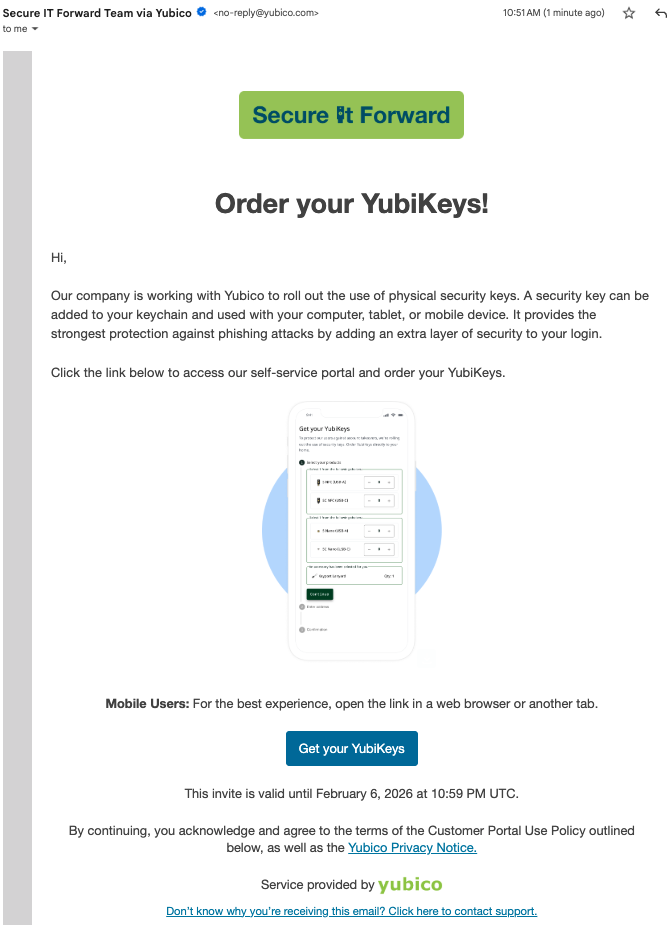
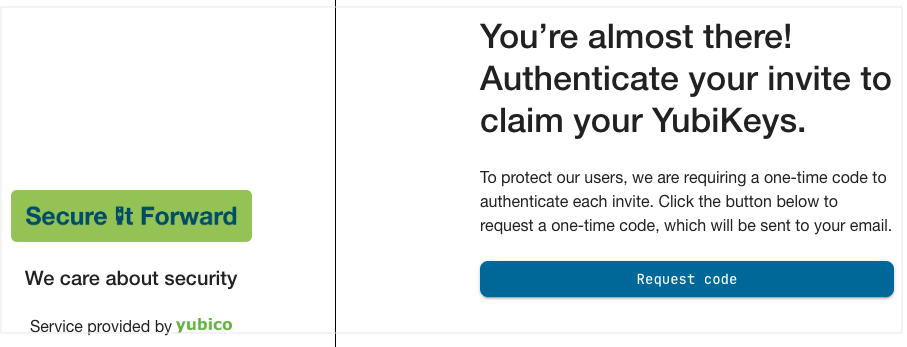
The recipient clicks Get your YubiKeys in the invite email and authenticates to the Self-service Ordering service providing a one-time code sent to their email address.
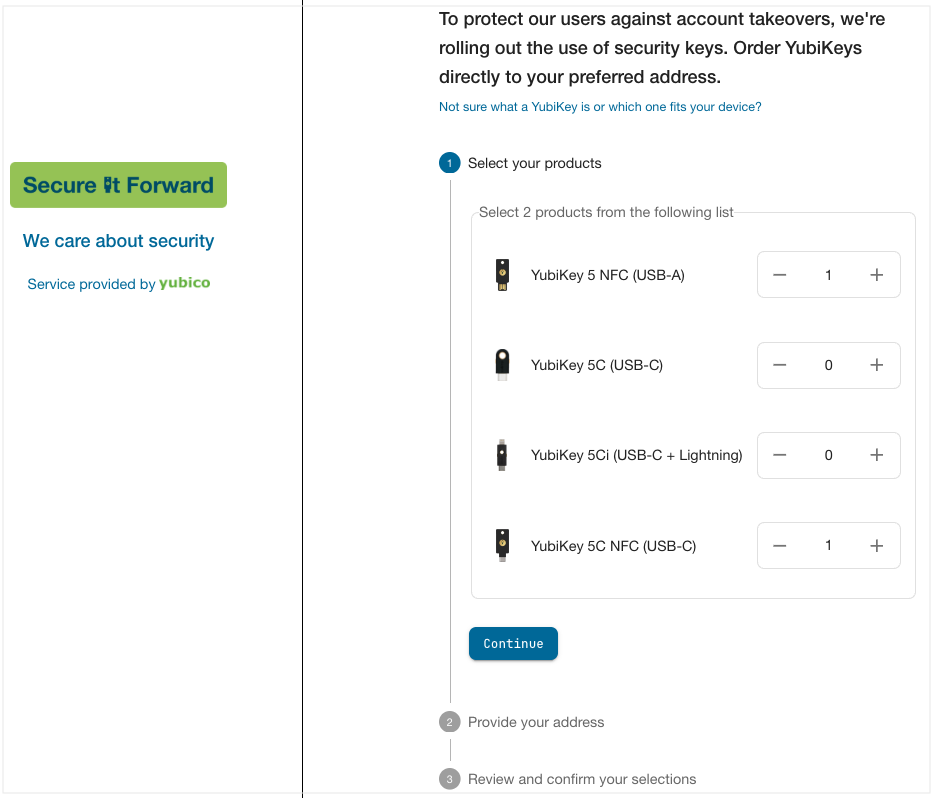
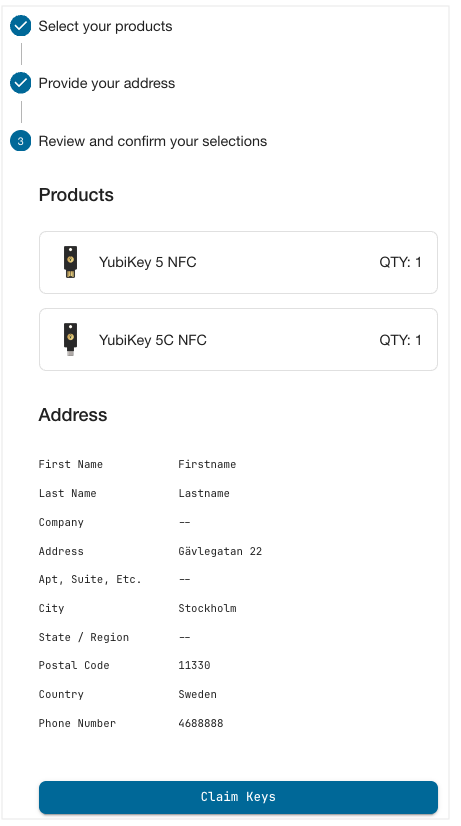
Upon successful authentication, the Self-service Ordering web page opens. The recipient selects the allocated number of products and clicks Continue. The products shown to the recipient depend on the product selections made when creating the invites.
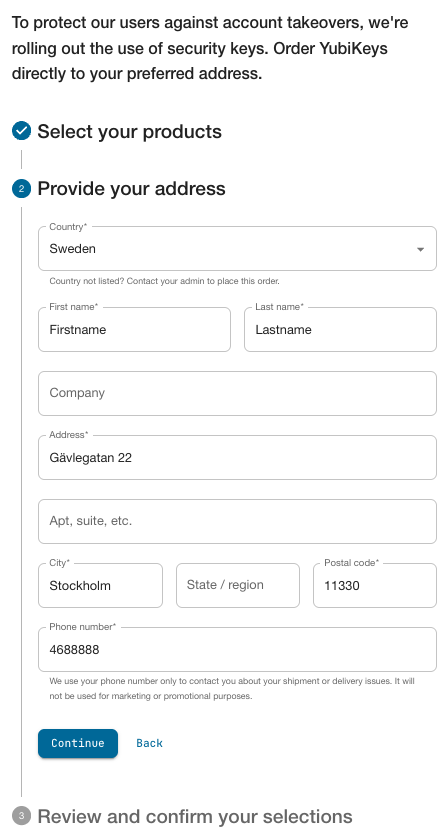
The recipient provides their delivery address and clicks Continue.
Note
Due to country-specific custom duty regulations, limitations apply if the recipient is located in certain countries. Recipients in these (single-key) countries can only select one (1) YubiKey. If Expedited shipping is selected in the invite, this will be downgraded to Normal shipping. See Allowed Shipping Destinations.
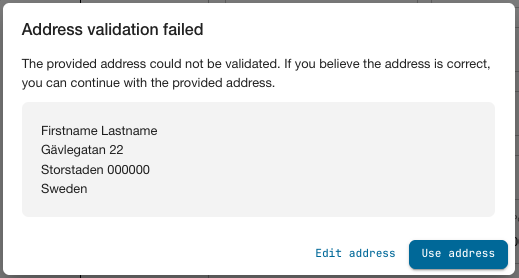
The system validates the address provided. If the validation fails, the recipient is presented with the option to either edit the address, or use the provided address. If using an address for which the validation failed, the created shipment will get the status “Address Validation Failed”. In this case the administrator can choose to override the validation to send the shipment through for fulfillment, or delete the shipment. See Overriding Address Validation.
The recipient reviews the information and clicks Claim keys to complete their claim.
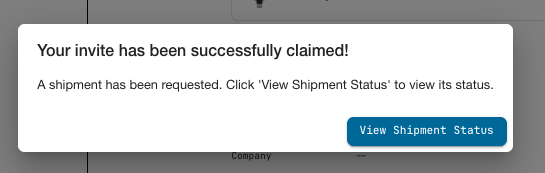
The status for the invite changes to “Claimed”, and a shipment request is triggered in the system. When clicking View shipment status after submitting the claim, the Self-service Ordering web page displays the status of the order.
By clicking the Edit icon in the displayed status portal page, the recipient can update the address while it is in status “Processing”. When the shipment reaches status “In transit” and beyond, the shipment request can no longer be edited.
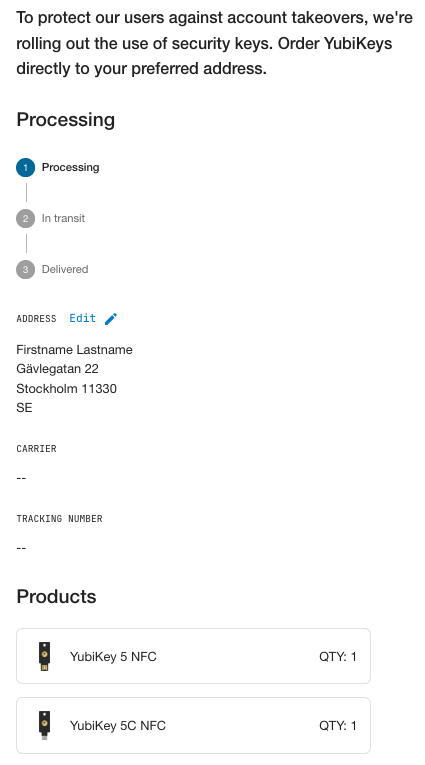
Upon successfully submitting the claim, an order confirmation email is sent to the recipient. The recipient can also see the status of their shipment by using the link provided in the invite email. For shipments with status “In transit”, the name of the associated carrier, and a link to the tracking number are displayed.
When the YubiKeys are shipped, the recipient receives an email from the Yubico Delivery service with shipment tracking information. If desired, you can also brand the emails sent by the Yubico Delivery service, see Customizing Automated Emails.
Upon package delivery, the recipient receives a delivery email, concluding the process flow.
Admin Process Flow
The following outlines the steps to set up Self-service Ordering and manage invites. This is typically done by an IT administrator responsible for distributing YubiKeys in an organization.
- Setup: Brand the web page, add logo, colors etc.
- Setup: Customize the invite email content.
- Create invites - select products, add recipients, and submit the invite.
- Monitor invite claims and act on shipment issues.
Tip
If you are navigating to Self-service Ordering for the first time and have not yet set up Self-service Ordering for your organization, a Welcome page is displayed guiding you through the steps to brand the Self-service Ordering Web page and email experience for your end users.
Branding Self-service Ordering
Branding of the Self-service Ordering web page and invite email is optional, if not done the default Yubico branding will be used. The only required action when setting up Self-service Ordering is a URL to your support organization. This URL will be used by your recipients should any support be needed.
Note
You can currently only have one Self-service Ordering web page for your organization.
Prerequisites
Ensure you have the following to be able to brand Self-service Ordering:
- Your organization’s logo, favicon, together with primary, accent, and background colors to be used (optional).
- Provide the color codes as hex code, for example “#9aca3c”.
- Text for a banner subtitle (optional).
- A preferred support URL to display in the Self-service Ordering email (required).
Branding the Web Page
To brand the design of the Self-service Ordering web page, do the following:
In the Customer Portal left menu, click Self-service Ordering > Design to access the branding options.
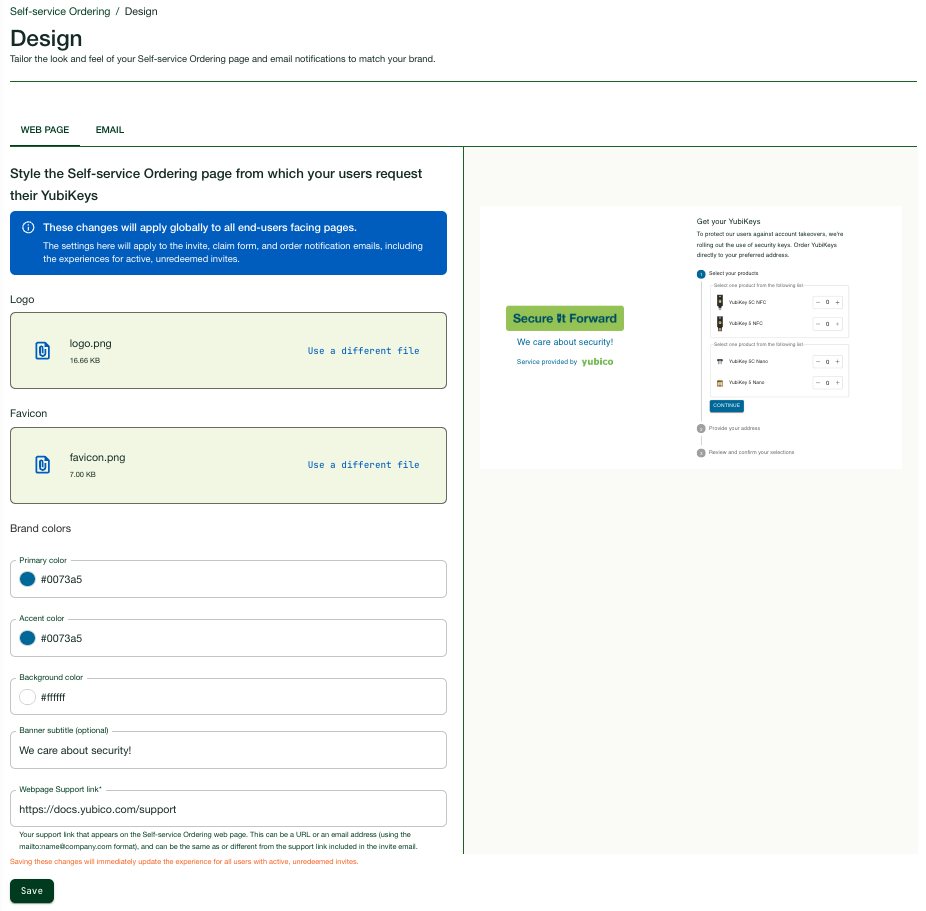
In the WEB PAGE section, enter information as follows:
Logo: Upload a logo to be displayed in the left section of the web page.
Note
If uploading a different image with the same file name, the image is cached and the new image will not display in the preview. To make the new image display in the preview, upload it using a different file name.
Favicon: Upload a favicon image. This is a small visual identifier displayed on the web browser page tab representing your Self-service Ordering web page.
Brand colors - enter applicable colors as follows (for accessibility guidance, the system will validate your color choices):
- Primary color: Used for example on the action buttons in the web page.
- Accent color: Used for text in the left section of the web page.
- Background color: Used for the background in the left section.
Banner subtitle (optional): Enter a subtitle to be displayed under the logo in the left section of the web page.
Web page support link: Enter a support link to be displayed to recipients on the invite web page. This can be the same or different as the one you use in the invite email.
Note
Setting a Support link for the web page is required. When editing the Self-service Ordering web page to customize the messaging, you will not be able to save your changes without providing a Support link.
Your branding changes will be immediately visible in the preview section to the right.
When done, click Save.
Note
The text at the top of the web page, and the “Service provided by Yubico” sentence in the left section, are default and cannot be customized.
Customizing the Invite Email
The email will inherit the branding attributes (logo, colors etc.) set when you configured the Self-service Ordering web page. However, you can customize the subject, heading, and body texts.
Important
Ensure to inform your recipients in advance that they will be receiving the invite emails, and that it is safe to click on the links provided.
To customize the invite email content, do the following:
In the Customer Portal left menu, click Self-service Ordering > Design to access the branding options.
Click EMAIL at the top to open the Design page.

Enter information as follows:
- Email subject line: Displayed in the subject line in the recipient’s email inbox.
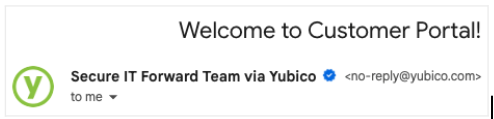
- Email sender name (optional): Provide a custom sender name, for example “Secure IT Forward Team” as in this example, to be added to the default “no-reply@yubico.com”. If the custom sender name is removed, only the default Yubico sender name is displayed.
Email preheader: Short summary of email content that will be displayed under the subject line in the recipient’s email inbox.
Email heading: Displayed under the logo in the invite email.
Body text: The main portion of text displayed in the invite email.
Disclaimer message (optional): Typically consists of legal information, for example to warn about viruses or state the message’s confidential nature. Displayed at the bottom of the invite email, immediately before the default Yubico Self-service Ordering Policy disclaimer message.
Support link: Enter a URL to which your recipients will be directed if they need support, for example a link to a support page or supporting documentation. The link is displayed at the bottom of the invite email and is applied to the text entered in the Support link text field.
Support link text: Optionally, enter a custom text to be displayed for the link you entered in the Support link field. If no custom text is applied, the default “Don’t know why you’re receiving this email?” text will be displayed for the support link in the email.
Note
Setting a Support link is required. When editing the Self-service Ordering email notification to customize the messaging, you will not be able to save your changes without providing a Support link. The Support link will be hidden until the email notification is updated.
Changes to the body text will be immediately visible in the preview section to the right (the email subject line, preheader, and heading are not shown in the preview).
- When done, click Save.
Note
Most of the lower parts of the invite email content are Yubico default and cannot be customized. However, you can add a custom message in the disclaimer section, and modify the support link.
Creating Invites
Note
You must have the Console Owner or Console Admin role in the Customer Portal to be able to create, edit, and delete invites. For more information, see Roles and Permissions.
Invites are reservations of inventory from which an organizations’ end users can select from a designated number of YubiKeys or accessories and have them shipped to their personal address.
Products are reserved when the invite is created. Therefore, when looking in your portal after invites are created, you might see fewer product items. If an invite expires without the product items being claimed, the items will be released back into inventory and are available for consumption again.
Prerequisites
Ensure you have the following in place before creating invites:
- Check that you have enough product inventory, and that you select products from the appropriate subscription tiers. To view your inventory available for shipment, see Delivery Overview.
- Email addresses for the targeted invite recipients. To upload multiple email addresses you can use a CSV file. Add the email addresses in the format “username@example.com” in a single column without header, with each email address on its own row.
Procedure
When creating invites, you will first select the products you are allocating to recipients to choose from. Then you will add the recipients to whom you will send the invite. Using templates you can reuse product selections from previous invites, or create a product selection for one-time use without saving the selection as a template.
Note
Self-service Ordering supports shipping to recipients in both multi-key and single-key countries. For more information on how to configure specific destinations for invites, see Allowed Shipping Destinations.
To create an invite, do the following:
In the Customer Portal left menu, click Self-service Ordering > Invites.
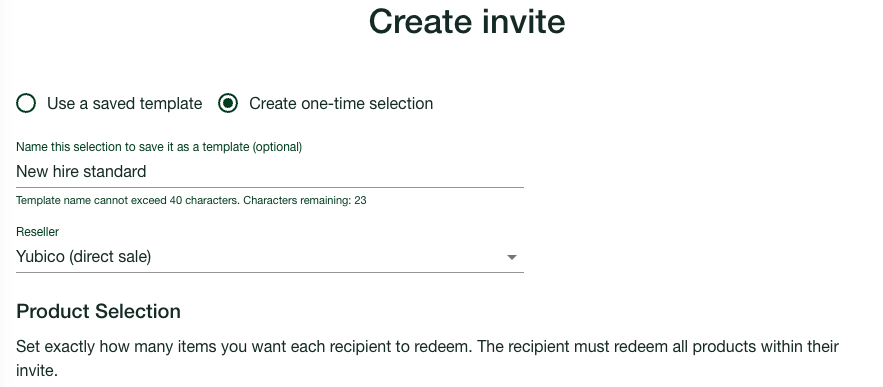
In the Invites page, click Create invites to the right to open the Create invite page, and enter information as follows:
- Product selection, use one of the following methods:
- Use a saved template: Select a product template from the list of saved templates to be used for the invite, click Switch template to see available templates and choose a different one.
- Create one-time selection: Provide a name if you want to save the product selection as a template (optional), and select a Reseller.
From the displayed inventories, select the products and quantities that each recipient will receive. Available inventories depend on the selected reseller.
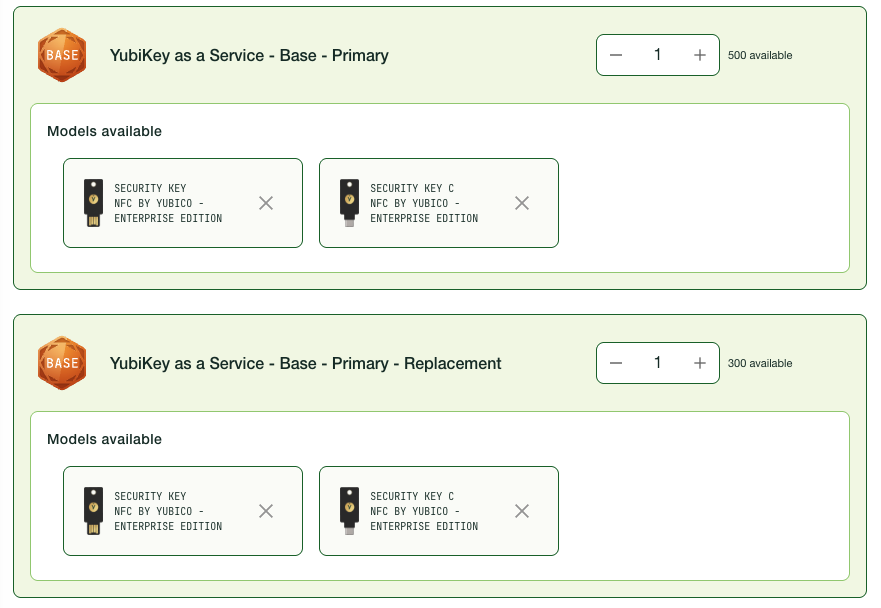
Example: If you have a “Base - Primary” and a “Base - Primary - Replacement” inventory, and allow recipients to choose one key from each, this means that each recipient can choose in total two YubiKeys from the models available. If you send the invite to 25 recipients, this will consume 25 “Base - Primary” licenses and 25 “Base - Primary - Replacement” licenses, in total 50 licenses.
Note
You can change the key models that will be available for selection by recipients to a desired subset of keys. See Modifying Available Key Models.
Expiration date (required): Set the last day that the recipient can claim their YubiKeys. After this date, the invite is no longer valid. The reserved products are released back to your inventory, and you have to create a new invite for recipients that have not claimed their YubiKeys. You can extend the expiration date of an invite that has not yet expired. The expiration time is 11:59 PM in your local time of the selected day.
Delivery type: Select “Normal” or “Expedited”. Expedited delivery might not be available for all shipping destinations, see YubiEnterprise Delivery pricing table. Note that shipment costs are charged to the organization, not to the individual recipient.
Recipients, you can add multiple recipient emails using a CSV file, or individual recipient’s email addresses one-by-one:
- Multiple recipients: Follow the CSV file format guidelines to create the file, and add the file in the upload area.
- Individual recipients: Add each recipient email address individually and click Add after each one.
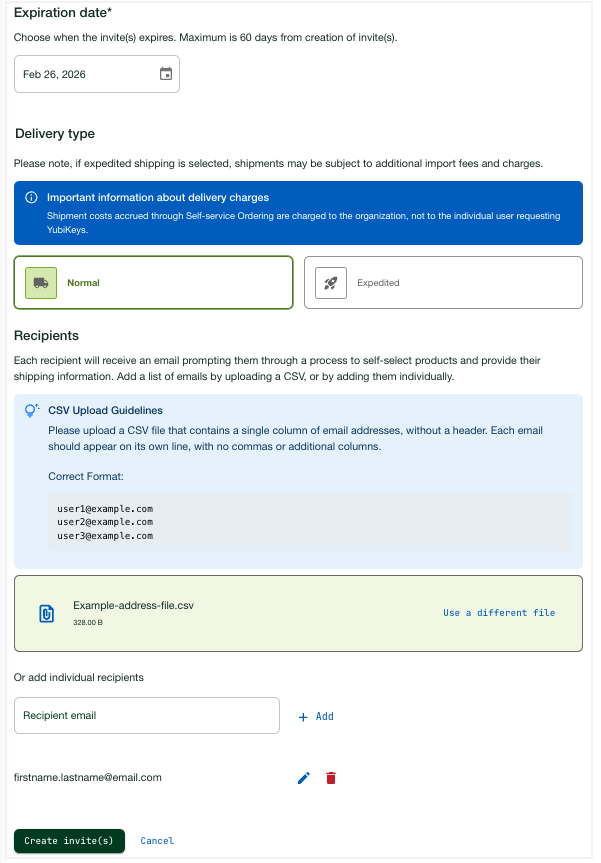
- When done, click Create invite(s). The invites will appear in the Invites page, one invite for each provided email address.
Modifying Available Key Models
A subscription includes a predefined set of YubiKey models. When creating invites, you can change the key models that will be available for selection by recipients, to a desired subset of keys.
For example, if you have purchased an Advanced - Primary subscription tier for your organization, this includes the YubiKey models YubiKey 5/5C NFC, YubiKey 5C, YubiKey 5/5C Nano, and YubiKey 5Ci. When creating an invite, you can exclude all other key models and leave only the YubiKey 5/5C NFC available for selection in the invite.
To remove products available for selection when creating an invite, click X for the desired products. To add products available for selection, click Add products. In the dialog that opens, select the desired products and click Save.
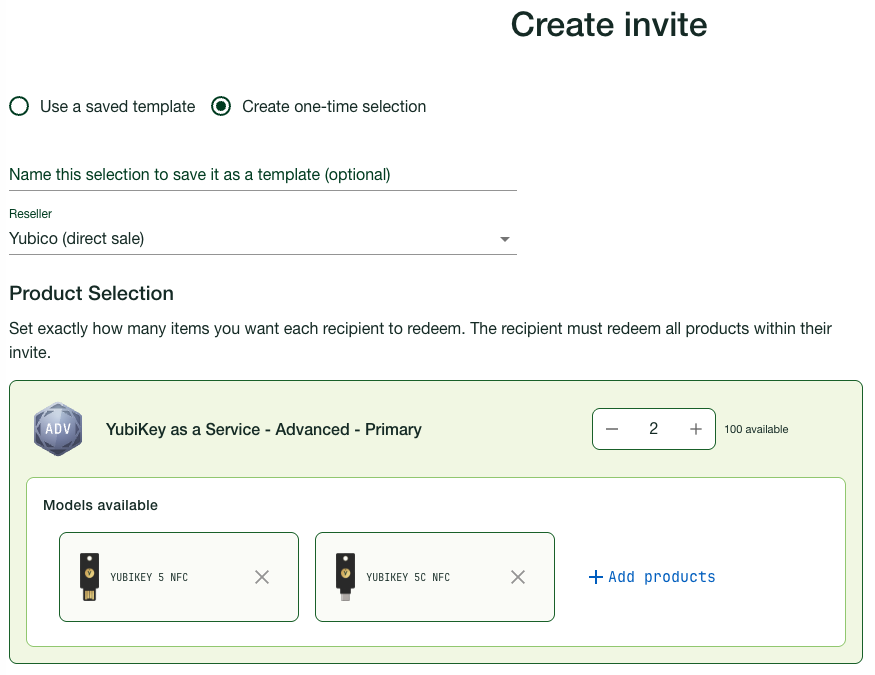
You can modify available YubiKey models both in the reusable product selection templates, as well as when creating invites using the one-time selection option.
Managing Invites
The Invites page provides an overview of sent invites and their statuses. From here you can manage invites that need attention, for example invites that have expired. To open the Invites page, click Self-service Ordering > Invites in the Customer Portal left menu.
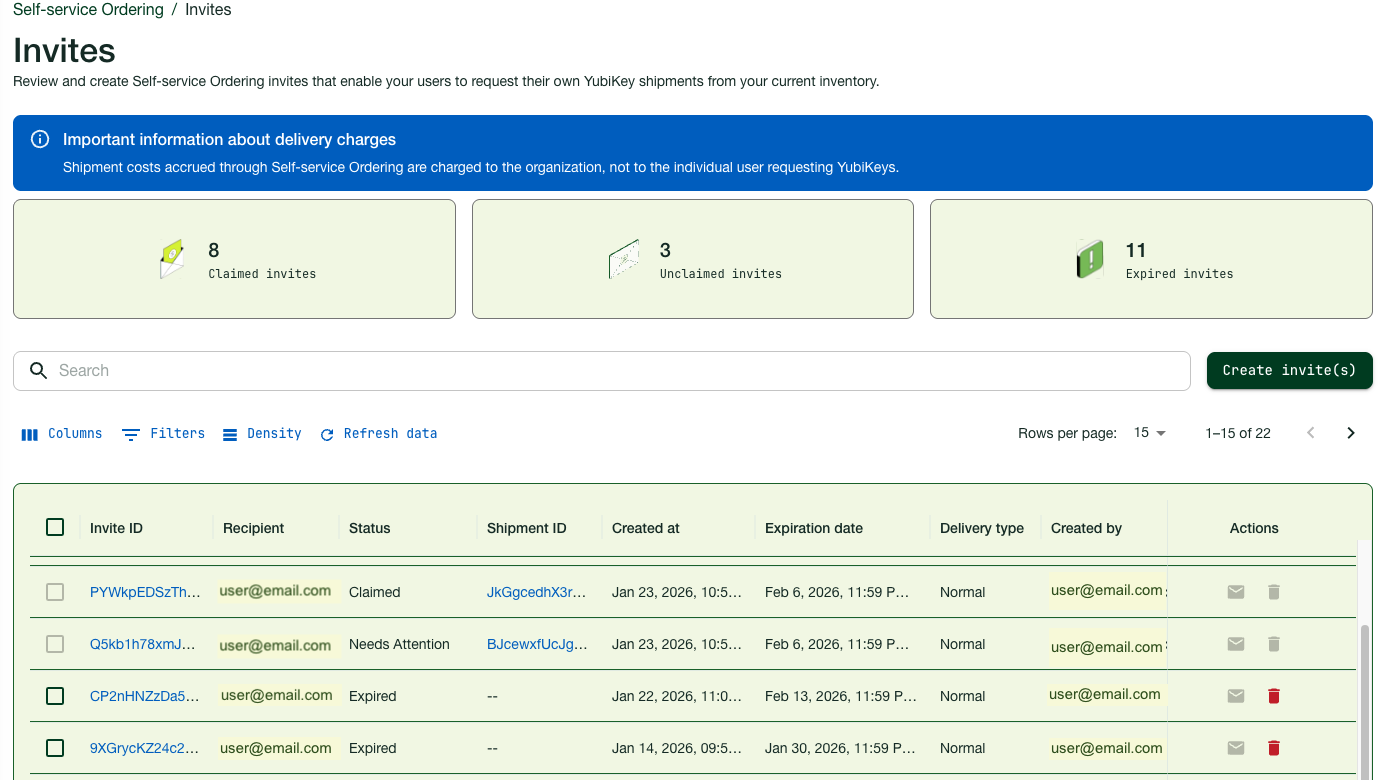
The Invites page displays the following information:
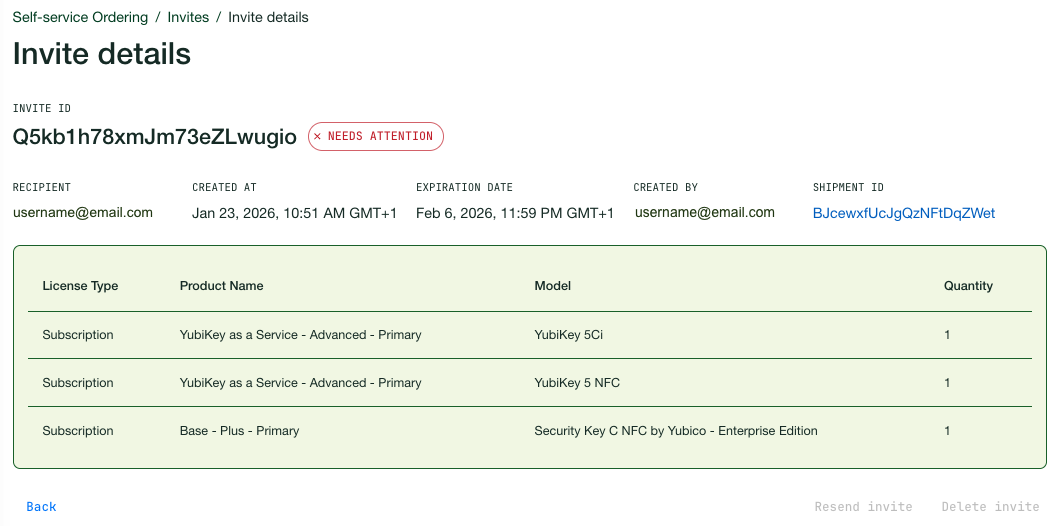
ID - the unique identifier for an invite, clicking the ID link opens the Invite details page.
Recipient - email address of the recipient of the invite.
Expiration date - the last day when the invite can be used to claim products.
Created at - when the invite was sent to the recipient.
Shipment ID - ID and link to view the Shipment details for a claimed invite.
Status - status for an invite, can be one of the following:
- Invited - invite has been sent but the recipient has not yet claimed their products.
- Claimed - invite has been claimed by the recipient and a shipment request has been created.
- Expired - the invite has not been claimed and is no longer valid.
- Needs Attention - there is an issue with the shipment, for example an address validation error, which needs to be handled, see Managing Shipment Issues.
- Failed - the associated shipment is in a state that cannot be recovered, for example “DPL Confirmed” or “Cancelled”. See Shipment Statuses.
Created by - the creator of the invite, usually an IT administrator.
Delivery type - type of delivery, normal or fast (expedited).
Use the Search field and the Filters functionality to locate specific invites. You can for example filter invites by their status, for example “Expired” or “Needs Attention”.
Viewing Invite Details
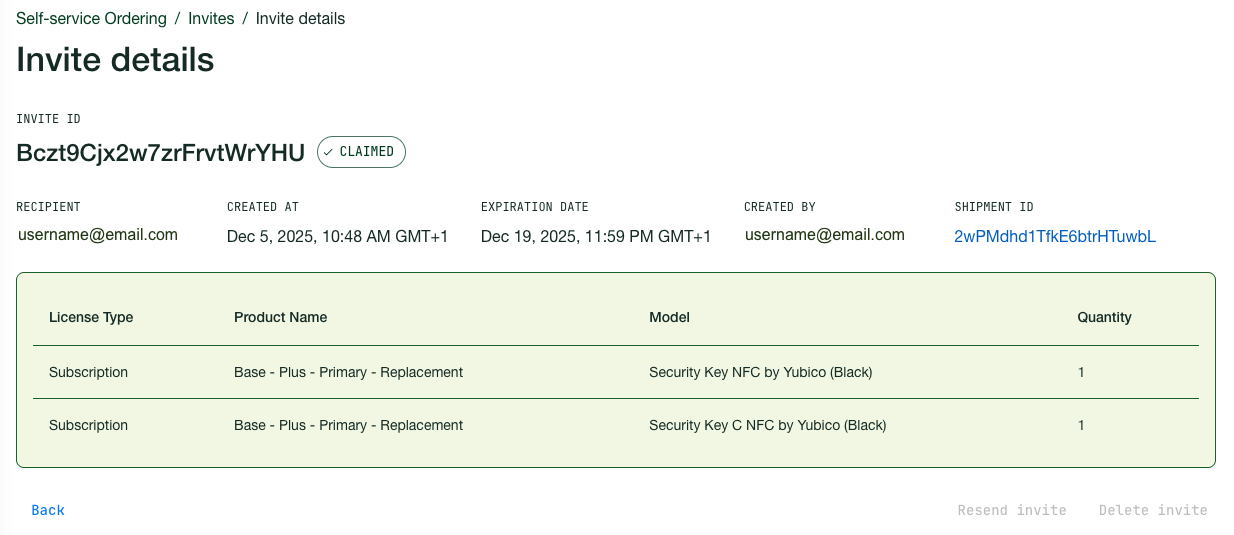
To view details for an invite, click the invite Invite ID in the table on the Invites page to open the Invite details page. This contains information about the recipient, creation/expiration dates, the creator of the invite, as well as the products and quantity. If the invite has been claimed and a shipment request has been created, you can click the Shipment ID link to view the shipment details.
Resending Invites
You can resend invites that have not yet expired, or have not been claimed by the recipient. This is useful for example if the invite email was lost or deleted by mistake. You can only resend an invite to the email address used when the invite was created. If you need to resend to a different email address, delete the current invite and create a new one using the new email address.
To resend an invite from the Invite details page, click the Resend invite option at the bottom right of the page. To resend an invite from the Invites page, click the Resend invite icon in the Actions column for the desired invite. Invites that are resent will have the same expiration date as in the original invite, unless the expiration date is updated as described in Editing Invites.
Editing Invites
You can edit the expiration date for invites that have not yet been claimed by the recipient (status “Invited”). The date can be changed to a date that is not in the past, or a date that is no more than 60 days from the create date of the invite.
To edit the expiration date, open the Invite details page for the desired invite and click the Edit icon next to Expiration date. In the dialog that opens, change the date and click Save.
When the expiration date has been updated, a new invite email with the new expiration date is sent to the recipient. You cannot change the products included in an invite once created. To change the available products, delete the current invite and create a new invite with the desired products.
Deleting Invites
You can delete an invite at any time before it is claimed, for example if it has been sent to a recipient that is no longer part of your organization. You can only delete invites with either status “Invited” or “Expired”. The products reserved by a deleted invite are released back to your inventory.
To delete a single invite from the Invites page, click the Delete invite icon in the Actions column for the desired invite. You can also delete an invite from the Invite details page by clicking the Delete invite option at the bottom right of the page.
To delete multiple invites at the same time, on the Invites page, select the checkbox to the left on the row for each invite ID you want to delete. Only invites with the appropriate status can be selected. To select all invites available for deletion, select the checkbox in the header. To clear a selection of rows, select the checkbox in the header again.
Managing Product Templates
Using product selection templates you can create invites reusing information about product selections and quantities, for example to send the same set of YubiKeys to new employees joining your organization.
To view existing product selection templates, in the Customer Portal left menu, click Self-service Ordering > Product selection templates to open the Product selection templates page. Available templates are displayed with their specific product selections.

To create a product template, do the following:
- In the Customer Portal left menu, click Self-service Ordering > Product selection templates.
- In the Product selection templates page, click Create new template.
- Provide a Template name to be displayed in the list of available templates.
- Select a Reseller if applicable for your organization, otherwise select Yubico (direct sale).
- Select the desired inventory and number of products that each recipient can choose.
- Click Create template. The new template is displayed in the list of templates, and will be available for selection when creating new invites.
To edit a product template, do the following:
- In the Customer Portal left menu, click Self-service Ordering > Product selection templates.
- In the Product selection templates page, click the Edit icon for the desired template.
- Update the template name and/or the product selection as desired. You can also change the key models that will be available for selection by recipients, to a desired subset of keys. See Modifying Available Key Models.
- When done, click Save.
Note
Product updates in a template will only affect invites created after the template was changed, invites created before that will remain unchanged.
To delete a product template, do the following:
- In the Customer Portal left menu, click Self-service Ordering > Product selection templates.
- In the Product selection templates page, click the Edit icon for the desired template.
- Click Delete template in the bottom right of the page.
- In the confirmation dialog, click Delete template.
Managing General Settings
The following describes general configurations that apply to all Self-service Ordering invites and usage. To change the default values for these settings in the Customer Portal, click Self-service Ordering > Settings to open the Settings page. Update the settings as described in the following, and click Save when done.
Note
Changes to the configuration values will only affect invites created after a change was done. When creating an invite, you can always manually select a different reseller, expiration date, or delivery method, which will override the configured default value.
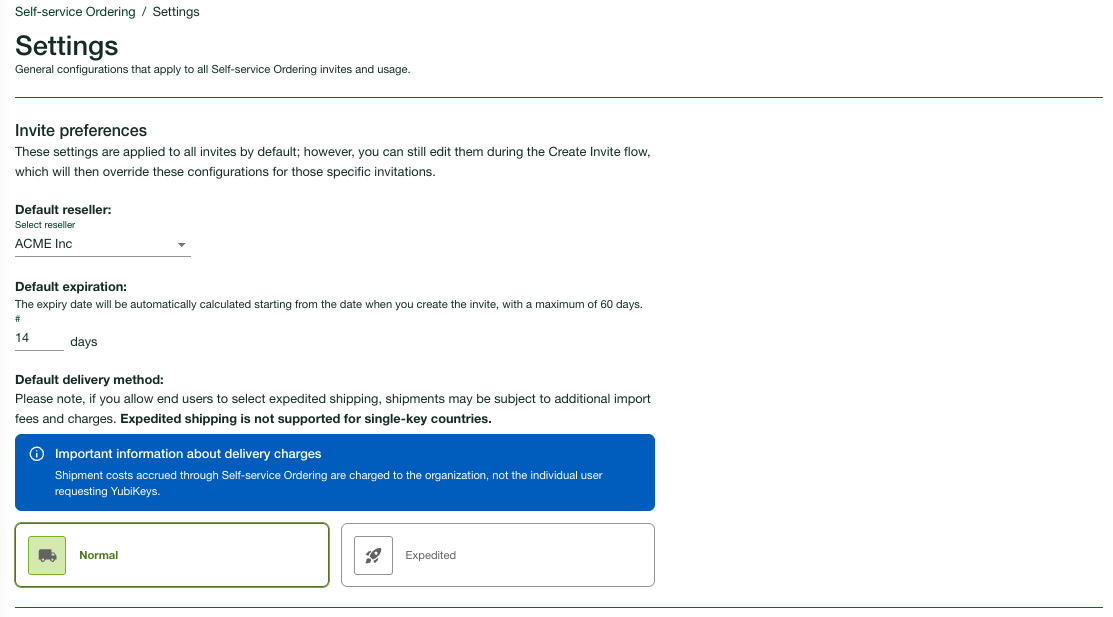
Default Reseller
In the Invite preferences section of the Settings page, you have the option to configure a default reseller that will be auto-selected for every new invite that is created. The default value is “Yubico (direct sale)” which can be changed to a preferred reseller available for your organization.
If you do not want to set a default reseller, you have the option to manually select a reseller whenever you create an invite. To configure this option, select “None - select manually” in the Default reseller list. Providing a reseller is required.
Default Invite Expiration
In the Invite preferences section of the Settings page, you have the option to configure a desired time length after which an invite should expire. The expiration date will then be calculated based on the creation date for the invite, and will be applied to all new invites.
To change the default value of 30 days, enter a preferred length in the Default expiration field. Maximum value is 60 days, and minimum value is 1 day. An expiration date is always required.
Default Delivery Method
In the Invite preferences section of the Settings page, you have the option to configure a default delivery method. Available options are “Normal” and “Expedited”, default value is “Normal”. Shipment costs are charged to the organization issuing the invite.
Allowed Shipping Destinations
Using the Delivery service you can ship YubiKeys to many destinations around the world. Each destination country has a maximum number of YubiKeys per shipment request. For some countries (US and the EU) you can include up to 500 keys per shipment request. These (multi-key) countries are enabled by default in the Customer Portal when your organization is added, and are automatically available when creating shipment requests. See Multi-Key Destinations.
For other countries (single-key) you can only include one (1) YubiKey per shipment request due to country-specific custom duty regulations. See Single-Key Destinations. Self-service Ordering supports shipping to recipients in single-key countries. However, be aware that shipping to single-key countries might result in higher shipping costs.
Important
Ensure that invites sent to recipients in single-key countries only allow for selection of one key. Recipients in single-key countries will not be able to complete their order if the invite includes more than one key.
The following applies when shipping to single-key countries through Self-service Ordering:
- Some single-key countries are enabled by default, other single-key countries can be enabled by contacting Yubico Support. For a list of single-key countries, see Single-Key Destinations.
- Any single-key country that is already enabled for your organization’s shipments will be available for selection in the country list on the Self-service Ordering Settings page.
- All single-key countries are disabled by default and must be enabled on the Settings page as described below. If a single-key country is not available for selection on this page, contact Yubico Support to enable it for your organization.
- If the invite requires the recipient to select 2+ YubiKeys, then single-key countries will not be available for selection by the recipient when entering an address on the invite ordering page. If the invite includes only 1 YubiKey, then the single-key countries will be available for selection.
- Expedited shipping is not supported for single-key countries. If the invite uses Expedited shipping and the recipient selects a single-key country for their address, then the shipment method will automatically be downgraded to Normal.
To configure the destination countries available for shipment when a recipient claims an invite, go to the Shipping destinations section of the Settings page.
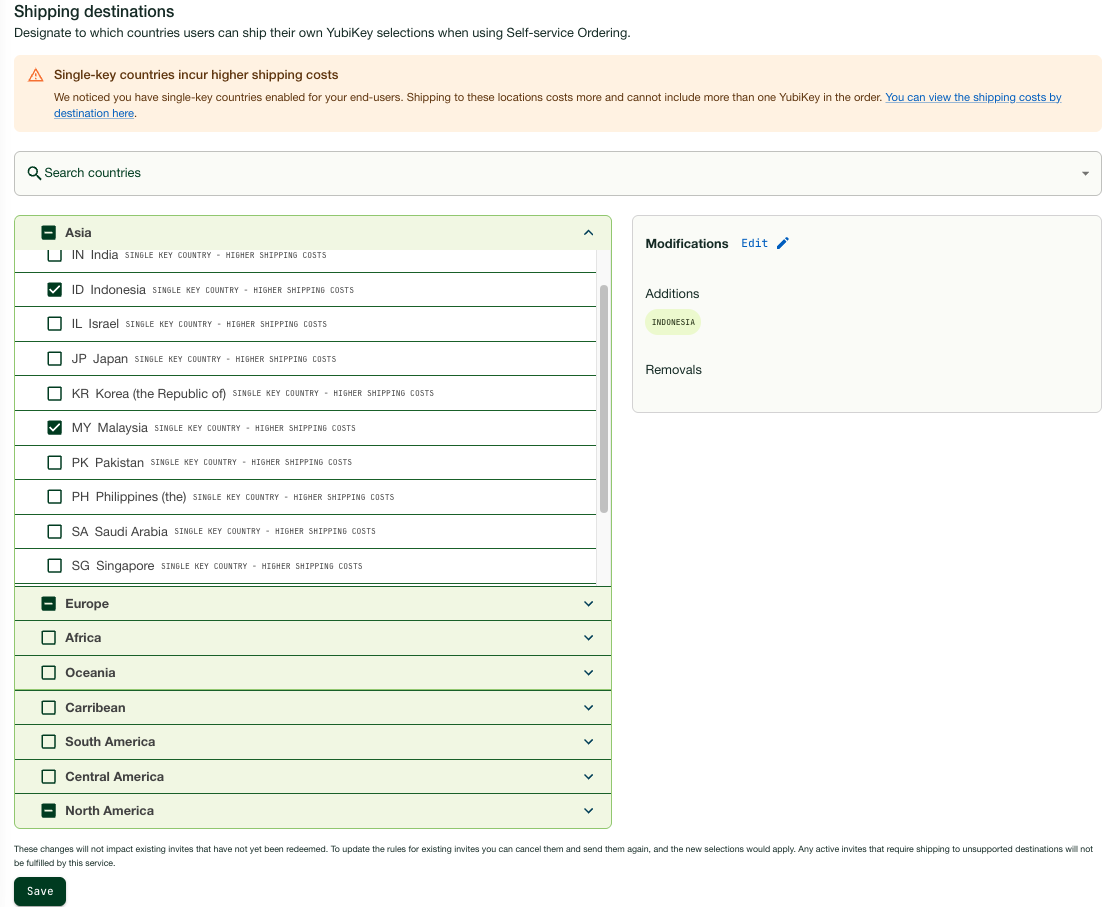
To enable or disable a country, click a region (for example Asia) to expand it, and select or deselect desired countries in the list. The changes to the current country selection are displayed in the Modifications section. If you regret a change you made, click the Edit icon to update the modifications. When done updating, click Save.
Managing Shipment Issues
The Invites page provides an overview from where you can identify invites with processing errors, for example due to address validation failures. These invites will have the status “Needs Attention”. Claimed invites will have a Shipment ID associated with the invite.
Note
When an invite reaches the status “Needs Attention”, you will receive an email notification to help you identify the issue and take action. A message will also be displayed under Notifications in the Customer Portal top menu.
In the following example, a sent invite that has been claimed by the recipient, triggered the creation of a shipment request. However, when processing the shipment request, an error occurred, and the invite therefore has the status “Needs Attention”.
To investigate the issue, in the Invite details page click the Shipment ID link to open the Shipment details page. Viewing the Shipment status section, you can see that the processing error was caused by an address validation failure.
You can either click the Edit shipment icon and correct the recipient address, or click Override address validation if your are certain that the entered address is correct. For more information, see Resolving Shipment Issues.

For invites with shipment processing errors, you will also receive an email with a link to the specific shipment. Clicking the View Shipment link in the email opens the Shipment details page for the specific shipment where you can explore the details, see Resolving Shipment Issues.
On the Shipments page, you can filter out shipments that originated from Self-service Ordering. Click Filters and select “Self-service Ordering” as Creation type. For more information, see Searching Shipments.
You can delete a shipment created when a recipient claims their invite. If this happens, the invite’s status will change from “Claimed” back to “Invited”, and the recipient can claim the products in the invite again. As long as the invite has not expired, the recipient can use the same invite to re-claim their products. Alternatively, once the invite’s status changes back to “Invited”, it can be deleted and its products will be returned to your inventory.