Organization Settings
The Your organization section in the Customer Portal contains organization-specific information and configurations that you can modify to support your business processes. The information include overviews of products and shipping destinations for your organization, as well as shipment processing options and Customer Portal IP address access restrictions. The following describes the different options available.
Viewing Product and Inventory IDs
The Organization summary page provides an overview of products and inventory product IDs, as well as country and region codes, for products and shipping destinations available to your organization. This information is intended for developers building integrations for their organization, to help users find the correct parameter input values, especially if the organization uses customized products.
To view the organization summary information in the Customer Portal, click Your organization > View organization in the left menu to open the Organization summary page.
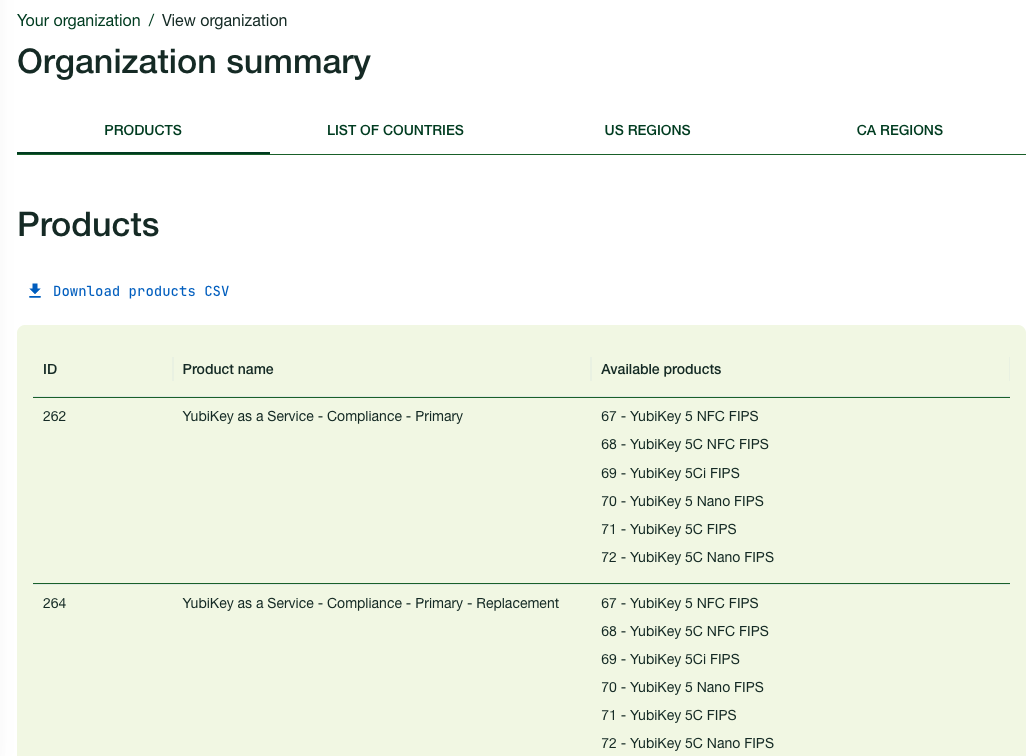
The Organization summary page provides the following information:
- Products:
- ID: Values for
product_id(physical keys) andinventory_product_id(subscription inventory). If your organization uses customizations, for example pre-programmed YubiKeys, these values will be unique, as compared to non-customized “standard” product and product inventory IDs. - Product name: YubiKey or subscription inventory name, for example “YubiKey 5 NFC” or “YubiKey as a Service - Compliance - Primary”.
- Available products: YubiKey models and their respective product IDs, included in an inventory (if applicable).
- ID: Values for
- List of countries: All shipment destinations enabled for the organization, and their respective two-letter country code.
- US and CA regions: Standardized two-letter USPS region code, required for shipments to the US and Canada.
For each of the sections in the page, you can download a CSV file containing the specific data.
Enabling Consolidated Shipments
If your organization is using the FIDO Pre-reg enrollment service to ship pre-enrolled YubiKeys to end users, you have the option to consolidate multiple shipments going to the same address, into a single package. When 10 or more keys share the same address across at least two shipment requests, they will be automatically consolidated into a single package with up to 200 keys per package. For more details about this concept, see Consolidated Shipments.
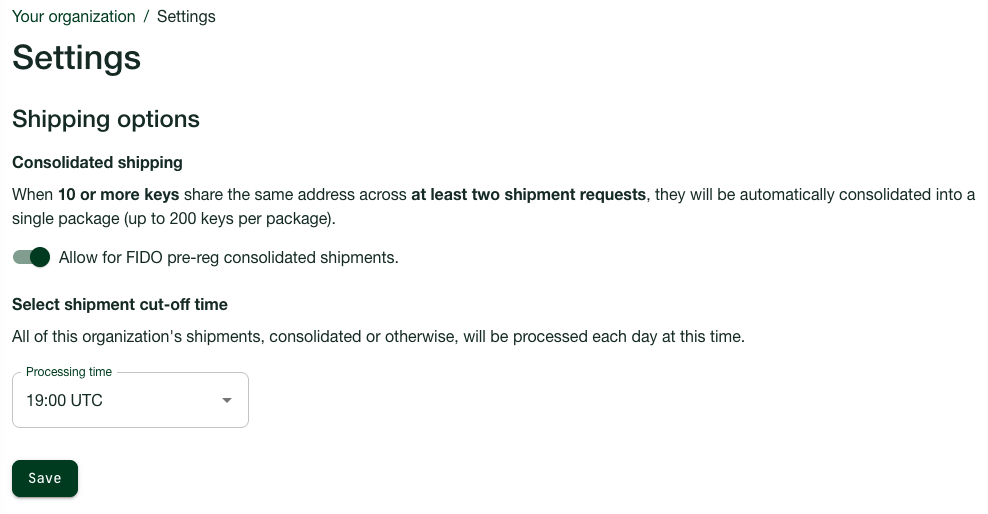
To enable and configure consolidated shipments, in the left menu of the Customer Portal, click Your organization > Settings to open the Settings page. In the Shipping options > Consolidated shipping section, switch the Allow for FIDO pre-reg consolidated shipments toggle, and click Save.
Configuring Shipment Processing Time
Optionally, you can configure a time when the daily processing of shipments (all shipments including consolidated) should start, to align with your business processes. Default value is 10am UTC.
To set a time when the daily processing should start, in the left menu of the Customer Portal, click Your organization > Settings to open the Settings page. In the Shipping options > Select shipment cut-off time section, select a time (UTC) in the Processing time drop-down menu, and click Save.
IP Address Access Restriction
For enhanced security, as a security administrator with the Organization Owner role, you have the option to restrict active Customer Portal user sessions to a defined list of trusted IP addresses or CIDR (Classless Inter-Domain Routing) ranges.
Enabling this feature, you can create a list of IP addresses that are allowed to access the Customer Portal and complete actions. All user session source IP addresses will be validated against the allow list. Users that are not included in the list will be logged out of the Customer Portal, and will see a message explaining the reason for the blocking.
Note
The IP address access restriction feature currently only supports IPv4.
Only Organization Owners for an organization can update the IP address settings, but all organization users can view the settings. Should a security administrator accidentally lock themselves out, for example due to a network change or misconfiguration, Yubico has the ability to disable the IP allow list enforcement for the organization.
In case of a lockout, the organization is placed in “Recovery” mode for 15 minutes, or until a user updates and saves the IP address allow list. All Organization Owners for the organization will be automatically notified by email about a disablement, as well as when the organization is out of “Recovery” mode, and the IP allow list enforcement is enabled again.
The IP address restriction feature also applies to API tokens, but in these cases there is no recovery mode. For API token lockout issues, a user can log into the Customer Portal, delete the existing token, and create a new one for the API caller account, in order to resolve the lockout.
Configuring IP Access
Important
To enable the enforcement of the IP address allow list for your organization, and avoid being locked out of the Customer Portal, ensure all your intended Customer Portal users’ IP addresses are included in the Allow list, before turning on the IP enforcement. Specifically ensure that IP addresses for security administrators with the Organization Owner role in your organization, are added to the allow list to be able to resolve any lockout issues.
To configure user IP access, in the left menu, click Your organization > Settings > IP Access to view the Govern User Access by IP Address settings.
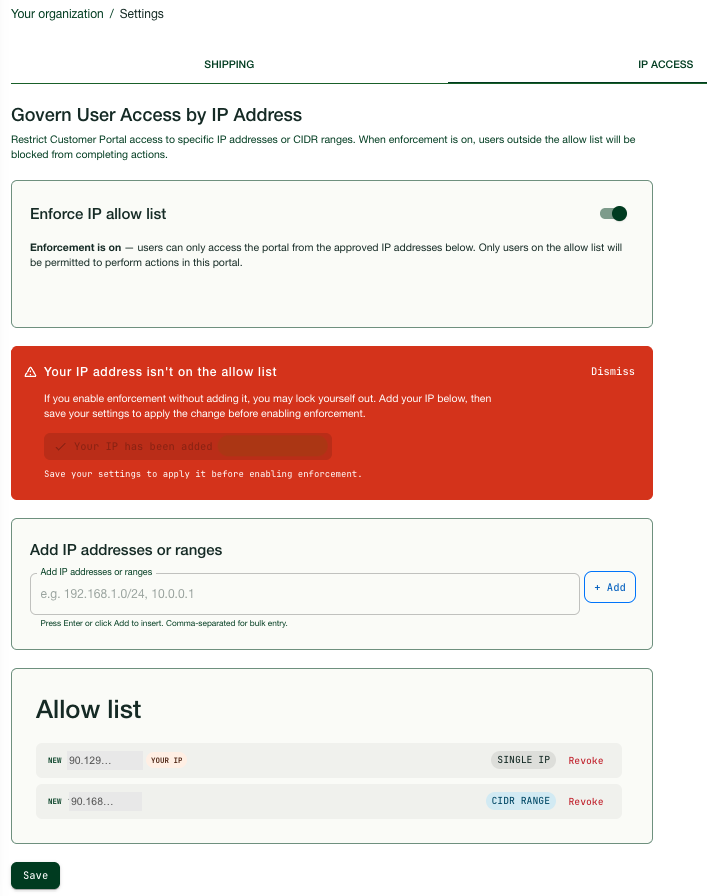
To add IP addresses and enable IP access enforcement, do the following:
- In the Add IP addresses or ranges section, add the desired IP addresses or CIDR ranges, and click +Add.
- To add your own IP address, click Add my IP… in the Your IP address isn’t on the allow list section (your own IP address is automatically displayed there). Skip this step if your IP address is already among the listed. Note that you cannot enable the IP enforcement if your own IP address is not listed, you can however update the Allow list items.
- Carefully check that the desired IP addresses are listed in the Allow list section.
- In the Enforce IP allow list section, toggle the Enforce IP allow list toggle to enabled.
- Click Save.
To remove an IP address or CIDR range from the Allow list, click Revoke for the desired item in the list, and click Save.